Table of Contents >> Show >> Hide
- Why This Whole Wheat Bread Machine Recipe Works
- Whole Wheat Bread Machine Ingredients
- How to Make Whole Wheat Bread in a Bread Machine
- What the Finished Loaf Should Be Like
- Common Mistakes and How to Fix Them
- Easy Variations
- How to Store and Serve It
- Whole Wheat Bread Machine Recipe: Final Thoughts
- Experience: What I’ve Learned From Making Whole Wheat Bread Machine Loaves Again and Again
There are two kinds of people in this world: people who bake whole wheat bread in a bread machine, and people who still believe the machine is just a giant kitchen paperweight. This article is for both. If you want a loaf that tastes wholesome, slices beautifully, toasts like a dream, and does not resemble a medieval brick, you are in the right place.
A good whole wheat bread machine recipe should do three things at once: be easy enough for a sleepy Tuesday morning, sturdy enough for sandwiches, and soft enough that nobody at the table asks, “Did we switch to eating lumber?” The trick is understanding that whole wheat flour behaves differently from white flour. It absorbs more liquid, brings more flavor, and can produce a denser loaf unless the ingredients and cycle are balanced correctly.
This version is designed as a reliable, sandwich-style loaf for most home bread machines. It uses mostly whole wheat flour for hearty flavor, plus a little bread flour to keep the crumb tender and the rise friendlier. You will also find troubleshooting tips, smart substitutions, and a long, real-life section on what it actually feels like to make this loaf over and over until it becomes one of those recipes you know by heart.
Why This Whole Wheat Bread Machine Recipe Works
Whole wheat bread has a reputation for being “healthy but serious.” That is a polite way of saying it can be heavy, dry, or a bit too earnest. The best bread machine recipes solve that problem with a few small moves: enough liquid for hydration, a touch of sweetener for balance, some fat for softness, and the right machine setting so the dough gets the kneading and rising time it needs.
In practical terms, this loaf works because it keeps the ingredient list simple but strategic. Honey adds flavor and helps the bread brown nicely. Oil or butter softens the crumb. Bread flour lightens the structure just enough to prevent a squat loaf. Optional dry milk powder and vital wheat gluten are the supporting actors that never ask for applause but often deserve it. If you have them, use them. If not, the recipe can still succeed.
Another reason this recipe works: it respects the reality of bread machines. Different machines have different personalities. Some are generous and forgiving. Others act like tiny stainless-steel judges. So instead of pretending one setting fits every model, this recipe gives you the most reliable default and tells you when to switch gears.
Whole Wheat Bread Machine Ingredients
For a 1 1/2-pound loaf
- 1 1/4 cups lukewarm water
- 2 tablespoons honey
- 2 tablespoons neutral oil or softened unsalted butter
- 1 1/2 teaspoons salt
- 2 1/2 cups whole wheat flour
- 1 cup bread flour
- 2 tablespoons nonfat dry milk powder, optional but recommended
- 1 tablespoon vital wheat gluten, optional but recommended
- 2 teaspoons bread machine yeast or instant yeast
Ingredient Notes
Whole wheat flour: This is where the nutty flavor lives. Standard whole wheat flour gives the loaf a fuller, deeper taste. White whole wheat flour can make the flavor milder if you prefer a softer wheat profile.
Bread flour: A small amount helps with lift and texture. If you want a 100% whole wheat loaf, you can replace it with more whole wheat flour, but expect a denser result and use the whole wheat cycle.
Honey: It adds gentle sweetness, helps balance the hearty flour, and makes the loaf feel more like sandwich bread and less like a life lesson.
Dry milk powder: This boosts softness and helps produce a more tender crumb. It is not mandatory, but it is a great trick for a softer loaf.
Vital wheat gluten: Think of it as optional insurance. Whole wheat flour can make dough heavier, and gluten helps give it more structure and better loft.
How to Make Whole Wheat Bread in a Bread Machine
- Check your manual first. If your manufacturer gives a different ingredient order, follow that. Many machines prefer liquids first and yeast last, while some reverse the order.
- Add the ingredients to the bread pan. For most machines, add water, honey, oil or butter, salt, whole wheat flour, bread flour, dry milk powder, and vital wheat gluten. Make a small well in the flour and add the yeast last, keeping it away from the liquid until mixing begins.
- Select the right cycle. Use the whole wheat or whole grain cycle if your machine has one. If your machine does not, use the basic/white cycle and keep the vital wheat gluten in the recipe.
- Choose loaf size and crust. Select the 1 1/2-pound setting and a light or medium crust. A dark crust can work, but whole wheat bread already browns well, so medium is the safer all-purpose choice.
- Peek during the first knead. After 5 to 10 minutes, open the lid and check the dough. It should look like a soft, slightly tacky ball. If it looks dry and stiff, add water 1 teaspoon at a time. If it looks like oatmeal having an identity crisis, add flour 1 teaspoon at a time.
- Let the machine do its thing. Once the dough looks right, close the lid and resist the urge to hover like a helicopter parent.
- Remove the loaf promptly. When the cycle finishes, take the bread out of the pan and cool it on a wire rack.
- Wait before slicing. Let it cool for at least 1 hour, preferably longer. Slicing too early can make the texture gummy.
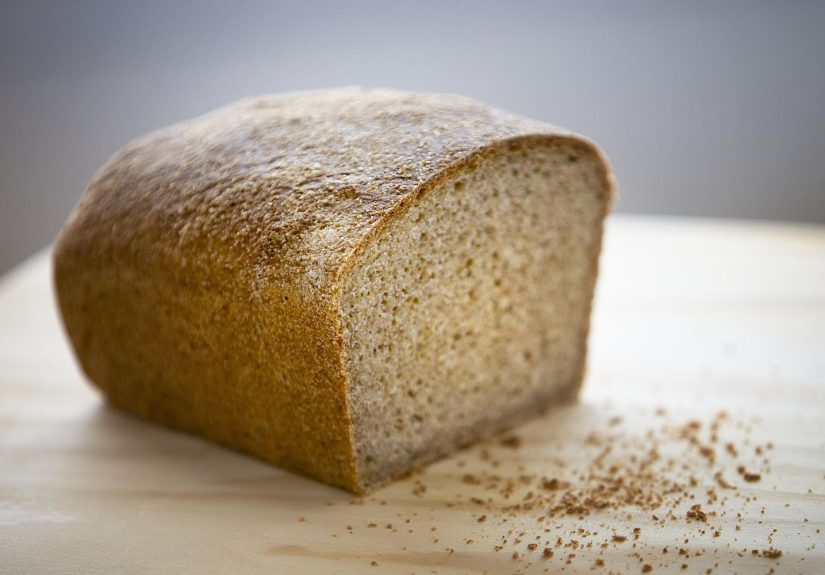
What the Finished Loaf Should Be Like
A successful whole wheat bread machine loaf should be slightly domed, evenly browned, and pleasantly soft once cooled. The crumb should be fine and tender, not cake-like, but not dense enough to qualify as gym equipment either. It should slice neatly for sandwiches, hold peanut butter without tearing, and make excellent toast the next morning.
Flavor-wise, expect a mild sweetness from the honey and a warm, nutty depth from the whole wheat flour. This is not white sandwich bread wearing a health halo. It tastes like real wheat bread, just in a form people actually want to eat.
Common Mistakes and How to Fix Them
The loaf is too dense
This usually means one of four things: not enough liquid, too much flour, old yeast, or the wrong cycle. Whole wheat flour is thirsty, so measuring accurately matters. Spoon flour into the measuring cup and level it rather than scooping directly from the bag. If your machine has a whole wheat setting, use it for longer kneading and rising.
The loaf collapses on top
That often points to too much liquid, too much yeast, or a recipe that is too large for the bread pan. Warm weather can also encourage over-rising. If this happens, reduce the liquid slightly next time and double-check your loaf size setting.
The bread is gummy
First, make sure you let it cool fully before slicing. Second, confirm the machine and recipe size match. A loaf that is too large for the pan may not bake through properly.
The bread is too dry
Add a little more water during kneading next time, or swap the oil for butter and include the milk powder. Whole wheat bread likes moisture and tends to improve when the dough is just a little softer than beginners expect.
The crust is too hard
Use the light crust setting, and remove the loaf from the machine as soon as the cycle ends. Leaving it in the pan on the warm setting can toughen the crust.
Easy Variations
For a softer loaf
Replace 1/2 cup of the whole wheat flour with more bread flour. This creates a gentler texture while keeping the flavor wholesome.
For a 100% whole wheat version
Use 3 1/2 cups whole wheat flour total, skip the bread flour, and keep the vital wheat gluten. Use the whole wheat cycle. You may need an extra tablespoon or two of water depending on your flour and humidity.
For a honey oat twist
Add 1/4 cup rolled oats and 1 extra tablespoon of water. This makes the loaf a little more rustic and breakfast-friendly.
For seed lovers
Add 2 to 3 tablespoons of sunflower seeds, flaxseed, or sesame seeds at the add-in signal if your machine has one. Suddenly your sandwich bread feels fancy.
How to Store and Serve It
Once fully cool, store the bread wrapped at room temperature for up to 3 days. For longer storage, slice it and freeze it. Pull out slices as needed for toast, sandwiches, or emergency butter delivery.
This loaf is excellent with peanut butter, turkey and cheddar, egg salad, avocado, or plain salted butter. It also makes surprisingly good French toast, especially if the loaf is a day old. Whole wheat bread has enough flavor to stand up to sweet and savory toppings without disappearing into the background.
Whole Wheat Bread Machine Recipe: Final Thoughts
If you have been disappointed by whole wheat bread machine recipes before, do not give up on the category. Often the problem is not that whole wheat bread is difficult. It is that the recipe did not account for how real bread machines behave in real kitchens. Small adjustments in flour balance, hydration, yeast, and cycle choice make a huge difference.
This recipe is dependable, flexible, and practical enough for weekly use. It delivers a loaf with real whole wheat flavor, decent rise, and soft sandwich texture without demanding advanced baking skills. In other words, it is exactly the kind of recipe a bread machine was invented for: low drama, high reward, and a kitchen that smells like you have your life together.
Experience: What I’ve Learned From Making Whole Wheat Bread Machine Loaves Again and Again
The first time I made whole wheat bread in a bread machine, I expected magic. I added the ingredients, pressed a button, and walked away like someone in a commercial. Hours later, I pulled out a loaf that looked respectable from one angle and deeply suspicious from another. The flavor was good, but the texture had the emotional warmth of a filing cabinet. That was the day I learned the most important truth about bread machines: they are convenient, not psychic.
After a few more loaves, patterns started to show up. Whole wheat dough almost always needed more attention during the first knead than white bread dough. Not a lot of attention, just a quick peek. When the dough was too dry, the loaf came out short and tight. When it was slightly tacky, the finished bread was softer, taller, and much better for sandwiches. That tiny dough check became my favorite habit because it prevented most of the classic bread-machine disasters before they happened.
I also learned that people say they want “healthy bread,” but what they really want is bread that tastes good enough to become a habit. Nobody wants to force down a worthy loaf out of moral obligation. The whole reason this type of recipe matters is that it can make everyday bread feel nourishing and enjoyable at the same time. A good whole wheat loaf should not punish you for your nutritional ambitions.
Another surprising lesson was how much difference one or two ingredients can make. Honey made the loaf taste rounder and more comforting. Dry milk powder helped the crumb feel softer. Vital wheat gluten improved the rise on days when the flour seemed especially thirsty or heavy. None of these changes turned the loaf into cake, and that was never the goal. They just made the bread friendlier, which is exactly what a daily sandwich loaf should be.
Machine size mattered too. A recipe that behaved beautifully in one bread machine could get dramatic in another. A pan that was slightly smaller or a cycle that ran slightly hotter could mean the difference between a proud dome and a loaf that puffed up like it had big plans, then collapsed under pressure. That experience made me much more respectful of bread machine manuals, which I once viewed as optional literature. They are, in fact, useful.
The biggest reward came when the recipe stopped feeling like a recipe and started feeling like a routine. You know that moment when you can add the ingredients without re-reading every line three times? That is when whole wheat bread machine baking becomes genuinely satisfying. It turns from “project baking” into “real-life baking.” You make a loaf because the last one is almost gone. You freeze a few slices because you know future-you will be grateful. You stop buying mediocre store bread because your machine is quietly outperforming it on the counter.
That, to me, is the best part of the whole wheat bread machine experience. It is not flashy. It is useful. It gives you a loaf that feels homemade in the most comforting sense of the word. Not perfect, not precious, just steady, delicious, and ready for breakfast.