Table of Contents >> Show >> Hide
- What Counts as a Pinterest Pin?
- The 2 Ways to Create Pins on Pinterest
- Way 1: Upload Photos Directly From Your Computer or Phone
- Way 2: Create a Pin From a Website URL
- How to Make Your Pin Better Before You Hit Publish
- Pinterest SEO Tips That Actually Matter
- Common Mistakes to Avoid
- A Simple Publishing Workflow You Can Steal
- Experience: What Happens When You Actually Start Pinning Consistently
- Final Thoughts
If Pinterest were a digital corkboard with a caffeine habit, Pins would be the shiny pushpins holding the whole thing together. They are the visual bookmarks people save, search, click, and revisit when they want recipes, outfit ideas, travel plans, home decor inspiration, or a reason to buy yet another storage basket they absolutely did not know they needed five minutes ago.
If you want your content to show up on Pinterest, you need to know how to create Pins correctly. The good news is that Pinterest gives you two simple ways to do it. You can upload photos directly from your computer or phone, or you can create Pins from images already living on a website. Both methods work. The trick is knowing when to use each one and how to make the Pin strong enough to earn clicks, saves, and actual traffic.
In this guide, you will learn exactly how to upload photos and create Pins on Pinterest in two practical ways, plus the best tips for writing titles, descriptions, and links that do not sound like they were assembled by a sleepy robot at 2 a.m.
What Counts as a Pinterest Pin?
A Pin is a post on Pinterest. In the simplest version, it includes an image, a title, a description, a destination link, and a board where it lives. When someone discovers your Pin in search results, on the home feed, or through related recommendations, they can save it, open it, and click through to learn more.
That last part matters. Pinterest is not just a place for pretty pictures. It behaves more like a visual search engine. So while your image catches attention, your title, description, board choice, and landing page help Pinterest understand what your Pin is about and who should see it.
The 2 Ways to Create Pins on Pinterest
There are two straightforward ways to publish image-based content on Pinterest:
- Upload photos from your device using the Pinterest website or mobile app.
- Create a Pin from a website URL by pulling images from a page online.
Method one is best when you have original graphics, product photos, blog images, infographics, or polished brand visuals ready to go. Method two is handy when the content already exists on your site and you want Pinterest to grab the image directly from the page.
Way 1: Upload Photos Directly From Your Computer or Phone
This is the cleanest and most flexible option. If you designed a vertical Pin graphic in Canva, snapped a beautiful product shot, or exported a polished blog image, direct upload is usually your best friend.
How to Upload Photos and Create a Pin on Desktop
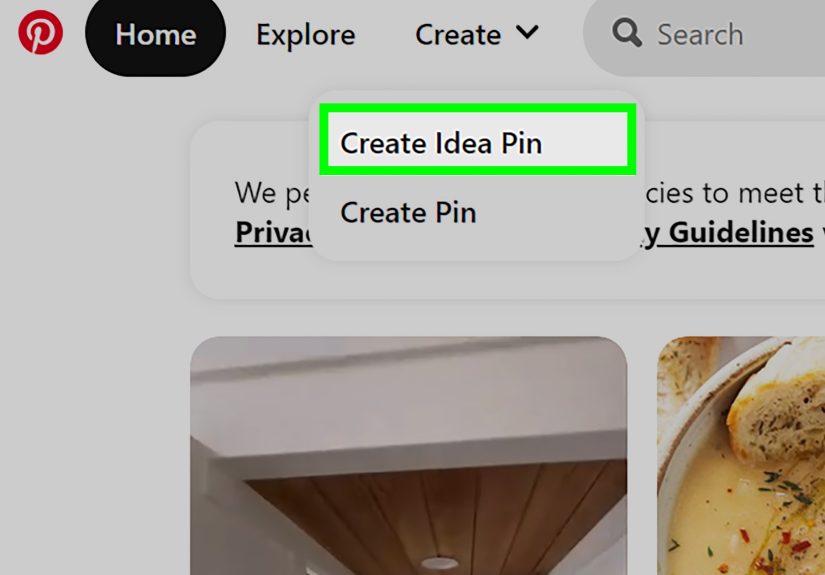
- Log in to your Pinterest account.
- Click Create and choose Create Pin.
- Upload an image from your computer, or drag and drop it into the uploader.
- Add a title that clearly says what the Pin offers.
- Write a description with helpful keywords and context.
- Add a destination link if you want users to visit a blog post, product page, landing page, or portfolio page.
- Select the most relevant board.
- Preview, then publish.
If Pinterest gives you editing tools, use them lightly. Cropping, aspect ratio tweaks, and text overlays can help, but do not turn your Pin into a ransom note made of seventeen fonts. Pinterest rewards clarity, not chaos.
How to Upload Photos and Create a Pin in the App
- Open the Pinterest app and log in.
- Tap the plus icon.
- Select Pin.
- Choose an image from your device.
- Add your title, description, and link.
- Choose a board.
- Tap Create or Publish.
On mobile, this process is fast enough to do while standing in line for coffee, pretending you are just checking messages. The app can also help with light editing, which is useful if you need to add text or adjust the visual before posting.
When Direct Upload Makes the Most Sense
- You created a custom Pinterest graphic.
- You want better control over branding and layout.
- You need to test different Pin designs for the same article or product.
- You want the image to be optimized for Pinterest from the start.
Example: A food blogger publishes a post called Easy Lemon Pasta for Busy Weeknights. Instead of relying on a random horizontal blog image, they upload a tall 1000 x 1500 graphic with readable text, a bright pasta photo, and a clear headline. Same article, much better Pinterest performance potential.
Way 2: Create a Pin From a Website URL
This method is ideal when your content is already published online and the page contains images Pinterest can pull. It saves time and can be especially useful for bloggers, ecommerce brands, and publishers who want to turn existing site visuals into Pins without downloading and re-uploading files first.
How to Create a Pin From a Website on Desktop
- Log in to Pinterest.
- Click Create, then choose the option to create a Pin.
- Select Save from site or Save from URL.
- Paste the website address.
- Let Pinterest load available images from that page.
- Select the image you want.
- Add a title and description.
- Choose the right board and save the Pin.
How to Create a Pin From a Website in the Pinterest App
- Open the Pinterest app.
- Tap the plus icon and choose to create a Pin.
- Tap the globe icon.
- Enter the page URL.
- Select one or more images from the page.
- Choose your board.
- Save the Pin.
You can also use the Pinterest Save Extension in a browser to save images directly from pages you are viewing. That is the shortcut route for people who love efficiency almost as much as they love avoiding repetitive clicks.
When Saving From a Website Works Best
- Your article or product page is already live.
- You want the Pin tied directly to the published page.
- You have multiple strong images on the page and want to save more than one.
- You are curating your own site content without rebuilding visuals from scratch.
Example: A travel blogger has a post called 3 Days in Charleston on a Budget. The page already contains strong, vertical-friendly images of hotels, cafes, and historic streets. Instead of exporting files one by one, they paste the URL into Pinterest, select the best image, add a keyword-friendly title, and save it to a board like Budget Travel Guides.
How to Make Your Pin Better Before You Hit Publish
Creating a Pin is easy. Creating one that people actually notice is the part where many creators wander into the digital wilderness. Here is how to give your Pin a fighting chance.
1. Use Vertical Images
Pinterest strongly favors vertical visuals. A 2:3 aspect ratio, such as 1000 x 1500 pixels, is a smart standard because it fills more screen space and looks natural in the feed. If your image is too wide, it can feel tiny. If it is too tall, parts may be cropped awkwardly. Nobody wants their beautiful headline sliced like a deli pickle.
2. Write Titles for Humans First
Your title should be clear, specific, and useful. Skip vague labels like Inspiration or Look at this. Better titles explain the outcome or topic immediately.
Weak title: Summer Vibes
Better title: 12 Easy Summer Porch Decorating Ideas
Pinterest titles can be longer than what shows in the feed, but the beginning matters most. Lead with the real topic.
3. Add Descriptions That Support Discovery
Your Pin description helps Pinterest understand the content and helps users decide whether to click. Use relevant keywords naturally, but do not write like a keyword blender exploded.
Bad: Pinterest tips Pinterest pin ideas Pinterest posting Pinterest upload photos Pinterest Pinterest Pinterest.
Better: Learn how to upload photos to Pinterest, create Pins from your phone or desktop, and optimize titles, boards, and links for more clicks.
4. Match the Pin to the Landing Page
If your Pin promises a kitchen makeover checklist, the landing page should deliver a kitchen makeover checklist. Not a vague homepage. Not a product page for bath mats. Not a blog post about emotional resilience. Pinterest and users both appreciate alignment.
5. Choose the Right Board
Boards are not random storage bins. They are category signals. A Pin about healthy breakfast meal prep belongs on a board called Healthy Breakfast Ideas, not on one called Stuff I Like. Specific board names help Pinterest understand context.
6. Add Alt Text When Available
Alt text improves accessibility and can help describe the content for users with screen readers. It is one of those small details that makes your content more thoughtful and more usable, which is always a good look on the internet.
Pinterest SEO Tips That Actually Matter
If you want your Pins to be discovered in Pinterest search and possibly even show up in Google image results, treat every Pin like a mini search asset.
- Use a primary keyword in the title.
- Add secondary keywords naturally in the description.
- Name boards clearly so they reflect the topic.
- Keep visuals crisp and easy to understand at a glance.
- Create fresh content regularly instead of posting one Pin and vanishing into the mist.
- Use a business account if you want analytics, scheduling, richer features, and a more serious growth setup.
For example, if your content is about apartment-friendly herbs, your ecosystem should line up. Your Pin title might be How to Grow Herbs in a Small Apartment. Your board could be Indoor Herb Garden Ideas. Your destination page should also talk about indoor herb gardening. This is not glamorous, but it works.
Common Mistakes to Avoid
- Uploading blurry images: Pinterest is visual. Fuzzy visuals do not inspire confidence.
- Using generic boards: Board relevance matters more than people think.
- Forgetting the link: A Pin without a destination can still get saves, but it will not drive traffic the way a well-linked Pin can.
- Stuffing descriptions: Keywords should help, not smother.
- Publishing and disappearing: Pinterest rewards consistency, not drive-by posting.
- Expecting instant results: Pinterest content often grows over time. It is more crockpot than microwave.
A Simple Publishing Workflow You Can Steal
Here is a beginner-friendly process that keeps things manageable:
- Create one main image for your blog post or product page.
- Upload it directly to Pinterest as your first Pin.
- Create a second Pin later using the page URL and a different image from the same article.
- Use slightly different titles so you can test what gets more clicks.
- Save both Pins to tightly relevant boards.
- Review performance and make more versions over time.
That gives you two Pins from one piece of content without turning your workday into a tragic spreadsheet opera.
Experience: What Happens When You Actually Start Pinning Consistently
The biggest surprise for most people is that Pinterest does not behave like a typical social platform. On many social networks, a post gets a quick burst of attention and then disappears into the digital basement. Pinterest is different. A Pin can sit quietly for days, weeks, or even months before it starts gaining momentum. That delay can make beginners think they are doing everything wrong, when in reality the platform is still figuring out where the Pin belongs.
A common early experience goes like this: you upload your first few photos, write titles that feel pretty decent, and then stare at your analytics like they owe you rent money. Day one is quiet. Day three is still quiet. Then one random Tuesday, a Pin about pantry labels or backyard wedding ideas begins pulling impressions and saves like it suddenly remembered it had a job to do.
Another thing people notice quickly is how much design affects results. Two Pins can point to the same page, use almost the same description, and still perform very differently. The version with a cleaner headline, brighter image, and more obvious benefit usually wins. In practice, that means you do not always need more content. Sometimes you just need a better cover image and a title that says what the user gets.
There is also a learning curve with boards. In the beginning, many users throw Pins into broad boards with names like Ideas or Favorites. Then they wonder why Pinterest seems confused. Once you start organizing boards around clear topics, things feel more logical. A board called Small Kitchen Storage Ideas tells Pinterest a lot more than a board called Home Stuff. It also helps you stay organized, which is less glamorous than going viral but dramatically more useful.
Over time, creators usually develop a rhythm. Maybe they publish one fresh Pin for every new blog post, then make two or three alternate versions later. Maybe they use direct upload for branded graphics and the URL method for older evergreen posts that already have strong site images. Either way, the process gets faster. What felt technical at first starts to feel routine.
One of the most valuable lessons is that Pinterest rewards patience mixed with clarity. Not perfection. Not overdesigned graphics. Not keyword soup. Just clear visuals, useful topics, relevant boards, and enough consistency for the platform to trust what you are publishing. Once that clicks, creating Pins becomes much less intimidating and much more strategic.
So yes, your first few Pins might feel like tiny paper airplanes tossed into a giant red search engine. That is normal. Keep testing, keep refining, and keep publishing. Pinterest often rewards the person who keeps showing up with helpful content long after the louder platforms have moved on to the next shiny thing.
Final Thoughts
If you want to upload photos and create Pins on Pinterest, you do not need a complicated system. Start with the two methods that matter most. Upload original photos directly from your device when you want full control, and create Pins from a website URL when your content already lives online and is ready to be discovered.
Then do the small things well. Use vertical images. Write specific titles. Add descriptions that sound natural. Link to relevant pages. Save to the right boards. Stay consistent. That combination is a lot less flashy than some mythical “Pinterest growth hack,” but it is also far more reliable.
In other words, make it useful, make it clear, and make it easy to save. Pinterest tends to like that. Humans do too.


