Table of Contents >> Show >> Hide
- What You Need Before You Start
- Why This Traditional Paper Cup Still Works
- How to Make a Paper Cup by Folding: 10 Steps
- Step 1: Start with a Square Sheet of Paper
- Step 2: Fold the Paper in Half Diagonally
- Step 3: Make a Guide Crease on One Side
- Step 4: Fold the Left Corner Across
- Step 5: Fold the Right Corner Over to the Left
- Step 6: Fold the Top Front Flap Down
- Step 7: Turn the Model Over
- Step 8: Fold the Other Top Flap Down
- Step 9: Check the Pockets and Shape
- Step 10: Open the Cup Carefully
- Tips for Making Your Folded Paper Cup Look Better
- Common Mistakes and How to Fix Them
- Creative Ways to Use a Folded Paper Cup
- Is a Folded Paper Cup Safe for Food or Drinks?
- Why This Simple Fold Is Still Worth Learning
- Real-World Folding Experiences: What You Learn After Making a Few
- Conclusion
If you have one square sheet of paper, two reasonably cooperative hands, and the courage to make a few crooked creases before things get pretty, you already have everything you need to make a paper cup by folding. This classic origami cup is simple, fast, oddly satisfying, and surprisingly useful. It can hold dry snacks, organize tiny desk clutter, entertain kids, and in a pinch, even handle a quick sip. For a short moment, paper becomes architecture. Not bad for something that usually ends its life under a shopping list.
In this guide, you will learn exactly how to fold a paper cup in 10 steps, plus how to choose the right paper, avoid common mistakes, and make the finished cup more practical. If you have ever wondered whether this project is just cute or actually useful, the answer is yes. It is cute, useful, and a little sneaky because while you think you are making a cup, you are also learning symmetry, alignment, spatial reasoning, patience, and the ancient skill of not panicking when a fold looks slightly weird.
Let’s fold.
What You Need Before You Start
The beauty of this folded paper cup is that it does not demand a craft room, a glue gun, or a dramatic trip to the hobby store. A single square sheet of paper is enough. Origami paper works great because it is thin, crisp, and easy to crease. Plain printer paper also works well if you trim it into a square. If you are using standard 8.5-by-11-inch paper, fold one corner diagonally to create a triangle and cut away the extra strip. That gives you the square base this traditional fold likes best.
A medium-size square is ideal for beginners. A 6-inch or 8-inch square is easy to handle and large enough to see what you are doing without squinting like a detective in a movie montage. Bigger paper usually makes the process easier because the folds are easier to line up and the opening is more obvious when you finish.
One quick reality check: a folded paper cup is best for dry snacks, craft storage, or a quick temporary use. It is not a forever mug. Thin paper softens quickly with liquid, and decorative paper is not always food-safe. If you plan to use it with food, keep it brief and use clean, food-safe paper. For longer contact with moisture, lining the inside with food-safe wax paper or parchment can help.
Why This Traditional Paper Cup Still Works
The folded paper cup has survived for generations because it is easy, practical, and honestly kind of charming. Unlike more complicated origami models, this one does not ask you to memorize mystical symbols or whisper politely to the paper. It relies on a few strong folds and a smart pocket-like shape. That makes it a favorite in classrooms, camps, libraries, and museums. It is one of those projects that feels simple enough for beginners but clever enough to make adults say, “Wait, that’s it? That actually works?”
It is also a terrific starter model if you want to learn origami basics. You practice folding a square into a triangle, aligning corners cleanly, making purposeful creases, flipping the model, and opening a flat shape into a three-dimensional object. In other words, this little cup is the paper-folding equivalent of a beginner workout that accidentally teaches real form.
How to Make a Paper Cup by Folding: 10 Steps
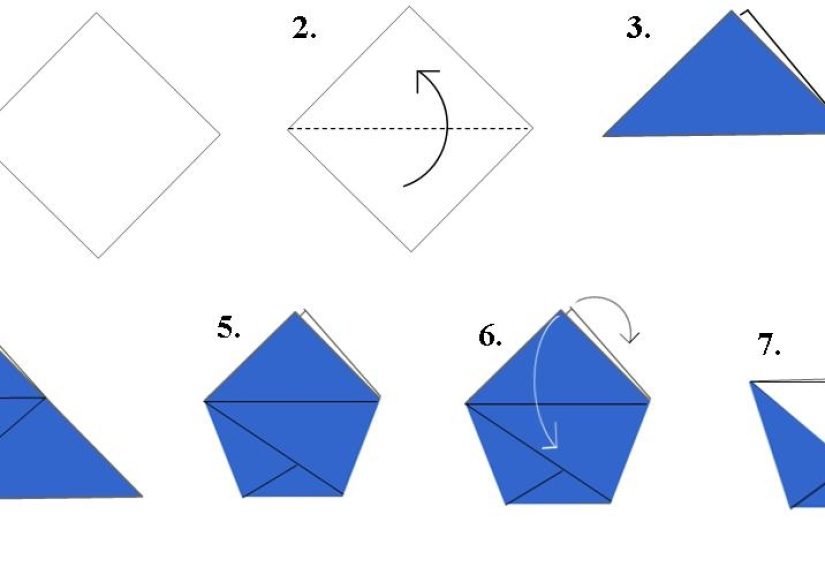
Step 1: Start with a Square Sheet of Paper
Place your square paper flat on a table with one corner pointing up, like a diamond. If one side of the paper is colored or patterned, put the side you want mostly visible on the outside facing down. Starting in this diamond position makes the next folds easier to follow and keeps the cup symmetrical.
Step 2: Fold the Paper in Half Diagonally
Bring the bottom corner up to meet the top corner so the paper becomes a large triangle. Press the fold firmly along the bottom edge of the triangle. This crease is the foundation of the entire cup, so take an extra second to line the corners up neatly. A lazy first fold is the paper version of building a house on pudding.
Step 3: Make a Guide Crease on One Side
Take the right corner of the triangle and fold it upward toward the left side just enough to create a guide point. You are not completing the whole structure yet. You are making a reference crease that helps you place the next fold accurately. Some folders skip this because they are feeling bold. Beginners should not. The guide crease is your tiny paper GPS.
Step 4: Fold the Left Corner Across
Now take the left corner of the triangle and fold it across the front so the tip lands at the end of that guide crease on the right side. Smooth the fold. At this point, the model begins to look less like a triangle and more like a strange envelope having an identity crisis. That is good. You are on track.
Step 5: Fold the Right Corner Over to the Left
Bring the right corner across the front and fold it over so its tip reaches the left side. The two side flaps now overlap, forming the body of the cup. Check that the bottom point stays tight and the top edges stay fairly even. If they drift too much, unfold and try again. Precision here helps the cup stand better later.
Step 6: Fold the Top Front Flap Down
You should see two top flaps at the upper part of the model. Fold the front top flap downward over the overlapping side folds. This locks part of the shape in place. Crease it firmly, but do not flatten the whole thing like you are ironing a sandwich. You still want the model to open later.
Step 7: Turn the Model Over
Flip the entire paper model to the other side. Keep the bottom point facing down. This is the moment where some people rotate the model accidentally and then wonder why the cup looks like modern art. Stay calm and keep the orientation the same.
Step 8: Fold the Other Top Flap Down
Fold the remaining top flap downward, mirroring what you did on the first side. Once this flap is creased, the cup is essentially locked together. If your folds are aligned, the shape should look tidy and stable, with a wide top and narrow base.
Step 9: Check the Pockets and Shape
Before opening the cup, gently press the side folds and make sure everything feels snug. The upper folds should sit flat, and the front should look like a layered pocket. If anything is sticking out wildly, this is the perfect time for a minor tune-up. Origami is very forgiving right up until you pretend your mistakes are “design choices.”
Step 10: Open the Cup Carefully
Gently pull the top opening apart and shape the bottom so the cup can stand. Use your fingers to round out the inside and settle the base. Congratulations, you now have a folded paper cup. It may not replace your kitchen cabinet, but it is charming, useful, and made entirely from one sheet of paper and a few minutes of civilized folding.
Tips for Making Your Folded Paper Cup Look Better
The biggest difference between a floppy paper cup and a good-looking one is crease quality. Press each fold firmly and line up edges carefully before committing. Thin paper is easier to shape, but slightly sturdier paper often helps the cup hold its form better. If you are making cups for dry snacks, try kraft paper, clean copy paper, or food-safe paper liners. If you are making them for decoration, patterned scrapbook paper can look fantastic.
Scale matters too. A larger square makes a wider cup. A smaller square creates a tiny holder for candy, beads, paper clips, or the one earring that keeps escaping your jewelry box. Make three or four in different sizes and suddenly you look suspiciously organized.
Common Mistakes and How to Fix Them
The cup will not stand up: The bottom point may be too loose, or the side folds may be uneven. Refold with sharper creases and make sure the overlapping sides are aligned.
The opening looks crooked: One corner probably landed too high or too low in Step 4 or Step 5. Unfold those two steps and realign the points.
The paper tears: The paper may be too thin, old, or damp. Use a fresh sheet and avoid overworking the same crease again and again.
The cup gets soggy fast: That is normal with ordinary paper. Use it for dry items, or line it with food-safe paper if needed for a brief serving.
Creative Ways to Use a Folded Paper Cup
Once you know how to make a paper cup by folding, you start seeing uses everywhere. It is great for popcorn kernels during movie night, mini candy servings at parties, desk organizers for push pins or clips, and activity stations for kids. Teachers can use folded cups for counting games, sorting small objects, or classroom crafts. Party hosts can turn them into rustic snack cups. Crafters can use them to hold buttons, sequins, or tiny screws that would otherwise vanish into the shadow realm beneath the table.
You can also personalize the cup before folding. Write a name on the paper for place settings. Add doodles for birthday parties. Use holiday prints for seasonal decor. Fold from recycled paper for a simple eco-conscious project. It is one of those rare crafts that can be cute, useful, and not overly dramatic about it.
Is a Folded Paper Cup Safe for Food or Drinks?
For dry snacks, a clean folded paper cup is usually the easiest and smartest use. For liquids, think temporary and cautious. A traditional origami cup can handle a quick sip in a pinch, but plain paper absorbs moisture and softens fast. Hot liquids are even less forgiving. Also, not all decorative paper is meant for food contact. If food safety matters, use clean, food-safe paper and keep contact brief. For anything more serious than a quick demonstration or tiny serving, a real food-grade cup is the wiser choice. Your paper cup is clever, but it is not applying to become a thermos.
Why This Simple Fold Is Still Worth Learning
Some crafts are fun once and then disappear into the fog of forgotten hobbies. The folded paper cup is not one of them. It sticks because it solves a real problem with almost no materials. It is a classic example of how useful design can be hiding inside simple geometry. One square becomes a container. A flat sheet becomes volume. A few folds become function. That is the kind of tiny magic people keep coming back to.
It is also beginner-friendly in the best way. You do not need to be artistic. You do not need expensive tools. You do not even need perfect folds on your first attempt. You just need a square and a few minutes. By the second or third cup, your hands start to remember what to do. By the fifth, you are giving advice like a tiny paper engineer.
Real-World Folding Experiences: What You Learn After Making a Few
The first time most people make a folded paper cup, it feels half craft project and half trust exercise. You look at a flat square and think, “There is absolutely no way this becomes a cup.” Then somewhere around the overlapping corner folds, the design reveals itself and the whole thing clicks. That moment is part of the charm. It is simple enough to teach in minutes, but satisfying enough to make people want to try again immediately with a better sheet of paper.
In real life, the experience changes depending on where you make it. At a kitchen table, it feels like a calm little practical project. In a classroom, it becomes a miniature event. Someone folds too fast. Someone folds backwards. Someone accidentally invents a paper hat for a grape. Then suddenly a whole room of people is comparing cups, fixing creases, and discovering that geometry is much more fun when it can hold popcorn. That social side is one reason this model lasts. It is easy to teach, easy to share, and forgiving enough that beginners do not give up after one attempt.
There is also a surprising amount of trial and error in paper choice. Thin origami paper makes beautiful, crisp folds, but heavier paper often makes a sturdier cup. Printer paper is convenient and works well for practice. Scrapbook paper looks great but can be less forgiving if it is too thick. Recycled paper can be charming, especially when you want a rustic look, but the print or texture sometimes makes alignment trickier. After a few tries, most folders realize the best paper is not always the fanciest paper. It is the sheet that folds cleanly, holds a sharp crease, and does not fight you like it has personal opinions.
Another common experience is discovering that the cup is more useful than expected. People start making one “just to try it,” then end up using it to hold paper clips, trail mix, wrapped candies, beads, game tokens, or small craft supplies. Kids like them because they are immediate and usable. Adults like them because they are weirdly efficient. It is one of those projects that quietly earns a place in everyday life.
And yes, nearly everyone tests the liquid question. Usually once. Usually with curiosity. Usually followed by a respectful realization that paper has limits. A traditional folded cup can manage a quick demonstration or brief sip, but nobody should expect it to replace a proper drink cup for long. That little experiment, though, teaches something useful: design matters, material matters, and even simple objects have boundaries. Not bad for a project made from one square sheet and a few neat folds.
By the time you have made several cups, you notice your technique improving. Corners line up faster. Creases get cleaner. The opening forms more easily. What starts as a small craft turns into a repeatable skill, and that is where the real satisfaction lives. The folded paper cup is not just a cute object. It is a tiny lesson in patience, precision, and practical creativity. Also, it is much cheaper than buying storage trays for every random button in your house.
Conclusion
Learning how to make a paper cup by folding is one of those small skills that punches above its weight. It is easy enough for beginners, useful enough for everyday life, and clever enough to impress people who thought paper only had two careers: writing and wrapping sandwiches. With one square sheet and 10 simple steps, you can create a classic origami cup for snacks, sorting, party tables, classrooms, or quick creative fun. Make one, then make another. The first teaches you the process. The second teaches you confidence. The third makes you look like you absolutely meant to become this good at folding paper.