Table of Contents >> Show >> Hide
- First: Know What You’re Creating (So Facebook Doesn’t Guess Wrong)
- Prep Checklist (2 Minutes Now Saves 2 Hours Later)
- How to Create an Event on Facebook (Mobile App: iPhone & Android)
- How to Create an Event on Facebook (Desktop: Facebook.com)
- Fill Out Your Event Like a Pro (So People Actually RSVP)
- 1) Name: Make it searchable and clear
- 2) Description: Answer the top 6 questions
- 3) Location: Use the official venue listing when possible
- 4) Add an end time (seriously)
- 5) Cover image: Design for mobile first
- 6) Co-hosts and permissions: Choose your helpers wisely
- 7) Tickets and registration: Don’t bury the link
- After You Publish: How to Promote Your Facebook Event Without Annoying Everyone
- Troubleshooting: Common Facebook Event Problems (and Fixes)
- Privacy & Safety Notes (Especially for Public Events)
- Quick Recap: The Fastest Paths
- Real-World Experiences & Lessons People Learn the Hard Way (So You Don’t Have To)
- Experience #1: The “I Made It Public and the Internet Arrived” moment
- Experience #2: The “Where is it?” comment loop
- Experience #3: The cover photo that looked perfect… on exactly one phone
- Experience #4: The missing end time turns your event into a mystery
- Experience #5: The “I created it on mobile and can’t find the same settings on desktop” surprise
- Experience #6: The best events feel “alive” before they start
Creating a Facebook Event is kind of like sending a party invite that also does your reminders, your directions, and (if you let it) your hype campaign.
Whether you’re planning a kid’s birthday, a local meetup, a livestream workshop, or a “please show up, I made snacks” open house, Facebook Events can help people
find it, RSVP, ask questions, and share itwithout you texting the same details 37 times.
This guide walks you through exact steps to create an event on mobile and desktop, plus the settings that actually matter,
real examples, troubleshooting, and a practical “what people mess up in real life” section at the end.
First: Know What You’re Creating (So Facebook Doesn’t Guess Wrong)
Before you tap “Create,” Facebook will usually ask what kind of event you’re hosting. Your choices can vary by account type and region, but in general you’ll see
options like:
- In person (a real-world location)
- Online / Virtual (a link to a livestream, meeting room, or registration page)
- Public vs Private (who can see it and who can invite others)
- Hosted by your profile vs hosted by a Page (important for businesses, creators, organizations)
Quick rule: if you want broad discovery (and you’re comfortable with strangers seeing it), go Public. If it’s a friends-only gathering or has a private location,
go Private. And if this is for your brand, venue, nonprofit, or club, hosting from your Facebook Page usually looks more official and is easier to manage with a team.
Prep Checklist (2 Minutes Now Saves 2 Hours Later)
You can create an event in under a minute… and then spend the next week answering “what time is it again?” in the comments. Instead, gather these details first:
- Event name (short, specific, and recognizable)
- Date & start time (and an end time if applicable)
- Location (venue page/address) or online link
- Description (what it is, who it’s for, what to bring, pricing/RSVP rules)
- Cover image (high-quality, easy to read on mobile)
- Tickets/registration link (if you’re collecting sign-ups elsewhere)
Pro tip: If your event has a “door opens at 6, show starts at 7” vibe, put that in the description. People love clarity almost as much as they love free parking.
How to Create an Event on Facebook (Mobile App: iPhone & Android)
The Facebook app interface shifts occasionally, but the path is usually the same: Menu → Events → Create.
Option A: Create an Event from Your Personal Profile (Most Common)
- Open the Facebook app.
- Tap Menu (the three lines, or sometimes your profile icon).
- Scroll and tap Events (you may need to tap See more first).
- Tap Create (often a “+” button).
- Choose the event type: In person or Online.
- Add the basics: Name, Date, Time, and Location or Link.
- Add a Description and Cover photo.
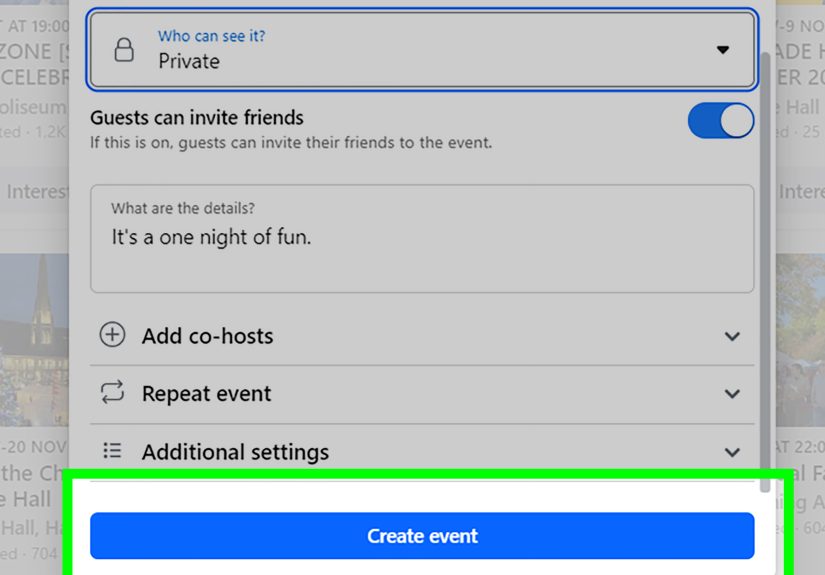
- Adjust Privacy (Public/Private) and any extra settings you see.
- Tap Create (or Done) to publish.
Example: “Neighborhood Toy Swap” (In person) → set location to your community center → add a quick list of rules (“label bags, no recalled items, kids welcome”).
Option B: Create an Event Hosted by Your Facebook Page (Great for Businesses & Organizations)
If you manage a Page, you may need to switch into the Page profile first (Facebook increasingly treats Pages as “profiles you switch into”).
Once you’re acting as the Page:
- Tap Menu.
- Use the Page/profile switcher (often under your profile picture or “See all profiles”) to select your Page.
- Return to Menu → tap Events.
- Tap Create / Create new event.
- Fill in details, then tap Create.
Why Page-hosted events matter: co-admins can help manage comments and updates, and the event looks more “official” for public promotion.
How to Create an Event on Facebook (Desktop: Facebook.com)
On desktop, you’ll usually create events from the left-side navigation under Events. Depending on your layout, you may need to click See more
to reveal it.
Option A: Create an Event from Your Personal Account (Desktop)
- Log in to Facebook.com.
- In the left menu, click Events.
- Click Create new event (or Create event).
- Select In person or Virtual/Online.
- Enter: Event name, Date, Start time (and preferably End time), plus Location or Link.
- Add a Description and Cover photo.
- Choose Public or Private.
- Click Create.
If you’re creating a virtual event, put the link where guests will actually see it easily (and clarify if it’s a Zoom link, a livestream link, or a registration page that emails the link later).
Option B: Create an Event Hosted by Your Page (Desktop)
If you run a Page, Facebook may require switching into it first:
- Click your profile photo (top right).
- Click See all profiles, then select the Page you want to use as the host.
- From the main feed, click Events in the left menu (click See more if needed).
- Click + Create new event.
- Choose In person or Virtual, add your details, then click Create event.
If you don’t see Events on your Page at all, jump to the troubleshooting sectionthis is a common “Facebook moved the button again” moment.
Fill Out Your Event Like a Pro (So People Actually RSVP)
1) Name: Make it searchable and clear
Strong event names are short and specific:
“Holiday Cookie Swap: Downtown Austin” beats “Cookie Swap!!!” (unless your brand is chaos, in which case… respect).
2) Description: Answer the top 6 questions
A great description reads like a friendly mini landing page. Include:
- What it is (one sentence)
- Who it’s for (families? professionals? beginners?)
- When (start + end time, time zone if virtual)
- Where (address, parking notes, or virtual link rules)
- Cost (free, paid, donation, bring-a-friend, etc.)
- How to attend (RSVP required? ticket link? what to bring?)
Example snippet: “Free beginner workshop. Bring a notebook. Seats limitedRSVP here. Livestream link sent 1 hour before start.”
3) Location: Use the official venue listing when possible
If your event is in-person, choose the venue Facebook recognizes (it often autocompletes). This helps with credibility and makes it easier for guests to get directions.
If it’s online, clarify whether the “location” is a link, a platform name, or a registration step.
4) Add an end time (seriously)
Facebook can display events oddly when there’s no end time, and some guidance notes that Facebook may default the event duration (often to a few hours) if you skip it.
End times also help guests plan rides, childcare, and snack strategy.
5) Cover image: Design for mobile first
Use a clean, high-resolution banner image. Many social media teams recommend a 16:9-style image around
1920 × 1005 pixels for Facebook event covers. Keep important text away from the edges so it doesn’t get cropped on different screens.
If you must put text on the image, keep it minimal: event name + date. Everything else belongs in the description where it can’t be chopped off by a mysterious crop.
6) Co-hosts and permissions: Choose your helpers wisely
If you’re partnering with another Page, venue, or collaborator, add them as a co-host so they can promote it too.
For public events, look for settings that manage who can post in the discussionthis can prevent spam, especially for widely shared events.
7) Tickets and registration: Don’t bury the link
If tickets are sold elsewhere, add the link clearly and repeat it in at least two places (for example: the event’s dedicated “ticket” field if available, plus the first lines of the description).
Your future self will thank you when people stop commenting “link?” every 12 minutes.
After You Publish: How to Promote Your Facebook Event Without Annoying Everyone
Pin a promo post to your Page
A simple tactic: create a post announcing the event (with key details and the event link), then pin it to the top of your Page so it’s the first thing visitors see.
Post updates inside the event (like a mini newsletter)
Use the event discussion for helpful countdown posts:
“Parking info,” “Agenda,” “Speaker intro,” “What to bring,” “Livestream link timing,” and “Last day to RSVP.”
These posts also signal that the event is active and organized.
Invite strategically
Invite people who are genuinely likely to come. If you blast everyone you’ve ever met, you’ll get a bunch of “Maybe” responses and one aunt asking if it’s a potluck.
(It becomes a potluck. It always becomes a potluck.)
Use ads only when it makes sense
If this is a business event, you can consider boosting the event or running event-focused ads to reach people beyond your followers.
Ads can help especially when your audience is local or interest-based and you need discovery.
Troubleshooting: Common Facebook Event Problems (and Fixes)
“I can’t find the Events button.”
- On mobile: use Menu and search for Events, or tap See more if it’s hidden.
- On desktop: check the left menu and click See more.
- For Pages: you may need to switch into the Page profile first.
“I can’t create an event as my Page.”
- Confirm you have the right Page role/access (admin-level permissions often required).
- Try switching into the Page profile on desktop using the profile selector.
“People aren’t seeing the link / address.”
- Repeat the essential info in the first 2–3 lines of the description.
- If virtual, clarify whether the link is posted immediately or sent later.
- For in-person events, use the venue’s official listing so it’s easy to tap for directions.
“My cover photo looks cropped or blurry.”
- Use a larger source image and export in high quality.
- Keep text centered and away from edges.
- Test on both mobile and desktop (cropping can differ).
Privacy & Safety Notes (Especially for Public Events)
Public events can be discovered and shared widely. That’s great for turnout, but it also means:
- Avoid posting private details (like gate codes or personal phone numbers) in public descriptions.
- Consider limiting who can post if you expect spam or off-topic comments.
- If it’s at a private residence, think twice about making it publicuse private + invite-only instead.
Quick Recap: The Fastest Paths
- Mobile: Menu → Events → Create → Choose type → Add details → Create
- Desktop: Left menu → Events → Create new event → Add details → Create
- Page-hosted: Switch into Page profile first, then follow the same Events path
Real-World Experiences & Lessons People Learn the Hard Way (So You Don’t Have To)
Let’s talk about what actually happens after you create a Facebook Event, because the “Create” button is the beginningnot the finish line.
Below are common real-life patterns people run into when creating events on Facebook from mobile and desktop, plus what tends to work better.
Experience #1: The “I Made It Public and the Internet Arrived” moment
Someone creates a public community eventsay, “Free Yoga in the Park”and it spreads fast (yay!). Then the comments fill up with unrelated promotions, spammy links,
and the occasional argument about whether yoga is a workout or a lifestyle. The lesson: if you’re going public, look for settings that help manage posting permissions,
consider having a co-host or moderator, and post a clear “House Rules” update early. Public reach is great, but you want a welcoming spacenot a digital yard sale.
Experience #2: The “Where is it?” comment loop
This one happens constantly: the host adds the address, but guests still ask where it is. Why? Because people skim. They skim like it’s an Olympic sport.
What works: put the location (or the virtual platform) in the first line of the description, and post a reminder update 24 hours before the event.
If it’s virtual and you’re not sharing the link immediately, say so plainly: “Link will be posted here 1 hour before start.”
That single sentence can eliminate half your admin work.
Experience #3: The cover photo that looked perfect… on exactly one phone
People often design a beautiful banner with tiny textfull agenda, speaker names, five sponsors, and a slogan that would look better on a billboard.
Then Facebook crops it differently on desktop vs mobile, and now the only readable words are “WELCOME” and “2025??”
The fix is boring but powerful: use the cover image for one job (attention + theme). Keep text minimal, center key elements, and place details in the description.
If you want an agenda graphic, upload it as a post inside the event instead.
Experience #4: The missing end time turns your event into a mystery
Hosts sometimes skip the end time because they “don’t want to commit.” Totally human. Unfortunately, guests plan their lives in mortal time.
A missing end time can confuse people (especially for multi-part events), and some setups default to a short duration. A better approach:
set an end time that’s realistic (even if it’s approximate) and clarify flexibility in the description:
“Networking until 8ish” or “Q&A after the talk, optional.”
Experience #5: The “I created it on mobile and can’t find the same settings on desktop” surprise
Facebook’s interfaces don’t always mirror each other perfectly. People create an event on mobile, then open it on desktop to edit and swear the buttons moved.
This is normal. The practical move is to treat Facebook Events like a living page: create it wherever it’s fastest (often mobile), then do a second pass on desktop for
detail-heavy edits like long descriptions, co-host management, and link cleanup. If you manage a Page, switching into the Page profile on desktop often reveals
event tools that feel hidden elsewhere.
Experience #6: The best events feel “alive” before they start
A surprisingly consistent pattern: events that get more RSVPs usually have a few updates posted in the days leading uphelpful info, a short video invite,
a speaker spotlight, parking tips, or a simple “We’re excited to see you” message. These posts do two things:
they answer questions in advance, and they reassure potential attendees that the event is legitimate and organized.
Even if you’re not a marketer, a couple of friendly updates can turn “Maybe” into “Going.”
Bottom line: the “Create Event” workflow is easy. The difference between a quiet event and a successful one is usually the clarity of details, smart settings,
and a few well-timed updates that make attending feel effortless.


