Table of Contents >> Show >> Hide
- Why a Flower Bed Border Changes So Much
- The “Before” Picture: Common Problems Around Flower Beds
- The “After” Picture: What a Finished Border Actually Delivers
- Best Garden Flower Bed Border Materials
- How to Create a Strong Before-and-After Border Transformation
- Design Ideas for a More Dramatic Before-and-After Result
- Common Mistakes That Ruin the Finished Look
- Before-and-After Example Scenarios
- of Real-World Experience: What Living With the “After” Actually Feels Like
- Conclusion
- SEO Tags
Some yard upgrades whisper. A flower bed border does not. It politely clears its throat, straightens its collar, and suddenly your whole garden looks like it has a plan. That is the magic of a good garden flower bed border before and after: the plants may be the stars, but the border is the stage manager making sure nobody wanders into the wrong scene.
If your garden bed currently melts into the lawn like spilled soup, you are not alone. Many flower beds start out with good intentions and end up looking soft, shaggy, and slightly confused. Grass creeps in. Mulch drifts out. The shape gets fuzzy. The flowers still bloom, but the bed never quite looks finished. The good news is that a smart border can change all of that without requiring a landscape architecture degree or a second mortgage.
This guide breaks down what a flower bed border really does, what the “before and after” transformation looks like in practical terms, which edging materials make sense for different styles and budgets, and how to build a border that looks sharp instead of shouty. We will also cover the real-life lessons people learn only after they finish the project and stand back with that deeply satisfying, “Well, would you look at that” moment.
Why a Flower Bed Border Changes So Much
A border is more than decoration. It creates definition between lawn and planting space, helps keep mulch and soil where they belong, reduces the constant battle with wandering grass, and makes the bed easier to mow around. In visual terms, it creates contrast. In maintenance terms, it creates boundaries. In emotional terms, it says, “Yes, this yard is under adult supervision.”
Without a border, the eye reads a planting bed as unfinished. Even a beautiful mix of perennials can look messy if the perimeter is vague. With a border, that same bed suddenly feels intentional. The lines are clearer. The colors pop more. The plants look curated instead of randomly assembled by a very optimistic squirrel.
That is why the before and after effect is so dramatic. You are not just adding brick, steel, stone, or a trench edge. You are improving the structure of the whole landscape.
The “Before” Picture: Common Problems Around Flower Beds
Before a border makeover, most flower beds share the same handful of issues. The first is edge blur. The lawn slowly pushes into the bed, and the bed slowly relaxes into the lawn. After one season, the original shape is more of a suggestion than a real line.
The second problem is mulch migration. Every heavy rain, strong hose spray, playful dog, or overenthusiastic leaf blower nudges mulch away from where you wanted it. Instead of a crisp garden frame, you get a soft halo of bark chunks drifting into the grass.
Third comes maintenance fatigue. If you have to weed-whack awkward curves every weekend or hand-trim around plant clumps because the mower cannot follow a clean edge, your flower bed becomes less “relaxing retreat” and more “recurring appointment with frustration.”
Then there is the design problem. A bed without a defined border often lacks contrast in texture and height. Plants can still be healthy, but the overall space looks less polished. The border is what turns a planting area into a garden feature.
The “After” Picture: What a Finished Border Actually Delivers
After the makeover, the first thing people notice is shape. Curves look stronger. Straight lines look deliberate. Even modest beds suddenly seem larger and better organized because the outline is visible from a distance.
The second change is plant presence. This sounds dramatic, but it is true: flowers often look brighter when the bed edge is clean. A neat border acts like punctuation for the color inside it. Bright annuals, silvery foliage, deep green shrubs, and layered perennials all stand out more when they are framed.
Third is the maintenance payoff. Mowing becomes easier. Mulch stays put longer. Grass has a harder time sneaking into the bed. And when you do need to refresh the edge, you already have a visual guide instead of inventing a line from scratch every spring.
Finally, the whole yard gains curb appeal. A simple front-yard flower bed with a defined border can make a house look more cared for, even if you did not add a single rare plant or fancy fountain. It is one of those upgrades that punches above its weight.
Best Garden Flower Bed Border Materials
1. Steel or Aluminum Edging
If you want the crisp, modern, nearly invisible look, metal edging is hard to beat. It creates a clean separation between lawn and bed, bends into graceful curves, and disappears visually enough to let plants take center stage. This is the material for people who love tidy lines and do not want the border shouting for attention.
Best for: Modern landscapes, minimalist gardens, curved beds, and homeowners who want a clean finish with low visual clutter.
Watch out for: Higher upfront cost than some plastic products and the need for careful installation to keep lines straight and secure.
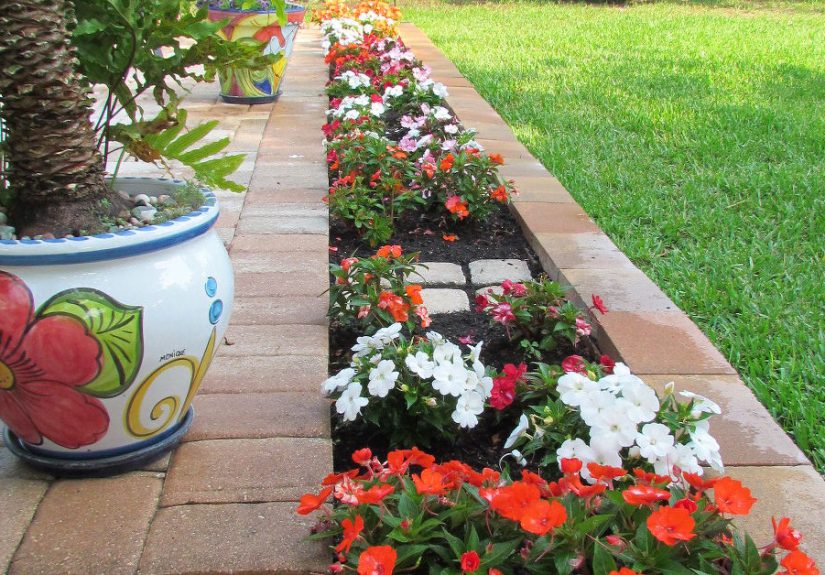
2. Brick Edging
Brick brings classic charm. It suits cottage gardens, traditional homes, and beds that need a little structure without feeling stiff. Bricks can be laid flat, angled like old-school soldier rows, or stacked for a more raised effect. This is the material that says, “I appreciate timeless style and possibly drink coffee while looking at hydrangeas.”
Best for: Traditional homes, pathways, foundation beds, and garden designs with a warm, established look.
Watch out for: Settling over time if the base is not prepared well and weeds popping up in joints if the layout is rushed.
3. Natural Stone
Stone edging looks organic, sturdy, and high-end without trying too hard. It works beautifully in informal gardens, rustic landscapes, and layered perennial beds. The texture of stone pairs especially well with ornamental grasses, mounded perennials, and natural-style planting.
Best for: Cottage gardens, natural landscapes, sloped areas, and beds where you want a substantial look.
Watch out for: Weight, cost, and the temptation to create a border so bulky it competes with the flowers.
4. Wood or Timber Borders
Wood feels warm, casual, and approachable. Cedar and other decay-resistant woods can create lovely garden edges, especially in backyard spaces where the goal is cozy rather than formal. Timber borders also work well when a bed needs a subtle raised effect.
Best for: Informal yards, vegetable-flower mixes, rustic gardens, and budget-conscious DIY projects.
Watch out for: Rot over time, especially in wet climates, and the fact that wood usually asks for replacement sooner than masonry or metal.
5. Plastic or Composite Edging
This is the budget-friendly crowd-pleaser. Plastic edging is easy to find, flexible for curves, and relatively simple to install. It can work well when the goal is function first, especially for large beds where cost matters.
Best for: Beginners, large curved beds, quick weekend projects, and lower budgets.
Watch out for: Cheap versions that warp, lift, or lose shape over time. Not all plastic edging is created equal, and some of it behaves like it has commitment issues.
6. The No-Material Trench Edge
Sometimes the best border is no visible border at all. A clean trench edge, cut into the turf with a sharp spade or edging tool, can look elegant and natural. It is also the least expensive option. When done well, it creates a crisp line that looks professional and understated.
Best for: Naturalistic beds, gardeners who like simple solutions, and anyone who wants maximum visual payoff with minimal material cost.
Watch out for: It needs refreshing. This is not the “set it and forget it” option. It is more like “set it and revisit it before it gets ideas.”
How to Create a Strong Before-and-After Border Transformation
Step 1: Fix the Shape First
Before choosing materials, decide on the bed shape. This matters more than most people think. A beautiful border around an awkward layout still looks awkward. Gentle curves tend to look natural and forgiving, while straight lines feel formal and architectural. Avoid tiny wiggles and fussy shapes. Large, confident curves usually read better from a distance and are easier to mow around.
Step 2: Remove or Smother the Existing Grass
If the bed is being enlarged or reshaped, clear the turf thoroughly. Slice it out, sheet mulch it, or otherwise stop the grass from making a comeback tour. A border works best when it is not immediately challenged by surviving lawn roots.
Step 3: Cut a Clean Edge
Whether you are installing stone, metal, brick, or no visible material at all, start with a crisp cut. Use a half-moon edger, flat spade, or dedicated edging tool to define the bed line. This step creates the dramatic “before and after” reveal more than people expect. Even before the plants are arranged, a sharp line changes the whole yard.
Step 4: Improve the Soil Inside the Bed
A border upgrade is the perfect time to improve soil with compost or other organic matter. This is the gardening equivalent of cleaning behind the couch while you are already moving furniture. You may as well do it now. Healthy soil gives the new border a better supporting cast, because the plants inside it will fill in faster and look better sooner.
Step 5: Install the Border Material Properly
Do not rush the foundation. Brick and stone need a level, stable base. Metal and plastic edging need firm anchoring. Timber borders need secure staking and thoughtful placement. A crooked installation can make even expensive materials look cheap. A careful installation can make a modest material look custom.
Step 6: Plant in Layers
The best flower bed borders do not end with hardscape. They are softened by plants. Place taller plants toward the back or center, medium plants in the middle zone, and low edging plants near the front. This layered arrangement keeps the border visible while still making the bed feel lush.
Great front-edge plants include low mounding perennials, compact grasses, evergreen clumps, and tidy annual fillers. The goal is not to hide the border completely. It is to soften it just enough that the transition looks intentional rather than severe.
Step 7: Mulch With Restraint
Mulch helps the finished bed look polished, suppresses weeds, and supports soil moisture, but too much can work against you. A moderate layer is usually enough. Keep mulch off the crowns of perennials and avoid creating little volcanoes around plants. This is a flower bed, not a geology exhibit.
Design Ideas for a More Dramatic Before-and-After Result
Pair a dark border with bright flowers. Black or dark gray metal edging makes white, yellow, pink, and purple blooms look more vivid.
Use a mowing strip near lawn-heavy areas. Brick or pavers laid flat at ground level can make mowing easier and reduce trimming headaches.
Repeat materials used elsewhere. If your walkway is brick, a brick bed border will look intentional. If your patio uses stone, echoing that material in the flower bed ties the landscape together.
Mix hard and soft edging. A physical border can define the bed while plants like candytuft, creeping thyme, heuchera, dwarf grasses, or low veronica soften the edge visually.
Keep bed depth realistic. A border bed should be deep enough to create layered planting, but not so deep that maintenance becomes an obstacle course.
Common Mistakes That Ruin the Finished Look
One common mistake is choosing a border based only on appearance. A gorgeous natural stone edge may not be ideal if you want a fast, low-maintenance install. Likewise, inexpensive plastic may fit the budget but disappoint if you expect a crisp formal line for years.
Another mistake is making the border too busy. The point of edging is to support the bed, not become a theme park attraction. If your flowers are already colorful and layered, a simpler border often works better.
A third mistake is planting too close to the lawn edge. Leave enough room for mowing and maintenance. A flower bed border before and after should not become a flower bed border before and after you apologize to your mower.
Finally, many gardeners forget about long-term growth. Those adorable little front-edge plants can become broad-shouldered champions by midsummer. Choose plants with mature size in mind so the border still reads clearly after the garden fills out.
Before-and-After Example Scenarios
Example 1: The Front Walk Bed
Before: A narrow bed along the walkway had faded mulch, patchy annuals, and grass spilling into the planting space.
After: The homeowner installed a slim steel edge, refreshed the curve near the steps, added a repeating row of compact edging plants, and topped the bed with dark mulch. Result: the entry suddenly looked newer, tidier, and far more expensive than the actual project cost.
Example 2: The Cottage Garden Rescue
Before: A charming but chaotic mix of coneflowers, salvia, and daisies leaned into the lawn with no clear boundary.
After: A brick edge defined the perimeter, taller perennials were grouped toward the back, and lower mounding plants were added along the front. Result: still romantic and lush, but no longer visually chaotic.
Example 3: The Backyard Budget Refresh
Before: A large curved bed looked flat, and mulch washed into the grass after every storm.
After: A trench edge was cut cleanly, compost was added, and the planting was rearranged in layers. Result: the bed looked professionally maintained even though the homeowner spent more sweat than money.
of Real-World Experience: What Living With the “After” Actually Feels Like
The most interesting part of a garden flower bed border before and after project is not always the installation day. It is what happens in the weeks and months after. At first, the change feels almost suspiciously dramatic. You step outside, look at the bed, and think, “Did I secretly hire a landscaper while I was asleep?” The lines are cleaner, the mulch looks richer, and every plant seems better behaved simply because it now has a proper address.
Then the practical benefits start to show up. Mowing takes less time because you are not trying to guess where lawn ends and garden begins. Weed trimming becomes more controlled. Pulling stray grass is easier because it is obvious when something has crossed the line. That alone changes how people feel about garden maintenance. The bed stops being a vague, needy area and becomes a defined part of the yard with a manageable routine.
Another experience many gardeners mention is that the plants seem to “read” better after a border is installed. A clump of purple salvia, a mound of catmint, or a drift of bright marigolds suddenly looks more intentional. Nothing about the plant changed overnight, but the context changed. Borders frame color. They also create rhythm, especially when low plants are repeated along the front edge. What looked random before starts to look designed after.
There is also a psychological effect. A finished border makes the whole yard feel more complete, even if other areas still need work. It is one of those improvements that can inspire the next round of upgrades. Once the flower bed has a crisp edge, people often notice other opportunities: maybe the path needs a refresh, maybe the mailbox bed deserves matching treatment, maybe the side yard finally needs that shade border. One tidy project can raise the standard for the whole landscape.
Of course, the after picture is not perfect forever. Real gardens move. Mulch settles. Plants grow wider. Bricks can shift. Trench edges soften. But that does not mean the transformation fades. It just means the border becomes part of the normal rhythm of care. A quick touch-up once or twice a season is far easier than trying to rescue a bed that never had structure in the first place.
Perhaps the best part of the experience is how many compliments come from people who cannot quite explain what changed. Neighbors may say your yard looks cleaner, brighter, or more polished. Friends may ask whether you planted new flowers when, in reality, you mostly just framed the ones you already had. That is the quiet genius of a flower bed border. It does not need to be flashy. It just needs to do its job well. And once it does, the whole garden looks like it finally found its outline.
Conclusion
A great garden flower bed border before and after project is not about forcing your yard into a rigid shape. It is about giving the garden enough structure to show off what is already beautiful. The right border makes flowers look brighter, maintenance feel easier, and the entire landscape feel more intentional. Whether you choose metal, brick, stone, wood, plastic, or a clean trench edge, the biggest win comes from thoughtful shape, careful installation, and plant layering that supports the final look.
If your flower bed feels like it is missing something, the answer may not be more flowers. It may just need a better edge. Sometimes the difference between “nice garden” and “wow, that looks finished” is a border that knows how to mind the line.