Table of Contents >> Show >> Hide
- Why Builder-Grade Mirrors Feel So “Meh”
- Pick Your Makeover Path (Before You Buy Anything)
- Materials & Tools Checklist (Plus a Realistic Budget)
- Step-by-Step: Frame a Builder-Grade Mirror Without Removing It
- 1) Measure Like You Mean It
- 2) Choose a Frame Style That Matches Your Bathroom
- 3) Plan Around Mirror Clips, Metal Tracks, and Weird Edges
- 4) Get Your Pieces Cut (Safely)
- 5) Finish the Frame Before You Attach It
- 6) Clean the Mirror (Adhesive Hates Dust and Soap Film)
- 7) Dry Fit and Mark Your Placement
- 8) Use a Mirror-Safe Adhesive (Seriously, Read the Label)
- 9) Attach the Frame Pieces and Tape Them in Place
- 10) Touch Up for a Built-In Look
- Renter-Friendly or Tool-Light Alternatives
- If You Must Remove the Mirror: A Safety-First Overview
- Common Mistakes (And How to Avoid a DIY Soap Opera)
- Design Ideas That Make the Makeover Look High-End
- FAQ: Quick Answers to Common Questions
- The Takeaway
- Real-Life Experiences: What It’s Actually Like to Do a DIY Builder Grade Bathroom Mirror Makeover
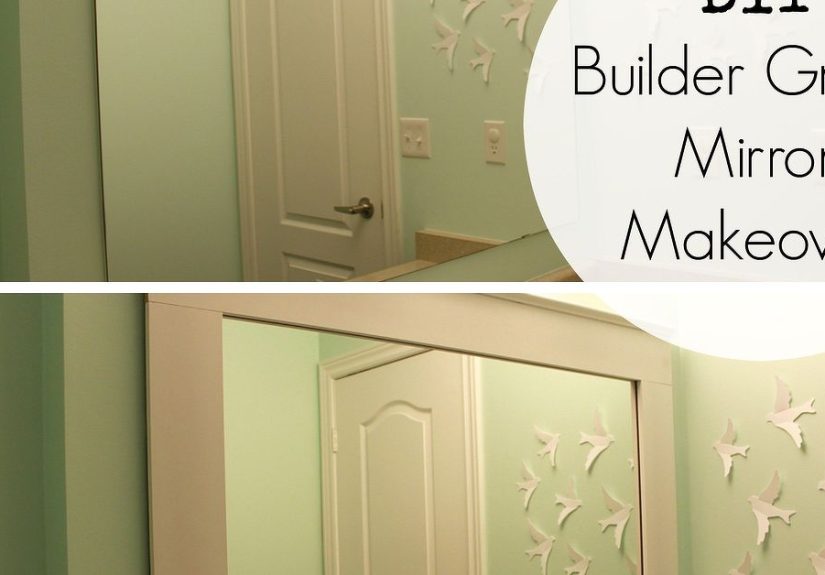
Builder-grade bathroom mirrors are the beige carpet of home decor: practical, durable, and somehow always a little… apologetic.
The good news? You don’t need a full remodel (or a second mortgage) to make yours look custom. With the right plan, you can
upgrade a plain, frameless mirror into a designer-looking focal point in a single afternoonoften without even taking it off the wall.
This guide walks you through multiple makeover optionsespecially the most popular one: adding a frame directly over the existing mirror.
You’ll get smart measuring tips, material choices that make sense in a humid bathroom, and the most common “oops” moments (so you can skip them).
Why Builder-Grade Mirrors Feel So “Meh”
A builder-grade mirror usually checks three boxes: big, frameless, and mounted as fast as possible. The size is great (hello, full-face visibility),
but the lack of a frame can make the vanity wall look unfinished. Visually, the mirror becomes one giant reflective rectangle, which can read more
“starter apartment” than “spa bathroom.”
A frame fixes that instantly. It adds contrast, defines the mirror as decor (not just a utility), and can tie into your faucet finish, light fixtures,
cabinet hardware, or even your wall color. The best part? This is one of those rare DIY upgrades that looks expensive even when it isn’t.
Pick Your Makeover Path (Before You Buy Anything)
Not every bathroom mirror situation is the same. Choose the option that matches your mirror’s mounting style, your timeline, and how “hands-on” you want to get.
Option A: Frame the Mirror in Place (Most Popular)
You add trim or boards directly to the mirror surface using a mirror-safe adhesive. No removal, no drywall patching, no mystery adhesive blobs behind the glass.
If your mirror is in decent shape and you like its size, this is usually the sweet spot.
Option B: Replace the Mirror
If the mirror is scratched, desilvering at the edges, oddly sized, or you want a different shape (arched, rounded corners, double mirrors),
replacement may be worth it. This can still be budget-friendly, but it’s more involved than framing.
Option C: Remove the Mirror (Only If You Truly Need To)
Removing a glued mirror can turn into a “surprise drywall project.” It can also be dangerous if the glass fractures.
If you’re a teen DIYer, this is the moment to recruit an adult or hire a prono shame, just wisdom.
Materials & Tools Checklist (Plus a Realistic Budget)
Your exact list depends on the style you choose, but here’s what most framed-mirror makeovers use. Pick the simplest version that fits your space.
Materials
- Trim or boards (wood, primed MDF trim, or moisture-friendly PVC/composite trim)
- Mirror-safe adhesive (read the labelsome adhesives can damage mirror backing)
- Painter’s tape (for temporary holding while adhesive cures)
- Wood filler (if you’re joining corners and want a seamless look)
- Caulk (paintable, for tiny gaps between frame and wall if needed)
- Primer + paint (bathroom-friendly enamel or cabinet/trim paint), or stain + clear topcoat
- Sandpaper (fine grit for smoothing)
Tools (Tool-Light Version Included)
- Tape measure, pencil, and a level
- Miter box + hand saw or have pieces cut at the store (many hardware stores will cut trim/boards)
- Caulk gun (for adhesive)
- Clamps (optional) or extra painter’s tape
- Cleaning cloth + glass cleaner (for prep)
Budget reality check: Most DIY frames land between $25 and $120 depending on trim style and finish.
Simple boards painted a crisp white are usually the cheapest. Ornate moulding or specialty PVC trim can cost morebut still far less than a full vanity makeover.
Step-by-Step: Frame a Builder-Grade Mirror Without Removing It
This method is popular for a reason: it’s fast, it’s high-impact, and it keeps you out of drywall-repair territory.
The goal is to build a frame that looks intentionalstraight lines, tight corners, and a finish that stands up to humidity.
1) Measure Like You Mean It
- Measure the mirror’s width and height in multiple spots (mirrors and walls can be slightly out of square).
- Decide how wide you want the frame to be. A common range is 2 to 4 inches, but go larger if your vanity wall can handle it.
- Check clearances: light fixtures above, outlets beside the mirror, backsplash below, and any medicine cabinet doors nearby.
Pro move: use painter’s tape to “draw” a pretend frame on the mirror. Step back. If it looks too chunky, you’ll know before you buy moulding.
2) Choose a Frame Style That Matches Your Bathroom
- Modern: flat boards with sharp corners, painted the same color as the trim or vanity
- Farmhouse: slightly wider boards with a stained finish, or a simple moulding profile
- Classic/traditional: layered trim (baseboard + small decorative moulding) for depth
- Coastal/spa: lighter wood tones, whitewash, or soft greige paint
In bathrooms, finishes matter. If you choose wood, seal it well. If your bathroom runs steamy (hello, long showers), moisture-friendly trim like PVC/composite can be a stress-free choice.
3) Plan Around Mirror Clips, Metal Tracks, and Weird Edges
Some builder mirrors are held by clips along the edges or sit in a metal channel. You have three common solutions:
- Cover them: pick a frame wide enough to hide clips and tracks
- Notch the back: if your trim is thick, you can create small relief cuts on the back so it sits flat
- Build a “cap” frame: a slightly larger frame that sits proud and hides everything
If notching is needed, it’s usually best done by an adult with the right tools (or a pro). The goal is a snug fit without forcing pieces into place.
4) Get Your Pieces Cut (Safely)
For a classic picture-frame look, you’ll typically use 45-degree mitered corners. If you don’t want to mess with miters,
you can do square butt jointsespecially with flat boards. It’s a slightly different look, but still clean and modern.
Teen DIY tip: If you don’t have access to safe cutting tools and adult help, choose a trim style that’s easy to cut with a miter box,
or buy trim/boards pre-cut to size. Many hardware stores can cut boards for you (bring a clear cut list).
5) Finish the Frame Before You Attach It
Painting or staining is easier when the frame pieces are on a work surfacenot balanced over a sink while you try not to drip on the countertop.
- Lightly sand.
- Prime if needed (especially raw wood or MDF).
- Paint/stain.
- Let it cure fully so it’s not tacky when you install.
A semi-gloss or satin enamel is a popular bathroom choice because it wipes clean and handles humidity well.
6) Clean the Mirror (Adhesive Hates Dust and Soap Film)
Clean the mirror surface where the frame will sit. Then wipe again with a lint-free cloth. If there’s hair spray residue, toothpaste mist,
or that mysterious “bathroom fog film,” your adhesive bond may suffer. Clean now, relax later.
7) Dry Fit and Mark Your Placement
Hold each piece in position and mark light guidelines with painter’s tape. Check that the frame is level and centered over the vanity.
A tiny tilt can look dramatic once the lights hit it.
8) Use a Mirror-Safe Adhesive (Seriously, Read the Label)
Mirror backing can be sensitive to certain adhesives, so it’s important to use a product intended for mirrors or rated safe for mirror installation.
Some manufacturers warn that the wrong adhesive can damage the reflective backing. Follow the product directions exactly.
A common best practice is applying adhesive in spaced beads rather than sealing all the way around the edges, so moisture isn’t trapped behind the mirror.
Let the adhesive cure for the recommended time before you stress-test it.
9) Attach the Frame Pieces and Tape Them in Place
- Start with the bottom piece (it’s easiest to align).
- Press firmly, then hold as directed by the adhesive instructions.
- Use painter’s tape to secure the piece while it cures (think of it as a temporary “third hand”).
- Add side pieces, then the top piece.
If your corners meet perfectly, celebrate quietly. If they don’t, don’t panicwood filler and caulk were invented for exactly this reason.
10) Touch Up for a Built-In Look
Once everything is cured, you can:
- Fill tiny corner gaps, sand smooth, and touch up paint.
- Add a thin bead of paintable caulk where the frame meets the wall if needed (not always necessary).
- Clean the mirror and enjoy your new “custom” bathroom upgrade.
Renter-Friendly or Tool-Light Alternatives
Mirror Frame Kits
Frame kits are designed to stick to the mirror and cover clips and edges with minimal tools. They can be a good option if you want a fast install,
but make sure the finish and adhesive are rated for bathroom humidity.
Peel-and-Stick Trim
Peel-and-stick moulding can work for low-humidity bathrooms or short-term upgrades, but steam and constant moisture can shorten the lifespan.
If you go this route, prep the surface thoroughly and keep expectations realistic.
Paint the Wall, Not the Mirror
If you have a thick mirror edge and a clean perimeter, you can create contrast by painting the wall behind it (or adding a bold accent color).
It won’t create a real frame, but it can reduce the “floating rectangle” effect.
If You Must Remove the Mirror: A Safety-First Overview
Removing a glued-on mirror is not the “quick little side quest” it looks like on social media. It can be heavy, stubborn, and risky if the glass cracks.
If you’re under 18, this is best done with an adult’s help or by a professionalespecially for large mirrors.
Safety basics commonly recommended by home improvement pros include protecting yourself with gloves and eye protection, working slowly,
having a helper for large mirrors, and covering the mirror surface to help contain shards if it fractures. Plan for possible drywall repair afterward.
If you’re doing a makeover for looks only, framing in place is usually the smarter pathand it avoids turning your bathroom into a drywall workshop.
Common Mistakes (And How to Avoid a DIY Soap Opera)
Mistake: Buying Trim Before Checking Clearances
That gorgeous chunky moulding looks amazing… until it blocks your light fixture or collides with the backsplash. Measure and test with painter’s tape first.
Mistake: Using the Wrong Adhesive
Not all construction adhesives are mirror-friendly. Some can damage mirror backing or fail in humidity. Use a mirror-safe adhesive and follow the cure time.
Mistake: Skipping Surface Prep
Bathroom mirrors collect invisible grime. If the frame falls later, it’s usually not “bad luck,” it’s “soap film.”
Mistake: Installing Before Paint Fully Cures
Paint may feel dry to the touch but still be soft underneath. Let it cure so you don’t end up with fingerprints permanently memorialized in semi-gloss.
Design Ideas That Make the Makeover Look High-End
- Match the hardware: black frame + black faucet, brass frame + brass pulls, etc.
- Go tone-on-tone: paint the frame the same color as the vanity for a built-in look.
- Add depth: layer two trims (a flat board plus a small decorative moulding) for a “custom millwork” vibe.
- Make it feel taller: choose a slightly wider top piece to visually “anchor” the light fixture.
- Use contrast smartly: if walls are white, a soft warm wood frame adds instant warmth.
A framed mirror also gives you a styling bonus: your bathroom suddenly looks intentional in photos (and in real life).
Yes, your mirror can become the “before and after” star. No, it doesn’t need an agent.
FAQ: Quick Answers to Common Questions
Will MDF hold up in a bathroom?
It canif it’s well sealed and not exposed to constant splashing. Primed MDF trim painted with a durable enamel often performs well in normal bathroom humidity.
For very steamy bathrooms, PVC/composite trim is the more worry-free option.
What if my mirror sits on a backsplash?
You can still frame it. Either (1) rest the bottom frame piece on the backsplash edge, (2) use side and top pieces only,
or (3) size the bottom piece to fit above the backsplash line. The “right” choice depends on how you want it to look.
How do I keep glue from showing in the reflection?
Keep adhesive away from the inner edge of the frame where it could be visible in the mirror. Follow adhesive directions and apply carefullyneat beads beat messy blobs.
Can I do this if my mirror has clips?
Usually yes. You may need a frame wide enough to cover the clips, or a design that sits proud and hides them.
If notching is required for a flush fit, ask an adult for help or choose a clip-covering style.
The Takeaway
A DIY builder-grade bathroom mirror makeover is one of the best “effort-to-wow” upgrades you can do. A frame brings structure, style,
and a finished lookwithout changing plumbing, tile, or cabinetry. Do the measuring, prep properly, use mirror-safe materials, and you’ll get a result
that looks like it came with the house… in the fancy version of your house.
Real-Life Experiences: What It’s Actually Like to Do a DIY Builder Grade Bathroom Mirror Makeover
Here’s the honest, real-world version: the makeover itself is easy, but the “in-between moments” are where most people get tripped up.
The first surprise is how not-square bathrooms can be. You measure the mirror, you cut perfect pieces, and then you hold them up and think,
“Why does this corner look like it’s trying to start an argument?” That’s normal. Walls and mirrors aren’t always perfectly aligned, especially in builder homes.
The fix is usually simpletiny adjustments, a slightly bigger reveal, or a little caulk and touch-up paintrather than redoing the whole project.
The second surprise is decision fatigue. Standing in the trim aisle feels like choosing a personality. Do you want modern? Farmhouse?
“This moulding looks like it belongs in a castle” traditional? In practice, most people are happiest when they choose trim that matches something already in the room:
cabinet style, hardware finish, or even the lines of the vanity light. When your frame repeats an existing design detail, it looks intentional instead of random.
Another very real experience: paint and humidity are frenemies. If you rush the paint cure time, your frame can look perfect until it gets its first steamy shower,
then you notice a soft spot or a fingerprint you didn’t see earlier. The best “experienced DIYer” move is boring but effective: paint first, wait longer than you think,
then install. It’s like letting cookies cool. You can eat them hot, surebut the structural integrity is questionable.
People also underestimate how much surface prep matters in a bathroom. Mirrors collect sneaky residuehair spray, face oil, cleaning product haze
and adhesive does not bond well to “mystery film.” Cleaning feels like an unnecessary step until you’re taping up a piece that keeps sliding down like it’s late for work.
A good wipe-down is the difference between a frame that feels rock-solid and one that makes you nervous every time someone closes the vanity drawer too hard.
Finally, the most satisfying part: the moment you step back and realize the whole bathroom looks upgraded, even though you didn’t move a single pipe.
It’s oddly powerful. A framed mirror makes the vanity wall feel finished, and suddenly your builder-grade light fixture looks less like a default setting.
And yes, you will absolutely catch yourself looking in the mirror more than usualnot out of vanity, but because your DIY turned out nice and you deserve to admire it.


