Table of Contents >> Show >> Hide
- Why Use a Clothes Hanger for a Valentine Ornament Wreath?
- What You Need
- How Many Ornaments Do You Actually Need?
- Step-by-Step: How to Make a Valentine Ornament Wreath With a Clothes Hanger
- Best Color Palettes for a Valentine Ornament Wreath
- Common Mistakes to Avoid
- Budget Tips for a Better DIY
- How to Store the Wreath After Valentine’s Day
- Creative Ways to Personalize Your Wreath
- Crafting Experiences and Lessons Learned From Making a Valentine Ornament Wreath
- Final Thoughts
There are two kinds of Valentine’s Day decorators in this world: the people who buy a wreath, and the people who stare at a lonely wire clothes hanger and think, “You, my friend, are about to become fabulous.” This article is for the second group. If you love a good DIY that looks more expensive than it is, a Valentine ornament wreath made from a clothes hanger is a cheerful, budget-friendly project that brings plenty of charm to your front door, gallery wall, mantel, or kitchen nook.
The beauty of this craft is that it feels clever without being complicated. You are taking a plain household item, reshaping it into a wreath form, and filling it with ornaments in romantic colors like red, pink, white, blush, berry, rose gold, or even candy-heart pastels. The result is festive, playful, and surprisingly polished. It also gives you the freedom to customize everything, from the color palette to the size, shape, bow, and overall vibe. Want something sweet and classic? Easy. Prefer a modern Valentine wreath that says “I celebrate love, but with tastefully restrained glitter”? Also very doable.
If you have ever wondered how to make a Valentine ornament wreath using a clothes hanger without turning your craft table into a tiny plastic avalanche, you are in the right place. Below, you will find a practical step-by-step guide, styling ideas, budget tips, common mistakes to avoid, and a longer section on real-world crafting experiences that can help your final wreath look intentional rather than “Cupid and a clearance bin got into a fight.”
Why Use a Clothes Hanger for a Valentine Ornament Wreath?
A wire clothes hanger is one of the easiest DIY wreath bases because it is inexpensive, easy to shape, and strong enough to hold a good number of lightweight ornaments. Unlike some wreath forms that require extra wrapping or padding, a hanger lets you thread ornaments directly onto the frame. That means fewer materials, fewer steps, and fewer opportunities to ask yourself why you started this project at 10:30 at night.
It is also flexible. You can keep the shape mostly round for a traditional wreath, or you can bend the hanger into a heart for a stronger Valentine theme. The built-in hook is another bonus because it gives you a convenient way to hang the wreath without attaching a separate loop. In other words, the clothes hanger is doing a lot of heavy lifting here, emotionally and structurally.
What You Need
- 1 wire clothes hanger
- Needle-nose pliers or regular pliers
- 35 to 70 lightweight ornaments, depending on size and fullness
- Shatterproof ornaments in Valentine colors such as red, pink, white, blush, or rose gold
- Narrow ribbon, velvet ribbon, satin ribbon, or wired ribbon
- Floral wire or thin craft wire
- Hot glue gun and glue sticks
- Optional extras: faux berries, mini hearts, glitter picks, tiny flowers, felt hearts, name banner, or conversation-heart accents
- Optional door hook or over-the-door hanger
If this wreath is going outdoors, it is smart to use sturdier materials and treat it as a covered-porch decoration rather than a full-weather warrior. Wind, moisture, and direct sun can all be rude to craft supplies. Indoors or on a protected door, though, this project tends to hold up beautifully.
How Many Ornaments Do You Actually Need?
This is one of the most common questions, and the answer depends on the size of your wreath and the diameter of your ornaments. A small wreath made with mostly 1.5-inch and 2-inch ornaments may need around 35 to 45 pieces. A fuller wreath with a mix of medium and mini ornaments often uses 50 to 70. If you want a lush, high-impact look, buy a little more than you think you need. Running out when your wreath is 85 percent done is a classic DIY plot twist, and not a fun one.
The best-looking ornament wreaths usually combine several sizes and finishes. Matte ornaments add softness, shiny ones reflect light, and glitter pieces bring sparkle. Too many identical pieces can make the wreath feel flat, while too much randomness can make it look like a party store exploded. Balance is the secret sauce.
Step-by-Step: How to Make a Valentine Ornament Wreath With a Clothes Hanger
1. Unwind and shape the hanger
Start by untwisting the wire hanger at the top. Use pliers if it is stubborn. Once open, decide on your shape. For a classic look, bend the hanger into as smooth and round a circle as possible. For a more Valentine-specific design, pinch the bottom into a point and round out the top sides to form a heart. Keep the hook portion intact because that will become your hanger.
Do not worry if your first attempt is a little wonky. Wire has personality. The good news is that the ornaments will cover most minor imperfections, so you are building a wreath, not training for competitive geometry.
2. Sort your ornaments before threading
Lay out your ornaments by color, size, and finish. This simple prep step makes the project easier and helps you avoid clumping all the red glitter balls in one area like an overenthusiastic Cupid dropped his lunch. If any ornament caps feel loose, add a dab of hot glue where the cap meets the ornament and let it cool before using it. This small move can save you from heartbreak later, and yes, that pun is staying.
3. Thread the larger ornaments first
Slide the larger ornaments onto the hanger one by one. Mix colors as you go so the wreath looks balanced from the beginning. Place deeper shades like crimson or fuchsia in different spots around the frame, then break them up with white, blush, or pink ornaments. This keeps the design moving visually and prevents one area from looking heavier than the rest.
As you add pieces, gently rotate them so the prettiest sides face forward. That sounds fussy, but it really improves the final look. Ornament wreaths are all about layering, so a little arrangement during the build saves you from a lot of adjusting later.
4. Fill gaps with smaller ornaments and embellishments
Once the base is mostly full, tuck in smaller ornaments to fill holes. You can either thread additional small ornaments directly onto the wire or attach them with floral wire or hot glue where needed. This is where the wreath starts to feel full and intentional instead of like a necklace for a giant holiday hamster.
Want more Valentine style? Add mini hearts, faux berry sprays, tiny ribbon loops, silk flowers, or glitter picks in pink and red. Keep embellishments evenly distributed so the wreath feels curated rather than crowded. Less “craft panic,” more “romantic statement piece.”
5. Close the hanger and secure the wreath
When you are happy with the fullness, twist the hanger closed again at the top. Use pliers to tighten the wire so the ornaments stay in place. Check the wreath for shifting. If some ornaments wobble too much, secure a few strategic pieces with floral wire or dots of hot glue. You do not need to glue every single ornament. Think of glue as backup support, not the entire personality of the project.
6. Add ribbon and finishing details
Tie a bow at the top, around the hook, or slightly off-center for a softer look. Velvet ribbon feels romantic and a little luxe, while gingham or striped ribbon makes the wreath feel more playful. A banner with a word like “love,” “xoxo,” or “be mine” can add personality. If you prefer a cleaner look, skip the text and let the ornaments do the talking.
7. Hang and adjust
Once the wreath is hung, step back and look at it from a short distance. This is the moment when tiny tweaks matter. Turn a few ornaments outward, fluff the bow, and make sure the shape still reads as round or heart-shaped. The door-view test tells the truth every time.
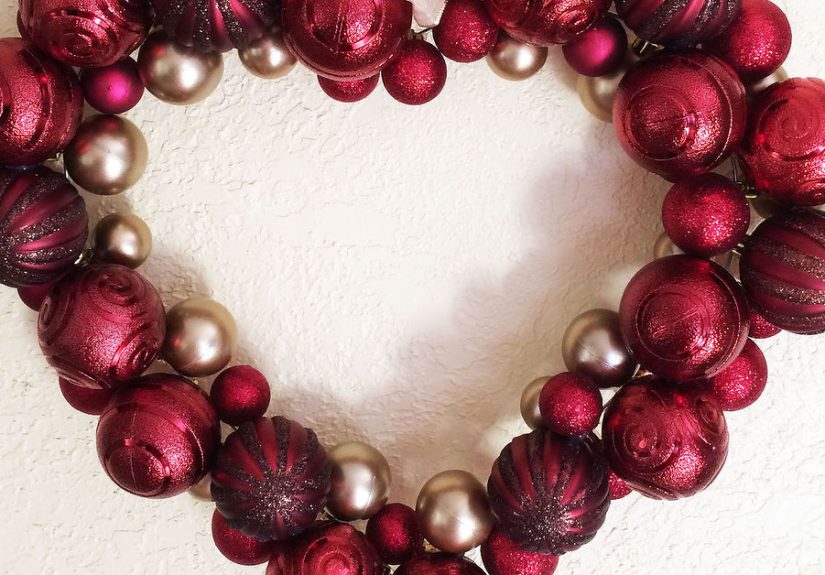
Best Color Palettes for a Valentine Ornament Wreath
Classic Valentine
Use red, pink, and white ornaments with a satin red bow. This combination is timeless and cheerful, and it works especially well if your home decor leans traditional.
Soft and Romantic
Choose blush, ivory, pale pink, and rose gold ornaments. Add velvet ribbon and a few faux florals for a more elegant look. This is the wreath version of lighting a candle and pretending your laundry does not exist.
Modern Minimalist
Stick to white, champagne, and one bold accent color such as magenta or deep berry. Keep embellishments simple. This style looks clean, fresh, and expensive in the best possible way.
Conversation Heart Fun
Mix pastel pink, mint, lavender, pale yellow, and white ornaments. Add a ribbon in polka dots or a small banner for a candy-inspired design that feels playful and family-friendly.
Common Mistakes to Avoid
Using ornaments that are too heavy. Glass ornaments can look gorgeous, but a hanger wreath works best with lightweight shatterproof pieces. The frame is strong, but your sanity deserves a lower-risk option.
Skipping the color plan. Random can be charming in some projects. Here, random can turn into visual chaos. A quick color strategy gives the wreath a polished finish.
Forgetting to secure loose caps. Ornament caps are often the weakest link. A tiny bit of glue before assembly is worth the extra minute.
Over-gluing everything. Hot glue is helpful, but too much can create strings, blobs, and a messy finish. Use it where it makes sense, not like you are frosting a cake.
Ignoring where it will hang. If the wreath will be exposed to weather, choose materials accordingly. Felt, paper, and some glitter finishes are better indoors or on a covered porch.
Budget Tips for a Better DIY
A Valentine ornament wreath can be surprisingly affordable if you shop smart. Multi-packs of ornaments usually cost less than buying individual decorative pieces. Start with a coordinated ornament set and then add a few special accents, such as glitter hearts or ribbon, to give the design more personality. Dollar stores, craft stores, seasonal sales, and leftover holiday decor bins can all be useful for this project.
You can also repurpose what you already have. Christmas ornaments in pink, white, gold, or red can often be remixed into a Valentine wreath with almost no one the wiser. Add a new bow, remove obviously wintery elements, and suddenly your old stash has a romantic second act.
How to Store the Wreath After Valentine’s Day
If you want to reuse the wreath next year, storage matters. Place it in a sturdy wreath box or a large plastic storage bin with enough room that the ornaments are not crushed. Wrap it lightly with tissue paper or a clean plastic bag to keep dust off. Store it in a dry area away from extreme heat. A little care now means you will not open the bin next January and discover that your lovely wreath has transformed into a sad pile of detached pink spheres.
Creative Ways to Personalize Your Wreath
One of the best things about this DIY Valentine wreath is how easy it is to make it personal. Add a monogram with lightweight wood or chipboard letters. Use ornaments in your wedding colors. Create a wreath that matches your living room instead of the typical red-and-pink palette. Add mini framed photos, faux flowers, or a ribbon streamer in a pattern you love.
You can also build the wreath around a theme. A sweetheart candy wreath, a rustic farmhouse wreath, a glam rose-gold wreath, or even a kid-friendly wreath with pom-poms and playful signs all work well. The clothes hanger base does not care about your aesthetic. It is here to support your vision and probably judge your wire-bending technique a little.
Crafting Experiences and Lessons Learned From Making a Valentine Ornament Wreath
One of the most relatable experiences with this project is that it starts out looking suspiciously unimpressive. At first, you have a bent hanger, a pile of ornaments, and the vague confidence of someone who watched exactly one craft video and said, “Yes, I too am an artist.” Then, somewhere around the halfway point, the magic kicks in. The colors begin to balance, the shape gets fuller, and suddenly the project stops looking like loose supplies and starts looking like decor.
Another common experience is learning that wreath-making is less about perfection and more about rhythm. You add a red ornament, then a pale pink one, then something shiny, then something matte. You step back. You squint. You move one piece two inches to the left like it offended you personally. This back-and-forth is normal. In fact, it is part of what makes the project enjoyable. The wreath becomes better each time you pause to look at it as a whole instead of obsessing over one small area.
Many people also discover that the hanger base is more forgiving than expected. Even if the circle is not perfectly round or the heart is not textbook symmetrical, the finished wreath can still look beautiful because the ornaments soften the structure. That is reassuring for beginners. You do not need advanced craft skills. You just need patience, decent lighting, and the willingness to keep going when the bow looks weird the first three times you tie it.
There is also a real sense of satisfaction in turning simple materials into something display-worthy. A wire hanger is one of the most ordinary objects in the house. It usually lives in a closet and asks for nothing. Transforming it into a Valentine ornament wreath feels clever in a deeply satisfying way. It is the kind of project that makes guests ask where you bought it, which is honestly one of the most delicious rewards in all of home crafting.
For families, this wreath can become a memory-making activity. Kids can help sort colors, hand over ornaments, or choose embellishments. Adults can manage the pliers and hot glue. Couples can make one together and immediately learn whether they are collaborative crafters or people who should maybe be given separate ribbon tasks. Either way, it becomes an experience, not just a decoration. The finished wreath often carries those small memories with it, which makes it feel warmer and more meaningful than something pulled from a store shelf.
Another lesson that comes up again and again is the importance of restraint. The temptation with Valentine decor is to add everything: hearts, bows, glitter, florals, signs, feathers, probably emotional support sequins. But the best wreaths usually have a focal point and enough breathing room for the eye to rest. That does not mean boring. It just means edited. A well-placed bow, a few mini hearts, and a thoughtful mix of ornament finishes often look more stylish than a design trying to do twelve things at once.
People also tend to remember the small practical tricks. Glue loose ornament caps before assembly. Mix sizes for a fuller look. Buy extra mini ornaments for gap filling. Test the wreath on the door before declaring victory. These are the kind of lessons that sound minor but make the difference between a project that feels frustrating and one that feels smooth. Every wreath teaches something, even if the lesson is simply, “Next year, I am absolutely buying more pink ornaments.”
In the end, the crafting experience is part of the appeal. This is not just about making front door decor for Valentine’s Day. It is about slowing down, using your hands, choosing colors that make you happy, and creating something festive from simple materials. The wreath may hang for only a few weeks, but the process gives you that lovely little feeling of having made your home more personal, more playful, and more your own.
Final Thoughts
A Valentine ornament wreath using a clothes hanger is one of those DIY projects that checks all the right boxes. It is affordable, customizable, beginner-friendly, and visually impressive without requiring a craft room worthy of a television show. Whether you go bold with classic red and pink, soft with blush and ivory, or modern with a more edited palette, the clothes hanger wreath form gives you a flexible starting point for a festive piece of seasonal decor.
The secret is simple: choose lightweight ornaments, shape the base carefully, build your color mix with intention, and use embellishments strategically. Once you do that, the wreath comes together in a way that feels fun rather than fussy. And when someone compliments it, you get to smile and say, “Thanks, it started as a hanger.” Which is a very strong main-character moment for a humble closet accessory.


