Table of Contents >> Show >> Hide
- Why a Pallet Headboard Works (When You Do It Right)
- The Safety Talk (Because Sweet Dreams Shouldn’t Include Mystery Chemicals)
- Design Options: Pick Your Pallet Headboard Personality
- Size It Like You Meant It
- Tools and Materials (A Realistic List)
- Step-by-Step: How to Build a Pallet Headboard That Looks Legit
- Step 1: Source pallets without being weird about it
- Step 2: Inspect and clean
- Step 3: Disassemble (or don’t)
- Step 4: Plan the layout on the floor first
- Step 5: Build a backing frame (the secret to “sturdy”)
- Step 6: Attach the pallet boards
- Step 7: Sand until it’s touch-friendly
- Step 8: Finish (the glow-up)
- Mounting Options: Wall-Mounted vs Bed-Attached
- Style Tips: Make It Look Expensive (Without Lying)
- Common Mistakes (So You Don’t Have to Learn the Hard Way)
- Cost and Time: The Honest Estimate
- FAQ
- Real-Life Experiences: Sweet Dreams in the Pallet Kingdom (Extended)
- Conclusion: A Better Bedroom, One Pallet at a Time
A headboard is basically a big, stylish “do not bonk your skull” sign. Unfortunately, many store-bought headboards are priced like they’re handcrafted by woodland elves using moonlight and artisanal glue. If your budget says “no thanks,” but your bedroom says “help,” a DIY pallet headboard can be the sweet-spot: rustic, customizable, and surprisingly classy once you stop thinking of pallets as “that thing behind the grocery store.”
This guide walks you through building a pallet headboard that looks intentional (not accidental), feels solid, and won’t shed splinters like a porcupine having a bad day. We’ll cover safety (yes, really), design ideas, step-by-step building, finishing tricks, and mounting optionsplus a longer real-life experience section at the end, because the best DIY stories always include at least one moment of “I definitely meant to do that.”
Why a Pallet Headboard Works (When You Do It Right)
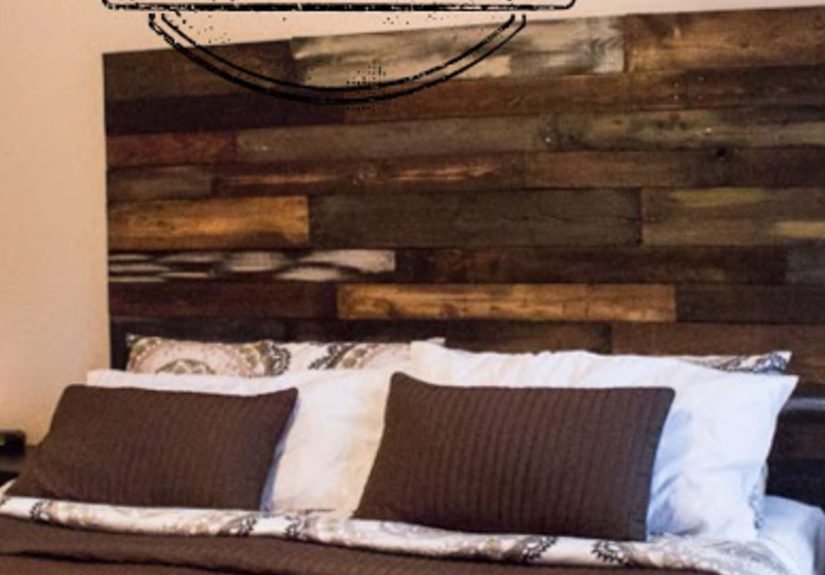
A pallet headboard is one of the most satisfying “budget bedroom makeover” projects because it delivers a lot of visual impact for relatively little money. Pallet wood tends to have character: grain variation, nail holes, weathering, and those imperfect edges that scream “farmhouse bedroom” without you having to buy a single “Live Laugh Love” sign.
Even better: you get to choose the vibe. Want a clean, modern reclaimed-wood headboard? Sand and stain evenly. Want a rustic headboard with dramatic texture? Lean into the knots and variations. Want something that looks like a boutique hotel? Add a top ledge, sconce mounts, or a hidden LED strip.
The Safety Talk (Because Sweet Dreams Shouldn’t Include Mystery Chemicals)
Let’s be blunt: pallets have a past. Some are perfectly safe and clean; others have lived through spills, pests, and who-knows-what in a warehouse saga. The goal is simple: pick pallets that are safe for indoor DIY projects, and skip anything suspicious. You are not running a pallet rescue shelter. It is okay to say no.
What to look for on the stamp
- Choose pallets marked “HT” (heat-treated) when possible. Heat treatment is commonly used for pest control in shipping.
- Avoid pallets marked “MB” (methyl bromide). That’s a pesticide fumigation treatment you do not want in your bedroom project.
- If you see DB (debarked) or KD (kiln-dried), those can be helpful indicators toostill inspect the pallet’s condition.
What to avoid, even if it’s free
- Unmarked pallets when you can’t verify their history.
- Any pallet with stains, oily spots, strong odors, or sticky residuethat’s not “patina,” that’s “nope.”
- Soft, crumbling, moldy wood or signs of pests.
- Protruding nails and broken boards that would require heavy reconstruction (unless you enjoy frustration as a hobby).
Protect yourself while building
Sanding and cutting wood creates dust. Wood dust can irritate your eyes and airways, and heavy exposure isn’t something to shrug off. Wear eye protection, and use a properly fitted dust mask or respiratorespecially during sanding. If you can, sand outdoors or use a shop vacuum/dust collection setup. Your lungs will send a thank-you note.
Design Options: Pick Your Pallet Headboard Personality
1) The “Simple Slat Wall” (Minimal tools, maximum payoff)
This is the classic DIY pallet headboard: horizontal (or vertical) slats attached to a sturdy backing frame. It reads clean, modern-rustic, and it’s easy to size to your bed.
2) The “Top Ledge” (For phones, books, and water cups you’ll forget overnight)
Add a narrow shelf across the topgreat for styling and genuinely useful. It also visually “finishes” the piece, making it look more like furniture and less like you stapled wood to the wall (even if you kind of did).
3) The “Framed Panel” (A little more polished)
Build a simple 1x frame around your slats. That frame creates a crisp border that instantly looks intentional and helps hide imperfect pallet edges.
4) The “Chevron or Herringbone” (For overachievers and people who own a miter saw)
Cut slats at angles and create a patterned reclaimed-wood headboard. It’s gorgeousjust plan extra time for measuring, cutting, and the inevitable “wait, why is this side drifting?” moment.
Size It Like You Meant It
A good rule: build your DIY headboard slightly wider than the mattress so it frames the bed instead of looking undersized. For example, if you have a queen mattress (typically 60 inches wide), aim for a finished headboard width around 62–66 inches. For a king (typically 76 inches wide), consider 78–84 inches depending on your room and style.
Height is personal, but many headboards look balanced in the 44–55 inch range from the floor, depending on bed height. If you’re wall-mounting behind a tall mattress, go taller so the headboard doesn’t disappear.
Tools and Materials (A Realistic List)
Materials
- Heat-treated pallets (quantity depends on design; 2–4 pallets often covers a queen)
- 2x3s or 1x3s for a backing frame (or plywood if doing a panel base)
- Wood screws (1-1/4″ to 2-1/2″, depending on layers)
- Construction adhesive (optional, for extra rigidity)
- Wood filler (optional, for smoothing nail holes)
- Sandpaper (80/120/180 grit range) or sanding discs
- Finish: stain + clear coat, or paint, or hardwax oil (choose your adventure)
Tools
- Work gloves, safety glasses, dust mask/respirator
- Pry bar and hammer (for disassembly)
- Nail puller or end-cutting pliers
- Drill/driver + bits
- Measuring tape, speed square, pencil
- Saw (circular saw, miter saw, or handsaw)
- Orbital sander (highly recommended)
- Stud finder (if wall-mounting)
Step-by-Step: How to Build a Pallet Headboard That Looks Legit
Step 1: Source pallets without being weird about it
Local small businesses are often better than big-box stores for finding pallets, since large retailers may have recycling programs. Always ask before taking pallets. “Hello, I would like to adopt your unwanted wood” is a sentence that gets easier with practice.
Step 2: Inspect and clean
Look for the stamp (HT good, MB bad), then inspect for stains, smells, mold, or pests. Vacuum off debris. If the pallet is dusty, scrub it with mild soap and water and let it dry thoroughlylike, truly dry. Damp wood and finishing products do not get along.
Step 3: Disassemble (or don’t)
You have two paths:
- Disassemble to harvest boards: more flexible, cleaner look, more work.
- Use whole pallet sections: faster, chunkier, more “industrial rustic.”
If disassembling, go slow. Pallet boards split easily. A pry bar, a steady hand, and mild emotional resilience help. Remove nails completelyespecially anything that could scratch a wall or snag bedding.
Step 4: Plan the layout on the floor first
Lay boards out like puzzle pieces. Mix tones and grain patterns so the finished headboard looks balanced rather than striped. Flip boards around until it feels right. This is the part where you become an “artist” to justify taking 45 minutes to arrange wood.
Step 5: Build a backing frame (the secret to “sturdy”)
A simple rectangular frame made from 2x3s or 1x3s gives your pallet slats something straight and strong to attach to. Add one or two horizontal braces across the middle to prevent wobble. If you’re going very wide (like a king), add vertical supports too.
Step 6: Attach the pallet boards
Pre-drill near board ends to reduce splitting. Then screw boards into the frame. Keep screw placement consistent for a cleaner look. If you want a hidden-fastener vibe, you can attach from the backjust make sure your screws are the right length and won’t poke through.
Step 7: Sand until it’s touch-friendly
Start with 80 grit to knock down rough spots, then move to 120 and 180 for a smoother finish. You do not need “baby cheek” smooth unless you want it, but you do want “won’t snag hair, sheets, or skin.” Round over sharp edges lightly.
Step 8: Finish (the glow-up)
Finishing is where pallet wood goes from “shipping platform” to “reclaimed wood headboard.” Options:
- Stain + clear coat: highlights grain, looks classic. Test stain on scrap first because pallet wood can absorb unevenly.
- Paint: great for modern or coastal looks. A matte black headboard can look shockingly high-end.
- Hardwax oil: a natural look and feel, often easier to spot-repair later.
Let finishes cure fully before putting the bed back in place. “Dry to the touch” and “ready for pillows rubbing against it nightly” are not the same thing.
Mounting Options: Wall-Mounted vs Bed-Attached
Wall-mounted (clean, stable, and easy to vacuum under)
A wall-mounted headboard looks sleek and can be very secure when anchored into studs. Many DIYers use a cleat-style mount (two angled boards that lock together) so the headboard can hang flat and be removed if needed. Always hit studs or use appropriate heavy-duty anchors rated for the load.
Bed-attached (portable, renter-friendly if done carefully)
If you prefer attaching to the bed frame, build “legs” behind the headboard and bolt them to the frame’s headboard brackets (if your frame has them). The benefit is you’re not drilling into walls. The tradeoff is the headboard may move slightly with the bed.
Style Tips: Make It Look Expensive (Without Lying)
- Go wider than the bed for a custom-built look.
- Add symmetry with matching sconces, art, or nightstands.
- Use layered textiles (a throw + euro pillows) to make the headboard feel intentional, not just “there.”
- Repeat the wood tone somewhere else in the room: a frame, a shelf, or even a tray on the dresser.
Common Mistakes (So You Don’t Have to Learn the Hard Way)
Mistake: Using sketchy pallets
If it’s stained, smelly, or unmarked and questionableskip it. Your bedroom should not smell faintly of “warehouse mystery.”
Mistake: Not removing nails completely
Tiny leftover nail points can scratch walls, tear fabric, and bite fingers. Hunt them down like you’re being paid per nail.
Mistake: Under-sanding
Pallet headboard + hair + static = snag city. Sand enough that running your hand across it feels safe.
Mistake: Weak mounting
A headboard is big leverage. Mount it like it mattersbecause gravity is patient and undefeated.
Cost and Time: The Honest Estimate
If you source free pallets, your main cost is hardware and finishing supplies. Many builds land somewhere between “a fancy dinner out” and “why is stain so expensive?” Time-wise, a simple design can be done over a weekend: one day for sourcing/disassembly/sanding, one day for assembly/finishing (plus drying time).
FAQ
Will a pallet headboard attract bugs?
Any reclaimed wood can harbor pests if it’s not clean and properly inspected. Start with clean, heat-treated pallets, inspect carefully, and avoid anything with signs of infestation. Sanding and finishing also help create a less inviting surface.
Can I make it look less “rustic”?
Yes. Choose straighter boards, sand more thoroughly, fill holes, and use a consistent stain or paint color. Add a clean frame border. Suddenly it’s “modern reclaimed,” not “barn audition.”
What if I don’t own power tools?
You can still do a simpler version with fewer cutsuse pallet sections and attach them to a backing with basic hand tools. It’ll take longer, but it’s doable. Just don’t skip safety gear.
Real-Life Experiences: Sweet Dreams in the Pallet Kingdom (Extended)
The first time I told someone I was making a pallet headboard, they looked at me the way you look at a raccoon carrying a slice of pizza: impressed, concerned, and quietly wondering how it all went so wrong. But here’s the thingDIY is often just confidence wearing a tool belt. And a pallet headboard is the perfect project for that kind of confidence, because the “before” is literally wood that has already lived a life. It’s hard to ruin something that started out as a shipping pallet. Hard. Not impossible. But hard.
My pallet adventure began with the classic free-wood treasure hunt. I found a stack that looked promising: dry, solid, and not smelling like industrial pickles. The stamps were the real moment of truth. I had read enough to know I wanted heat-treated pallets, and absolutely did not want anything that had been chemically fumigated. Choosing the right pallets felt like dating: you’re not looking for perfection, just a background check and a clean vibe.
Then came disassembly, also known as “how many nails can one object legally contain?” Pallet nails do not come out like normal nails. They come out like they’re holding grudges. I learned quickly that rushing splits boards, and split boards make you say words you wouldn’t want stitched on a throw pillow. The breakthrough was going slower, working from multiple points, and accepting that I wasn’t “taking apart a pallet” so much as “negotiating its surrender.”
The layout stage was unexpectedly fun. I arranged boards on the floor, swapping them like I was curating an art exhibit titled “Wood, But Make It Fashion.” Dark board next to light board, knotty board next to smooth boardsuddenly the whole thing looked deliberate. That’s the magic trick of reclaimed wood: random becomes intentional when you pay attention to contrast and balance.
Sanding, however, was where romance went to die. Sanding is not glamorous. Sanding is you, a sander, and a cloud of dust that wants to become part of your personality. I wore eye protection and a dust mask, and I still somehow ended up looking like I had auditioned for the role of “Friendly Ghost in a Hardware Store Commercial.” But after working through grits, the boards transformed. They still had texture and character, but they no longer felt like they could remove a layer of skin if you leaned back too enthusiastically.
The finishing choice was the final identity crisis: stain to highlight the grain, or paint for a cleaner look? I tested stain on a scrap piece, and I’m glad I didsome boards drank stain like they’d been thirsty since 1998. I adjusted, mixed tones, and embraced variation instead of fighting it. Once sealed, the headboard finally looked like furniture, not “wood I found.”
Mounting was the part that made me respect physics. A headboard is big, and big things need proper support. The moment it clicked into place and sat flush against the wall was genuinely satisfyinglike hanging a giant piece of art you built yourself. And the first night sleeping with it? Chef’s kiss. The room felt more finished, more grounded, more adult. Not “adult” as in “boring,” but “adult” as in “I can now host someone and they won’t assume I just moved in yesterday.”
The funniest part is how quickly the headboard became normal. After a week, it felt like it had always been there. That’s the best sign you did it right: the project stops looking like a project and starts looking like a choice. And every time I caught the warm wood tones behind the pillows, I had that small, smug joy DIY people live forthe joy of knowing you made something functional, personal, and a little bit fancy out of materials everyone else walked past.
Conclusion: A Better Bedroom, One Pallet at a Time
A DIY pallet headboard can be a budget-friendly upgrade that looks custom, adds warmth, and makes your bedroom feel finished. The keys are simple: pick safe pallets, prep carefully, build a sturdy structure, sand until it’s touch-friendly, and finish it like you mean it. Do that, and you’ll end up with a reclaimed wood headboard that delivers the best kind of bragging rights: the quiet kind, every time you walk into the room.


Кратко о Monro — shewoman.ru/ — Приветственная цепочка на первые три депозита от 1000 ? — 150%, потом фриспины, потом ещё проценты. В кабинете дозаполняешь ФИО и дату рождения — к KYC готов заранее. Раздел «Only at Monro» и jackpot — отдельно заглядываю когда хочется чего-то другого. Активный бонус сначала отыграй, потом заявку — так меньше вопросов от поддержки. shewoman.ru — тот же профиль и баланс, второй аккаунт не нужен. Мобильный браузер тоже тянет, если не хочется ставить apk. Кто играет в Монро — как вам турниры и кэшбэк до 10%?