Table of Contents >> Show >> Hide
- Why a printer’s tray works so well in a medicine cabinet
- Before you start: what should (and shouldn’t) live in a “medicine” cabinet
- Step-by-step: the medicine cabinet redo with a printer’s tray
- Step 1: Empty everything (yes, everything)
- Step 2: Sort into quick categories
- Step 3: Do the expiration-date check (without panicking)
- Step 4: Dispose of old meds the right way
- Step 5: Choose the right printer’s tray for your space
- Step 6: Clean and prep the tray (especially if it’s vintage)
- Step 7: Plan a “compartment map” that matches real life
- Step 8: Line compartments (optional, but surprisingly satisfying)
- Step 9: Install it: inside the cabinet or as a wall sidekick
- Step 10: Load items intentionally (and keep meds in original containers)
- How to make it look clean (not cluttered)
- Maintenance that doesn’t require a life coach
- Troubleshooting: common printer’s tray redo problems
- FAQ
- Real-life experiences: what it’s actually like to do this redo
- Conclusion
If your medicine cabinet currently looks like a mini drugstore that got hit by a tiny tornado, you’re not alone. These cabinets are magnets for half-used toothpaste, mystery ointments, and that one bandage box that’s been “almost empty” since the last presidential administration.
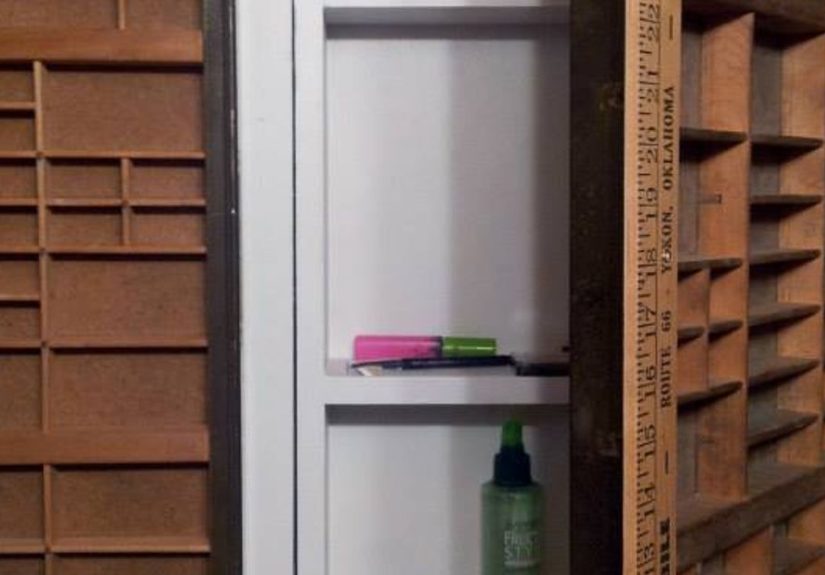
Here’s the fun part: you can fix the chaos without buying a dozen matching acrylic bins or committing to a full bathroom remodel. The secret weapon is a printer’s tray (also called a type case): a vintage, compartment-filled drawer originally used to sort printing type. Today, it’s basically the world’s most satisfying grid organizerperfect for turning a cluttered cabinet into an orderly, easy-to-maintain setup.
Why a printer’s tray works so well in a medicine cabinet
A printer’s tray is the opposite of “one big shelf where small things go to disappear.” It breaks your storage into clear, visual “homes,” so you’re not playing hide-and-seek with floss picks and allergy pills at 1 a.m.
Built-in categories (without the mental gymnastics)
When you can see everything at a glance, you naturally stop overbuying duplicates (“Do we have ibuprofen?”) and you spot what’s expiring before it turns into a museum exhibit. The compartments also keep tall bottles from toppling into smaller items like razors, nail clippers, or travel tubes.
It’s a redo that’s both practical and pretty
Printer’s trays add a little vintage characterlike your cabinet got a glow-up and a personality. Even if your bathroom is modern, the tray’s grid creates a clean, intentional look. Order is a style choice, too.
Before you start: what should (and shouldn’t) live in a “medicine” cabinet
Quick reality check: bathrooms get humid. Many medications store best in a cool, dry place away from moisture and heat. If you can relocate most medicines to a hallway closet or bedroom dresser drawer, that’s often better for long-term storage. If your cabinet is the only option, you can still organize it safelyjust be smart about what you keep there and how you store it.
Good candidates for the cabinet
- Daily-use toiletries (toothpaste, floss, deodorant, face wash)
- First-aid basics (bandages, antiseptic wipes, gauze)
- Non-sensitive items you use frequently (lip balm, tweezers, nail clippers)
- Short-term “active” meds currently in rotation (kept in original containers)
Better stored elsewhere (if you can)
- Heat/moisture-sensitive medications (check labels and pharmacy instructions)
- Anything you’re keeping “just in case” for years (that’s how expiration happens)
- Child-risk items if kids visit your home (store locked and out of reach)
- Backstock that turns into overstock (extra bottles, unopened duplicates)
Not trying to be the Storage Policejust aiming for a cabinet that supports your life instead of quietly plotting against it.
Step-by-step: the medicine cabinet redo with a printer’s tray
Step 1: Empty everything (yes, everything)
Take it all out. Put a towel on the counter and make a “cabinet yard sale” pile. Wipe down shelves, corners, and the inside of the door. This is where you’ll find the sticky ring left by mouthwash and the rogue bobby pins that have been living there rent-free.
Step 2: Sort into quick categories
Create simple piles. Keep it basic so you don’t turn organizing into a dissertation:
- Daily (grab every day)
- First Aid (bandages, ointment, thermometer)
- Cold/Allergy (seasonal, occasional)
- Skincare/Beauty (if you store it here)
- Tools (tweezers, nail clippers, scissors)
- Backstock (extras you don’t need visible every day)
- Toss/Dispose (expired, questionable, duplicates you’ll never use)
Step 3: Do the expiration-date check (without panicking)
Check labels on medications, ointments, and even “health-adjacent” items like sunscreen or eye drops. If something looks or smells off, or it’s clearly past date, it’s not a “maybe.” It’s a “bye.”
Step 4: Dispose of old meds the right way
The safest option is a drug take-back program or authorized drop box. Many communities also host take-back events. If you truly can’t access a take-back option, follow official at-home disposal guidance: keep personal info protected, and don’t flush meds unless the medication specifically qualifies under official flush guidance.
Step 5: Choose the right printer’s tray for your space
Printer’s trays come in different sizes and compartment layouts. Before you buy or thrift one, measure:
- Interior width and height of the cabinet (or the wall space next to it)
- Depth clearance so the door still closes
- Mounting options (can you screw into wood? do you need adhesive hooks?)
Pro tip: If your cabinet is shallow, consider using the printer’s tray as a nearby wall organizer instead of inside the cabinet. You still get the compartment magicwithout the door refusing to close like a moody teenager.
Step 6: Clean and prep the tray (especially if it’s vintage)
Vintage trays are charming… and sometimes dusty. Clean it thoroughly so you’re not storing cotton swabs in a compartment that used to hold century-old printing debris.
- Vacuum compartments with a brush attachment.
- Wipe with a slightly damp cloth and mild soap; avoid soaking the wood.
- Let it dry completely.
- If you want extra protection, use a clear sealant appropriate for indoor wood and let it cure fully before loading items.
Step 7: Plan a “compartment map” that matches real life
Here’s the trick people skip: don’t organize for the person you wish you were. Organize for the person who lives here. If you always reach for allergy meds and floss, those belong in prime real estate (easy-to-see, easy-to-grab compartments).
| Zone | What goes there | Why it works |
|---|---|---|
| Top row | Daily small items (lip balm, floss picks, contact case) | Quick visibility, quick grab |
| Center | First aid + “common fixes” (bandages, antiseptic, blister pads) | Easy access during minor emergencies |
| One corner | Cold/allergy season (kept in original boxes/bottles) | Contained, grouped, not scattered |
| Door area | Tools (tweezers, scissors, nail clippers) | Stops tools from migrating into oblivion |
| Backstock bin | Extras (refills, unopened duplicates) | Out of sight, still organized |
Step 8: Line compartments (optional, but surprisingly satisfying)
If you want to reduce rattling, add grip, and make cleanup easier, line the compartments. Great options:
- Non-adhesive shelf liner cut into squares
- Felt squares for a softer look
- Thin cork sheets for a “tiny apothecary drawer” vibe
Step 9: Install it: inside the cabinet or as a wall sidekick
Installation depends on your cabinet and comfort level:
- Inside cabinet: Place the tray on a shelf (if it fits), or mount it securely to the cabinet back (only if you can anchor safely).
- Wall next to cabinet: Mount at eye level for daily items, and use the cabinet for taller bottles and backstock.
If you’re mounting anything, prioritize stability. The goal is “organized,” not “surprise avalanche during teeth brushing.”
Step 10: Load items intentionally (and keep meds in original containers)
Use the compartments for small, category-friendly items. For medications, keep them in their original containers/packaging so dosing instructions and safety info stay with the product. If a compartment is too small for a bottle, that’s okayuse it for related items (like a dosing cup, thermometer covers, or travel tissues), and store the bottle on the shelf directly below.
How to make it look clean (not cluttered)
Use “visual quiet” rules
- One category per compartment (no mixed junk drawers in miniature form)
- Limit duplicates in the trayextras go in backstock
- Label lightly (small labels beat giant ones that scream “I HAVE A SYSTEM”)
Try a simple color-coding trick
You don’t need a rainbow. But you can use subtle cues: blue label dots for first aid, green for allergy, yellow for daily, etc. It helps everyone in the house put things back where they belongbecause the cabinet can’t maintain itself (yet).
Maintenance that doesn’t require a life coach
The 60-second nightly reset
Once a day (or a few times a week), do a quick scan: return items to their compartments, toss obvious trash, wipe any drips. This prevents the slow slide back into chaos.
The quarterly “expiration sweep”
Every three months, check dates quickly. If you want a simple schedule, tie it to something memorable: daylight saving time, the start of a season, or whenever you suddenly remember you own a lint roller.
The once-or-twice-a-year deep purge
Plan a bigger cleanout around community take-back events or whenever you’re already in a “fresh start” mood. You’ll prevent buildup and keep the cabinet from becoming a time capsule.
Troubleshooting: common printer’s tray redo problems
“The cabinet door won’t close.”
Your tray is too deep, or you mounted it where it bumps the door shelves. Move the tray to a wall beside the cabinet, or reserve the inside-cabinet tray for ultra-flat items (like blister packs, travel sachets, or slim tools).
“My products don’t fit the compartments.”
Perfect. That’s your clue to store bulky bottles on shelves and use the tray for small items that usually get lost. Trays excel at corralling the tiny stuff.
“It looks busy, not organized.”
Remove backstock from the tray, reduce duplicates, and group by function. Also: stop storing items you don’t actually use. Your cabinet isn’t a storage unit; it’s a support system.
FAQ
Is a printer’s tray sanitary enough for bathroom storage?
Yesif you clean it thoroughly and let it dry fully. Lining compartments also helps keep things tidy and easy to wipe down.
Should I decant medications into smaller containers?
Generally, keep medications in their original packaging so directions, warnings, and expiration dates stay attached. Use the tray to organize around the original containers (or store the original bottles on the shelf and use tray compartments for related items and categories).
What if I don’t have a “real” medicine cabinet?
No problem. This works just as well for an under-sink cabinet, linen closet shelf, or a wall organizer outside the bathroom. The tray is the organizerwhere it lives is flexible.
Real-life experiences: what it’s actually like to do this redo
Let’s talk about the part no one puts in the perfect “after” photo: the moment you empty your cabinet and realize you own six nearly-identical tiny lotions, three half-used rolls of medical tape, and a sunscreen thatbased on the label design aloneclearly survived at least two phone upgrades.
The first experience most people have is a strange mix of victory and betrayal. Victory because you’re finally taking control; betrayal because your cabinet has been quietly collecting duplicates like it’s training for a competitive sport. You’ll find things you forgot you bought, and things you remember buying but can’t explain (why do we have two travel sewing kits in here?). This is normal. Cabinets are excellent at holding secrets.
The second experience is the “category argument” you have with yourself: Is floss a daily item, or is it “dental,” or is it “the thing I only think about when I’m already in bed”? This is where the printer’s tray helps, because it forces clarity. When you have a compartment that fits floss picks perfectly, you stop debating philosophy and start making decisions. The tray doesn’t care about your inner monologue. It wants things in squares.
Then comes the most satisfying part: the layout click. You’ll place bandages in one compartment, antiseptic wipes in another, and suddenly your cabinet feels like it has a plan. It’s the same weirdly calming energy as organizing a junk drawerexcept this time, you’re not going to get stabbed by a rogue pen. If you live with other people, this is also when you discover what everyone actually uses. One person reaches for allergy meds all the time, another is a “lip balm in every pocket” type, and someone (possibly you) is hoarding hair ties like they’re currency.
The next real-life lesson: “pretty” doesn’t matter as much as “findable.” If you make the tray look Instagram-perfect but you can’t grab what you need quickly, the system won’t last. The best setups feel almost boringbecause boring means predictable. Predictable means you can find the thermometer in ten seconds. And that’s the whole point.
Finally, the long-term experience: maintenance becomes easier than you expect. When every item has a home, putting things back stops being a chore and starts being automatic. Most people notice the biggest payoff about two weeks later, when they’re in a rush and don’t have to dig for anything. The cabinet stays calmer because the tray acts like a physical boundaryonce the compartments are full, you naturally stop cramming in extras. It’s a built-in “we don’t need another bottle of cough syrup” reminder, which is honestly the most supportive thing your bathroom has ever done for you.
Conclusion
A medicine cabinet redo doesn’t have to be expensive, complicated, or dependent on a matching bin set that costs more than your electric bill. With a printer’s tray, you get instant structure: small-item control, clear categories, and a setup that looks intentional without trying too hard. Start with a cleanout, plan your compartments around real habits, and keep maintenance simple. Your future self (the one hunting for a bandage at midnight) will be extremely grateful.