Table of Contents >> Show >> Hide
- Why Make a Reusable Kitchen Sponge?
- What Materials Work Best?
- How to Make a Reusable Kitchen Sponge
- How to Use It Without Wrecking Your Cookware
- How to Keep a Reusable Sponge Clean
- What Makes This More Eco-Friendly?
- Common Mistakes to Avoid
- Why This DIY Is Worth It
- Real-Life Experiences Using a Reusable Kitchen Sponge
If your kitchen sponge has ever smelled like it has seen things, you are not alone. Traditional sponges are cheap, convenient, and about as glamorous as a wet sock. They also wear out fast, get funky faster, and turn into one more throwaway item you keep buying on autopilot. The good news? You can make a reusable kitchen sponge that scrubs, wipes, rinses, and survives more than one dramatic encounter with baked-on cheese.
This DIY reusable kitchen sponge is part sewing project, part eco-friendly upgrade, and part tiny rebellion against single-use kitchen clutter. It is practical, customizable, washable, and surprisingly satisfying to use. Even better, you can make it with repurposed fabric scraps, old towels, and mesh you may already have around the house. Your sink gets a useful scrubber, your trash can gets less action, and your kitchen gets a little personality boost. That is what we call a solid domestic plot twist.
Why Make a Reusable Kitchen Sponge?
The biggest appeal is simple: reusability. Instead of tossing synthetic sponges every week or two, you can make a washable scrubber that lasts longer and cuts back on waste. If you sew from scraps or upcycle old materials, the project gets even greener. A worn hand towel, a cotton shirt, leftover terry cloth, or a piece of mesh produce bag can all become part of the finished sponge.
There is also the hygiene factor. Regular kitchen sponges stay damp, trap food particles, and can get gross in a hurry. A reusable version is not magic, but it is easier to treat like a washable cleaning tool instead of a mysterious science experiment living by the sink. If you make several at once, you can rotate them through the wash and always have a clean one ready.
And yes, looks matter. Store-bought sponges are not exactly bringing style to the room. A handmade scrubber can match your kitchen, use cheerful prints, or simply avoid that depressing neon yellow-and-green combo that screams, “I clean casserole pans and know too much.”
What Materials Work Best?
The best reusable kitchen sponge combines three jobs: absorbent, scrubby, and sturdy. That means you want layers that each bring something useful to the party.
1. Cotton fabric for the outer layer
Cotton is breathable, washable, and easy to sew. It also lets you use fabric scraps in a smart way. Quilting cotton works well for one side of the sponge, especially if you want something pretty and durable.
2. Terry cloth for absorbency
Terry cloth is the MVP when it comes to soaking up water. You can cut up an old washcloth, hand towel, or bath towel and give it a second life. That instantly makes the project more affordable and more sustainable.
3. Mesh for scrubbing power
A piece of plastic-free mesh is ideal if you have it, but many people also repurpose clean produce bags or lightweight scrubby netting. The goal is a textured layer that helps loosen food without shredding your pans. For delicate cookware, make a softer version without the roughest mesh and reserve the scrubby one for sinks, baking dishes, and stovetop splatters.
4. Inner filling for sponge-like structure
Some DIY versions use foam or batting to mimic a classic sponge feel. For a lower-waste alternative, try folded towel scraps, cotton batting, or a couple of extra terry layers instead. The sponge may feel a little flatter, but it will still clean beautifully and avoid the “plastic pillow in your dishwater” vibe.
How to Make a Reusable Kitchen Sponge
This project is beginner-friendly. If you can sew a straight-ish line and accept that perfection is overrated, you are fully qualified.
Supplies
- 1 piece cotton fabric, about 5 x 7 inches
- 1 piece terry cloth, about 5 x 7 inches
- 1 piece mesh, about 5 x 7 inches
- 1 smaller piece of inner filling, about 3 x 5 inches
- Scissors
- Pins or clips
- Sewing machine or needle and thread
Step 1: Cut your layers
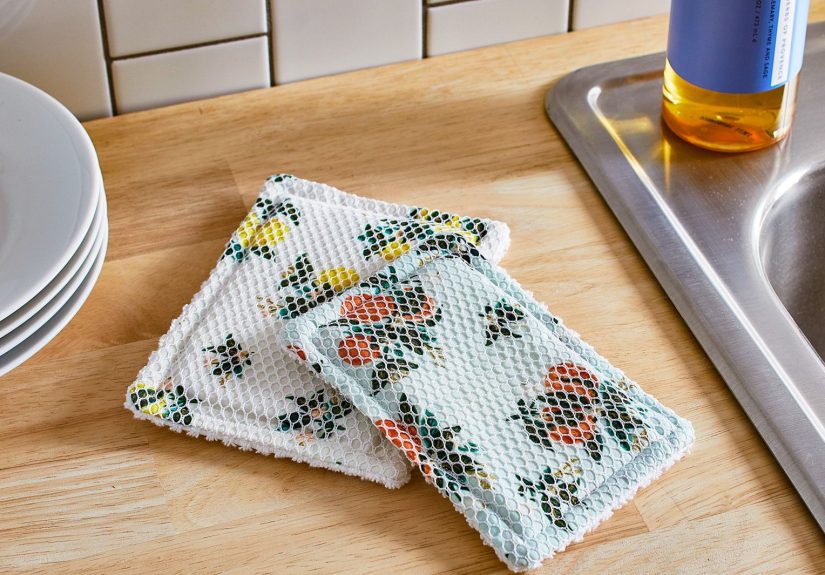
Cut the cotton, terry cloth, and mesh to the same size. Cut your filling slightly smaller so the edges do not get too bulky. If your mesh is scratchy enough to frighten your nonstick skillet, save it for heavy-duty cleaning and make a second, gentler version for dishes.
Step 2: Stack the fabric
Place the cotton and terry cloth with right sides together, with the mesh layered against one side. Think of it like building a tiny sandwich that can tackle lasagna residue. Pin around the edges.
Step 3: Sew around the perimeter
Sew around the edges with a half-inch seam allowance, leaving a small opening on one side. That gap is your doorway for turning the sponge right-side out. Trim the corners to reduce bulk, but do not clip through your stitches unless you enjoy unnecessary drama.
Step 4: Turn and fill
Turn the sponge right-side out through the opening. Push out the corners gently. Insert your inner filling and spread it evenly so the sponge feels plump but not overstuffed.
Step 5: Close and topstitch
Fold the raw edges of the opening inward and stitch it closed. Then topstitch around the entire sponge. This makes it sturdier, flatter, and better able to hold up through repeated use and washing.
That is it. You now have a reusable kitchen sponge that looks charming, works hard, and does not require a corporate logo to feel official.
How to Use It Without Wrecking Your Cookware
A reusable scrubber works best when you match it to the task. The terry side is great for wiping counters, soaking up spills, and washing glasses or plates. The mesh side is better for scrubbing dried sauce, sticky stovetop messes, or sink residue. For nonstick pans, always test gently first. If the surface is delicate, switch to the soft side or use a version with no aggressive scrub layer.
You can also make a small set with different purposes. For example, one sponge for dishes, one for counters, and one for grimier cleaning jobs. Keeping them separate is smart for sanitation and stops you from using the same scrubber on the dinner plates and the raw-chicken cutting board. Nobody needs that kind of kitchen suspense.
How to Keep a Reusable Sponge Clean
This is the make-or-break part. A reusable sponge is only eco-friendly if you actually reuse it, and that only happens when it stays clean enough that you do not want to launch it into the sun.
Rinse and wring after every use
After washing dishes or wiping the sink, rinse the sponge thoroughly to remove soap and food bits. Then wring it out well. Leaving it soaked is basically sending bacteria a handwritten invitation.
Let it dry fully
Hang it over the faucet, drape it on a drying rack, or set it somewhere with airflow. Faster drying means fewer odors and less buildup. A reusable sponge should dry between uses as often as possible.
Wash it often
The safest routine is to wash reusable sponges and dishcloth-style scrubbers regularly in hot water. If your materials are machine washable, toss them in with towels or cleaning cloths. A few handmade sponges can live as a rotation set so one is in use, one is drying, and one is in the wash.
Be careful with heat sanitizing
Some conventional sponge-cleaning advice includes microwaving or dishwashing, but a handmade sponge is different because the exact materials vary. If your scrubber includes synthetic mesh, metallic fibers, or unknown scraps, do not microwave it. Machine washing and full drying are usually the simplest default. When in doubt, choose the method that is safest for the fabric, not the bravest for your appliance.
Know when to retire it
If the sponge smells bad after washing, starts falling apart, or keeps trapping grime, it is time to replace or repurpose it. One nice thing about a handmade version is that replacement does not feel wasteful when it came from leftover fabric in the first place.
What Makes This More Eco-Friendly?
The eco-friendly part is not just that the sponge is reusable. It is also about making smarter material choices and extending the life of what you already own. Repurposed towels, fabric remnants, and leftover sewing supplies all reduce the need to buy something brand-new. That fits beautifully with a lower-waste kitchen routine.
You can push that even further by making a batch at once, storing them in a drawer, and rotating them the same way you rotate dish towels. That cuts down on impulse buys, packaging waste, and emergency grocery-store sponge purchases that always happen when you are already tired and just wanted pasta.
Reusable kitchen tools also encourage better habits overall. Once you start washing and rotating your scrubbers, you tend to think more intentionally about what you clean with, how often you replace it, and what you throw away. That mindset shift is small but powerful.
Common Mistakes to Avoid
Using materials that never dry
If your sponge stays soggy for ages, it will not be pleasant to use. Balance absorbency with airflow. Too much dense filling can make the sponge bulky and slow to dry.
Making it too scratchy
Abrasive layers are helpful, but they are not universal. One scrubber should not be expected to clean cast iron, glassware, and a nonstick skillet with equal diplomacy. Make more than one style if needed.
Skipping reinforcement stitching
Topstitching around the edges helps the sponge hold its shape in the wash. Without that extra pass, the layers may shift or fray faster.
Treating it like a forever object
Reusable does not mean immortal. It means longer-lasting, washable, and less disposable. A well-made sponge can serve you far better than a cheap throwaway one, but it still deserves retirement when it is worn out.
Why This DIY Is Worth It
Some DIY projects save money. Some save waste. Some make your home feel more personal. This one manages to do all three while taking up very little time or skill. It is useful right away, easy to customize, and practical enough that you will not have to explain it to anyone with a 14-minute speech about your lifestyle choices.
A reusable kitchen sponge is one of those rare home projects that feels instantly rewarding. You make it, use it, wash it, and realize your sink setup got a little smarter. It is a tiny change, but those are often the ones that stick. And unlike a trendy gadget that ends up exiled to the junk drawer, this one actually earns its keep.
Real-Life Experiences Using a Reusable Kitchen Sponge
The first time you use a handmade reusable sponge, there is a decent chance you will be slightly suspicious of it. It looks too cute to handle a greasy sauté pan. It may even look like something that belongs in a sewing basket rather than next to a bottle of dish soap. Then you scrub a casserole dish, wipe down the sink, rinse it out, and realize the little thing means business.
One of the biggest differences is texture. A store-bought sponge often feels squishy and disposable, while a reusable version feels more substantial. It has a little backbone. That sounds ridiculous until you are cleaning peanut butter off a knife and appreciate that the sponge is not folding in on itself like a damp napkin in a crisis. The terry side tends to feel familiar and soft, while the scrubby side gives you enough friction to tackle dried food without going full medieval on your cookware.
Another real-life perk is that it changes your rhythm in the kitchen. Because you know the sponge can be washed, you are more likely to rinse it properly, wring it out, and hang it to dry. That simple routine makes the whole sink area feel less grim. A handmade sponge also tends to make people more aware of keeping separate cleaning tools for separate jobs. Once you have a cute floral scrubber for dishes and a striped one for counters, you stop pretending one soggy rectangle should do everything. That is progress.
There is also the surprising satisfaction of making multiples. A single reusable sponge is handy, but a small stack is where the system really shines. You can keep one by the sink, toss one in the wash, and have a backup ready. It is the same satisfaction as having fresh dish towels folded in a drawer, except this time you made the thing yourself and get to feel mildly triumphant every time you use it.
In everyday use, the biggest lesson is that drying matters more than almost anything else. A reusable sponge that gets rinsed and left somewhere airy stays fresher and nicer to use. One that gets crumpled in the bottom of the sink will still become a tiny tragedy. In other words, the sponge is not the villain. The swampy sink corner is the villain.
People who try this project often find that the sponge becomes less of a novelty and more of a staple. It is useful for dishes, quick counter wipes, sink cleaning, and even small spills on the stovetop. Some versions get designated for tougher messes, while softer ones become favorites for glasses and everyday dishes. Over time, that kind of simple system feels easier than relying on disposable sponges that collapse just when you need them most.
There is also something undeniably pleasant about using a kitchen tool that does not look generic. Patterns and colors sound like a small detail, but they make a functional item feel intentional. A handmade scrubber can match your kitchen, coordinate with your towels, or just add one cheerful pop of color near the sink. It is hard to be angry at dish duty when your sponge looks like it has a personality.
Perhaps the best experience of all is realizing this is not an all-or-nothing eco challenge. You do not have to become the ruler of a zero-waste kingdom by Tuesday afternoon. You can simply swap one everyday item for a reusable version, see how it works in your home, and build from there. That is what makes this DIY so effective. It is practical enough for real life, flexible enough for different cleaning needs, and simple enough that it does not feel like homework disguised as sustainability.
So if you are curious, make one. Test it on the dishes. Wash it. Adjust the design. Make three more. The experience is less about sewing a perfect sponge and more about creating a kitchen tool that fits your habits better than the disposable version ever did. And once you get used to that, going back to the old soggy sponge brick feels a little like willingly choosing dial-up internet.