Table of Contents >> Show >> Hide
- First: Do You Actually Need to Defrost Your Refrigerator?
- The Best Method: Slow, Safe, and (Mostly) Mess-Free
- Step-by-Step: How to Defrost a Refrigerator (Best Practice)
- Step 1: Plan your timing (and your snacks)
- Step 2: Move food to a safe cold zone
- Step 3: Power down properly
- Step 4: Protect floors and create a drip strategy
- Step 5: Let the ice melt (the safest core method)
- Step 6: Speed it up safely (optional, choose your level)
- Step 7: Remove loosened ice gently (only when it’s ready)
- Step 8: Clean the interior while it’s empty
- Step 9: Dry thoroughly
- Step 10: Restart and re-load the right way
- How Long Does Defrosting Take?
- Common Mistakes That Make Defrosting Harder (or Expensive)
- Prevent Frost from Coming Back
- Troubleshooting: When Frost Buildup Is a Symptom, Not Just a Nuisance
- Quick Example: A Safe “Saturday Morning Defrost” Game Plan
- Real-World Defrosting Stories & Lessons (The Extra )
- Conclusion
If your freezer looks like it’s auditioning to be a walk-in igloo, congratulations: you’ve discovered the most common
(and most annoying) form of refrigerator “maintenance” that nobody puts on their weekend plans. The good news is that
defrosting a refrigerator isn’t hard. The bad news is that it requires patience, towels, and the emotional strength
to temporarily live without easy access to ice cream.
This guide walks you through the best method to defrost a refrigerator safelythe kind that won’t
damage your appliance, won’t turn your kitchen into a slip-and-slide, and won’t gamble with food safety. We’ll also
cover smart shortcuts (safe ones), common mistakes, and how to prevent frost from staging a comeback tour.
First: Do You Actually Need to Defrost Your Refrigerator?
Many modern refrigerators are “frost-free,” meaning they run automatic defrost cycles behind the scenes. But you may
still need to manually defrost in a few situations:
- You have a manual-defrost unit (common in some compact fridges, older models, and many chest/upright freezers).
- Frost buildup is thick enough to steal space, block drawers, or keep doors from closing.
- Cooling performance drops or the appliance runs nonstop (frost can reduce efficiency).
- You see abnormal ice patterns (like a solid ice sheet on the back wall), which may signal a door seal or defrost issue.
A practical rule of thumb: if frost is getting thick enough that you’re chiseling your peas out like an archaeologist,
it’s time. Many manufacturers recommend defrosting once frost reaches roughly ¼ inch to ½ inch in
manual-defrost freezers, or whenever it interferes with normal use.
The Best Method: Slow, Safe, and (Mostly) Mess-Free
The “best” way to defrost is the one that protects the appliance and your food. In most cases, that means:
unplug, open doors, let ice melt naturally, manage water, clean, dry, restart.
What You’ll Need
- Towels (more than you think; then add two more)
- A shallow pan or tray (for drips)
- A cooler + ice or frozen gel packs (for food)
- A soft cloth or sponge
- Mild dish soap or a baking-soda-and-water mix
- A plastic scraper or spatula (optional; only for loosened slush)
- A small fan (optional, safe speed-up)
- A thermometer (optional but excellent for food safety)
Step-by-Step: How to Defrost a Refrigerator (Best Practice)
Step 1: Plan your timing (and your snacks)
Defrosting can take anywhere from a couple hours to overnight depending on frost thickness, room temperature, and
whether you use safe accelerators like a fan. Pick a time when you can leave the doors open without chaos (i.e., not
during dinner rush or when toddlers are roaming like tiny chaos scientists).
Step 2: Move food to a safe cold zone
Transfer perishable items to a cooler with ice or gel packs, or another working refrigerator/freezer. If you’re
defrosting just the freezer compartment, keep refrigerated items cold and minimize time at room temp.
Food safety note: Cold foods should be kept at 40°F or below. If you’re unsure how
warm things got, use a thermometer and follow conservative “when in doubt, throw it out” rules for risky perishables
like meat, poultry, seafood, dairy, and leftovers.
Step 3: Power down properly
Turn the temperature control to “Off” (if your model has it) and unplug the refrigerator. This is
important for safety and helps prevent electrical issues when water starts melting.
Step 4: Protect floors and create a drip strategy
Open the doors and place towels around the base of the appliance. If your unit has a drain plug or drain hose (common
in some freezers), set it up with a pan or bucket. If not, towels and shallow pans are your best friends.
Step 5: Let the ice melt (the safest core method)
Leave doors open and let room air do the work. This is the least risky method because you’re not forcing tools,
heat, or sharp edges near delicate interior panels or cooling lines.
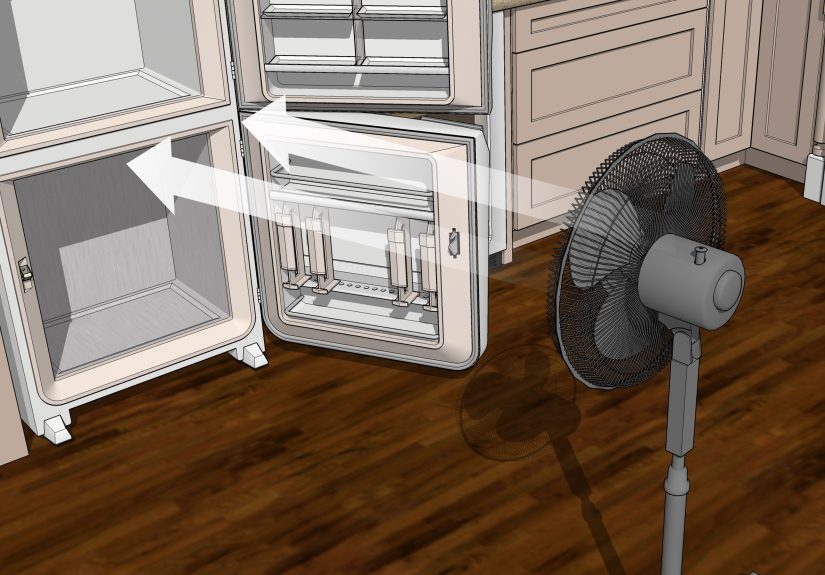
Step 6: Speed it up safely (optional, choose your level)
If you want to accelerate melting without doing anything sketchy, use one or more of these:
-
A fan: Point a small fan toward the open compartment to circulate warmer room air. This can
noticeably reduce defrost time. -
A bowl or pan of hot water: Place it on a towel inside the freezer compartment (or on a stable
surface) and close the door for 10–15 minutes at a time, then refresh as needed. The steam helps loosen ice. -
Warm, damp cloth method: For thin frost layers, pressing a warm cloth against the ice can help it
release fasterespecially around shelves and gasket edges.
What not to do: Don’t chip at ice with knives, screwdrivers, or anything metal and sharp. You can
puncture interior panels or hit cooling componentsturning “quick defrost” into “surprise appliance replacement.”
Step 7: Remove loosened ice gently (only when it’s ready)
Once ice becomes slushy or starts separating from surfaces, you can gently lift it off with a plastic scraper or
spatula. If it resists, it’s not ready. Let it melt more rather than forcing it.
Step 8: Clean the interior while it’s empty
With the ice gone, clean shelves, drawers, and interior surfaces using mild soap and warm water or a baking soda
solution (great for odors). Wipe down the door gasket toocrumbs and sticky spots can prevent a good seal, which
invites more frost later.
Step 9: Dry thoroughly
This part matters. Excess moisture can quickly refreeze and create instant frost. Use dry towels to remove water from
corners, drawers, and gasket folds. Let the compartment air-dry for a few minutes if possible.
Step 10: Restart and re-load the right way
Plug the unit back in and set the temperature controls to normal. Give it time to reach safe temps before fully
restockingespecially for meats and dairy. Keep the door closed as much as possible during cooldown.
How Long Does Defrosting Take?
Typical timelines vary, but here’s a realistic range:
- Light frost: 1–3 hours
- Moderate buildup: 3–6 hours
- Heavy ice sheets: 6–12+ hours (often overnight)
Using a fan and periodic hot-water bowls can cut time significantly, but the thickness and how cold-soaked the ice is
will always win the “I do what I want” contest.
Common Mistakes That Make Defrosting Harder (or Expensive)
1) The “I’ll just chip it” mistake
Chipping with sharp tools is the fastest path to punctured panels and damaged components. Even if you don’t hit a
coolant line, you can crack plastic liners or tear insulationproblems that can cause long-term efficiency issues.
2) Overheating with high-heat devices
Some people use hair dryers. Some people also text while walking down stairs. Both can end badly. If you ever choose
to use a hair dryer, keep it far from pooled water, avoid extension cords, use low heat, and follow your
manufacturer’s guidance. In many households, the fan + hot water bowl combo is safer and plenty fast.
3) Ignoring food safety during the “fridge is off” window
If perishables warm above 40°F for too long, bacteria can multiply quickly. Use coolers with ice/gel packs and a
thermometer when possible, and don’t take risks with high-risk foods.
4) Skipping gasket cleaning and door-close checks
If the door doesn’t seal well, warm humid air enters and frost forms faster. A quick wipe-down and a visual check can
prevent repeat defrost sessions.
Prevent Frost from Coming Back
Frost is basically moisture plus time. Reduce moisture entry and you reduce frost.
Quick prevention checklist
- Check the door seal: If it’s torn, warped, or grimy, it may leak air. Clean it and replace if needed.
- Don’t “hang out” with the door open: Every extra minute invites humid air inside.
- Let hot foods cool before storing: Steam becomes frost later.
- Keep vents clear: Overpacked compartments can disrupt airflow and cause uneven cooling.
- Level the appliance: A slightly off-level fridge can affect door closure and drainage.
- Watch for recurring ice patterns: Fast re-freezing may indicate a drain or defrost-system issue.
Troubleshooting: When Frost Buildup Is a Symptom, Not Just a Nuisance
If you defrost and the ice returns quickly (like, “I just did this last week” quickly), consider these common causes:
Door left ajar or gasket leak
This is the #1 culprit. A slightly open freezer door can pull in humid air for hours, producing dramatic frost
overnight. Check for bins blocking closure and test the seal.
Blocked or frozen defrost drain
Some refrigerators route defrost water into a drain system. If it’s blocked by ice or debris, water can refreeze in
the freezer compartment and create recurring ice at the bottom or back wall.
Defrost system failure in a frost-free unit
If your refrigerator is designed to self-defrost but you’re seeing thick, persistent frost, a component like a heater,
sensor, or control may not be doing its job. At that point, manual defrost may be a temporary fixbut service might be
the real solution.
Quick Example: A Safe “Saturday Morning Defrost” Game Plan
- 8:00 AM: Move perishables into a cooler with ice packs.
- 8:10 AM: Unplug fridge, open doors, lay towels, set drip pans.
- 8:15 AM: Set up a fan blowing into the freezer compartment.
- 8:30 AM: Add a hot-water bowl for 10–15 minutes, then refresh if needed.
- 10:30 AM: Remove loosened slush gently, wipe water, repeat hot water bowl once if needed.
- 11:00 AM: Clean interior and gasket; dry thoroughly.
- 11:30 AM: Plug in, set temps, keep doors closed.
- 1:00 PM: Restock once temps stabilize (use a thermometer if you have one).
Real-World Defrosting Stories & Lessons (The Extra )
People rarely talk about defrosting a refrigerator until they’re standing in front of a freezer drawer that won’t
open, whispering “why” into the icy void. Based on common homeowner and repair-tech experiences, the same few themes
pop up again and againusually right after someone says, “This will only take a minute.”
Story #1: The Great Frozen Pea Avalanche. A classic: you tug the freezer drawer, it finally breaks
free, and a glacier of frost releases an avalanche of loosely stacked frozen vegetables. The lesson isn’t “buy fewer
peas” (though that’s an option). The lesson is: when frost starts narrowing the rails or bulging along the sides,
defrost sooner. Waiting until movement is blocked guarantees a mess and usually adds hours because thick ice is slow
ice.
Story #2: The Towel Shortage That Nobody Predicted. Most defrost sessions don’t fail because of ice.
They fail because of water. Meltwater sneaks under the fridge, creeps along grout lines, and somehow ends up in a
place water should not belike right where you’re standing in socks. People who’ve done this once often become
evangelical about using a “towel moat” and staging extra towels nearby. A shallow pan helps, but towels are what
prevent the kitchen from turning into an accidental skating rink.
Story #3: The “I’ll just chip it” regret. Many DIYers have learned (sometimes the expensive way) that
ice doesn’t care how late you are for brunch. One sharp jab can crack an interior liner or damage something hidden
behind a panel. The safer pattern people recommend after they’ve lived through the mistake: speed up melting with a
fan and hot water bowls, then only remove ice when it’s already separating. Defrosting is a waiting game, not a duel.
Story #4: The Mystery Frost That Keeps Returning. A surprisingly common experience: you defrost, you
feel victorious, and thentwo weeks laterthe frost is back, thick in the same spot. Often the “plot twist” is a door
that’s not sealing due to a sticky gasket, a bin preventing closure, or a habit of holding the freezer door open
while “just looking.” People who solve it usually do two things: (1) clean the gasket and check for gaps, and (2)
adjust loading so nothing blocks the door. If frost still returns quickly, that’s when many owners discover drainage
issues or a defrost-system problem that needs professional help.
Story #5: The Food Safety Wake-Up Call. Some folks learn about the 40°F rule only after a long
defrost turns into a long day. The most practical takeaway from real kitchens: keep a cheap thermometer around (even
a basic fridge/freezer one), and pack a cooler like you mean itice packs on the bottom and top, perishable items in
the middle, and the lid closed. People who do this once often say it makes defrosting feel less stressful and more
like a controlled operation instead of a race against time.
The moral of these very normal, very human stories is simple: the best defrost method isn’t heroicit’s prepared.
A little planning, a lot of towels, and a strict “no stabbing the ice” policy go a long way.
Conclusion
The best method to defrost a refrigerator is also the least dramatic: unplug, empty, protect your
floors, let ice melt naturally, and use safe helpers like a fan or hot-water bowls if you want to speed things up.
Avoid sharp tools, keep food at safe temperatures, dry everything thoroughly, and restart patiently so the appliance
can return to normal cooling without instantly re-freezing leftover moisture.
Do it this way and you’ll get a fridge that runs better, holds more, and doesn’t require you to physically wrestle
a freezer drawer ever againwhich, honestly, is the real American Dream.


