Table of Contents >> Show >> Hide
- Before You Tap In: SkyTrain 101 (So You Don’t Feel Like a Lost Extra in a Sci-Fi Movie)
- The 13 Steps to Riding Vancouver’s SkyTrain
- Step 1: Pick Your Destination (Then Find the Closest Station)
- Step 2: Confirm Which Line You Need (Expo, Millennium, or Canada)
- Step 3: Check Service Hours (Especially If You’re Out Late)
- Step 4: Decide How You’ll Pay (Compass Card, Ticket, DayPass, or Contactless Tap)
- Step 5: Buy or Load Your Fare Product (Before You Meet the Fare Gate Boss)
- Step 6: Enter the Station and Tap In at the Fare Gate
- Step 7: Follow Signs to Your Platform (Then Double-Check Direction)
- Step 8: Wait Like a Pro (Doors Clear, Let People Off, No Backpack Bodychecks)
- Step 9: Board, Ride, and Watch the Stops
- Step 10: Transfer If Needed (It’s Normal, Not a Plot Twist)
- Step 11: Tap Out When You Exit (SeriouslyThis Is Where People Get Burned)
- Step 12: Understand Zones, Timing, and the Airport Add-On (So You Don’t Pay “Surprise Math”)
- Step 13: Ride Like a Local (Accessibility, Bikes, Safety, and Etiquette)
- Fares, Zones, and Transfers (Plain English + Examples)
- Proof of Payment, Fare Checks, and How Not to Accidentally Donate $173
- Common SkyTrain Mistakes (and How to Avoid Them)
- Accessibility, Luggage, Strollers, and Bikes
- Mini Itineraries: SkyTrain Trips Visitors Actually Take
- Extra Section: of Real-World “SkyTrain Moments” (What Riders Notice)
- Wrap-Up: Your SkyTrain Game Plan
- SEO Tags
Vancouver’s SkyTrain is the city’s “blink-and-you’re-there” rapid transit systemfast, clean, frequent, and
pleasantly low-drama for a major metro. It’s also the rare subway where you can enjoy skyline and mountain
cameos between stations (and then immediately dive into a tunnel like nothing happenedbecause Vancouver
loves surprises).
This guide walks you through riding the SkyTrain in 13 clear steps, with the stuff tourists actually need:
how to pay (Compass Card vs. contactless tap), how zones work, how the airport add-on fare behaves, what
to do at fare gates, and how to avoid the classic “I tapped in… now what?” stare.
Before You Tap In: SkyTrain 101 (So You Don’t Feel Like a Lost Extra in a Sci-Fi Movie)
SkyTrain serves Metro Vancouver with three main lines you’ll hear about constantly: the Expo Line, the
Millennium Line, and the Canada Line. Downtown hubs like Waterfront connect you to other transit options,
and the Canada Line is the one you’ll care about most if you’re coming from Vancouver International Airport
(YVR). Trains run early to late, and service is frequentmeaning you usually don’t need to plan your day
around a single perfect departure time.
The 13 Steps to Riding Vancouver’s SkyTrain
-
Step 1: Pick Your Destination (Then Find the Closest Station)
Start with where you’re going (a neighborhood, attraction, hotel, or restaurant). Then identify the
nearest SkyTrain station. Downtown has multiple stations close together, so “closest” can change your
walking time from 18 minutes to 4 minuteswhich is the difference between “scenic stroll” and
“why did I wear these shoes?”If your destination isn’t near a station, SkyTrain still helps by getting you close, then you connect to
a bus or walk the last stretch. -
Step 2: Confirm Which Line You Need (Expo, Millennium, or Canada)
Match your start and end stations to a line. In broad strokes:
- Canada Line: Downtown ↔ Richmond ↔ YVR Airport.
- Expo Line: Downtown ↔ Burnaby/New Westminster ↔ Surrey.
- Millennium Line: East Vancouver ↔ Burnaby ↔ Port Moody/Coquitlam.
Some trips require a transfer (for example, Canada Line to Expo Line), usually at a major hub. Don’t
worrytransfers are normal, well-signed, and you don’t have to “re-buy” your ride if you’re transferring
correctly. -
Step 3: Check Service Hours (Especially If You’re Out Late)
SkyTrain doesn’t run 24/7. Most days, first trains are around early morning and last trains are around
late night, with variations by line, direction, and day of week. If you’re leaving a concert, game, or
an ambitious dinner that mysteriously turned into a second dinner, check the last-train time before you
commit. -
Step 4: Decide How You’ll Pay (Compass Card, Ticket, DayPass, or Contactless Tap)
Vancouver makes paying pretty flexible. Your main options are:
- Compass Card: Reloadable, great if you’ll ride multiple times or want the smoothest experience.
- Compass Ticket: A paper ticket you can buy at machines (handy for a short visit).
- DayPass: Unlimited transit for the day (useful if you’re hopping around a lot).
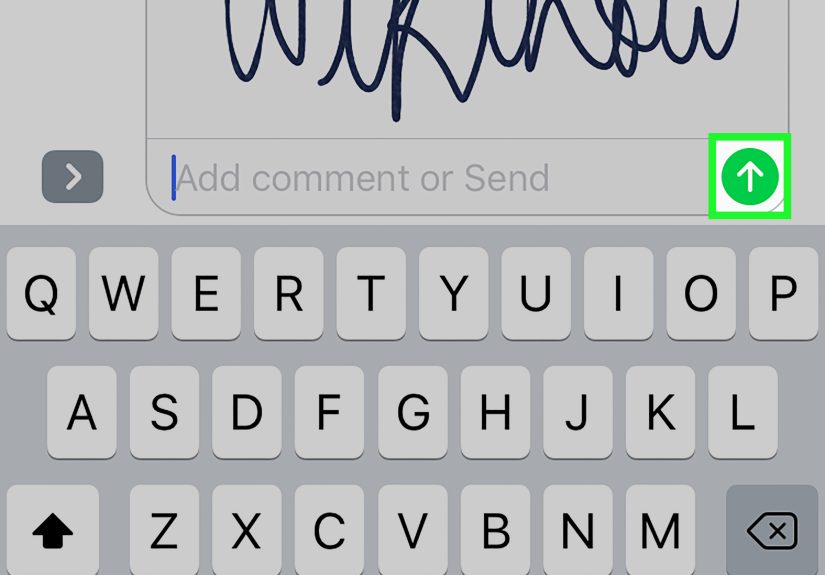
- Contactless tap: Tap a supported debit/credit card or mobile wallet at the gate (fastest for “I just need one ride”).
If you use contactless tap, remember: one person = one card/device. Don’t “share a tap,” unless you
enjoy awkward math and unhappy fare gates. -
Step 5: Buy or Load Your Fare Product (Before You Meet the Fare Gate Boss)
At most SkyTrain stations, you’ll find vending machines where you can buy Compass Tickets or add stored
value to a Compass Card. If you’re at the airport or major hubs, you’ll also have plenty of options.If you’re using contactless tap, you can often skip the vending machine line entirely and go
straight to the gatejust make sure your card/device is ready, unlocked if needed, and not buried inside
a wallet full of other tap-enabled cards. -
Step 6: Enter the Station and Tap In at the Fare Gate
On SkyTrain, SeaBus, and West Coast Express, you validate your fare by tapping as you enter and
as you exit through the fare gates. Think of it like checking in and checking outexcept the
hotel is a train system and the minibar is just a person eating chips too loudly.If you’re paying with contactless, tap your card/device (not your whole wallet) to avoid “card clash,”
where multiple cards try to pay at once. The gate does not appreciate chaos. -
Step 7: Follow Signs to Your Platform (Then Double-Check Direction)
Stations are well-labeled, but direction matters. Look for signs showing the terminal station in the
direction you’re traveling (for example, “Waterfront” vs. “Richmond-Brighouse” on the Canada Line).
If you’re unsure, check the platform screens or ask a station attendant or a fellow rider who looks
like they’ve been here before (translation: they’re holding a coffee with calm confidence). -
Step 8: Wait Like a Pro (Doors Clear, Let People Off, No Backpack Bodychecks)
Basic etiquette makes everything smoother:
- Stand back and let riders exit before you board.
- Keep doors clear and don’t “hover” in the doorway like it’s prime real estate.
- Take your backpack off if it’s crowded (your bag doesn’t need its own seat).
- On escalators, stand on the right, walk on the left. If you’re hauling luggage, use the elevator.
-
Step 9: Board, Ride, and Watch the Stops
When the train arrives, step in, move away from the doors, and hold onespecially if you’re standing.
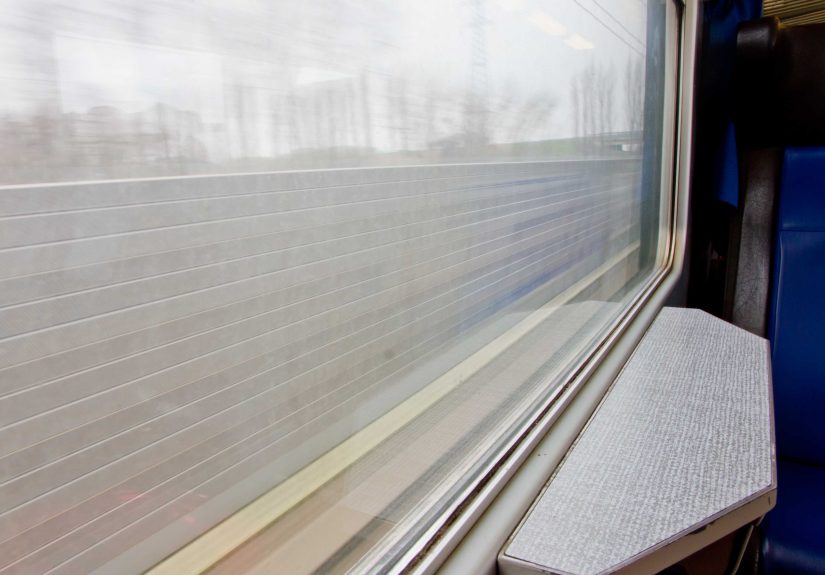
Stations are announced, and displays show upcoming stops. If you’re sightseeing, grab a window spot
for the elevated stretches; Vancouver’s “postcard views” sometimes appear when you least expect it. -
Step 10: Transfer If Needed (It’s Normal, Not a Plot Twist)
Transfers are part of the system’s design. Big connection points (like Waterfront or Commercial–Broadway)
are built for switching lines. Follow the overhead signs for your next line and direction.Your fare is time-based: you typically have a transfer window (often up to 90 minutes for most services),
so you can move between SkyTrain and buses without starting overprovided you’re within the valid period
and using the same payment method/card/device. -
Step 11: Tap Out When You Exit (SeriouslyThis Is Where People Get Burned)
When you reach your destination station, head to the fare gates and tap out. This is how the system
calculates the correct fare for SkyTrain trips. Forgetting to tap out can mean your fare defaults in a way
you probably won’t love.If you used contactless, tap out with the same card/device you tapped in with. Switching cards
mid-journey is like switching passports mid-flight: it creates questions nobody enjoys answering. -
Step 12: Understand Zones, Timing, and the Airport Add-On (So You Don’t Pay “Surprise Math”)
SkyTrain fares can depend on zones and time of day. In general, weekday daytime trips may charge based
on zones traveled, while evenings and weekends often simplify to a lower zone level. Transfers are time-based.If you start your trip at certain airport-area Canada Line stations, you may see an additional airport
add-on charge. Plan for it if you’re heading from YVR toward downtown or beyond. -
Step 13: Ride Like a Local (Accessibility, Bikes, Safety, and Etiquette)
SkyTrain works best when everyone follows a few shared rules:
- Use elevators if you have a stroller, suitcase, or mobility device.
- Offer priority seating to those who need it.
- Keep valuables secure and stay awareespecially late at night.
- Don’t hold doors; it can delay service (and occasionally cause bigger issues).
If you’re bringing a bike, know the restrictions on some lines during peak directions, and remember space
can be limited.
Fares, Zones, and Transfers (Plain English + Examples)
Vancouver’s transit fares can feel like a small puzzle at first, but it’s the friendly kindlike a crossword,
not a tax form.
Transfers: One Fare, Multiple Moves
If you pay with a Compass Card, Compass Ticket, or contactless tap, you typically get a transfer window
(commonly up to 90 minutes on most services) to move between SkyTrain, bus, and SeaBus as part of
a single fare. That means you can go “SkyTrain → bus → short walk to the donut shop” without buying another fare,
as long as you’re within the valid time and you tap consistently.
Zones: When They Matter (And When They Chill Out)
SkyTrain and SeaBus fares can depend on how many fare zones you travel through during certain weekday daytime
periods. During evenings (after a set time) and on weekends/holidays, fares are often simplified to a single-zone
level, which is great for visitors because the math stops fighting back.
Example A (weekday daytime): Downtown (Zone 1) to Metrotown (Zone 2) is typically a two-zone trip.
Example B (weekday daytime): Downtown to Surrey Central or King George is typically a three-zone trip.
Example C (evening/weekend): That same long ride may price like a one-zone tripbecause Vancouver is nice like that (after 6:30 p.m. and on weekends).
The Airport Add-On Fare (YVR AddFare): What It Is and When It Hits
If your trip starts at YVR Airport, Sea Island Centre, or Templeton Station on the Canada Line and
ends from Bridgeport onward, an extra $5 charge can apply on top of the regular fare. There’s no
AddFare for journeys to the airport. Some exemptions exist (for example, certain pass holders, and
travel among the three Sea Island stations).
Proof of Payment, Fare Checks, and How Not to Accidentally Donate $173
Inside fare gates and on transit, you’re in a fare-paid zone. You’re expected to have valid proof of payment
(tapped Compass product, validated ticket, or your contactless payment method used to enter). Fare enforcement
happens, and the fine for not having proof of payment can be $173 (and can increase if ignored).
If you used contactless tap and you’re asked for proof, be prepared to show the payment method used (often by
verifying the last four digits). Translation: don’t panic. Just don’t toss your card into the ocean right after
you tap in.
Common SkyTrain Mistakes (and How to Avoid Them)
- Forgetting to tap out: Always tap out at the exit gates so your fare is calculated correctly.
- Tapping your whole wallet or phone case: Card clash is real. Tap one card/device only.
- Holding doors open: It slows service and can trigger system issues. Let the doors do their job.
- Standing on the left side of the escalator: Vancouver escalators have a social contract: stand right, walk left.
- Assuming buses work the same way: Buses are tap-in only, and cash bus transfers don’t transfer to SkyTrain.
Accessibility, Luggage, Strollers, and Bikes
Accessibility
SkyTrain stations are equipped with elevators, and riders using wheelchairs or mobility devices should use
elevators (not escalators). If elevator access is essential for your route, it’s smart to check service alerts
before traveling.
Luggage and Strollers
Luggage is commonespecially on the Canada Line to/from YVR. Use elevators, keep aisles clear, and avoid blocking
doors. If the train is packed, take a deep breath: another one is usually coming soon.
Bikes
Bikes are allowed, but rules vary by line and time. Generally, the Canada Line is bike-friendly all day, while
Expo and Millennium can have peak-direction restrictions during weekday rush hours. Capacity is limited per car,
and operators may restrict boarding if it’s too crowded. Be flexible and prioritize safety over squeezing in.
Mini Itineraries: SkyTrain Trips Visitors Actually Take
YVR Airport to Downtown (Canada Line)
Follow signs for the Canada Line station at YVR, tap in, ride toward Waterfront, and get off at a downtown stop
that matches your destination (Vancouver City Centre, Yaletown–Roundhouse, or Waterfront). Budget roughly
25 minutes for the full ride from YVR to Waterfront, plus any airport add-on fare if applicable.
Downtown to Metrotown (Expo Line)
Metrotown is a classic shopping trip: quick, easy, and a good “first SkyTrain ride” because it’s straightforward.
Tap in downtown, ride eastbound, and tap out at Metrotown. Bonus: it’s a great test-run for zone fares if you’re
traveling during weekday daytime.
Waterfront to Lonsdale Quay (SkyTrain + SeaBus Combo)
Start at Waterfront, ride SkyTrain if needed to get there, then connect to the SeaBus for a scenic short ferry
ride to North Vancouver. It’s one of the most “wow, public transit can be fun?” moves in the region.
Extra Section: of Real-World “SkyTrain Moments” (What Riders Notice)
Here’s the stuff people don’t always tell youuntil you’ve already done it once and think, “Oh, that’s how it works.”
Consider this the unofficial emotional map of riding the SkyTrain for the first time.
Moment 1: The Fare Gate Confidence Test. The gate looks simple, but it has the energy of a security
checkpoint in a spy movie. You approach. You tap. There’s a tiny pause where your brain asks, “Did I do that right?”
Then the doors open and you feel like you just got accepted into a very exclusive club called “People Who Can Transit.”
Pro tip: have your card/device ready before you reach the gate. Fumbling at the front of the line is how you become
the main character in someone else’s commuter story.
Moment 2: The First Transfer, a.k.a. “Is This Still the Same Trip?” Transfers feel suspicious
to newcomers because in some cities, switching systems means paying again. In Vancouver, the network is designed
for it. You follow signs, walk a few minutes, and suddenly you’re on a different platform headed somewhere totally new.
The key mental unlock is this: your fare is time-based and your taps are the breadcrumb trail. Stay consistent with the
same card/device and you’ll usually be fine.
Moment 3: The View Sneaks Up On You. You’ll be riding along thinking it’s “just transit,” and then
the train rises above the street andboommountains, skyline, water, neighborhoods stacked like a postcard display.
It’s one of the reasons locals will casually recommend SkyTrain to visitors as if it’s no big deal, even though it kind of is.
If you’re traveling at daylight hours, grab a window seat on elevated stretches and watch the city shift from glossy downtown
to residential pockets and back again.
Moment 4: The Unspoken Etiquette Becomes Obvious Fast. The escalator rule (stand right, walk left) is
not optional in the court of public opinion. The door rule (let people off first) is sacred. The backpack rule (don’t swing
it into strangers) is a quiet act of peacekeeping. Follow these and you’ll blend in instantlyeven if you’re holding a map,
taking photos, and clearly delighted by how clean everything is.
Moment 5: The “Tap Out” Reality Check. When you exit, the gates remind you this isn’t a one-and-done system.
You tap out, the trip completes, and it feels satisfyingly officiallike finishing a level in a game. The people who forget
to tap out usually learn the hard way that fare systems have memories. Make “tap out” your new habit and you’ll save yourself
both money and unnecessary customer-service conversations.
Wrap-Up: Your SkyTrain Game Plan
If you remember only five things, make them these: pick the right line, tap in, follow direction signs, transfer calmly,
and tap out. Add a little etiquette (stand right, let riders off first, don’t hold doors), and you’ll ride like you belong.
Vancouver’s SkyTrain is built for visitors as much as commutersso once you do it once, it becomes the easiest part of your day.