Table of Contents >> Show >> Hide
- Quick Size Guide: Pick the Right Repair (So You Don’t Overthink It)
- Tools and Materials You’ll Actually Use
- Before You Patch: 5 Minutes of Prep That Saves 50 Minutes of Regret
- How to Patch Small Holes (Nail Holes, Tiny Screws, Little Dings)
- How to Patch Medium Holes (About 1/2 Inch to 6 Inches)
- How to Patch Large Holes (6 Inches and Up): Cut, Support, Replace
- Sanding Without Sadness (And Without Ruining the Paper)
- Texture Matching: The Step That Separates “Nice” From “Nailed It”
- Prime and Paint: How to Avoid the “Flash Spot”
- Common Mistakes (So You Can Skip Them)
- When to Call a Pro (No Shame, Just Strategy)
- Real-World Experiences: What Drywall Patching Usually Feels Like (500+ Words)
- Conclusion
Drywall is the unsung hero of your homequietly holding up paint, pictures, and the illusion that nobody ever
moved a couch through a doorway at a 37-degree angle. Then one day, boom: a hole appears. Maybe it’s a tiny
nail hole. Maybe it’s a doorknob-shaped crater. Either way, you can fix itand you don’t need a magical “wall
repair wand” (though if someone invents one, please tell me first).
This guide breaks drywall repair into the only categories that really matter: small, medium, and
large holes. You’ll learn which patching method to use, why some repairs look perfect until the sun hits
them, and how to sand without turning your room into a powdered donut.
Quick Size Guide: Pick the Right Repair (So You Don’t Overthink It)
| Damage Type | Typical Size | Best Fix | Why It Works |
|---|---|---|---|
| Nail, pin, tiny screw holes | Up to 1/8 in. | Spackle (or lightweight compound) | Fills fast, minimal shrink, easy sanding |
| Anchor holes, dents, small “oops” holes | 1/8–1/2 in. | Spackle or joint compound in thin layers | Builds flush without cracking |
| Doorknob holes, fist-sized holes | About 1/2–6 in. | Patch kit (mesh/aluminum) or California patch | Adds reinforcement so the repair doesn’t sag |
| Large holes / cutouts / broken drywall | 6 in. and up | Cut-out-and-replace with backing (wood strips or clips) | Restores structure and creates solid edges for finishing |
Tools and Materials You’ll Actually Use
You can patch drywall with a shocking number of tools, but here’s what consistently matters. (Translation:
this is the list that keeps you from making seven trips to the hardware store.)
Basics
- Putty knife (2–3 in.) for small holes
- Drywall knife (6 in. and/or 10–12 in.) for feathering compound on bigger patches
- Sanding sponge (120–220 grit) and/or sanding block
- Utility knife (sharp bladedull blades tear paper)
- Dust brush or vacuum + damp rag (dust is the enemy of smooth finishes)
- Primer (spot primer is usually enough) + matching paint
Depending on hole size
- Spackle for small repairs (fast dry, low shrink)
- Joint compound (premixed or setting-type powder) for reinforced and larger repairs
- Mesh tape or paper tape (mesh is beginner-friendly for patches; paper is great for seams)
- Self-adhesive patch (mesh/aluminum) for medium holes
- Scrap drywall (same thickness as existing wallcommonly 1/2 in.)
- Backer strips (thin wood) or drywall repair clips for big holes
- Drywall saw (jab saw) or oscillating tool for cutouts
Before You Patch: 5 Minutes of Prep That Saves 50 Minutes of Regret
1) Check what caused the hole
If the hole came from water damage (staining, softness, or crumbly gypsum), patching is only step two.
Step one is fixing the leak and removing any compromised material. Patching over wet or weak drywall is like
putting a Band-Aid on a soggy cracker.
2) Make the edges clean and solid
Peel away loose paper, knock off crumbly gypsum, and cut ragged edges into a cleaner shape. A neat edge gives your
patch something to gripand makes it easier to feather the repair so it disappears.
3) Remove dust
Vacuum, brush, or wipe the area. Compounds stick best to clean, dry surfaces (and paint looks better when it’s not
applied over invisible chalk).
4) Decide: spackle or joint compound?
A simple rule: spackle is for small repairs; joint compound is for bigger, reinforced work.
Spackle typically dries faster and shrinks less, while joint compound is designed for taping and finishing larger areas.
If you’re taping seams, doing a California patch, or repairing a large opening, joint compound is usually the better tool.
How to Patch Small Holes (Nail Holes, Tiny Screws, Little Dings)
These are the easy wins: picture-hook holes, thumbtack holes, and those tiny craters left behind by a removed screw.
Done right, you’ll finish in under an hour (including dry time if you use fast spackle).
Step-by-step
- Lightly sand around the hole to knock down raised paint edges.
- Apply spackle with a small putty knife, pressing it into the hole.
- Scrape flush using a tight, smooth pass. Aim for “barely there,” not “frosting a cupcake.”
- Let dry (follow the product label; lightweight spackle often dries quickly).
- Sand smooth with a fine sanding sponge. Use light pressuredrywall is softer than your confidence.
- Prime the patch (spot priming helps prevent dull “flashing” spots).
- Paint to match, feathering the edges with a small roller if needed.
Example: fixing TV-mount screw holes
If you removed a wall-mounted TV bracket and now you have four to twelve holes (plus emotional damage),
fill each with spackle in thin layers. For holes bigger than a pencil eraser, switch to joint compound or
use a dab of compound + mesh tape if the area feels weak.
How to Patch Medium Holes (About 1/2 Inch to 6 Inches)
Medium holes are where people get into trouble. They look small enough to “just fill,” but large enough to crack,
sag, or show a dip if you don’t reinforce them. Your best options are a patch kit or a
California patch.
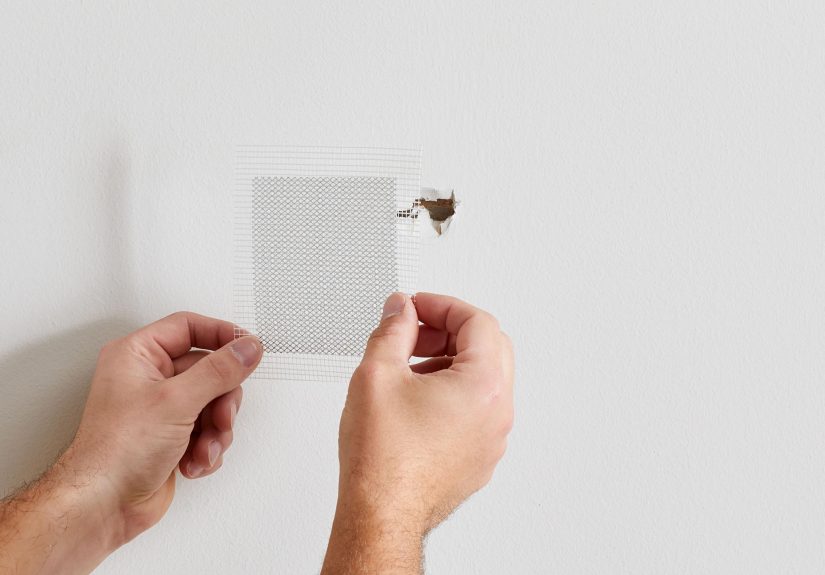
Option A: Use a Self-Adhesive Mesh/Aluminum Patch (Fast + Beginner-Friendly)
- Prep the hole: remove loose paper and sand any raised edges.
- Stick the patch centered over the hole. Press firmly so it bonds flat to the wall.
- First coat: spread joint compound over the patch, pressing compound through the mesh and feathering outward.
- Second coat: after the first coat dries, add a wider coat to blend edges.
- Third coat (if needed): go wider again for a perfectly invisible transition.
- Sand, prime, paint.
Pro tip: Your patch should disappear in width, not just thickness. If the patch is 4 inches wide,
your final feathered area might be 12 inches wide. That’s not overkillit’s how you avoid the dreaded
“I can see exactly where you fixed it” halo.
Option B: Do a California Patch (Strong, Clean, No Metal Patch Needed)
A California patch uses drywall itself as reinforcement by leaving a paper “flange” around the patch. It’s a favorite
for medium holes because it creates a strong, smooth repair without adding bulky hardware.
- Cut a drywall patch slightly larger than the hole.
- Score the back of the patch and remove gypsum around the edges, leaving the face paper intact as an overlap “frame.”
- Trace and cut the wall opening so the center gypsum fits, with the paper flange overlapping the wall face.
- Press patch into place, smoothing the paper flange so it bonds flat.
- Coat with joint compound over seams and paper edges, let dry, then sand and add coats as needed.
This method is especially handy for holes that are awkwardly shaped (the classic “I swear it was already like that”
accident) because you can square the opening and custom-fit your patch.
How to Patch Large Holes (6 Inches and Up): Cut, Support, Replace
Large holes need structure. If you try to fill a big opening with compound alone, you’ll get cracking,
sagging, and a finish that screams “DIY archaeology.” The goal is to replace the missing drywall with new drywall
that’s supported on all sides.
Step 1: Square up the damage
Use a utility knife and straightedge to cut the hole into a clean rectangle or square. It’s counterintuitive,
but making the hole slightly bigger makes the repair much easier and cleaner.
Step 2: Add support (two common methods)
Method A: Wood backer strips (simple and strong)
- Cut two strips of wood a few inches longer than the hole (thin furring strips work well).
- Slide each strip behind the drywall so half the strip is behind solid wall and half spans the opening.
- Screw through the existing drywall into the wood to lock it in place.
- Now you have a solid “shelf” to screw the new drywall patch onto.
Method B: Drywall repair clips (clean edges, less woodworking)
Repair clips attach around the edge of the cutout, creating tabs that hold your new drywall patch flush. They’re
especially useful when you can’t easily add wood behind the wall.
- Attach clips around the perimeter of the opening (follow the clip spacing instructions).
- Cut your drywall patch to fit the opening precisely.
- Screw the patch into the clips so it sits flush.
- Break off/remove clip tabs if required by the product design.
Step 3: Tape and mud the seams (this is where the magic happens)
- Apply tape over seams (mesh or paper). Avoid overlapping tape at corners if possiblebulk shows through paint.
- First coat (embed): press compound into the tape and smooth it out.
- Second coat (build): go wider, feathering edges.
- Third coat (finish): wider still, aiming for an invisible transition.
- Sand lightly between coats as needed. Focus on ridges, not the whole patch.
Feathering explained: Your wall doesn’t need a thick patchit needs a gradual slope that the eye can’t
detect. Think “gentle hill,” not “speed bump.”
Sanding Without Sadness (And Without Ruining the Paper)
- Use a sanding sponge so it follows contours and doesn’t gouge.
- Shine a work light across the wall (side lighting reveals lumps before paint does).
- Don’t sand into the drywall face paper. If you expose paper, seal it with primer before repainting.
- Vacuum dust and wipe with a damp cloth before priming.
Texture Matching: The Step That Separates “Nice” From “Nailed It”
Smooth walls are straightforward. Textured walls (orange peel, knockdown, skip trowel) are where patch jobs go to
either become invisible… or become a conversation starter at every party.
Quick texture tips
- Test first on cardboard or scrap drywall.
- Build texture in light passes. It’s easier to add than remove.
- Match paint sheen as closely as possiblesheen differences highlight patches more than color does.
Prime and Paint: How to Avoid the “Flash Spot”
Fresh compound is porous. If you paint it without primer, it can absorb paint differently than the surrounding wall,
leaving a dull or shiny “ghost” of the patchespecially in sunlight or hallway lighting.
Best practice
- Let compound fully dry.
- Sand smooth and remove dust.
- Spot prime the patched area (or prime the whole wall if you have many patches).
- Paint using the same nap roller as the rest of the wall to match texture.
If you’re patching multiple areas in one room (say you removed a gallery wall with 27 frames), consider priming the
entire wall for the most uniform finish. Otherwise, careful spot priming plus feathered painting often works great.
Common Mistakes (So You Can Skip Them)
1) Overfilling and “mountain sanding”
If you pile compound thick, you’ll spend forever sandingand risk sanding into the drywall face paper. Thin coats win.
2) Not reinforcing medium holes
Holes bigger than a small dent need support (mesh patch, California patch, or a proper drywall insert). Otherwise,
cracking is basically scheduled.
3) Skipping primer
It’s tempting. It’s also how patches “flash” under certain lighting. Primer helps create a uniform surface before paint.
4) Rushing dry times
If you apply the next coat too soon, you can trap moisture, soften the previous layer, or create bubbles. Let each coat
dry per the product instructionsespecially in humid conditions.
When to Call a Pro (No Shame, Just Strategy)
- Recurring water damage or soft, crumbling drywall
- Possible mold (musty smell, dark spotting, repeated dampness)
- Fire-rated assemblies or specialty wall systems where repair details matter
- Large areas needing skim coats for perfect smoothness under critical lighting
Real-World Experiences: What Drywall Patching Usually Feels Like (500+ Words)
Drywall repair looks simple in a 30-second video: spread compound, sand once, paint, done. In real life, it’s more like
a mini-series with plot twistsmost of them starring dust. Here are a few common “yep, that happened” experiences and
what they teach you.
The “I’ll Just Fill It” Anchor-Hole Lesson
A lot of people learn the difference between spackle and joint compound after removing wall anchors from a curtain rod,
a shelf, or a baby gate. The holes look modestuntil you fill them in one thick blob. The patch dries, shrinks a little,
and suddenly there’s a tiny crater where you wanted a smooth wall. The fix is usually simple: add a second thin coat and
feather it wider than feels necessary. The takeaway is that drywall repair is less about “stuffing the hole” and more
about building a flat surface in gentle layers.
The Doorknob Hole That Turned Into a Geometry Project
Doorknob holes are a classic. What starts as a round impact spot becomes a ragged opening once you remove loose paper and
crumbly gypsum. This is where many DIYers discover the power of making the hole slightly biggeron purpose. Squaring it up
can feel like admitting defeat (“I’m making it worse!”), but it’s actually the moment you take control. Once the edges are
clean, the repair becomes predictable: add backing (wood strips or clips), screw in a drywall patch, then tape and mud.
The best part is how solid it feels when you knock on it afterward. The wall stops sounding hollow and starts sounding
like… a wall again.
The Patch Looked Perfect… Until the Sun Hit It
This is the sneakiest experience: you finish the patch at night, admire your work, and go to bed feeling unstoppable.
Then morning light streams in at a low angle and reveals every ridge you left behind. Side lighting is brutally honest.
The good news is that this is normaland fixable. A quick skim coat (thin, wide, and smooth), followed by careful sanding,
often erases the problem. People also learn that “smooth enough” depends on the paint sheen. Flat paint forgives. Satin and
semi-gloss? They remember everything. If you’re painting with a sheen, plan on a little extra finesse in sanding and
feathering.
The Texture Match That Went a Little… Enthusiastic
Texture is where confidence can outpace results. A common story: someone sprays orange peel texture, and the patch becomes
the most textured place in the entire roomlike the wall got goosebumps. The smarter approach is testing on cardboard,
building texture in light passes, and matching not only the size of the bumps but also their density. If you overshoot,
you can sometimes knock it back gently with a sanding sponge once it dries. And if the texture still isn’t perfect,
remember the secret truth of home repair: most walls aren’t examined from six inches away by trained museum curators.
They’re viewed from across the room while someone is carrying laundry.
The Dust Situation (A Love Story Nobody Asked For)
Nearly everyone underestimates dust the first time. Even a small sanding job can leave a fine layer on baseboards and
nearby furniture. The upgrade is simple: use a vacuum attachment, close doors, and wipe surfaces afterward. Many DIYers
also discover that sanding lightly between coats is easier than trying to sand one thick coat into perfection. Drywall
patching is a patience gamethin coats, smooth passes, and just enough sanding to erase edges.
If you’ve never patched drywall before, the biggest “experience” takeaway is this: the repair isn’t judged by how well you
filled the hole. It’s judged by how invisible the transition is after paint. Focus on feathering, dust control, and primer,
and you’ll get that “wait… where was the hole?” result.
Conclusion
Patching drywall is one of the most useful DIY skills you can have because it turns wall damage from a “home disaster”
into a quick weekend fix. Match your method to the hole size, reinforce anything medium-to-large, feather your compound
wide, and never underestimate primer. Do that, and your wall will look like it’s always been politely intact.


