Table of Contents >> Show >> Hide
- Why a Solar Oven Works
- Common Solar Oven Types
- What You Need for a DIY Pizza-Box Solar Oven
- How to Make a Solar Oven Step by Step
- How to Use a Solar Oven for Best Results
- Food Safety Rules You Should Never Skip
- Troubleshooting: Why Your Solar Oven Isn’t Getting Hot Enough
- Simple Upgrades That Make a Big Difference
- Conclusion
- Field-Tested Experiences and Lessons Learned (Extended 500-Word Section)
What if your next batch of melted s’mores, soft-baked apples, or gooey nachos came from pure sunshine? No gas. No charcoal. No extension cord snaking across the yard. A solar oven is one of the most satisfying weekend projects you can build with everyday supplies, and it doubles as a practical lesson in renewable energy, food science, and patience (yes, patience is an ingredient).
This guide shows you exactly how to make a reliable DIY solar oven, how to use it safely, what foods work best, and how to improve performance when the weather is less than perfect. It combines classroom-tested methods, food safety standards, and real-world maker tips into one complete walkthrough. If you can cut cardboard, fold foil, and point things at the sun, you can do this.
Why a Solar Oven Works
The science in plain English
A solar oven works because it combines four simple ideas:
- Reflection: Shiny surfaces (like aluminum foil) bounce sunlight toward your food.
- Absorption: Dark surfaces absorb light energy and convert it to heat.
- Heat trapping: A clear cover (plastic wrap or a transparent lid) lets sunlight in but slows heat from escaping.
- Insulation: Cardboard, newspaper, or other insulating layers reduce heat loss to the outside air.
Put those together, and your box becomes a mini greenhouse for food. It won’t act like a broiler, but it can get hot enough to melt, warm, bake, and slow-cook many foods on sunny days. Think of it as “low and slow, powered by the sky.”
Common Solar Oven Types
1) Box cooker
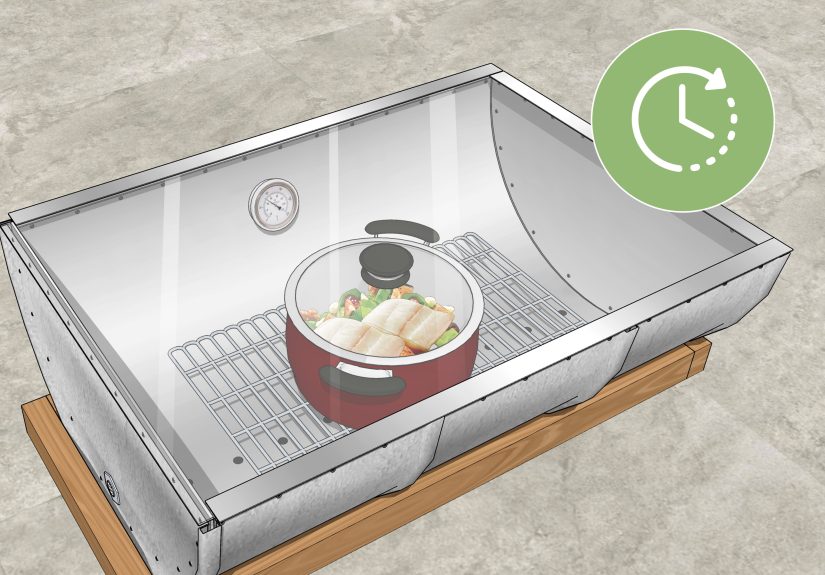
The classic beginner model. Insulated box, transparent cover, reflective flap. Steady heat and easy to build.
2) Panel cooker
Multiple reflective panels direct sunlight to a dark pot inside a heat-safe clear enclosure. Lightweight and portable.
3) Parabolic cooker
Curved reflector focuses intense heat at one point. Fast, powerful, and less forgiving. Great for advanced users who want higher temperatures and close control.
For first-time makers, start with a pizza-box style box cooker. It is cheap, safe, and ideal for learning the technique.
What You Need for a DIY Pizza-Box Solar Oven
- 1 clean pizza box (or similarly shallow cardboard box)
- Aluminum foil
- Clear plastic wrap (or oven-safe transparent sheet for better durability)
- Black construction paper (or matte black food-safe tray liner)
- Tape and glue
- Scissors or craft knife
- Ruler and marker
- Wooden skewer, chopstick, or dowel to prop flap
- Optional but highly recommended: oven thermometer
- Optional insulation: crumpled newspaper or cloth around the box exterior
Pro tip: Wrinkles in foil scatter light. Smooth foil reflects better. Think mirror, not crumpled moon rock.
How to Make a Solar Oven Step by Step
Step 1: Cut the reflector flap
On the pizza box lid, draw a large rectangle, leaving a 1-inch border around the edges. Cut three sides of the rectangle and fold it back to create a flap. This flap will become your sunlight reflector.
Step 2: Add foil to the flap
Cover the underside of the flap with aluminum foil, shiny side out. Smooth it tight and tape all edges. The cleaner the reflection, the more sunlight you funnel inside.
Step 3: Build the heat window
Cover the opening you cut with two tight layers of clear plastic wrap, sealing all edges so warm air cannot leak easily. This creates the transparent heat-trapping layer.
Step 4: Create a dark absorber
Line the bottom interior of the box with black construction paper. Dark surfaces absorb more solar energy and help convert light to heat.
Step 5: Add optional insulation
If your box is thin, lightly insulate the sides or bottom exterior with folded newspaper or a towel wrap. Avoid blocking the reflective flap or sunlight entry.
Step 6: Angle control
Use a skewer or stick to prop the foil flap at an angle that reflects sunlight directly through the window into the box. This angle changes as the sun moves.
Step 7: Preheat
Set the oven in direct sun and preheat for 20–30 minutes. If you have a thermometer, monitor heat gain before adding food.
Step 8: Cook smart, not chaotic
Put food in a dark, shallow container when possible. Open the box as little as possible to prevent heat loss. Rotate or re-aim every 20–30 minutes so sunlight stays centered.
How to Use a Solar Oven for Best Results
Pick the right time
Best performance usually happens near midday when sunlight is strongest and shadows are shortest. Morning and late afternoon still work, just slower.
Use weather to your advantage
- Clear skies = best heat
- Light wind = okay with insulation
- Cloud bursts = expect temperature dips
Choose solar-friendly foods
Solar ovens excel with foods that benefit from gentle, steady heat:
- S’mores, nachos, quesadillas
- Baked apples or bananas
- Roasted veggies in small pieces
- Rice or grains in dark lidded cookware
- Soups and stews (in appropriate containers)
Manage expectations with timing
A solar oven is not a race car. It is a scenic train. Depending on sun strength, design quality, and food mass, cooking can take anywhere from 30 minutes (melting snacks) to several hours (larger dishes). On excellent sunny days, well-built units can reach surprisingly high temperatures; simple cardboard versions are generally lower but still useful.
Food Safety Rules You Should Never Skip
Sun-cooked food still follows normal food safety science. “Cooked by sunlight” does not mean “exempt from bacteria.”
Critical temperature basics
- Poultry: 165°F (74°C)
- Ground meats: 160°F (71°C)
- Whole cuts like steaks/chops/roasts: 145°F (63°C) with rest time
- Leftovers/reheated foods: 165°F (74°C)
Danger zone awareness
The bacterial growth danger zone is 40°F to 140°F. Avoid letting perishable food sit in that range for too long. If outdoor temps are high, be extra strict about timing and cold storage before cooking.
Use a thermometer, not guesswork
Do not rely on color, texture, or “it smells done.” Check internal temperature in the thickest part of the food. A thermometer turns food safety from hope into data.
Beginner-friendly safety strategy
Start with low-risk foods first (snacks, fruit, veggie dishes), then progress to proteins after you’re confident in your oven’s temperature profile.
Troubleshooting: Why Your Solar Oven Isn’t Getting Hot Enough
Problem: Temperature climbs slowly
- Re-aim reflector flap more precisely toward the sun.
- Smooth foil; replace torn or dull sections.
- Reduce air leaks around plastic window and seams.
- Add insulation around box sides and bottom.
Problem: Heat drops every time you check food
- Open less often. Combine checks with re-aiming.
- Use a probe thermometer when possible.
Problem: Food cooks unevenly
- Use shallow containers.
- Cut ingredients into smaller, similar-size pieces.
- Rotate food and oven orientation periodically.
Problem: Wind steals heat
- Create a windbreak (chair, crate, or fence side).
- Secure lightweight flaps and plastic layers.
Simple Upgrades That Make a Big Difference
- Dual reflectors: Add side wings to boost light capture.
- Better glazing: Use a clearer, sturdier transparent cover.
- Dark cookware: Black or dark pots absorb heat faster.
- Thermal mass: Pre-warm a dark stone/tile (safely) to stabilize heat.
- Sun-tracking habit: Set a timer every 20–30 minutes to re-aim.
Each small improvement stacks. Think of your oven as version 1.0, then 1.1, then 1.2by the third sunny weekend, you’ll have a noticeably stronger cooker.
Conclusion
Building a solar oven is more than a craft project. It is hands-on proof that renewable energy can do practical work in your daily life. You learn physics without a lecture, food safety without panic, and patience without doom-scrolling. Start simple with a pizza box, test often, track temperatures, and improve your design like an engineer. Soon, your “sun snacks” become “sun meals,” and your backyard turns into a tiny off-grid kitchen.
On a bright day, sunlight is free. Your curiosity is the fuel that makes it useful.
Field-Tested Experiences and Lessons Learned (Extended 500-Word Section)
Across classrooms, backyards, camps, and 4-H activities, one pattern appears again and again: first attempts are usually messy, second attempts are promising, and third attempts are weirdly impressive. Most beginners expect instant results and get humbled by cloud cover, loose tape, or a reflector flap pointed a few degrees off target. Then they tweak one variable at a time and suddenly the marshmallows actually melt. That moment is the gateway drug to engineering.
In youth STEM settings, teams that keep a simple log perform better: time, sky conditions, box temperature, flap angle, and what food was tested. Groups that skip notes tend to repeat the same mistakes and blame “bad sun.” Groups that track data quickly discover useful truths: smooth foil matters, dark trays matter, and peeking every five minutes destroys progress. The best-performing teams typically assign rolessun tracker, thermometer reader, safety lead, and food prepso everyone has a job and fewer steps are forgotten.
Family makers report a similar arc. Day one is usually “Let’s make s’mores!” Day two becomes “Can we warm pizza?” By day three, someone tries apple slices with cinnamon and learns that thin cuts cook more evenly than thick chunks. Another frequent discovery: tiny portions beat giant servings. A packed container looks efficient, but a shallow layer heats faster and safer. The same goes for proteinssmall pieces with clear temperature checks outperform large, thick portions every time.
Weather lessons are unforgettable. A breezy 72°F afternoon can outperform a still 60°F morning if the sun angle is stronger and the box is better aligned. Wind can quietly steal heat, so experienced users place ovens near a wall or low barrier. Cloud interruptions are not automatic failure; many cooks keep going by extending time, re-aiming quickly when the sun returns, and avoiding unnecessary lid openings. Consistency beats intensity in most backyard scenarios.
Safety habits also evolve with experience. New users often focus only on whether food “looks done.” More experienced users rely on internal temperature and timing rules. They pre-chill perishable ingredients, stage tools before cooking, and treat solar cooking like any outdoor food prep: clean hands, clean surfaces, thermometer ready, and no long hangs in the danger zone. One practical trick is to start with low-risk foods first, then move to more sensitive recipes once your oven’s temperature behavior is predictable.
Teachers and club leaders often mention the confidence shift. At first, learners think they’re doing a cute craft. Later, they realize they are controlling heat transfer with design choices: reflector geometry, absorber color, insulation thickness, and glazing quality. The project becomes less “arts and crafts” and more “applied science with snacks.” That mindset transfer is hugeespecially for students who never thought of themselves as “science people.”
From a flavor perspective, slow solar cooking has fans. Gentle heat can preserve texture in vegetables and prevent scorched edges in simple dishes. The tradeoff is speed; you plan ahead or you get hungry and impatient. Experienced users build around that reality: prep early, preheat the oven, and choose recipes that reward slow heat. If dinner timing is strict, they treat the solar oven as a preheater or side-dish station rather than the only cooking tool.
The biggest long-term lesson is practical optimism: you don’t need perfect equipment to learn meaningful energy skills. A cardboard box can teach thermal design, data collection, and food safety discipline in one afternoon. With each sunny test, users move from guesswork to method. They stop asking, “Will this work?” and start asking better questions: “What variable should I change next?” That is exactly how good makersand good cooksimprove.