Table of Contents >> Show >> Hide
- Why a SpongeBob Cake Is Easier Than Most Character Cakes
- Choose Your SpongeBob Cake Style
- What You Need to Make a SpongeBob Cake
- The Best Cake Flavor for a SpongeBob Cake
- How to Bake the Cake
- How to Make the Frosting
- How to Assemble the Cake
- How to Decorate a SpongeBob Cake
- Common Mistakes to Avoid
- Make-Ahead and Storage Tips
- Serving Ideas for a SpongeBob Birthday Cake
- Final Thoughts
- Experience: What Making a SpongeBob Cake Teaches You in Real Life
If ever there were a cake that deserved to be loud, cheerful, and just a little ridiculous, it would be a SpongeBob cake. This is not the dessert for subtle people. This is the dessert for birthday parties, cartoon marathons, nostalgic grown-ups, and kids who believe dessert should smile back at them.
The good news? Making a SpongeBob cake is much easier than it looks. You do not need a pastry degree, a TV baking show soundtrack, or the emotional stamina of a fondant sculptor. In fact, the easiest version is built from a simple rectangular cake, covered in buttercream, and decorated with a few bold shapes and colors. SpongeBob is basically a yellow rectangle with excellent energy. That is a very bakeable personality.
In this guide, you will learn exactly how to make a SpongeBob cake from start to finish, including the best cake shape, frosting choices, decorating tricks, and a few “please do not do this unless you enjoy chaos” warnings. Whether you want a beginner-friendly birthday cake or a more polished character cake for photos, this method will get you there without turning your kitchen into Bikini Bottom after a storm.
Why a SpongeBob Cake Is Easier Than Most Character Cakes
Some character cakes demand sculpting, carving, and a level of patience usually reserved for people who build ships in bottles. SpongeBob is different. His boxy shape is your best friend. A sheet cake or a stacked rectangular cake already gives you the basic silhouette, which means you can spend your time decorating instead of wrestling geometry.
Another reason this design works so well is color contrast. Yellow body, white shirt, brown pants, red tie, giant eyes, bright smile. Nothing about this cake whispers. Everything announces itself. That makes the design forgiving, because strong shapes and bold lines do a lot of the visual work for you.
Choose Your SpongeBob Cake Style
Option 1: Easy Flat-Face SpongeBob Cake
This is the best choice for beginners. Bake a 9×13-inch cake, frost it, and decorate SpongeBob’s face and clothes directly on top. It is fast, recognizable, and ideal for home bakers.
Option 2: Layered Rectangular SpongeBob Cake
This version looks taller and more dramatic. Stack two rectangular cake layers with frosting in between, then decorate the front and top so SpongeBob looks more three-dimensional. It is still beginner-friendly, just a little more ambitious.
Option 3: Buttercream with Fondant Details
If you want cleaner eyes, teeth, tie, or pants, use buttercream for the main frosting and fondant only for small features. This gives you a polished look without covering the entire cake in fondant like it owes you rent.
What You Need to Make a SpongeBob Cake
For the Cake
- One 9×13-inch cake, or two rectangular layers for a taller cake
- Vanilla cake, yellow cake, or funfetti cake
- Parchment paper
- Nonstick spray or butter for the pan
For the Frosting
- American buttercream or another sturdy decorating frosting
- Yellow gel food coloring
- Black gel food coloring
- Red, blue, and brown gel food coloring
- White frosting reserved for eyes, shirt, and teeth
Helpful Tools
- Offset spatula
- Bench scraper or straight spatula
- Piping bags or zip-top bags
- Small round piping tip
- Turntable if you have one
- Toothpicks for sketching the design
- Serrated knife for leveling, if needed
A quick baking tip before we get into the fun part: use room-temperature butter and eggs if your recipe calls for them. Cold ingredients make batter and frosting harder to mix smoothly, which is not the vibe when you are trying to create a cheerful cartoon sponge instead of a lumpy yellow mystery block.
The Best Cake Flavor for a SpongeBob Cake
Vanilla or yellow cake is the classic choice because it matches the bright, playful look of SpongeBob. Chocolate is delicious, but if you are doing a lot of white and yellow frosting, dark crumbs can be dramatic in the wrong way. Not “award-winning bakery” dramatic. More like “I accidentally decorated during an earthquake.”
If you want the flavor to feel extra fun, pineapple filling or pineapple simple syrup is a great nod to SpongeBob’s pineapple house. You do not have to go full tropical, but a small pineapple note is a cute detail that fans will appreciate.
How to Bake the Cake
Step 1: Prep the Pan
Grease your pan well and line it with parchment if possible. This helps the cake release cleanly, which is wonderful because peeling broken cake out of a pan by hand is a terrible pre-party hobby.
Step 2: Fill the Pan Properly
Do not overfill. Cake pans generally do best when filled about two-thirds full. Too much batter can spill, dome aggressively, or bake unevenly. Too little batter gives you a sad little SpongeBob who looks like he skipped lunch.
Step 3: Bake and Cool Completely
Bake according to your recipe, then let the cake cool fully before frosting. This part is not optional. Frosting a warm cake is basically volunteering for buttercream landslides. If you want neat decorating lines, cool the cake completely and chill it briefly before assembling.
How to Make the Frosting
American buttercream is the easiest choice for a SpongeBob cake because it is sturdy, pipes well, and takes color beautifully. Make one large batch, then divide it into bowls:
- Yellow for SpongeBob’s face and body
- White for shirt, eyes, and teeth
- Brown for pants
- Red for tie
- Blue for irises
- Black for outlines, lashes, and smile details
Use gel food coloring instead of liquid coloring when possible. Gel colors give you stronger shades without thinning the frosting, and that matters when you need bright yellow frosting that behaves itself.
How to Assemble the Cake
For a Single-Layer Sheet Cake
Place the cooled cake on a board or serving tray. If the top is domed, level it lightly. Spread a thin crumb coat over the cake, then chill it for about 30 minutes. The crumb coat traps loose crumbs and gives you a cleaner final finish. Think of it as primer for cake, only much tastier and with fewer home renovation arguments.
For a Tall Layered SpongeBob Cake
Place the first rectangular layer on the cake board. Add an even layer of frosting, then stack the second layer on top. Press gently so the layers settle evenly. If your cake is especially tall, add support straws or a dowel for stability. SpongeBob may be absorbent and yellow and porous, but he should not lean like a doomed apartment building.
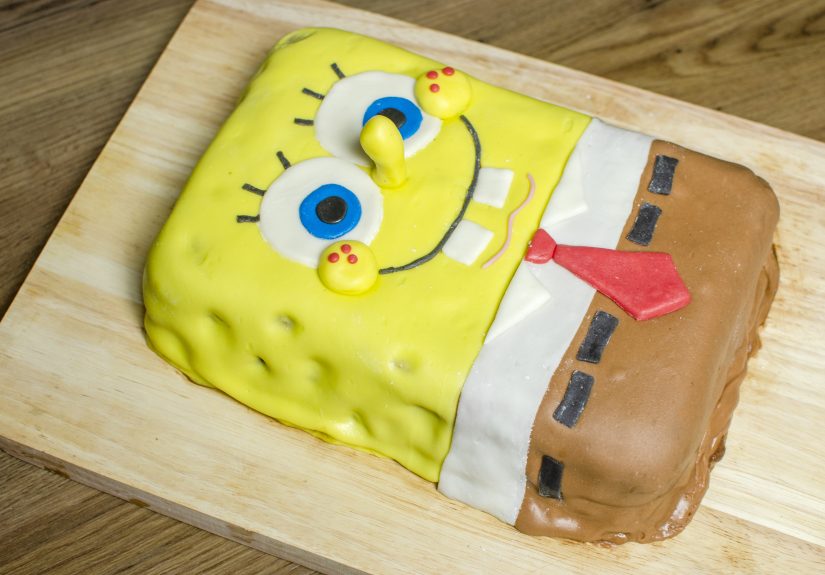
How to Decorate a SpongeBob Cake
Step 1: Frost the Body Yellow
Cover most of the cake in yellow buttercream. Smooth it with an offset spatula or bench scraper. Do not panic if it is not bakery-perfect. SpongeBob is a sponge. A little texture actually helps.
Step 2: Mark the Face Layout
Use a toothpick to lightly sketch where the eyes, nose, mouth, shirt, and pants will go. This saves you from piping one giant eyeball too high and having to explain why SpongeBob suddenly looks spiritually exhausted.
Step 3: Add the Shirt and Pants
Pipe or spread white frosting for the shirt across the lower third of the cake. Add a brown section under that for the pants. Then pipe a red tie in the center. You can use fondant for these shapes if you want sharper edges, but buttercream works just fine.
Step 4: Make the Eyes
Pipe or place two large white circles near the top center. Add blue circles for the irises and small black pupils. SpongeBob’s eyes should be big, bright, and slightly overenthusiastic. That is the whole brand.
Step 5: Add the Nose, Teeth, and Smile
Pipe or shape a small yellow nose between the eyes. Add two white rectangles below it for the teeth. Then pipe a wide smile in black buttercream. A little red inside the mouth adds dimension. If you want to be extra, add pink for the tongue.
Step 6: Outline the Features
This is where the cake comes to life. Use black buttercream in a piping bag with a small round tip to outline the eyes, smile, tie, shirt, pants, and any other features. These strong dark lines create that cartoon effect and instantly make the design read clearly from across the room.
Step 7: Add Sponge Texture
Use a small round tip or the back of a spoon to create little pores on the yellow frosting. Add a few darker yellow or light brown dots here and there for depth. Keep it playful, not alarming. You want “cartoon sponge,” not “science fair specimen.”
Step 8: Optional Arms, Legs, and Shoes
If you want a more detailed SpongeBob birthday cake, pipe thin black outlines for arms and legs, then add white socks and black shoes using frosting or fondant. This step is optional, but it makes the cake look more complete and party-ready.
Common Mistakes to Avoid
Using Warm Cake
Warm cake plus frosting equals sliding, tearing, and regret. Cool it first.
Skipping the Crumb Coat
If you want clean colors, especially white eyes and shirt on a yellow cake, do not skip the crumb coat. It makes decorating much easier.
Using Thin Frosting
If your buttercream is too soft, the details will sag. If needed, chill it briefly or add a little more confectioners’ sugar.
Overcomplicating the Design
You do not need every tiny facial line and wardrobe detail. Focus on the eyes, smile, shirt, tie, and pants first. Those are the elements that make the cake instantly recognizable.
Make-Ahead and Storage Tips
You can bake the cake layers a day ahead, wrap them well, and keep them at room temperature if your kitchen is cool. Chilling layers briefly before decorating can make assembly easier. Once frosted, storage depends on your frosting. A dairy-based buttercream is best refrigerated if it will be held for a while, and it should not sit out for hours and hours like it is on a permanent beach vacation. If you are serving the cake the same day, let it come closer to room temperature before slicing so the texture stays soft and pleasant.
If you use frosting or icing without milk or eggs in it, room-temperature holding is generally more forgiving. Still, when in doubt, be sensible: keep the cake covered, avoid long stretches in a hot room, and refrigerate leftovers within about two hours.
Serving Ideas for a SpongeBob Birthday Cake
A SpongeBob cake already steals the spotlight, so keep the rest of the dessert table simple. Blue cupcakes look like ocean bubbles. Pineapple candies tie into the theme. Yellow sprinkles on the cake board add color without extra work. If you want the photos to look especially cute, surround the cake with sea-themed decorations, but do not crowd the front. SpongeBob deserves camera angles that respect his square face.
Final Thoughts
Learning how to make a SpongeBob cake is one of those projects that sounds harder than it really is. Once you start with a rectangular cake and break the design into basic shapes, the whole thing becomes much more manageable. Yellow rectangle. Giant eyes. Big smile. Tiny tie. Cartoon confidence. That is the formula.
The smartest approach is to keep the structure simple and let the details do the storytelling. Use a good buttercream, chill between stages, outline boldly, and do not aim for perfection. SpongeBob is joyful, weird, and full of personality. Your cake should be too.
And if one eye ends up slightly larger than the other? Congratulations. You have made him even more animated.
Experience: What Making a SpongeBob Cake Teaches You in Real Life
The first thing most people learn when making a SpongeBob cake is that character cakes are not really about perfection. They are about recognition, personality, and timing. You can spend an hour trying to smooth every inch of yellow buttercream until it looks like polished fondant, but the second those big round eyes and goofy smile go on, everyone stops noticing the tiny flaws. That is oddly comforting. It reminds you that in baking, the overall impression matters more than microscopic details.
Another real-life lesson is that planning beats panic every single time. The easiest SpongeBob cakes usually come from bakers who prep in stages. Bake the cake first. Make the frosting next. Chill the cake before decorating. Sketch the face before piping. None of this is glamorous, but it is the difference between “What a cute cake” and “Why does SpongeBob look like he has seen things?” The more organized you are, the more fun the decorating becomes.
There is also something surprisingly helpful about choosing a familiar character. When you make a floral cake or an abstract cake, people admire it politely. When you make a SpongeBob cake, people react instantly. Kids laugh. Adults get nostalgic. Someone inevitably says, “Oh my gosh, it’s SpongeBob!” before you have even set the cake down properly. That immediate recognition gives the cake energy. It becomes part dessert, part conversation starter, part accidental emotional support sponge.
In practical terms, making this cake also teaches restraint. It is very easy to overdecorate. You start with the eyes, then add pores, then cheeks, then extra piping, then candy, then more color, and suddenly SpongeBob looks like he fell into a craft store explosion. Experience shows that fewer, cleaner details usually look better. Bold outlines, simple facial features, and clear clothing sections do more than twenty unnecessary flourishes.
One of the funniest realities is that the “mistakes” often become the best parts. A slightly crooked smile can make the face look more animated. A textured patch of buttercream can actually resemble sponge pores. Even a not-quite-perfect tie can still read correctly once the whole cake is assembled. That is why so many home bakers end up loving this project. It rewards effort, but it also forgives imperfections.
Finally, making a SpongeBob cake teaches you that themed baking is really about memory-making. The person receiving the cake rarely remembers whether the buttercream was flawlessly smoothed. They remember that someone made a whole SpongeBob cake just for them. They remember the bright yellow color, the funny face, the photos, the candles, and the moment the cake was brought into the room. That is the real magic. Not the piping tip. Not the frosting consistency. Not even the crumb coat, though yes, please still do the crumb coat. The real win is turning cake into an experience people talk about long after the last slice is gone.


