Table of Contents >> Show >> Hide
- What Is a Kusudama Ball (and Why Is Everyone Obsessed With It)?
- Materials You’ll Need
- How to Make a Kusudama Ball: 12 Steps
- Step 1: Choose your finished size (and commit like an adult)
- Step 2: Cut 60 identical paper squares
- Step 3: Make one petal unit as a test run
- Step 4: Fold the square into a triangle (foundation fold)
- Step 5: Form the “helmet base” (a fancy name for a useful shape)
- Step 6: Fold the outer corners down
- Step 7: Squash-fold (aka the “this is why we practice” step)
- Step 8: Fold the top triangles down and shape the petal
- Step 9: Glue the petal seam and clip it
- Step 10: Make 5 petals and glue them into 1 flower
- Step 11: Repeat until you have 12 flowers (yes, it’s a lotno, you’re not alone)
- Step 12: Assemble the ball (two halves, one glorious sphere)
- Troubleshooting: Common Issues (and How to Fix Them Without Crying)
- Design Variations to Try Next
- Where to Use Your Kusudama Ball
- Real-World Maker Experiences: What It Feels Like to Make a Kusudama Ball (and Why You’ll Probably Do It Again)
If origami and “I want my home to look like a whimsical paper garden” had a baby, it would be a kusudama ball. This classic Japanese paper craft is a decorative sphere built from repeated folded units (a.k.a. modular origami), often shaped like little flowers. The best part? It looks wildly impressive, but the process is mostly a satisfying loop of “fold, fold, glue, repeat”like meal prep, but cuter.
In this guide, you’ll learn how to make a kusudama ball in 12 clear steps, with practical tips on paper choice, clean folds, and frustration-proof assembly. By the end, you’ll have a polished origami flower ball you can hang in a window, decorate a party with, or gift to someone who deserves something better than another scented candle.
What Is a Kusudama Ball (and Why Is Everyone Obsessed With It)?
“Kusudama” is often translated as “medicine ball,” and historically these spheres were associated with fragrant herbs and incense. Today, most people make them as DIY paper decorationsand modern folders have created designs that range from beginner-friendly flower balls to jaw-dropping geometric sculptures.
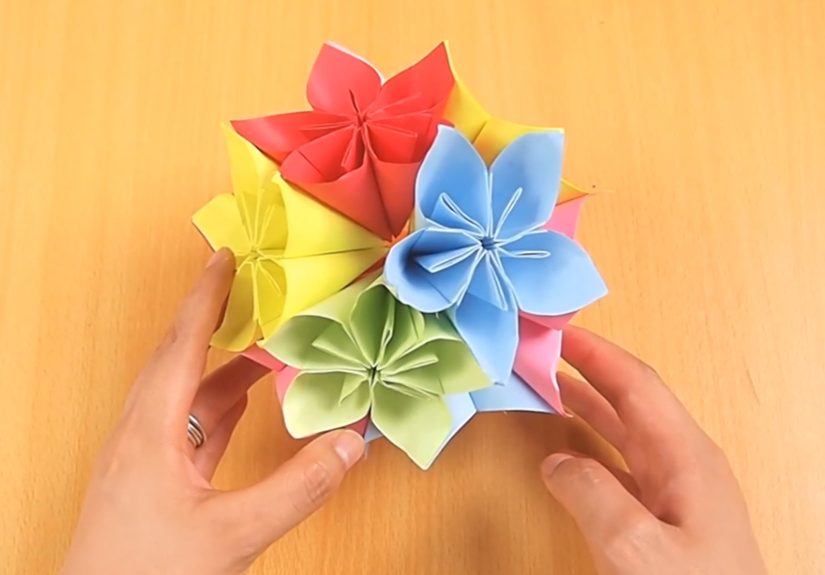
The version you’re making here is a popular “flower-style” kusudama: 12 flowers, each made from 5 petals, for a total of 60 folded petals. Yes, it’s repetitive. No, it’s not boring. It’s the good kind of repetitive like bubble wrap for your brain.
Materials You’ll Need
- 60 paper squares (typically 3 in to 6 in squares; start bigger if it’s your first time)
- Craft glue (glue stick or tacky/liquid craft glue; quick-dry helps, but don’t rush it)
- Paper clips or mini binder clips (optional, but extremely sanity-preserving)
- Ruler + pencil + scissors (or a paper trimmer) to cut perfect squares
- String/cord for hanging (optional)
- Beads, tassel, or charm (optional, for extra “I totally bought this at a boutique” energy)
Paper Tips (Because Paper Is Basically the Whole Project)
Aim for paper that holds creases well but isn’t so thick it fights you during assembly. Patterned scrapbook paper can look amazing, but super glossy paper may pop open at the seams. If you’re unsure, start with standard origami paper or light craft paper. If your folds feel mushy, go slightly heavier; if your modules feel bulky, go slightly lighter.
How to Make a Kusudama Ball: 12 Steps
-
Step 1: Choose your finished size (and commit like an adult)
Your finished kusudama ball size depends on your square size and paper thickness. If you’re a beginner, use larger squares (like 5–6 inches) so the folds are easier to handle. If you want a smaller ornament-style ball, use 3–4 inch squares.
Quick reality check: bigger paper = easier folding; smaller paper = sharper details but more “tiny-fold rage.” Choose wisely.
-
Step 2: Cut 60 identical paper squares
Uniform squares are the difference between a crisp, symmetrical sphere and a lumpy “paper potato.” If you’re cutting from letter-size paper (8.5 x 11), measure carefully and use a paper trimmer if possible.
- Cut a test square first and stack-check it against the rest.
- Keep the grain direction consistent if you’re using handmade or textured paper (it affects folding).
-
Step 3: Make one petal unit as a test run
Before you fold all 60, make one complete petal, glue it, and see if you like the size and stiffness. This small act of patience prevents the classic crafting tragedy: finishing 60 units and realizing they’re too floppy, too thick, or too large to assemble cleanly.
-
Step 4: Fold the square into a triangle (foundation fold)
Place the paper color/pattern-side down if you want the color on the outside of the petal (this can vary by paper style). Fold corner to corner to form a triangle. Crease sharply.
Pro move: run a fingernail or a bone folder along the crease. Crisp folds make your kusudama look professionally made.
-
Step 5: Form the “helmet base” (a fancy name for a useful shape)
With the triangle pointing up, bring the left and right corners up to meet the top point. You should now have a diamond/square-like shape. This step sets up the petal’s structure and helps it hold a rounded “flower” look later.
-
Step 6: Fold the outer corners down
Take the left and right flaps you just raised and fold each outer corner downward so it aligns neatly with the edge below. You’re creating smaller flaps that will later be opened and flattened.
Keep everything symmetrical. If one side is even slightly off, your flower will look like it’s winking.
-
Step 7: Squash-fold (aka the “this is why we practice” step)
Open one side flap gently and flatten it into a neat triangular “squash fold.” Repeat on the other side. This move is a core origami technique and shows up in many models, so congratulationsyou’re leveling up as a paper wizard.
- Open slowly so you don’t wrinkle the paper.
- Flatten from the center outward to keep the fold clean.
-
Step 8: Fold the top triangles down and shape the petal
Fold the small top triangles down to lock the shape and create clean edges. Then fold the left and right points inward toward the center crease. You’ll end up with a petal-like form that can be glued closed.
This is where the unit starts looking like a real “petal” instead of an abstract geometry homework problem.
-
Step 9: Glue the petal seam and clip it
Apply a thin layer of glue inside the folded petal seam (too much glue can warp paper). Press the edges together to form a cone-like petal. Use a paper clip or binder clip to hold it while it sets.
- Glue stick: cleaner, less warping, slower grab.
- Liquid/tacky glue: stronger hold, can warp if you overdo it.
- Hot glue: fast, but bulky and can create bumps; use sparingly if you go this route.
-
Step 10: Make 5 petals and glue them into 1 flower
Repeat Steps 4–9 until you have five matching petals. Glue the petals together edge-to-edge in a ring to form one flower. Clip each join as you go and let connections set before adding the next petal.
Tip: Build flowers like you’d build a teamone strong connection at a time. Rushing makes weak joins that pop later during assembly.
-
Step 11: Repeat until you have 12 flowers (yes, it’s a lotno, you’re not alone)
Make a total of 12 flowers. This is the “podcast and snacks” phase. Put on music, a show you’ve watched 14 times, or a friend who enjoys crafting (or at least enjoys watching you craft).
Keep your flowers consistent:
- Stack-check petals to confirm matching size and shape.
- Let glue fully set before you start ball assembly.
- Remove clips gently so you don’t tear the paper.
-
Step 12: Assemble the ball (two halves, one glorious sphere)
Now you’ll glue flowers together to form the sphere. A common approach is building two halves and joining them:
- Make half #1: Glue flowers together until you have 6 connected in a curved “bowl” shape.
- Make half #2: Repeat for the other 6 flowers.
- Add a hanger: If hanging, glue a loop of string between two top flowers (or anchor it inside with extra paper tabs).
- Join halves: Glue the rims together carefully, aligning petals so the pattern looks even.
Finish with optional embellishments: a bead center in each flower, a charm at the bottom, or a tassel to give it that “I bought this at an art fair” finish. Then step back and admire your work like the responsible craft legend you are.
Troubleshooting: Common Issues (and How to Fix Them Without Crying)
My petals don’t match
This usually comes from inconsistent creases or slightly uneven squares. For the remaining petals, slow down and make sure each fold lines up precisely. If a few petals are off, use them in less-visible areas (like the underside) so the ball still looks symmetrical from most angles.
My glue is warping the paper
Use less glue, spread it thin, and let each join dry before moving on. If you’re using liquid glue, apply with a toothpick for control. Switching to a glue stick can also reduce wrinkling.
The ball won’t close neatly
That usually means the halves aren’t aligned or the flower joins set at slightly different angles. Dry-fit before gluing the final seam. If needed, gently “massage” the shape into alignment while the glue is still flexible (not soaking wetjust tacky).
Design Variations to Try Next
- Book-page kusudama: vintage, literary, and perfect for cozy decor.
- Money kusudama flowers: a fun gift presentation (and a sneaky way to make cash feel thoughtful).
- Scrapbook-paper statement ball: bold patterns, big visual impact for parties and weddings.
- No-glue modular kusudama: some designs interlock with tabs and pockets for a pure modular origami build.
Where to Use Your Kusudama Ball
Kusudama balls are lightweight, eye-catching, and surprisingly versatile. Hang one in a sunny window, cluster a few over a party table, use them as wedding decor, or make mini versions as holiday ornaments. They also make excellent “I made this for you” gifts because they’re both personal and not something most people already own.
Real-World Maker Experiences: What It Feels Like to Make a Kusudama Ball (and Why You’ll Probably Do It Again)
Let’s talk about the part tutorials rarely admit: making a kusudama ball is a tiny emotional journey. Not a dramatic oneno one’s writing a prestige TV series about paper folding (yet)but it has chapters. The first chapter is optimism: you cut your squares, stack them neatly, and think, “Wow, I’m so organized. I should probably run a small country.”
Then comes the “learning the folds” phase. The first petal might look a little… interpretive. A crease slips. A corner doesn’t match. You stare at it like it personally betrayed you. But by petal three or four, your hands start remembering what your brain is still trying to understand. That’s when the process becomes weirdly calminglike a fidget toy, but with a payoff you can hang from the ceiling.
The next experience is the repetitive rhythm. Once you’ve nailed the unit, you enter the “assembly line” mindset. This is where people often discover their ideal crafting setup: a podcast, a comfort show, a playlist that makes them feel like the main character, and a snack that won’t leave fingerprints on paper (choose wiselygreasy chips are the enemy of clean folds). Many crafters end up folding in batches: make 10 petals, take a break, make 10 more. It feels less like climbing a mountain and more like strolling up a hill with scenic overlooks.
Then comes the glue reality. Even if you’re neat, glue introduces variables: drying time, paper warping, and the temptation to rush. Most people learn quickly that clipping your joins is the difference between “this is relaxing” and “why is my flower exploding.” Clips feel like a small tool, but they create huge confidence. You glue, clip, sip your drink, and move on. No drama.
The most satisfying experience is when separate flowers become a sphere. Up until then, you’re making componentspretty components, but still parts. The moment you start joining flowers, your brain goes, “Ohhhh, this is becoming a real thing.” It’s like building a snowman: one ball is cute, two balls is promising, and three balls is suddenly a character with a future.
People also tend to discover their personal style through kusudama. Some love symmetryone pattern repeated perfectly, everything aligned. Others go maximalist: mixed prints, bold colors, “this looks like a party threw up and I mean that as a compliment.” Some add beads in the centers because they want sparkle; some keep it minimal because the folds are the star.
And finally, there’s the pride moment. You hang it up, step back, and realize you made a complex-looking piece of decor out of flat squares. It’s not just a craft; it’s proof that patience turns repetition into beauty. The most common “after experience” is this: you immediately start planning the next onesmaller, bigger, different paper, maybe as a giftbecause once you’ve got the rhythm, a kusudama ball stops feeling like a project and starts feeling like a superpower.


