Table of Contents >> Show >> Hide
- Quick Prep: What Makes a Great Corner Bookmark?
- Method 1: Classic Origami Corner Bookmark (No Glue, All Magic)
- Method 2: No-Sew Felt Corner Bookmark (Soft, Durable, and Gift-Ready)
- Method 3: Cardstock Corner Bookmark (Sturdy Pocket + Endless Customization)
- How to Choose the Best Method for You
- FAQs: Corner Bookmark Problems (Solved)
- Conclusion: Pick a Method, Make It Yours, and Save Your Pages
- Real-Life Corner Bookmark Experiences and Tips (The Extra )
If you’ve ever “marked your place” by folding the page corner and then immediately felt guilty (or heard a librarian gasp from three aisles away),
a corner bookmark is your new best friend. It slides onto the corner of the page like a tiny paper hat, stays put, and doesn’t stick out of
the book like a flag yelling, “I am a bookmark!” (No shade to traditional bookmarks. They’re just… dramatic.)
In this guide, you’ll learn three easy, crafty ways to make a DIY corner bookmark: a classic no-glue origami version, a soft and durable
felt pocket, and a sturdy cardstock style that’s perfect for decorating with tape, markers, and big “look what I made” energy. Each method includes
step-by-step directions, smart sizing tips, and fun theme ideas so you can make bookmarks that match your mood (or your current reading obsession).
Quick Prep: What Makes a Great Corner Bookmark?
A corner bookmark works best when it’s snug but not bulky. Too loose and it falls off. Too thick and your book won’t close nicely.
Aim for a smooth pocket that grips the page corner without creasing it.
Tools You’ll Use Again and Again
- Scissors (kid-safe if needed)
- Ruler (helpful for cardstock methods)
- Glue stick or craft glue (for Methods #2 and #3)
- Markers, pens, stickers for decorating
- Optional: double-sided tape, washi tape, clear packing tape, or a laminating sheet
Best Materials (and When to Use Them)
- Origami paper: Thin, crisp folds, perfect for Method #1.
- Printer paper: Works in a pinch, but folds may be softer; decorate lightly.
- Cardstock: Strong and sturdy; ideal for Method #3.
- Craft felt: Durable, cozy, and forgiving; excellent for Method #2.
Method 1: Classic Origami Corner Bookmark (No Glue, All Magic)
This is the iconic origami corner bookmark that turns one square of paper into a pocket that slips over your page. It’s fast, clean,
and oddly satisfyinglike organizing a drawer, but with less existential dread.
Supplies
- 1 square sheet of paper (start with 6″ x 6″ for a beginner-friendly size)
- Optional: markers, stickers, cut-out shapes for decorating
Step-by-Step Folding Instructions
- Start with a square. If you only have rectangular paper, trim it into a perfect square.
- Fold diagonally corner to corner to make a triangle. Crease firmly.
-
With the triangle’s long edge at the bottom, take the top corner of the triangle and fold it down to meet the bottom point.
You’ll create a smaller triangle flap on top. Crease wellthis flap becomes the “roof” of your pocket. - Fold the left corner up to meet the top point (the same point you folded down in the previous step). Crease.
- Fold the right corner up to meet that same top point. Now you’ll have a diamond-ish shape with two flaps.
- Unfold the two side flaps back down so you’re looking at the triangle again, but with those crease lines ready to help you.
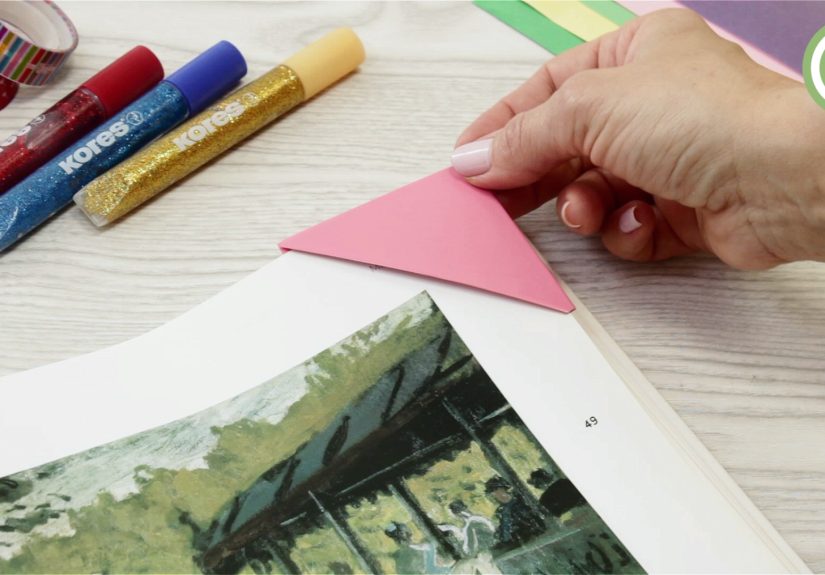
- Lift the top flap (the “roof” you made in Step 3) to form a pocket. Tuck the left flap into that pocket.
-
Tuck the right flap into the pocket as well. Press the creases. You should now have a neat triangle pocket that can slip onto
a page corner.
Fit Check (So It Doesn’t Fall Off Mid-Plot-Twist)
- Too loose? Use a slightly larger square or sharpen your creases. Soft folds = floppy bookmark.
- Too tight? Use thinner paper (origami paper beats cardstock here) or make a larger version for thicker pages.
- Page keeps wrinkling? Your pocket may be too small; try a 7″ x 7″ square for textbooks or thick paper.
Easy Decoration Ideas
The basic origami corner bookmark is just the beginning. The fun part is turning it into something that makes you smile every time you open your book:
- Monster bookmark: Draw teeth along the pocket edge and add big eyes on top.
- Animal faces: Add paper ears, whiskers, or a tiny nose.
- Fruit slices: Watermelon, orange, kiwibright colors + simple shapes = instant cute.
- Book-themed jokes: A tiny pun turns a bookmark into a personality.
Method 2: No-Sew Felt Corner Bookmark (Soft, Durable, and Gift-Ready)
If paper bookmarks are the “quick snack,” felt bookmarks are the “packed lunch”: sturdy, reusable, and surprisingly satisfying. This method creates a
felt corner bookmark that grips well and holds up to daily use.
Supplies
- Craft felt sheet (one or two colors)
- Scissors
- Fabric glue or tacky glue (or hot glue with adult supervision)
- Optional: embroidery floss + needle, buttons, small felt shapes, fabric marker
Cut Your Pieces (Two Simple Options)
Choose the style that matches your vibe: fast-and-simple or extra-durable.
-
Fast-and-simple triangle pocket:
Cut a 4″ x 4″ square of felt, then cut it diagonally to make two triangles. Use one triangle as the front and one as the back. -
Full pocket coverage:
Cut a 4″ x 4″ square, then cut a second piece that’s slightly smaller (about 3.75″ square) and diagonal-cut that for a neat layered look.
Assemble the Pocket
- Stack two triangles so their corners align. This creates a double-layer triangle.
- Decide where the pocket opening will be (usually the long edge stays open).
- Apply a thin line of glue along two sides of the triangle (the sides that will form the pocket edges), leaving the opening unglued.
- Press firmly and let dry. Place it under a book for a few minutes so it bonds flat.
Make It Extra Durable (Optional but Worth It)
- Blanket stitch around the glued edges (or instead of glue) for a strong, handmade finish.
- Keep embellishments flat so the book still closes nicelysave chunky buttons for journals or sketchbooks.
Design Ideas That Look Fancy Without Being Fussy
- Monogram corner: Stitch or draw an initial for a classy gift.
- Mini embroidery: A tiny flower, star, or heart goes a long way.
- Felt appliqué: Add a small shape (leaf, paw print, book icon) with glue.
- Color-block pocket: Use one color for the back and a contrasting color for the front.
Method 3: Cardstock Corner Bookmark (Sturdy Pocket + Endless Customization)
Want a corner bookmark that feels “store-bought” sturdy? This cardstock corner bookmark method uses a simple template so you can cut,
fold, and glue a durable pocketthen decorate it with tape, patterns, or themed cutouts.
Supplies
- Cardstock (solid or patterned)
- Ruler + pencil
- Scissors (or craft knife + cutting mat for crisp lines)
- Glue stick, double-sided tape, or strong craft glue
- Optional: washi tape, duct tape, stickers, markers, clear packing tape for reinforcement
Make the Simple Template
You’ll draw a shape that looks like a square with two “arms” attachedthose arms fold in to create the pocket.
- Draw a 2.5″ x 2.5″ square in the center of your cardstock.
- Attach a second 2.5″ x 2.5″ square to the left side of the center square.
- Attach a third 2.5″ x 2.5″ square to the right side of the center square.
-
Now you have three squares in a row. On the left and right squares, draw a diagonal line from the outer top corner down to the inner bottom corner,
creating two triangle flaps. - Cut out the whole shape. Cut off the extra triangles so you’re left with a center square and two triangular flaps.
Fold and Assemble
- Score (lightly crease) along the edges where the flaps meet the center square.
- Fold both flaps inward so they meet neatly over the center square.
- Glue the flaps down along their edges, leaving the top open to create a pocket.
- Press flat and let dry. Slide it onto a page corner to test the fit.
Reinforcement Tips (Because Some Books Are Thick)
- Tape the edges: A strip of clear packing tape or washi tape strengthens the pocket and prevents fraying.
- Use double-sided tape: It holds flat and cleangreat if you dislike glue wrinkles.
- Laminate for longevity: If you want a bookmark that survives backpacks and coffee shops, a laminating sheet can help.
Theme Ideas That Kids and Adults Both Love
- Ladybug corner: Red paper, black dots, and two tiny eyesadorable and simple.
- Character-inspired: Use colors and symbols that hint at your favorite series (without needing complicated art).
- “Trophy bookmark”: Write the title of a finished book on the front like a badge of honor.
- Seasonal sets: Make a batchpumpkins for fall, hearts for February, stars for summer reading.
How to Choose the Best Method for You
All three methods work, but they shine in different situations:
- Method 1 (Origami): fastest, zero glue, perfect for quick crafts and classroom activities.
- Method 2 (Felt): most durable and giftable, great for daily readers and cozy handmade vibes.
- Method 3 (Cardstock): sturdiest structure and easiest to customize with tape, layers, and bold designs.
FAQs: Corner Bookmark Problems (Solved)
What size paper should I use for an origami corner bookmark?
Start with a 6″ x 6″ square. Go bigger (7″ or 8″) for thick textbooks or journals. Go smaller (5″) for thin novels or a cute mini look.
How do I keep it from slipping off?
Sharpen your creases (origami loves confidence), use slightly thicker paper, or choose the felt/cardstock method for a tighter grip.
If you decorate, keep bulky items away from the pocket area so it still hugs the page corner.
Can kids make these?
Yesespecially the origami method with a bit of guidance the first time. For younger kids, cardstock templates can be pre-cut, and they can focus on
folding, gluing, and decorating. Always supervise scissors and hot glue.
Will a corner bookmark damage pages?
When sized correctly, it should not. A good corner bookmark covers the corner without creasing it. If you notice bent corners, your pocket is
too tight or you’re forcing it onto the pagesize up.
Conclusion: Pick a Method, Make It Yours, and Save Your Pages
Corner bookmarks are one of those crafts that feel almost unfairly rewarding: minimal supplies, maximum usefulness, and endless ways to customize.
Whether you go for a crisp origami corner bookmark, a cozy felt corner bookmark, or a super-strong cardstock pocket,
you’ll end up with a page-saver that’s way cuter than dog-earing. Make one, then make three more, then suddenly you’re the person who “just happens”
to have an extra handmade bookmark for a friend. (Aka: the hero of the reading world.)
Real-Life Corner Bookmark Experiences and Tips (The Extra )
Corner bookmarks have a funny way of turning into more than “a small craft.” They become a little routinesomething people reach for when they want
to relax their brain without zoning out completely. The first experience many crafters share is the surprise of how fast you can go from “I’ll make one”
to “I have accidentally created a bookmark army.” That’s because the learning curve is short: once your hands remember the folds (or your template),
making another takes just a few minutes.
One common “aha” moment happens when someone tries the origami version with regular printer paper and thinks, “It’s fine.” Then they try origami paper
and suddenly understand why paper people get dramatic about paper. Origami paper holds sharp creases and forms a cleaner pocket, so the bookmark feels
more secure. But printer paper still worksespecially if you reinforce it with careful creases and light decoration. The experience teaches a practical
lesson: the best material is often the one you’ll actually use right now.
In group settingslike classrooms, book clubs, or family craft nightscorner bookmarks also reveal personality fast. Some people immediately go for a theme
(monsters, animals, fruit, seasonal designs). Others turn the bookmark into a mini message board: a tiny quote-style phrase, an inside joke, or the title
of the book they’re reading. It’s not unusual to see someone make a “serious” minimalist bookmark at first, then quietly add googly eyes later because
the bookmark “looked lonely.” Corner bookmarks have that effect: they invite play.
The felt method often becomes a favorite for daily readers because it’s forgiving. Felt doesn’t wrinkle, doesn’t tear easily, and stays comfortable in a
bag. People who try felt bookmarks often discover a second skill boost: simple hand stitching. A basic blanket stitch around two edges can feel like a
rite of passagesuddenly the bookmark looks boutique-level, even if the stitch work is slightly… enthusiastic. The experience here is less about perfection
and more about durability and pride: you made something that will still be usable months from now.
The cardstock pocket method tends to shine when people want clean shapes, bold patterns, or a “gift-ready” look. It’s also where crafters learn the
value of reinforcing edges. A single strip of tape can turn a good bookmark into a great oneespecially for heavy readers who toss books into backpacks,
purses, or car seats. Many people end up making sets: one for a planner, one for a novel, one for a cookbook, and one that’s purely decorative because
it’s too cute to risk. That’s a real experience too: sometimes the bookmark becomes a tiny collectible.
The best tip that comes from real use is simple: always do a quick “page test” before you mass-produce. Slide the bookmark onto a page corner and close
the book gently. If the book won’t close, the bookmark is too bulky. If it slips off when you tilt the book, the pocket is too loose. That tiny test saves
time and frustrationand helps you match your bookmark to the kind of books you actually read. Once you start thinking that way, you’re not just crafting.
You’re crafting with strategy. And yes, that sounds dramatic for a bookmarkbut so is losing your page in the middle of a good chapter.


