Table of Contents >> Show >> Hide
- Why Homeowners Choose Artificial Grass
- Before You Start: Plan the Project Like a Pro
- Tools and Materials You Will Likely Need
- How to Install an Artificial Lawn: Step-by-Step
- Step 1: Mark the area and call 811
- Step 2: Remove the existing grass and top layer
- Step 3: Shape the subgrade for drainage
- Step 4: Install edging if needed
- Step 5: Add and compact the base layer
- Step 6: Install a weed barrier where it makes sense
- Step 7: Roll out the turf and let it relax
- Step 8: Cut, seam, and fit the turf
- Step 9: Secure the edges and field
- Step 10: Add infill and groom the lawn
- Step 11: Final inspection and cleanup
- How to Install Artificial Grass on Concrete
- Common Mistakes to Avoid
- DIY or Hire a Pro?
- Maintenance After Installation
- Real-World Experience and Practical Lessons From Artificial Lawn Projects
- Final Thoughts
- SEO Tags
If your natural lawn has turned into a full-time drama queenbrown patches, muddy spots, mysterious bald circles, and water bills that look like ransom notesan artificial lawn can be a smart upgrade. It gives you the green-lawn look without the weekly mowing ritual, the fertilizer guesswork, or the emotional damage of watching real grass die in slow motion every summer.
That said, installing artificial grass is not a “roll it out and hope for the best” kind of project. The secret to a lawn that looks smooth, drains well, and stays put for years is what happens underneath it. A great synthetic lawn is really a base-prep project wearing a handsome green sweater.
This step-by-step guide walks you through how to install an artificial lawn the right way, from planning and excavation to seams, infill, and finishing touches. Whether you are tackling a front yard, backyard, dog run, or side yard makeover, this guide will help you avoid the mistakes that make fake grass look painfully fake.
Why Homeowners Choose Artificial Grass
Artificial grass has become popular for one simple reason: it offers a cleaner, lower-maintenance yard. You do not need to mow it, seed it, fertilize it, or beg it to survive a heat wave. It can also work well in places where natural grass struggles, such as shaded side yards, high-traffic play zones, pet areas, and dry climates.
Still, the product is only half the story. Even premium turf can look lumpy, wrinkle-prone, or oddly shiny if the lawn is installed badly. So before you start dreaming about your permanently green backyard, focus on the installation process like a patient, slightly obsessive pro.
Before You Start: Plan the Project Like a Pro
Measure carefully
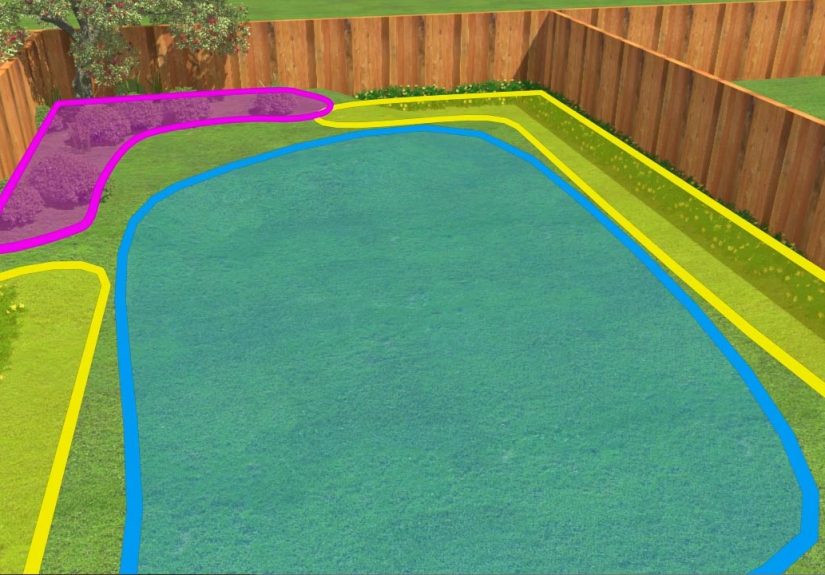
Start by measuring the full length and width of the area. Artificial turf often comes in wide rolls, so your layout matters. If your lawn shape is irregular, sketch it out and think through where seams will land. Bad seam placement is one of the fastest ways to ruin the illusion of a natural lawn.
Check utilities and irrigation
Before digging, identify sprinkler heads, pipes, wiring, and drainage lines. If the lawn area currently has irrigation, decide what will stay, what will be capped, and what needs to be rerouted. This is also the time to think about water flow. Even though synthetic turf drains, your yard still needs a grade that helps water move where it should go instead of creating a backyard swamp with commitment issues.
Choose the right turf
Not all artificial grass is built for the same use. A front lawn, pet zone, playground, and decorative side yard may need different turf features. Look at pile height, face weight, backing, drainage rate, and warranty. In plain English: choose a turf that matches how the area will actually be used, not just how pretty it looks in a product photo.
Tools and Materials You Will Likely Need
- Tape measure and marking paint
- Shovel or sod cutter
- Wheelbarrow
- Rake and broom
- Plate compactor or roller
- Weed barrier or geotextile fabric, if appropriate
- Base material such as crushed rock, road base, or gravel/sand mix
- Utility knife or turf cutter
- Seam tape and turf adhesive
- Landscape nails, spikes, or pins
- Infill material
- Drop spreader or broadcast spreader
You may not need every item for every site, but if your current tool inventory is “one shovel and some optimism,” it is smart to gather everything before you begin.
How to Install an Artificial Lawn: Step-by-Step
Step 1: Mark the area and call 811
Outline the lawn area clearly. Then, before excavation starts, contact 811 to have underground utilities marked. This is not a glamorous step, but it is the difference between installing a lawn and accidentally discovering your cable line with a shovel. A safe dig is a smart dig.
Step 2: Remove the existing grass and top layer
Strip out natural grass, weeds, roots, mulch, rocks, and loose debris. Most installations require removing a few inches of existing soil so there is room for the base layer. You want a clean, stable starting pointnot a soft, organic layer that will settle later and create dips.
If the area contains sprinklers you no longer need, cap or remove them properly. If nearby plants still rely on irrigation, reroute drip lines before moving on.
Step 3: Shape the subgrade for drainage
Once the area is cleared, rough-grade the soil so water has a place to go. The surface should be firm, smooth, and slightly sloped for runoff. This step matters more than many DIY installers realize. Artificial grass may be low maintenance, but standing water is high maintenance in disguise.
Step 4: Install edging if needed
Optional edging or bender board can give the lawn a cleaner perimeter and make the finished job look more polished. It also helps define borders against planting beds, gravel, pavers, or hardscape. It is not mandatory for every yard, but it often improves the final look significantly.
Step 5: Add and compact the base layer
This is the heart of the project. Spread a permeable base material evenly across the area. The goal is a stable, well-draining foundation that will support the turf and resist shifting over time. Work the base into a smooth grade, lightly dampen it if needed, and compact it thoroughly with a plate compactor or roller.
If the base is uneven, the artificial lawn will advertise that flaw forever. Every hump, dip, ridge, and shortcut has a way of becoming permanent. Take your time here. Future-you will be grateful and slightly smug.
Step 6: Install a weed barrier where it makes sense
Many installers add landscape fabric or geotextile weed barrier over the compacted base to reduce weed growth. Overlap seams and secure the fabric neatly. In some pet-heavy applications, however, installers may skip weed barrier because certain fabrics can hold odor if drainage is poor. The right choice depends on your site conditions, weed pressure, and how the lawn will be used.
Step 7: Roll out the turf and let it relax
Unroll the artificial grass and let it sit in the sun for a while so wrinkles and transport creases can relax. Then position it carefully, keeping the blade direction consistent across all pieces. This detail matters more than people expect. If one section runs against the grain of another, the color can look different even when the turf is the exact same product.
For the most natural appearance, orient the grain toward your main viewing area, which is often the house, patio, or street depending on the project.
Step 8: Cut, seam, and fit the turf
Trim from the back side of the turf using a sharp utility knife. Leave a little extra around edges, then fine-tune the fit gradually. Rushing this step is how people turn an expensive roll of turf into a very convincing green puzzle.
If your project needs more than one piece, line them up carefully with the grain going the same direction. Join the pieces using seam tape and turf adhesive. Keep the seam tight without overlapping. Some installers prefer slightly curved or S-shaped seam cuts because they can be less visible than long straight seams.
Step 9: Secure the edges and field
Once the turf is properly positioned, secure the perimeter with nails, spikes, or landscaping pins. Depending on the system, additional fastening may be used in seams or interior sections to prevent movement. The key is to pin the turf firmly without crushing the fibers or creating dimples. Separate the grass blades before driving each fastener so the hardware disappears into the lawn instead of shouting, “Hello, I am a nail.”
Step 10: Add infill and groom the lawn
Infill helps support the blades, adds ballast, and protects the backing. Common options include silica sand, acrylic-coated sand, rubber in some specialty uses, and zeolite for pet areas. Spread the infill evenly with a drop spreader or broadcast spreader, then brush the turf against the grain so the infill settles and the blades stand upright.
This is the step that takes an installation from “rolled-out carpet” to “that actually looks like a lawn.” Do not skip it unless your turf manufacturer specifically allows a no-infill installation for your exact product and application.
Step 11: Final inspection and cleanup
Walk the entire area. Check seams, edges, corners, and drainage flow. Brush the turf again anywhere the fibers look flat. Remove scraps, adhesive residue, and stray infill. A final grooming pass makes a surprising difference in how realistic the lawn looks.
How to Install Artificial Grass on Concrete
If you are installing artificial grass on concrete, the process changes a bit. You do not usually need a traditional compacted base, but you do need a clean surface, drainage planning, and a secure attachment method. Sweep or power wash the slab, repair major cracks, and consider a foam or shock pad if you want more cushioning underfoot.
Then lay the turf out, allow it to relax, seam any joins, and secure the perimeter with adhesive rather than nails. If the concrete has poor drainage, address that before installation. Turf over a hard surface with trapped moisture can create mold, odor, or mildew underneath, which is not the kind of “lush ecosystem” anyone is aiming for.
Common Mistakes to Avoid
- Installing turf directly over existing grass
- Skipping drainage planning
- Using an uneven or poorly compacted base
- Ignoring grain direction
- Making sloppy seams
- Driving fasteners too deep and causing dimples
- Using too little infill or skipping the final brushing
Most artificial lawn failures are not caused by the turf itself. They come from rushed groundwork, messy cuts, bad seams, or wishful thinking. Wishful thinking is lovely in poetry. It is less effective in landscaping.
DIY or Hire a Pro?
A small, flat lawn can be a realistic DIY project for a careful homeowner with the right tools. But larger yards, curved layouts, drainage challenges, pet systems, and projects with multiple seams can get complicated fast. If your site has serious slope issues or you break into a cold sweat reading the phrase “subgrade compaction,” hiring a pro may save time, money, and several regrettable weekends.
Either way, understanding the installation sequence helps you make better decisions. Even if you hire out the work, you will know what questions to ask and what shortcuts to watch for.
Maintenance After Installation
Artificial grass is low maintenance, not no maintenance. Brush it occasionally to keep fibers upright, rinse pet areas as needed, remove leaves and debris, and inspect seams or edges once in a while. If infill settles unevenly over time, top it up and groom the lawn again.
That is still a lot easier than mowing in August while pretending you enjoy it.
Real-World Experience and Practical Lessons From Artificial Lawn Projects
One of the biggest surprises homeowners report after installing artificial grass is that the visible part of the lawn is only the final chapter. The real story happens in the measuring, excavation, leveling, and compaction. People often begin the project thinking the turf itself is the difficult part, but experienced installers know the opposite is true. Rolling out the grass is satisfying and fast. Getting the ground right is where the skill lives.
Another common lesson is that small measuring mistakes become expensive very quickly. A seam placed in the wrong location, a grain direction mismatch, or a poorly planned cut around curves can turn a clean design into a patchwork. That is why experienced DIY installers often dry-fit everything first, then cut slowly. Nobody has ever regretted checking the layout twice. Many have regretted cutting once with too much confidence.
Drainage is another area where experience changes everything. On paper, artificial turf sounds simple because the material is permeable. In real yards, though, runoff patterns, compacted soil, heavy rain, pet use, and surrounding hardscape all influence how well the finished lawn performs. A lawn that looks perfect on day one can develop low spots, odor problems, or puddling later if the drainage plan was treated like an optional personality trait.
Pet owners also tend to learn quickly that not every installation detail should be copied from a decorative front yard project. A dog run may need different infill, stronger odor-control planning, and extra attention to rinsing and drainage. Families with kids often care more about comfort underfoot and edge security than a razor-sharp ornamental finish. In other words, the best artificial lawn is not just the prettiest one. It is the one that matches real life.
There is also a visual lesson that only becomes obvious once the turf is down: realism comes from the finishing work. Brushing the fibers, balancing the infill, hiding the fasteners, and tucking edges cleanly all matter. A rushed install can technically be complete and still look flat or artificial. A careful finishing pass is often what turns a project from “nice improvement” into “wait, that is fake?”
Finally, many homeowners who do this project say the same thing afterward: the lawn looks easy now because the hard part is invisible. That is exactly the point. A good artificial lawn should not advertise the labor behind it. It should just sit there looking neat, green, and unfairly composed while your neighbors wrestle with mowers, patchy sod, and seasonal lawn drama.
Final Thoughts
If you want to know how to install an artificial lawn the right way, remember this: the beauty of the finished turf depends on the boring stuff underneath. Excavate properly, build a solid base, think through drainage, keep the grain consistent, and finish strong with clean seams and proper infill. Do that, and your synthetic lawn can look polished, feel stable, and stay attractive year-round.
In short, do not just install fake grass. Build a real foundation for it.