Table of Contents >> Show >> Hide
- What Is an Apollonian Gasket, Exactly?
- Before You Start: The One Formula That Makes Everything Work
- How to Create an Apollonian Gasket: 10 Steps
- Step 1: Decide Whether You Want a Hand-Drawn or Digital Gasket
- Step 2: Choose the First Three Tangent Circles
- Step 3: Convert the Radii to Curvatures
- Step 4: Solve for the Two Missing Tangent Circles
- Step 5: Draw the Outer Circle and the First Inner Circle
- Step 6: Identify Every Curved Triangular Gap
- Step 7: Calculate the Next Circle for One Gap at a Time
- Step 8: Repeat the Process Recursively
- Step 9: Check Tangency, Symmetry, and Sign Conventions
- Step 10: Add Style, Depth, and Extra Iterations
- A Simple Worked Example
- Common Mistakes to Avoid
- Why This Fractal Is So Fascinating
- Experience Notes: What It Feels Like to Build One
- Conclusion
- SEO Tags
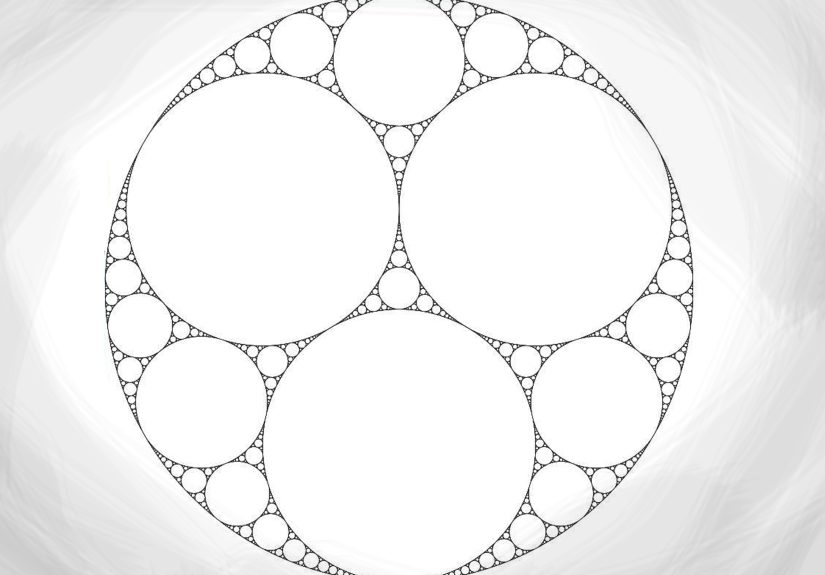
If you have ever looked at a picture full of circles packed inside circles inside more circles and thought, “Well, that seems rude to my eyeballs in the best possible way,” you were probably staring at an Apollonian gasket. It is one of those rare math objects that manages to be elegant, slightly mysterious, and ridiculously satisfying all at once. It is geometry showing off, frankly.
An Apollonian gasket is a fractal made by starting with a small set of mutually tangent circles and then repeatedly filling each curved triangular gap with another circle tangent to the surrounding ones. Repeat that process enough times and you get a pattern that looks both ancient and futuristic, like Euclid wandered into a digital art studio.
The good news is that learning how to create an Apollonian gasket does not require a Ph.D., a wizard hat, or a secret geometry society password. It does help to understand one key idea: instead of focusing only on radius, mathematicians often use curvature, which is simply the reciprocal of the radius. Once you do that, the sizes of the next circles become much easier to calculate. From there, the design becomes a repeatable process.
This guide walks through the full method in plain American English, with enough mathematical detail to keep it accurate and enough practical advice to keep you from throwing your compass across the room.
What Is an Apollonian Gasket, Exactly?
At its core, an Apollonian gasket is a circle packing. You begin with circles that touch but do not overlap. Then, every time three circles create a curvilinear triangular gap, you add a new circle that is tangent to all three. That new circle creates fresh gaps, which you fill the same way, and the process continues indefinitely.
The result is a classic fractal geometry pattern: self-similar, recursive, and full of finer structure the more closely you zoom in. Some versions are especially famous because the curvatures of all the circles are integers, turning a pretty picture into a number theory playground. In other words, the gasket is not just decorative. It is secretly doing math while looking fabulous.
Before You Start: The One Formula That Makes Everything Work
To create an Apollonian gasket reliably, you need the circle-packing rule behind it. If a circle has radius r, its curvature is:
b = 1 / r
When four circles are all tangent to each other, their curvatures satisfy Descartes’ Circle Theorem:
2(b1² + b2² + b3² + b4²) = (b1 + b2 + b3 + b4)²
If you already know three curvatures, the two possible fourth circles are given by:
b4 = b1 + b2 + b3 ± 2√(b1b2 + b2b3 + b1b3)
That plus-or-minus sign matters. One solution usually gives the small circle that fits into the gap. The other gives the companion circle, which may be the outer enclosing circle. If one circle wraps around the others, its curvature is treated as negative. That tiny sign change is the difference between “nice fractal” and “why is my diagram exploding?”
How to Create an Apollonian Gasket: 10 Steps
Step 1: Decide Whether You Want a Hand-Drawn or Digital Gasket
You can build an Apollonian gasket with a compass and ruler, with graph paper and a calculator, or with digital tools such as a geometry app, spreadsheet, or coding script. A hand-drawn version is great for understanding the structure. A digital version is better if you want precision, color, or enough recursion to make your laptop question your life choices.
If this is your first attempt, start simple: sketch by hand first, then refine digitally later. That way you understand the logic before turning the whole process over to automation.
Step 2: Choose the First Three Tangent Circles
Your starting point is a set of three circles that are all tangent to one another. These are sometimes called the seed circles. They do not have to be the same size, but equal circles make the first example much easier to visualize.
If you choose three equal circles of radius 1, then each has curvature 1. Arrange them so that each touches the other two. This gives you a nicely symmetric base, and symmetry is wonderful when you are learning a process that otherwise feels like geometry wearing a magician cape.
Step 3: Convert the Radii to Curvatures
Once your seed circles are chosen, convert each radius into curvature. This step matters because Apollonian gasket construction is most naturally described using curvature, not radius.
For example, if your three starting circles all have radius 1, then:
b1 = b2 = b3 = 1
If your circles have radii 1, 1/2, and 1/3, then the curvatures are 1, 2, and 3. In practice, many artists and math hobbyists prefer integer curvatures because the arithmetic becomes cleaner and the pattern still looks spectacular.
Step 4: Solve for the Two Missing Tangent Circles
Now use the Descartes formula to find the two circles tangent to all three seed circles. With three circles of curvature 1, the fourth curvature values are:
b4 = 1 + 1 + 1 ± 2√(1 + 1 + 1) = 3 ± 2√3
That gives two circles:
3 + 2√3 ≈ 6.464 and 3 - 2√3 ≈ -0.464
The positive curvature corresponds to the small inner circle. The negative curvature corresponds to the outer enclosing circle. Once you have those, you now have the classic four-circle starting configuration for an Apollonian gasket.
Step 5: Draw the Outer Circle and the First Inner Circle
Use the curvature values to convert back to radii. Since r = 1 / b, the small center circle has a radius of about 1 / 6.464, while the enclosing circle has radius about 1 / 0.464. The enclosing circle is much larger because its curvature magnitude is small.
At this stage, your drawing should contain:
one outer circle, three original tangent circles inside it, and one small central circle touching all three seed circles.
If the arrangement looks balanced and every circle kisses its neighbors without crossing them, congratulations: you have created the seed configuration of an Apollonian gasket.
Step 6: Identify Every Curved Triangular Gap
Look closely at the figure. Between groups of three tangent circles, there are curved triangular spaces. Every one of those spaces can hold another circle tangent to the three circles surrounding it. Those gaps are where the gasket grows.
This is the mental shift that makes the whole structure click: you are no longer drawing random circles. You are repeatedly solving the same tangency problem for each newly created gap. The gasket is recursive, which is just mathematician-speak for “do the same clever thing again and again until the page fills up or your software starts sighing.”
Step 7: Calculate the Next Circle for One Gap at a Time
Take any gap bounded by three mutually tangent circles. Use their curvatures in the same Descartes formula. Because one of the two solutions is already known from the existing configuration, the other solution gives the new circle you want.
A handy shortcut is this: if four tangent circles have curvatures a, b, c, and d, and you want the other circle tangent to a, b, and c, then:
d' = 2(a + b + c) - d
That shortcut saves time once you already have one completed four-circle cluster. It is especially useful in spreadsheets, scripts, and organized hand calculations.
Step 8: Repeat the Process Recursively
Every new circle creates more gaps. Each gap gets another tangent circle. Each of those creates still more gaps. This is where the gasket earns its fractal status.
If you are drawing by hand, you may stop after two or three rounds, because very small circles become difficult to sketch cleanly. If you are working digitally, you can keep going much further. The deeper you recurse, the more the image takes on that mesmerizing lace-like appearance that makes viewers lean in and forget what they were doing five minutes ago.
For best results, keep a record of each circle’s curvature, center point, and parent gap. Without a system, recursive construction can become less “beautiful mathematics” and more “circle soup.”
Step 9: Check Tangency, Symmetry, and Sign Conventions
Most mistakes in an Apollonian gasket come from one of three issues: using radius instead of curvature, forgetting that the enclosing circle has negative curvature, or placing a new circle in the wrong gap.
Pause occasionally and verify that each new circle touches exactly the circles it should touch. If a circle overlaps, floats loose, or behaves like it is auditioning for a different fractal, revisit your arithmetic. The structure is unforgiving, but it is also wonderfully consistent. When the numbers are right, the geometry clicks into place.
Step 10: Add Style, Depth, and Extra Iterations
Once the construction works, make it beautiful. Color circles by curvature. Shade them by recursion depth. Highlight integer curvatures. Use line weight to emphasize the large structural circles and let the tiny ones create texture.
This is where math and design shake hands. An Apollonian gasket works as a classroom demonstration, a poster, a coding challenge, a tattoo concept, or a digital artwork. It can look minimalist, baroque, futuristic, or quietly nerdy. All of those are valid. Geometry is flexible like that.
A Simple Worked Example
Suppose you begin with seed curvatures 2, 2, and 3. The two circles tangent to all three have curvatures:
b4 = 2 + 2 + 3 ± 2√(4 + 6 + 6) = 7 ± 8
So the two values are 15 and -1. That is a lovely integer configuration. It means one small circle has curvature 15 and the enclosing circle has curvature -1. Because these are all integers, every time you continue the packing, you stay inside an integral Apollonian gasket. This is one reason the topic is beloved by people who enjoy both shapes and numbers: it lets geometry and arithmetic gossip in the same room.
Common Mistakes to Avoid
Using radius where curvature belongs. The formula works with curvature, not radius.
Forgetting negative curvature for the outer circle. If one circle encloses the others, its curvature must carry a negative sign.
Assuming every gap is new. Some circles come from a gap you have effectively solved already. Track your work.
Stopping too early and calling it a gasket. Technically, the full gasket is infinite. Practically, a few clear levels are enough for a great visual.
Why This Fractal Is So Fascinating
The Apollonian gasket sits at a delightful intersection of geometry, recursion, visual art, and number theory. It starts with a problem so simple a child can sketch it: fit another circle into the gap. Yet the deeper you go, the richer it becomes. The pattern can be explored through Euclidean geometry, Möbius transformations, group theory, integer arithmetic, and computational design. Not bad for a bunch of circles minding their own business.
It also rewards different kinds of thinkers. Artists love the symmetry and density. Students love the clear construction rule. Programmers love the recursive algorithm. Mathematicians love the way a classical picture opens into serious modern questions. That is rare. Most topics either look friendly or hide deep theory. This one somehow does both.
Experience Notes: What It Feels Like to Build One
Anyone who has tried to create an Apollonian gasket, whether on paper or on a screen, usually has a very similar experience. The first few minutes feel manageable. You draw three tangent circles and think, “Okay, I understand this.” Then you calculate the next circle, place it correctly, and suddenly the picture becomes more than a geometry exercise. It turns into a system. That is the moment the gasket starts to feel addictive.
One common experience is the surprise of seeing order emerge from repetition. At first, the process can seem mechanical: measure, calculate, draw, repeat. But after a few rounds, the pattern develops a kind of visual rhythm. The large circles anchor the design. The medium circles organize the spaces. The tiny circles begin to create texture that almost looks woven. People often describe that stage as calming, and that makes sense. The gasket rewards patience with visible structure.
There is also usually a moment of frustration, especially when working by hand. A circle that should be tangent ends up slightly off. A sign error turns an enclosing circle into an impossible one. A carefully planned sketch becomes a persuasive argument for erasers. Oddly enough, that frustration is part of the educational value. It teaches precision. You start to notice that these patterns are not just pretty. They are exact. The beauty is a consequence of the logic, not a replacement for it.
Digital creation brings a different kind of experience. Once the recursive process is automated, the gasket unfolds with breathtaking speed. You can watch a sparse design turn into a dense fractal field almost instantly. That experience often changes how people think about recursion. What seems abstract in a textbook becomes concrete when each loop visibly fills another gap. It also opens up artistic experimentation: different seed curvatures, color systems, line styles, and stopping depths can make each gasket feel unique.
Teachers and students often find the topic memorable because it offers a rare mix of accessibility and depth. Beginners can understand the idea of tangent circles in a single class period. More advanced learners can explore Descartes’ theorem, integer packings, and fractal dimension. That layered experience is part of the topic’s staying power. The gasket grows with the learner. It can start as a sketch and end as a research question.
Perhaps the most lasting experience, though, is simple amazement. People do not expect circles to produce this much complexity from such a compact rule. But they do. And once you have built an Apollonian gasket yourself, even a modest one, you tend to look at the finished image differently. It is no longer just a pretty arrangement of circles. It is a record of repeated decisions, hidden formulas, and recursive growth. In other words, it is a picture of thought made visible. That is a pretty good return on ten steps and a little stubbornness.
Conclusion
Learning how to create an Apollonian gasket is one of the most rewarding ways to see geometry come alive. Start with three tangent circles. Convert radius to curvature. Use Descartes’ theorem to find the next tangent circles. Fill each curved triangular gap. Repeat. That is the whole method, and yet the results can be endlessly rich.
Whether you are a student exploring fractal geometry, a designer hunting for a mathematically elegant pattern, or a curious reader who likes shapes that seem smarter than they look, the Apollonian gasket is worth your time. It proves that repetition is not boring when the rule is good. Sometimes the universe really does run on simple ideas repeated beautifully.


