Table of Contents >> Show >> Hide
- Quick Answer: What Is the Easiest Way to Change Saturation on Windows 10?
- What Saturation Actually Does
- Method 1: Use Color Filters in Windows 10
- Method 2: Use the Built-In “Calibrate Display Color” Tool
- Method 3: Change Saturation with Intel Graphics Command Center
- Method 4: Use NVIDIA Control Panel and Digital Vibrance
- Method 5: Use AMD Software: Adrenalin Edition
- Method 6: Adjust Saturation on the Monitor Itself
- Method 7: Check Color Profiles in Color Management
- Why Saturation Keeps Resetting on Windows 10
- Common Mistakes to Avoid
- Best Practical Setup for Most People
- Conclusion
- Real-World Experiences with Changing Saturation on Windows 10
If your Windows 10 screen looks dull, washed out, weirdly neon, or like someone turned your laptop into a low-budget movie filter, you are probably trying to fix one thing: saturation. In plain English, saturation controls how intense colors look. Turn it down, and everything feels muted. Turn it up, and reds, blues, and greens start showing off like they just got a fresh haircut.
Here is the slightly annoying truth: Windows 10 does not give you one giant button labeled Make Colors Pop. Instead, changing saturation on Windows 10 usually means choosing the right method for your setup. Sometimes that is a Windows setting. Sometimes it is your graphics card software. Sometimes it is your monitor. And sometimes, yes, the culprit is a “helpful” calibration or color profile that made things worse instead of better.
This guide breaks it all down in a simple, practical way. You will learn how to change saturation on Windows 10 using built-in tools, Intel, NVIDIA, and AMD graphics settings, monitor menus, and color profile fixes. You will also learn what to avoid, because it is surprisingly easy to chase the wrong setting and end up fixing your wallpaper instead of your whole display.
Quick Answer: What Is the Easiest Way to Change Saturation on Windows 10?
The easiest method depends on your device:
- Need a fast built-in Windows option? Try Color Filters or the Calibrate Display Color tool.
- Using Intel graphics? Open Intel Graphics Command Center and adjust Saturation under display color settings.
- Using NVIDIA? Open NVIDIA Control Panel and change Digital Vibrance.
- Using AMD? Open AMD Software: Adrenalin Edition and adjust Custom Color > Saturation.
- Using an external monitor? Check the monitor’s built-in OSD color menu for saturation, hue, or custom color controls.
If you only remember one thing from this article, remember this: there is no single universal saturation slider in basic Windows 10 settings for every PC. The best fix is the one that matches your hardware.
What Saturation Actually Does
Saturation changes how vivid colors appear on your screen. Higher saturation makes colors look richer and bolder. Lower saturation makes everything look flatter and more gray. It does not control brightness, contrast, warmth, or sharpness, although people often mix those settings up.
For example, if your display looks too yellow at night, that is probably not a saturation problem. That is more likely Night Light or color temperature. If blacks look washed out and whites feel blinding, that is probably brightness, contrast, HDR, or a color profile issue. But if every photo looks lifeless or cartoonishly intense, saturation is a fair suspect.
Method 1: Use Color Filters in Windows 10
This is the quickest built-in method to change how colors appear across the screen, although it is not a traditional freeform saturation slider. It is still useful if you want a fast visual adjustment without downloading anything.
How to use Color Filters
- Open Settings.
- Go to Ease of Access.
- Select Color & high contrast or Color filters, depending on your Windows 10 version.
- Turn on Color filters.
- Test the available filters to see which one gives you a more comfortable look.
This option is especially helpful for accessibility and for users who want a quick whole-screen visual shift. It is not as precise as a dedicated saturation control, but it can absolutely help when colors feel “off.” Think of it as the fast fix, not the precision instrument.
Best for: laptops, office PCs, and users who want a built-in solution without touching GPU software.
Method 2: Use the Built-In “Calibrate Display Color” Tool
If Color Filters are too blunt, Windows 10’s display calibration tool gives you more control. This tool is great when your screen feels wrong in a deeper way, not just a little bland.
How to open it
- Click the Start button.
- Type Calibrate display color.
- Open the result.
- Follow the on-screen wizard.
The calibration wizard walks you through gamma, brightness, contrast, and color balance. Notice the phrase color balance. That matters. Even though the tool is not labeled “saturation,” it can dramatically change how vivid or flat colors appear once the screen is balanced properly.
What this tool is good at
It is ideal for fixing a display that looks washed out, too dark, overly harsh, or strangely tinted. It also helps when you suspect a recent update, a driver change, or a monitor swap made colors look different than before.
For example, if you plugged your laptop into a new external monitor and everything suddenly looked pale, calibration can often get you back to a normal baseline before you start chasing advanced tweaks.
One important limitation
The calibration tool is more about accuracy than dramatic color styling. So if your goal is “make my display more vibrant for games and movies,” you may still prefer Intel, NVIDIA, AMD, or monitor controls after calibration.
Method 3: Change Saturation with Intel Graphics Command Center
If your Windows 10 computer uses Intel integrated graphics, this may be your best route. It is one of the most direct ways to change saturation on Windows 10 without relying on monitor buttons.
How to change saturation with Intel
- Open Intel Graphics Command Center from the Start menu.
- Click Display.
- Open the Color tab.
- Create or switch to a Custom profile if needed.
- Adjust Saturation, along with color, hue, or brightness if necessary.
This is a handy solution because it affects the display more directly than basic Windows personalization settings. It is especially useful on laptops where the internal panel does not offer many hardware controls.
Pro tip: make small changes. Cranking saturation too far can make skin tones look sunburned, blue skies look radioactive, and spreadsheets look like they are trying to win a design award.
Method 4: Use NVIDIA Control Panel and Digital Vibrance
If your PC runs on NVIDIA graphics, the setting you want is usually Digital Vibrance. NVIDIA does not call it “saturation,” but in real-world use, that is basically the effect most people are looking for.
How to change Digital Vibrance
- Right-click the desktop and open NVIDIA Control Panel.
- Under Display, choose Adjust desktop color settings.
- Select the correct display if you use more than one monitor.
- Adjust Digital Vibrance.
- Click Apply.
This is one of the easiest ways to make desktop colors richer and more vivid. Gamers often love it. Photo editors often approach it with caution. Both reactions are reasonable.
Best for: gaming setups, entertainment-focused PCs, and users who want a more colorful desktop without entering the calibration rabbit hole.
Method 5: Use AMD Software: Adrenalin Edition
AMD users get a straightforward method too. In AMD Software, the feature to look for is usually Custom Color.
How to change saturation with AMD
- Open AMD Software: Adrenalin Edition.
- Go to Display.
- Turn on Custom Color.
- Adjust Saturation.
- Save your settings.
This option is useful because AMD bundles saturation with related controls such as hue, contrast, and color temperature. That means you can fine-tune the overall look without bouncing between three different apps and one very judgmental monitor menu.
If colors look faded in games but normal on the desktop, AMD’s software is also worth checking because some display and video enhancements can affect certain content types differently.
Method 6: Adjust Saturation on the Monitor Itself
Sometimes the easiest fix has nothing to do with Windows at all. External monitors often include their own color controls inside the on-screen display, usually called the OSD.
How to find it
- Use the buttons or joystick on your monitor.
- Open the Menu.
- Look for sections like Color, Picture, Custom Color, Hue, or Saturation.
- Make small adjustments and compare the result.
This is often the best choice for external displays because the monitor can apply changes regardless of which app or graphics profile is active. Some displays even let you switch between preset modes like Standard, sRGB, Movie, FPS, and Custom.
One wrinkle: on some monitors, hue or saturation controls may be unavailable depending on the input format. If the option is grayed out, check the input source and color format before assuming the monitor is broken.
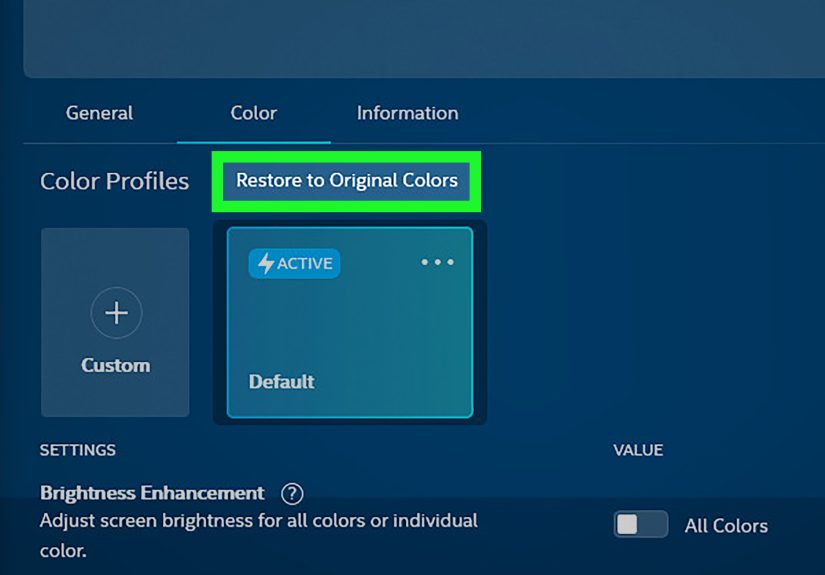
Method 7: Check Color Profiles in Color Management
If saturation suddenly changed after a driver update, monitor swap, or calibration attempt, your real issue may be the active color profile.
How to check color profiles
- Open Settings.
- Go to System > Display.
- Look for Color profile or open Color Management from search.
- Select your display.
- Review, add, remove, or change the default color profile.
This matters because an ICC profile can change how colors are interpreted, even when your hardware settings stay the same. If you installed a profile meant for a different monitor, congratulations: your screen may now be living someone else’s life.
Best for: creators, designers, photographers, and anyone who has already experimented with calibration tools.
Why Saturation Keeps Resetting on Windows 10
If you fix the colors and they keep changing back, one of these usual suspects is probably responsible:
- Graphics driver updates: Intel, NVIDIA, or AMD software may restore default values.
- Competing utilities: your laptop manufacturer app, Intel software, and NVIDIA software may all try to control color at once.
- New color profiles: a calibration tool or monitor driver may load a different ICC profile.
- Monitor presets: switching inputs or picture modes can override your preferred look.
- HDR or video enhancements: these can make colors look different, especially in media apps.
If your settings never stick, simplify the stack. Use one main method at a time. Do not adjust Intel, NVIDIA, Windows calibration, and your monitor menu all in the same 10-minute panic session. That is how people end up with a screen that looks like a tropical fish tank.
Common Mistakes to Avoid
1. Confusing warmth with saturation
A yellow screen is often a color temperature issue, not a saturation issue.
2. Turning everything up at once
If you raise contrast, saturation, and brightness together, you may like the result for about four minutes. After that, your eyes will file a complaint.
3. Ignoring the monitor menu
External monitors often have the most effective controls, yet many users never open the OSD.
4. Forgetting multi-monitor differences
Each display may need separate adjustment. What looks perfect on your laptop screen may look bizarre on a wide-gamut external monitor.
5. Expecting one setting to fix every app
Browsers, games, video players, HDR content, and photo editors do not always respond the same way to color adjustments.
Best Practical Setup for Most People
If you want a clean, low-drama workflow, this is the order I recommend:
- Reset obviously strange monitor presets.
- Run Calibrate display color in Windows 10.
- Use your GPU app to fine-tune saturation or vibrance.
- Check color profiles only if the display still looks wrong.
- Save or note your preferred settings so a future update does not ruin your good work.
This approach gives you a stable base first, then adds style. In other words, fix accuracy before chasing drama.
Conclusion
Learning how to change saturation on Windows 10 is less about finding one hidden magic slider and more about choosing the right tool for your setup. Windows itself offers Color Filters and the display calibration wizard. Intel, NVIDIA, and AMD provide more direct saturation-style controls. External monitors may offer the cleanest hardware-level fix. And if colors suddenly go weird, color profiles may be the quiet troublemaker in the background.
The good news is that you do not need to be a display engineer to make your screen look better. Start small, compare changes carefully, and avoid turning every setting into a science experiment. A few thoughtful tweaks can make photos look more natural, games feel more alive, and your everyday desktop a lot less blah.
Real-World Experiences with Changing Saturation on Windows 10
In real life, most people do not wake up and say, “Today I shall optimize my color saturation pipeline.” It usually starts with a complaint. Maybe Netflix looks pale. Maybe a game looks amazing on YouTube but flat on your monitor. Maybe your laptop screen seems lifeless next to your phone, which, to be fair, is often tuned to look like it had three energy drinks.
One common experience is the new-monitor shock. You buy an external display, plug it in, and immediately wonder whether you ordered the “mildly depressed edition.” The colors are not necessarily wrong, just less boosted than what you are used to. In that case, monitor presets and a modest bump in saturation or vibrance can make a huge difference. The trick is modest. Push too far, and people’s faces start looking like they lost an argument with a spray tan machine.
Laptop users often run into the opposite issue. Some systems look overprocessed right out of the box. Reds scream. Greens glow. White backgrounds somehow look both bright and dirty at the same time. On these machines, opening Intel, NVIDIA, or AMD color settings can feel like finally finding the thermostat in a hotel room that was secretly set by a prankster.
Then there is the work-versus-fun problem. A saturation level that makes movies and games look fantastic may be awful for editing photos or shopping online. That navy shirt you ordered might arrive looking suspiciously less navy in real life. Many users end up creating a compromise setup: accurate enough for work, lively enough for entertainment, and not so aggressive that Excel feels like an esports event.
Another very normal experience is not trusting your own eyes. You make a change, think it looks better, then five minutes later decide it looks worse. That is not you being dramatic. Human vision adapts quickly. The best move is to adjust one control at a time, open a few familiar photos, and compare before and after. Skin tones, blue skies, and neutral grays are especially useful reference points. If all three look believable, you are probably in a good place.
People also discover that “better” is personal. Some users genuinely prefer a softer, more neutral display. Others want color that jumps off the screen. Neither camp is wrong. The goal is not to make your display please the internet. The goal is to make it useful and comfortable for you.
That is why the easiest long-term strategy is simple: get the screen looking natural first, then add a little extra punch only if you still want it. Not maximum saturation. Not zero saturation. Just enough that your display feels alive without turning every icon into a tiny fireworks show.


