Table of Contents >> Show >> Hide
- Why Open Shelving Is a Smart Budget Project
- Plan Before You Buy a Single Board
- Budget-Friendly Materials That Still Look Good
- Basic Tools You Will Need
- How to Build Simple Open Shelving on a Budget
- An Illustrative Budget Breakdown
- Common Mistakes to Avoid
- Best Places to Use Simple Open Shelving
- How to Make Cheap Shelves Look More Expensive
- Experience and Lessons From Building Budget Open Shelving
- Conclusion
If your walls are bare, your cabinets are bursting, and your budget is giving you the side-eye, simple open shelving might be the home upgrade you need. It is practical, beginner-friendly, and surprisingly good at making a room look more intentional, even if the rest of the room is currently powered by “I’ll deal with it later” energy. Whether you want extra storage in the kitchen, laundry room, bathroom, pantry, office, or that awkward corner where clutter goes to form a union, budget-friendly open shelves can help.
The best part is that you do not need a full workshop, a dramatic renovation montage, or a bank loan disguised as a weekend project. With a few basic tools, inexpensive lumber or shelf boards, and a smart plan, you can build shelves that look clean, useful, and a lot more expensive than they really were. That is the sweet spot of DIY: making something custom while quietly congratulating yourself every time you walk past it.
This guide breaks down how to build simple open shelving on a budget, from choosing materials and measuring your space to installing the shelves securely and styling them so they look polished instead of accidental. We will also cover the common mistakes that can turn a cheap shelf project into a wobbly life lesson.
Why Open Shelving Is a Smart Budget Project
Open shelving is one of the rare home projects that checks three boxes at once: it is functional, affordable, and attractive. Compared with upper cabinets or full built-ins, basic wall shelves usually require fewer materials, less labor, and fewer specialized tools. That makes them a strong option for homeowners, renters with permission to drill, and anyone trying to improve storage without committing to a full remodel.
Another reason budget open shelving works so well is flexibility. You can build one shelf over a desk, two shelves in a pantry nook, or a whole row in a laundry room. You can use simple pine boards and painted brackets for a clean modern look, or stain the wood and choose black metal brackets for something more rustic. If your taste changes later, you are not stuck with a huge custom cabinet system glaring at you from across the room like an expensive mistake.
And yes, there is one catch: open shelves are visible. That means they do not just store your stuff; they display your habits. If you pile on random takeout soy sauce packets, an expired coupon book, and one lonely mug from 2014, the shelves will not protect your reputation. But if you keep them tidy, they can make a space feel lighter, brighter, and more open.
Plan Before You Buy a Single Board
Choose the Right Location
The most affordable shelves are the ones you only build once. Before buying materials, decide exactly where the shelves will go and what they need to hold. A shelf for cookbooks and bowls needs different support than a shelf for framed photos or extra toilet paper. If you want open kitchen shelving, pantry storage, or utility shelves for heavy items, wall studs matter a lot. If the shelves are mostly decorative, you have more flexibility.
Good low-risk spots for simple open shelving include above a desk, over a coffee station, beside a window, in a pantry alcove, above a washer and dryer, or on a blank bathroom wall. Avoid blocking outlets, vents, switches, or doors. Also avoid placing shelves where you will constantly smack your head and suddenly remember every bad word you know.
Measure With a Real Plan
Measure the width of the wall space, then decide how long and deep the shelves should be. For many everyday uses, a shelf depth around 10 to 12 inches is plenty. If you are storing pantry containers, baskets, or folded towels, 12 to 16 inches can make more sense. For spices, small decor, or narrow display shelves, shallower shelves work better and keep the room from feeling bulky.
Also think vertically. Leave enough space between shelves for the items you actually plan to store. A common beginner mistake is building pretty shelves that only fit items from a dollhouse. Test your spacing with real objects before installation. Stack a few bowls, set out a cereal box, or measure a storage bin. Real-life objects are honest in a way mood boards never are.
Budget-Friendly Materials That Still Look Good
If your goal is to build simple open shelving on a budget, the material choices matter more than people think. You do not need the fanciest hardwood in the lumber aisle. You just need material that is straight, sturdy enough for the span, and easy to finish.
- Pine boards: Affordable, easy to cut, easy to stain or paint, and widely available. Great for beginner DIY shelves.
- Common shelf boards: Convenient and inexpensive, especially for painted shelves in closets, pantries, or utility rooms.
- Plywood: Cost-effective for wider shelves. A trimmed plywood shelf can look polished once sanded and finished.
- MDF: Smooth and budget-friendly for painted shelves, though it is heavier and not ideal for damp areas unless properly sealed.
- Metal brackets: One of the easiest and cheapest support methods. They are beginner-friendly and visually reliable.
- Wood cleats: Great for a simple built-in look. Usually cheaper than premium floating shelf hardware.
If you want the biggest visual payoff for the least money, a stained pine board paired with simple black or white brackets is hard to beat. It looks intentional, costs less than many ready-made shelves, and does not require advanced woodworking. That is the budget DIY equivalent of showing up in jeans and somehow still looking well dressed.
Basic Tools You Will Need
You do not need a garage packed with power tools to make open shelving. For most simple shelf projects, these basics are enough:
- Tape measure
- Pencil
- Stud finder
- Level
- Drill/driver
- Screws and anchors
- Miter saw or circular saw, or store-cut lumber
- Sander or sandpaper
- Paint, stain, or clear finish
If you do not own a saw, many home improvement stores can cut boards for you. That one decision can save time, reduce mistakes, and prevent the classic “why is this board somehow shorter on one side” mystery.
How to Build Simple Open Shelving on a Budget
Step 1: Find the Studs
Use a stud finder to locate wall studs and mark them lightly with pencil or painter’s tape. If you are near an outlet, switch, or plumbing line, be extra cautious. Studs provide the best support, especially for shelves that will hold dishes, books, baskets, or pantry supplies. If you cannot hit studs where you need them, choose anchors rated for both your wall type and the expected load.
Step 2: Decide on Brackets or a Cleat System
For the simplest and cheapest shelf build, brackets are usually the winner. They are easy to install, forgiving for beginners, and widely available in budget-friendly sizes. Space them evenly, keep them level, and place them into studs when possible.
If you want a cleaner look, use a wood cleat system. A cleat is a strip of wood fastened to the wall that supports the shelf from underneath or behind. This method works especially well in pantries, closets, laundry rooms, and alcoves where the shelves run wall to wall. Cleats often save money and create a more built-in appearance.
Step 3: Cut the Shelf Boards
Cut your boards to length. If the shelf will fit between two walls, measure carefully in more than one place because walls are not always perfectly square. Sand the edges and corners so the shelves feel finished rather than splintery and mildly threatening.
For a cleaner look, soften the front edge with sandpaper. If you are using plywood, consider adding a trim piece to hide the layered edge. That small detail can make a cheap shelf look far more custom.
Step 4: Finish the Wood Before Installation
It is much easier to stain or paint shelf boards before they go on the wall. Sand first, wipe off dust, then apply wood conditioner if needed, followed by stain, paint, or a clear protective finish. Let everything dry fully. Patience here pays off. Installing tacky shelves is a great way to leave fingerprints that look like modern art.
Step 5: Mark a Level Line
Measure the desired height for the shelf and draw a level line where the top or bottom of the bracket or cleat will sit. Check it twice. Crooked shelves have a way of making an entire room look like it gave up.
Step 6: Install the Supports
Fasten brackets or cleats into studs whenever possible. Pre-drill pilot holes to help prevent splitting and make installation easier. If using anchors, follow the manufacturer’s instructions exactly and do not assume every anchor is created equal. Some are designed for light-duty decor, not a shelf full of stoneware serving bowls and your emotional support Dutch oven.
For longer shelves, add a middle bracket or center support to reduce sagging. Simple shelves can still be strong, but only if the support matches the span and expected weight.
Step 7: Attach the Shelf Boards
Set the board onto the installed brackets or cleats and check for fit. If your brackets allow it, secure the shelf board from underneath with short screws. If you are using cleats, the shelf can be screwed down from the top or nailed and filled for a cleaner look, depending on the design.
Give the shelf a gentle shake before loading it. “Gentle” is the keyword. This is a stability test, not an audition for a home renovation reality show.
An Illustrative Budget Breakdown
Costs vary by region and material choice, but here is a realistic example for two simple 36-inch shelves with stained pine boards and basic brackets:
| Item | Estimated Cost |
|---|---|
| Two pine boards | $20-$30 |
| Four basic metal brackets | $16-$30 |
| Screws and anchors | $8-$12 |
| Sandpaper | $4-$8 |
| Stain or paint | $8-$15 |
Total estimated budget: roughly $56 to $95, depending on what you already own and whether you buy new finishes or use leftover supplies. Go with painted MDF or ready-made shelf boards, and the cost can drop even more.
Common Mistakes to Avoid
Using the Wrong Anchors
If you are not drilling into studs, you need anchors appropriate for drywall, plaster, or masonry, and they must be rated for the load. Guessing is not a fastening strategy.
Making Shelves Too Deep
Deeper is not always better. Overly deep shelves eat into the room, gather more clutter, and can require more support. Build for the items you need, not for a hypothetical future in which you suddenly collect antique soup tureens.
Ignoring Weight Distribution
Even strong shelves can fail if all the heaviest items sit in the center with insufficient support. Spread weight intelligently and use enough brackets.
Skipping the Finish
Raw wood can work in some spaces, but unfinished budget lumber often looks, well, budget. Even one coat of paint, stain, or polyurethane can dramatically improve the final result.
Best Places to Use Simple Open Shelving
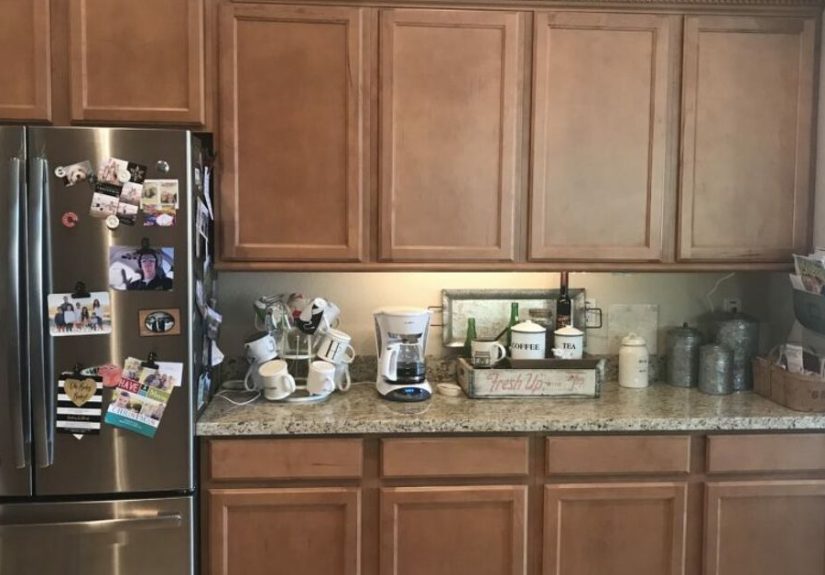
One reason this project is so popular is that it works almost anywhere. In kitchens, open shelves keep dishes, mugs, and pantry jars within easy reach. In laundry rooms, they provide space for detergent, baskets, and cleaning supplies. In bathrooms, they hold towels, toiletries, and small storage bins. In home offices, they display books and supplies without taking up floor space. In pantries and closets, cleat-supported shelves are especially budget-friendly because style matters a little less and function matters a lot more.
If you are furnishing a small room, open shelving can also make the space feel less boxed in than bulky cabinets. That visual lightness is one of the biggest reasons people love the look. Done well, shelves make a room feel more edited and less crowded.
How to Make Cheap Shelves Look More Expensive
You do not need luxury materials to get a polished result. You need consistent measurements, good finishing, and restraint. Keep the shelf thickness consistent, line up brackets evenly, and use matching hardware. Fill visible holes, sand rough edges, and choose a finish that works with the room.
For styling, group items by color or function. Mix practical storage with a few decorative pieces. Use matching containers if the shelves are visible in a kitchen or office. Leave a little empty space so the shelves can breathe. A shelf stuffed wall-to-wall with random objects does not look curated. It looks like the shelf lost an argument.
Experience and Lessons From Building Budget Open Shelving
One of the most useful things people discover after building simple open shelving on a budget is that the project is usually less about advanced carpentry and more about good decisions. The shelves themselves are often the easy part. The real magic happens in the planning: choosing the right depth, knowing what will actually be stored there, using supports that make sense, and resisting the urge to overcomplicate a project that is supposed to save money.
A common experience for first-time DIYers is starting with a very ambitious vision and ending with a very humble tape measure. Someone plans a dramatic wall of shelves, then realizes the room only needs two clean, useful boards above a coffee bar. And honestly, that is often the better outcome. Budget shelving works best when it solves a real problem. If the shelf gives you a place for daily dishes, baskets, towels, or office supplies, it earns its keep immediately.
Another lesson is that shelf styling changes after real life moves in. On day one, the shelves may look like a magazine spread with a tiny plant, three matching bowls, and a candle that smells like cedar and personal growth. By week three, they hold vitamins, printer paper, two coffee syrups, and a measuring cup that somehow migrated from the kitchen. That is normal. The goal is not perfection. The goal is useful, attractive storage that still looks good once everyday life shows up wearing sweatpants.
People also learn very quickly that walls have opinions. Studs are not always where you want them. Corners are rarely perfectly square. Old houses especially like to keep DIYers humble. Many budget shelving projects get better the moment the builder stops expecting showroom-level conditions and starts adjusting intelligently. A slightly custom cut, an extra bracket, or a shelf that is half an inch shorter can be the difference between frustration and success.
There is also a big emotional payoff with budget shelving that does not get talked about enough. When you build something simple with your own hands and it actually works, your confidence grows fast. Suddenly, measuring, drilling, sanding, and leveling do not feel intimidating anymore. One shelf becomes two. Two shelves become a pantry upgrade. Then you start eyeing other blank walls the way a baker looks at an empty mixing bowl. You see possibilities everywhere.
At the same time, experienced DIYers will tell you that simple projects stay simple only if you let them. It is easy to talk yourself into fancy hardware, thicker boards, decorative trim, custom stains, and a dozen add-ons that quietly turn a budget shelf into a premium project. Sometimes that upgrade is worth it. Often it is not. If your main goal is affordable storage, keep coming back to the core question: does this change improve function, strength, or appearance enough to justify the extra cost?
Another real-world lesson is that open shelving works best when you build around the habits you already have instead of the habits you wish you had. If you know you are not going to decant every pantry item into matching jars, do not design shelves that only look good with matching jars. If you use big mixing bowls, paper towels, or oversized laundry bottles, plan for them from the beginning. Good shelving is realistic. Great shelving feels like it was made for your life because, well, it was.
Finally, nearly everyone who builds budget open shelves says some version of the same thing afterward: they wish they had done it sooner. The project is approachable, the cost is manageable, and the improvement in function is immediate. That is a rare combination in home improvement. So if you have been staring at an empty wall and waiting for a sign, this is probably it. The wall is ready. Your drill is nervous but supportive. Let us call that progress.
Conclusion
Building simple open shelving on a budget is one of the most practical DIY projects for adding storage and style without draining your wallet. Start with a clear plan, choose affordable but reliable materials, install supports securely, and finish the shelves so they look intentional. Keep the design simple, build for the way you really live, and do not underestimate what a few well-placed boards can do for a room. The result is custom storage that feels useful on day one and satisfying every day after.


