Table of Contents >> Show >> Hide
- Why ribbon, string, and tape get messy so fast
- Start with a 15-minute stash audit
- Choose your storage style: display, drawer, or grab-and-go
- DIY Project #1: Shoebox dowel dispenser (ribbon + tape in one box)
- DIY Project #2: Picture-frame ribbon rack (wall-friendly and pretty)
- DIY Project #3: Pegboard spool bar (ribbon, twine, and “all the tapes”)
- DIY Project #4: Mason jar twine dispenser (no tangles, no drama)
- DIY Project #5: Washi tape “library” (see everything at a glance)
- How to keep supplies in good shape (so storage isn’t just “pretty clutter”)
- Three real-life setups (steal one and call it your own)
- Budget breakdown (what this usually costs)
- FAQ: quick answers that save you time
- Experience: what I learned after actually using these DIY systems (the real-life version)
- Conclusion
If your ribbon stash has ever “politely” unspooled itself into a tangled party streamers situation, welcome.
Ribbon, string, and tape are tiny supplies with big chaos energybecause they roll, they stick, they kink, and they multiply when you’re not looking.
The good news: you don’t need a fancy craft room (or a reality show budget) to get them under control.
This guide walks you through simple, DIY storage ideas that keep everything visible, easy to grab, and actually pleasant to usewhether you craft once a week or wrap gifts like it’s an Olympic sport.
Main goal: Make your supplies easier to see, easier to pull, and harder to explode across your desk.
We’ll do that with a few smart “dispenser-style” builds, some vertical storage tricks, and a couple of low-effort upgrades that feel suspiciously life-changing.
Why ribbon, string, and tape get messy so fast
These supplies share three traits that turn organization into a daily soap opera:
- They’re designed to move. Rolls spin. Spools unwind. Twine slips. Tape seeks dust like it’s their soulmate.
- They’re hard to stack. Different widths and diameters create “leaning towers of craft supplies.”
- They need quick access. If grabbing tape takes 60 seconds, you’ll just… leave it out. Then it becomes furniture.
So the best DIY storage systems aren’t just containersthey’re controlled dispensing systems.
Think: a way to pull what you need while the rest stays put.
Start with a 15-minute stash audit
Before you build anything, you’ll get better results by doing a quick “inventory reality check.” This keeps you from designing storage for supplies you don’t actually use.
Step 1: Sort by function, not just color
- Ribbon: gift wrap, hair bows, sewing, wreaths, party decor
- String/Twine: baker’s twine, jute, embroidery floss, elastic cord
- Tape: washi, masking/painter’s, double-sided, packing, adhesive dots
Step 2: Group by “how you use it”
Put the supplies you grab weekly in one “prime real estate” group. The rest can live in backup storage.
The point isn’t to display everything like a craft store aisle (unless that sparks joy). The point is to reduce daily friction.
Step 3: Measure the troublemakers
Grab a ruler and jot down:
- Largest ribbon spool diameter
- Widest ribbon roll (2″, 3″, 4″?)
- Largest tape roll diameter (packing tape is usually the bully here)
These measurements help you choose dowel sizes, spacing, and bins that won’t pinch or jam.
Choose your storage style: display, drawer, or grab-and-go
1) Display storage (best for color lovers)
Pros: fast access, inspiring, easy to “shop your stash.” Cons: dust and sunlight can fade some materials over time.
Great options: wall racks, pegboards, mounted rods, shallow shelves.
2) Drawer storage (best for small spaces)
Pros: hides visual clutter, protects from dust/light, works in bedrooms and shared spaces. Cons: out of sight can become out of mind.
Great options: drawer dividers, shallow trays, modular organizers.
3) Grab-and-go storage (best for gift wrap stations)
Pros: portable, keeps essentials together, easy cleanup. Cons: can get heavy if you toss in “just one more roll.”
Great options: handled bins, rolling carts, tote inserts.
DIY Project #1: Shoebox dowel dispenser (ribbon + tape in one box)
This is the “cheap and brilliant” build: a lidded box becomes a dispenser where ribbons and small tapes feed out neatly.
It’s perfect if your supplies live on a shelf and you want them contained but usable.
Supplies
- Sturdy shoebox or photo storage box with lid (thicker cardboard is better)
- 1–3 wooden dowels (3/8″ to 1/2″ diameter works for most ribbon spools)
- Ruler + pencil
- Craft knife or scissors
- Optional: grommet kit or heavy tape for reinforcing holes
- Optional: binder clips (for controlling ribbon ends)
Build steps
- Mark dowel positions. Measure down 2–3 inches from the top edge on both sides of the box and mark matching points.
- Make side holes. Cut small holes just big enough for the dowel to fit snugly. (Reinforce with tape or grommets.)
- Load your spools. Slide ribbon spools and small tape rolls onto the dowels.
- Insert dowels. Push the dowels through the box side holes so they rest securely.
- Create “feed slots.” Cut narrow notches along the front lip of the box or small slits in the lid so ribbon ends can pull out without lifting the lid every time.
- Stop the runaway ends. Use binder clips to clamp ribbon tails when not in use.
Why it works
The box prevents spools from tumbling and keeps ends from vanishing.
It also turns ribbon into a controlled “pull and cut” experience instead of a “hold spool with elbow while cutting with teeth” situation.
(We are aiming for calm crafting, not survival crafting.)
DIY Project #2: Picture-frame ribbon rack (wall-friendly and pretty)
If you want ribbons visible but not scattered, a frame rack is a clean, classic solution: dowels mounted inside an old frame hold spools in tidy rows.
It looks intentionallike you planned to be organized all along.
Supplies
- Old picture frame (remove glass/backing)
- 2–4 dowels cut to frame width
- Cup hooks or small screw-in hooks
- Drill or screwdriver
- Sandpaper (optional)
- Paint/stain (optional)
Build steps
- Prep the frame. Remove glass and backing. Lightly sand if needed.
- Plan your rows. Mark where each dowel will sit. Leave enough vertical space for your thickest spools.
- Install hooks. Screw hooks into both sides of the frame so dowels can rest in them (and lift out easily).
- Load spools and place dowels. Slide spools on, set dowels into hooks.
- Mount it safely. Use wall anchors if needed and keep it away from direct sun to protect colors.
Safety note: If you’re using a drill or mounting into studs, get help from an adult and wear eye protection.
A ribbon rack is cuteuntil gravity decides it’s a floor decoration.
DIY Project #3: Pegboard spool bar (ribbon, twine, and “all the tapes”)
Pegboard is the craft room MVP because you can reconfigure it anytime your collection changes.
The key trick: make (or buy) a “spool bar” using dowels so rolls spin smoothly.
Supplies
- Pegboard panel + mounting spacers
- Pegboard hooks or brackets that can support dowels
- Wooden dowels
- Small bins or wire baskets (for loose ends and scissors)
- Label tape or tags
Setup steps
- Mount pegboard with airflow space. Use spacers so hooks fit and items don’t scrape the wall.
- Create dowel bars. Place two sturdy hooks/brackets level with each other and rest a dowel across.
- Load rolls by category. Put ribbon spools on one bar, painter’s/masking tape on another, and keep daily-use rolls at eye level.
- Add a “cut zone.” Keep scissors or a small cutter nearby so you don’t walk away mid-project and leave ribbon trailing behind you like a parade float.
Pro tip: keep it from looking cluttered
Mix open storage (spools) with closed storage (small lidded bins) so the wall looks styled, not chaotic.
Pegboard is flexibleuse that flexibility to give your eyes a break.
DIY Project #4: Mason jar twine dispenser (no tangles, no drama)
Twine and string get messy because they collapse, knot, and grab onto themselves. A mason jar dispenser keeps the ball contained while the end feeds out neatly.
Two easy versions
- Daisy-cut lid method: Use a lid with decorative cutouts and feed twine through one opening.
- Grommet lid method: Punch a hole in the lid and install a grommet so the twine glides smoothly.
Build steps (grommet method)
- Punch a hole. Mark the center of the lid and create a hole sized for your grommet.
- Install grommet. Follow the kit instructions so the edges are smooth (no sharp metal).
- Load twine. Drop the twine spool or ball in the jar.
- Feed and close. Thread the end through the grommet and screw on the lid.
This method is also great for baker’s twine and thin cord. If you store multiple colors, label the jar top so you don’t play “guess the shade” every time.
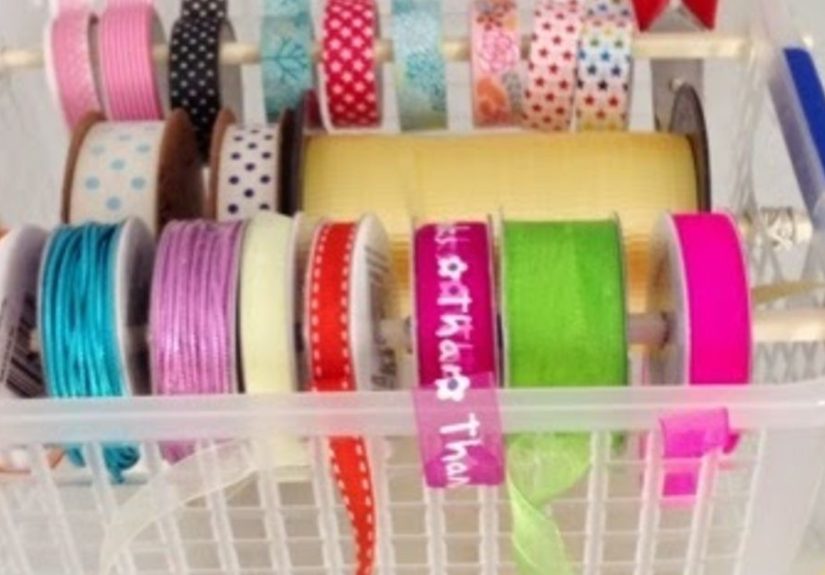
DIY Project #5: Washi tape “library” (see everything at a glance)
Washi tape is delightfuluntil it becomes a pile of tiny cylinders that roll off your desk like they’re late for an appointment.
Your best DIY options depend on how many rolls you own.
If you have under 30 rolls: tray + divider system
- Use a shallow drawer tray, add small dividers, and stand rolls upright.
- Sort by color family (warm, cool, neutrals) or by theme (florals, solids, seasonal).
- Bonus: keep a small “current favorites” cup on your desk so you don’t dump the whole collection out daily.
If you have 30–150 rolls: repurpose small parts organizers
Hardware-style organizers (with small compartments) are surprisingly perfect for washi because each roll stays in its lane.
Clear lids help you find patterns fast without opening everything.
If you have a truly impressive collection: bobbin method
For maximum space savings, wind tape onto flat bobbins (like embroidery bobbins) and store them in a thread case.
It’s not as “cute display,” but it’s efficient and makes it easier to carry your tape to a project table.
How to keep supplies in good shape (so storage isn’t just “pretty clutter”)
Prevent ribbon fraying and crushed edges
- Use clips for ends. Binder clips or small hair clips keep tails from unraveling.
- Avoid overstuffing. Tight compression can crease wired ribbons and crush delicate textures.
- Store special ribbons separately. Velvet, satin, and wired ribbon benefit from low-pressure storage.
Keep tape sticky (and less dusty)
- Store away from direct sunlight. Heat and UV can reduce adhesive performance and fade decorative tapes.
- Keep it cool and dry. A stable room temp is better than garages or near heaters.
- Seal what you can. For backup rolls, closed bins or zipper pouches reduce dust that loves to cling to edges.
Some industrial-grade tapes list shelf-life guidance and recommend storing in moderate temperatures and humidity; craft tapes vary, but the same common-sense rule helps:
avoid heat swings, moisture, and sun.
Make cutting easy and safe
If you’re constantly hunting scissors, your storage system is incomplete. Add a “cut station”:
- one dedicated pair of scissors (or two: fabric + paper),
- a small ruler,
- and a tiny trash cup for snipped ends.
Three real-life setups (steal one and call it your own)
1) The desk-corner wrap station
- One shoebox dowel dispenser for daily ribbons/tapes
- One mason jar twine dispenser
- One shallow tray for “today’s” washi tape picks
This setup is compact and easy to reset after projects. It’s ideal if you craft in a bedroom or shared space.
2) The closet-shelf organizer
- Backup spools in labeled clear bins
- Washi tape in a lidded organizer
- “Holiday ribbons” in one bin, “everyday ribbons” in another
The trick here is labeling and zoning. If everything is just “in bins,” you’ll end up rummaging.
If bins are themed, you can grab exactly what you need.
3) The rolling cart of victory
- Top tier: daily tape + scissors + rulers
- Middle: ribbons by color or type
- Bottom: twine, gift wrap tools, refills
A cart works especially well for gift-wrapping seasons. Roll it out, wrap like a pro, roll it away.
Budget breakdown (what this usually costs)
You can build a solid system without spending much. Typical DIY costs:
- $0–$10: shoebox dispenser, repurposed jars, cardboard dividers, binder clips
- $10–$30: picture-frame rack, basic pegboard section, small organizers
- $30–$80: larger pegboard wall, rolling cart, multiple clear bins
The sweet spot is usually a hybrid: DIY dispensers for active supplies, plus simple labeled bins for backups.
FAQ: quick answers that save you time
Should I store ribbon on spools or on cards?
If you use ribbon often, spools on dowels are easiest. If you’re tight on space, winding ribbon onto cards or bobbins can reduce bulkespecially for partial spools.
How do I stop ribbon ends from disappearing?
Use clips, tiny rubber bands, or a small piece of low-tack tape to secure the tail. Then store tails facing forward so you can grab them fast.
What’s the best way to store a mix of tapes?
Keep daily-use tapes upright in a tray or on a pegboard bar. Store backup rolls in a closed bin away from heat and sunlight.
Group by purpose: decorative, masking/painter’s, double-sided, packing.
Experience: what I learned after actually using these DIY systems (the real-life version)
The first “system” I tried was the classic: everything in one giant bin. It felt tidy for exactly two days.
Then came the moment I needed one specific ribbonjust oneand suddenly I was elbow-deep in spools, pulling out rolls like I was auditioning for a game show called “Guess That Glitter.”
That’s when I learned the first rule of craft organization: if you have to dig, you will eventually quit.
Digging is fine for backup supplies. It is terrible for daily-use supplies.
My next attempt was display storage, because it looks so satisfying. I mounted a simple bar, lined up spools by color, and admired it like it was modern art.
And honestly? For ribbons I use all the time, it was amazing. I could see everything, pull what I needed, and put it back without thinking.
But display storage taught me a second rule: visibility creates temptation.
When everything is out, you’ll “just add one more roll” because it looks cuteand suddenly the rack is crowded, spools scrape each other, and nothing spins smoothly.
The fix was spacing: fewer spools per bar and a “backup bin” for the extras.
The biggest surprise win was the shoebox dowel dispenser. I expected it to feel a little flimsy, like a temporary solution.
But once I reinforced the holes and cut neat feed notches, it became my go-to for gift wrap ribbons and small tapes.
It kept ends from disappearing, and it stopped the dreaded floor-unspooling incident (you know the onewhen ribbon trails behind you as you walk, like you’re accidentally decorating the hallway).
The only downside: if you overfill it, the rolls start rubbing and dispensing becomes annoying.
So I started loading it with “current season” supplies onlyeveryday neutrals, birthday ribbon, basic washiand rotating specialty items in and out.
That made the box feel curated instead of crammed.
Twine was my personal nemesis. It would knot itself while sitting perfectly still, which feels rude.
The mason jar dispenser fixed that instantly. I tried the daisy-cut lid version first (super easy), then upgraded one jar with a grommet.
The grommet jar feeds smoother and looks more finished, but honestly both work.
The real secret was labeling the top: “jute,” “baker’s twine,” “elastic cord.”
Without labels, I’d open every jar like a raccoon checking trash cans. With labels, I just grab the right one and go.
Washi tape was the final boss. Standing rolls upright in a tray looked greatuntil I bumped the tray and created a tiny tape avalanche.
I switched to compartment storage for the bulk of my collection and kept only a “favorites cup” on my desk.
That little move changed everything: I stopped dragging out 80 rolls to pick two.
I also started grouping washi by project themes: “journaling neutrals,” “holiday sparkle,” “bright patterns.”
It made decision-making faster and kept my desk calmer.
If you’re someone who likes options, theme grouping gives you variety without chaos.
The overall lesson? The best storage isn’t the prettiestit’s the one that matches how you actually craft.
If you craft at a desk, keep supplies within arm’s reach in dispensers and trays. If you craft seasonally, keep your everyday tools accessible and rotate seasonal ribbons and tapes like a mini craft wardrobe.
And if you ever feel your system slipping, don’t start overjust do a five-minute reset: clip the tails, return rolls to their zones, and toss the mysterious tape scraps that somehow appear like craft confetti.
Organization isn’t a “finished” state. It’s a tiny routine that keeps your supplies ready to usewhich is the whole point of having them in the first place.
Conclusion
Organized ribbon, string, and tape storage doesn’t require a huge craft room or expensive organizersit requires a plan that supports how you use your supplies.
Start with a quick sort, choose a storage style (display, drawer, or portable), and build one or two dispenser-style DIY projects that prevent tangles and runaway rolls.
When your materials are easy to see and easy to pull, you’ll craft faster, waste less, and spend more time making things instead of hunting for the end of the ribbon like it’s a lost sock.