Table of Contents >> Show >> Hide
- What “Fretwork” Means Here (And Why It’s DIY-Friendly)
- Why a Walnut Plywood Top Is the Smart Flex
- Project Planning: Size, Placement, and Proportions
- Materials and Tools
- Step-by-Step: Building the Fretwork Base
- Prep and Paint: Getting a Smooth Finish on a Detailed Base
- Building the Walnut Plywood Top Without Ruining the Veneer
- Attaching the Top: Strong, Clean, and Not Overcomplicated
- Troubleshooting: Common “Oops” Moments (And How to Fix Them)
- Style Ideas: Make It Look Intentional (Because It Is)
- Real-World Build Notes: The Part Nobody Mentions (But Everybody Lives)
If you’ve ever looked at a fretwork table and thought, “That’s gorgeous… and also definitely outside my skill level and budget,”
welcome to the club. The good news: this particular style of “fretwork” isn’t the fragile, hair-thin scroll-sawn kind that makes you whisper
apologies to your blades. It’s a crisp, geometric lattice built from simple angled cuts, glued into a pattern that looks expensive enough to
deserve its own spotlight.
The even better news: you can crown it with a walnut plywood top that gives you that rich, high-end walnut look without paying “solid-walnut-tabletop”
money. (Walnut is wonderful. Walnut is also the kind of wood that makes your wallet do a little cough.)
What “Fretwork” Means Here (And Why It’s DIY-Friendly)
Traditional fretwork often refers to intricate, pierced designs cut into woodthink ornate patterns and lots of negative space. For this project,
the fretwork effect comes from repeating squares made from short, mitered pieces assembled into a clean, modern grid. You get the same airy, architectural
vibe, but the process is more like building a stylish wood puzzle than performing woodworking surgery.
That’s why this is such a satisfying build: it looks detailed, but the difficulty mostly comes from accuracy and repetition, not from
complicated joinery. If you can cut consistent angles and keep things aligned while glue dries, you’re in business.
Why a Walnut Plywood Top Is the Smart Flex
A walnut plywood panel (often walnut-veneered hardwood plywood) gives you three big wins:
- Looks like walnut: The grain and color read “furniture,” not “workshop scrap.”
- Stays flatter: Plywood is dimensionally stable, which is great for long, narrow console tops.
- Costs less: You can get the walnut look without buying enough solid walnut to make you consider a second job.
The one trade-off is edge treatment. Plywood edges don’t magically turn into walnut. That’s where edge banding (or a solid wood edge) comes in
and it’s absolutely doable with basic tools and a little patience.
Project Planning: Size, Placement, and Proportions
This fretwork style shines as a console table: entryway, behind a sofa, along a hallway wallanywhere you want “wow” without bulky furniture.
A practical starting range for a console is:
- Length: 36–60 inches (pick based on wall space)
- Height: 28–32 inches (so it sits nicely under art/mirrors)
- Depth: 10–14 inches (slim enough to pass by, deep enough for a lamp)
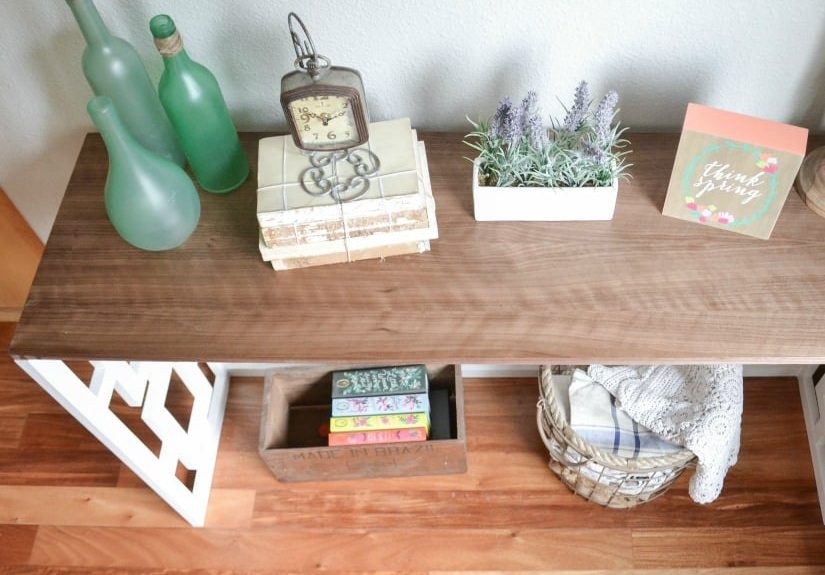
Pro tip: keep the base painted (poplar is great for this), and let the walnut top be the star. The contrast makes the fretwork read crisp and intentional,
like it belongs in a catalog where everything is somehow always perfectly dust-free.
Materials and Tools
Materials
- 1×2 boards (commonly poplar for paint-grade builds; pine if you’re budgeting hard, with the understanding it dents if you look at it wrong)
- 3/4-inch walnut-veneered hardwood plywood for the top (furniture-grade)
- Veneer edge banding (walnut tone) or solid wood edging strips
- Wood glue
- Brad nails (optional, used like tiny clamps while glue sets)
- Wood filler (paintable) for nail holes
- Primer + paint for the base (or stain if you prefer)
- Clear finish for the walnut top (wipe-on poly, polyurethane, or another durable topcoat)
Tools
- Miter saw (or a miter box if you’re extremely patient and enjoy forearm workouts)
- Table saw or circular saw with a straightedge guide
- Brad nailer (optional but very helpful)
- Clamps (you can never have too many; you can only have “not enough”)
- Orbital sander + sanding pads for tight spaces
- Iron (for iron-on edge banding) + a wood block for pressing
- Utility knife/edge banding trimmer + sandpaper for final flush-up
Step-by-Step: Building the Fretwork Base
1) Cut consistent pieces (a stop block is your best friend)
The fretwork look depends on repeating the same cuts accurately. Set up a stop block on your miter saw station so every short piece comes out the same length.
You’ll make a lot of identical partsthis is where you save time and sanity.
Expect to cut dozens of small segments, many with 45-degree miters. The exact count varies by your table size and pattern, but the workflow stays the same:
cut a batch, stack them neatly, and label if needed so you don’t accidentally mix lengths.
2) Assemble the fretwork squares (glue first, brads second)
Dry-lay a section on a flat surface and mark centerlines so you can align the pattern consistently. Apply glue with a light handtoo much glue turns your
pieces into little ice skates that slide out of position. Brad nails can hold parts while the glue cures, but the glue is doing the long-term work.
If you can recruit a helper, do it. One person can hold alignment while the other tacks pieces in place. If you’re solo, clamps and painter’s tape can help,
but you’ll want to work slowly and check squareness constantly.
3) Frame each fretwork panel to fit tight (measure what you built, not what you planned)
Here’s the golden rule: build the fretwork first, then measure it. Small variances add up when you’re working with many pieces.
Cut the surrounding frame parts (the longer rails and stiles) to fit the actual fretwork panel so you don’t end up with gaps that scream, “I eyeballed it.”
Dry-fit everything before committing to glue. Clamp the frame around the fretwork, check for tight contact, then glue and secure as needed.
4) Assemble the base and keep it square
Once your side panels are framed, assemble them into the table base with the connecting rails/aprons. Work on a flat surface, measure corner-to-corner
to confirm squareness, and clamp like you mean it.
Important build reality: fretwork sides can have a bit of flex until the top is installed. If the structure feels slightly “springy,” that’s normal.
A temporary brace across the top edges can help keep everything aligned during sanding and painting.
Prep and Paint: Getting a Smooth Finish on a Detailed Base
Fretwork means lots of corners, edges, and little shadows where drips love to hide. The smoother your prep, the better the final look:
- Fill nail holes and seams with paintable filler, then sand flush.
- Use an orbital sander on flat zones and hand-sand tight spots so paint doesn’t highlight rough areas.
- Prime thoroughly so your topcoat levels evenly.
If you spray, use multiple thin coats and let them dry properly. If you brush/roll, keep your paint thin and avoid overworking it. With fretwork,
“just one more pass” is how you earn a drip you’ll be sanding out later while muttering to yourself.
Building the Walnut Plywood Top Without Ruining the Veneer
1) Cut for minimal tear-out
Walnut veneer looks amazing, but it can chip if you cut it like ordinary construction plywood. To keep edges clean:
- Tape your cut line (top and bottom if possible).
- Use a sharp, fine-tooth blade meant for plywood/veneers.
- Support the sheet fully so it doesn’t sag or vibrate during the cut.
- Set blade depth shallowjust enough to cut through, not dramatic enough to impress your neighbors.
Blade direction matters. With a circular saw, the blade typically cuts upward, so put the “good face” down to reduce tear-out on the visible side.
With a table saw, the blade cuts upward through the sheet, so the “good face” is usually up.
2) Edge banding: making plywood look like real furniture
Veneer edge banding is a thin strip of real wood veneer (often pre-glued) that covers the plywood edge. The basic process:
- Cut edge banding slightly long.
- Iron it on with steady heat and pressure.
- Press firmly with a wood block as it cools to set the adhesive.
- Trim the overhang carefully, then sand lightly to blend.
For a more rugged edge (especially if kids, keys, or enthusiastic snack placement are involved), consider a solid walnut edge strip instead. It takes longer,
but it’s tougher and more forgiving if the table gets knocked around.
3) Finish the top so it stays pretty in real life
Walnut veneer really comes alive under clear finish. If you like the natural color, skip stain and go straight to a protective topcoat. A wipe-on finish
is beginner-friendly because it levels easily and reduces brush marks.
Whichever finish you choose, the secret to a clean result is boring (which is rude, because you did all this work for excitement): light coats,
proper dry time, and gentle sanding between coats to knock down dust nibs.
Attaching the Top: Strong, Clean, and Not Overcomplicated
Because the top is plywood, it won’t expand and contract the way a solid wood top does. That gives you flexibility. You can:
- Screw up from underneath through the aprons/rails (pre-drill to avoid splitting).
- Use tabletop fasteners or figure-8 fasteners for a tidy, serviceable connection.
- Add a thin bead of glue only where appropriate (many builders prefer screws so the top can be removed later).
Before fastening, confirm the top overhang is consistent on both sides and the front. Step back and eyeball it. This is the stage where tiny alignment
errors become permanently visible from across the room.
Troubleshooting: Common “Oops” Moments (And How to Fix Them)
My fretwork looks slightly uneven
That usually comes from tiny variations in cut length or drifting alignment during glue-up. Lightly sand high edges, fill micro-gaps with paintable filler,
and rely on a smooth paint finish to unify the look. (Paint is forgiving. That’s why we love it.)
My veneer chipped on the cut
If it’s minor, you can often hide it on the underside or at the back. For visible chips, carefully patch with a matching wood marker or filler, then
position décor strategically. Interior design is sometimes just elegant camouflage.
My edge banding lifted at a corner
Reheat gently with the iron and press firmly. Corners are where patience matters. Let it cool completely before trimming so you don’t pull the veneer loose.
Style Ideas: Make It Look Intentional (Because It Is)
This table loves a few well-chosen pieces: a tall lamp, a sculptural vase, a tray for keys, or a stack of books with a candle on top. The fretwork base
already does a lot visually, so you don’t need to overcrowd the surface. Let the negative space breathe.
Real-World Build Notes: The Part Nobody Mentions (But Everybody Lives)
Let’s talk about what building a fretwork table actually feels likebecause the photos online are always suspiciously calm. In real life, the first stage
is optimism. You set up your miter saw, you line up your stop block, and you think, “Wow, I’m basically a production shop now.” Then you realize you’re
making a lot of small cuts, and every single one needs to match, because this design is basically geometry with feelings.
Here’s the funny thing: the repetitive cutting part can be oddly satisfying. There’s a rhythm to itcut, stack, repeatuntil your brain starts doing
unhelpful math like, “If I cut 42 pieces in 10 minutes, then I can cut 90 pieces in… why am I still cutting pieces?” The best tip I can give is to
organize as you go. Make neat piles by length. Label them. If you don’t, you’ll eventually grab the wrong stack, assemble a “square” that isn’t square,
and discover it right after the glue turns from “adjustable” to “permanent life choice.”
The glue-up stage is where the project gets emotionally dramatic. Tiny pieces slide around on glue like they’re auditioning for a skating competition.
You clamp one corner, the opposite corner shifts. You fix that, another piece lifts slightly. If you’re using brad nails, you’ll feel like a heroright
up until you notice a nail hole in a spot you didn’t plan for, and now you’re debating whether filler will hide it or whether you should simply rotate the
whole panel and call it “design evolution.”
Painting the base is its own adventure because fretwork has a million little edges that all want equal coverage. Too much paint and you get drips in the
corners. Too little and you get thin spots that show up the moment sunlight hits it from the side. Spraying can make this easier, but spraying also
increases the odds you’ll discover paint in places you didn’t know existedlike the inside of your nostril (wear a mask), or somehow on the far wall
behind your drop cloth (physics is rude).
Then comes the walnut plywood top, which is the “wow” moment and the moment you become extremely protective of a single sheet good.
Veneer tear-out is a special kind of heartbreak because it happens fast and feels personal. The experience most DIYers share is that careful setup
makes all the difference: fresh blade, proper support, tape line, and a slow, steady cut. When you do it right, the edge looks clean enough to make
you pause and admire it like you just won a small woodworking award.
Edge banding is the stage where you learn patience in a very practical way. You iron it on, it looks great, and then you trim it and think,
“That was easy!”until you hit a corner, or a spot where the banding didn’t fully bond, or you trim a little too aggressively and take off a tiny chunk.
The good news is: most of these issues are fixable with gentle reheating, careful trimming, and light sanding. The even better news is that once the top
is finished and attached, your brain starts forgetting the fussy parts and remembers the dramatic transformation: a painted, architectural base and a warm,
walnut-toned surface that looks far more expensive than it was.
The final “real experience” moment happens when you stand the table upright and realize the top is doing structural work too. That slight flex in the sides?
Gone. The table suddenly feels solid and finished. It’s one of the most satisfying before-and-after transitions you can get from a weekend build:
a pile of short offcuts and a sheet of plywood become a statement piece that looks like it belongs in a high-end entryway. And yes, you’re allowed to
walk past it for the next week and casually say, “Oh this? I made it.” That’s basically required.