Table of Contents >> Show >> Hide
- Why Giant Nutcrackers Work So Well for Christmas Décor
- Plan the Build Before You Buy a Single Thing
- Tools and Materials You’ll Likely Need
- How to Make a DIY Giant Nutcracker
- Easy Design Ideas for a Better-Looking Nutcracker
- Common Mistakes to Avoid
- How to Style Your DIY Giant Nutcracker
- How to Store It After Christmas
- Real-World Experience: What Making a DIY Giant Nutcracker Actually Feels Like
- Conclusion
If your holiday decorating style falls somewhere between “classic Christmas charm” and “I would like the neighbors to slow down and stare,” a DIY giant nutcracker is your moment. These oversized figures have become a favorite for porches, entryways, fireplaces, and holiday photo corners because they instantly make a space feel festive, theatrical, and just a little bit magical. In other words, they do for your Christmas décor what whipped cream does for hot cocoa: technically optional, emotionally essential.
The good news is that making a giant nutcracker is far more doable than it looks. You do not need to be a master carpenter, a scenic designer, or the kind of person who owns seventeen clamps and calls them “the good ones.” You just need a solid plan, a handful of basic materials, and enough patience to let paint dry without poking it every six minutes. This guide walks you through how to build a DIY giant nutcracker step by step, how to make it hold up outdoors, how to style it beautifully, and how to avoid the common mistakes that turn “storybook elegance” into “confused toy soldier energy.”
Why Giant Nutcrackers Work So Well for Christmas Décor
Nutcrackers already carry a strong holiday association, thanks to centuries of winter tradition and the enduring popularity of The Nutcracker ballet. That makes them instantly recognizable, even when you reinterpret them in a more modern, colorful, or whimsical way. A giant version amplifies that effect. It becomes décor and focal point at the same time.
Unlike some holiday projects that disappear into the visual chaos of garland, lights, bows, inflatables, and the annual mystery tangle of extension cords, a large nutcracker has presence. It anchors a porch, frames a front door, adds height to a fireplace setup, and pairs beautifully with wreaths, lanterns, ornaments, and evergreen swags. One looks intentional. Two look grand. Four starts to feel like you’re staging a Christmas coup, which may or may not be the dream.
Plan the Build Before You Buy a Single Thing
Decide Where It Will Live
Before you choose materials, figure out whether your giant nutcracker will be used indoors, on a covered porch, or fully outdoors. This matters more than people think. An indoor version can be lighter and more decorative. An outdoor version needs a sturdier base, more weather-resistant paint, and better sealing. If the nutcracker will sit outside, a covered area is the safest choice because it reduces direct exposure to rain, harsh sun, and wind.
Choose a Realistic Size
A six-foot nutcracker is a popular sweet spot. It feels dramatic without becoming impossible to move, store, or paint without questioning your life choices. If you want something more manageable, go with five feet. If you want serious curb appeal, six to seven feet works beautifully for a front porch.
Think in Simple Shapes
The easiest giant nutcracker builds rely on basic forms: a round or square body, straight limbs, a stable base, and decorative trim that creates the illusion of complexity. The body is often made from a concrete form tube or another sturdy cylindrical material. The internal frame can be built from two-by-fours, while PVC pipe works well for arms and legs. Circular wood rounds or cut wood panels help create the top and bottom sections.
Tools and Materials You’ll Likely Need
- Two-by-fours for the internal frame
- A concrete form tube or similar body tube
- PVC pipe for arms and legs
- Wood rounds, plywood, or MDF for the head, base, and trim details
- Screws and construction adhesive or heavy-duty glue
- PVC primer and cement if you’re permanently joining PVC pieces
- Wood filler for seams, holes, and imperfections
- Sandpaper in medium and fine grits
- Exterior primer and exterior paint if it will be displayed outdoors
- Paintbrushes, foam rollers, or spray paint for decorative details
- A drill, miter saw or hacksaw, measuring tape, and clamps
- Painter’s tape, drop cloths, and a tack cloth or clean rag
- Optional embellishments like faux fur, tassels, trim, buttons, battery lights, and metallic accents
Wear eye protection while cutting, sand in a well-ventilated area, and avoid spray painting in an enclosed space. Wood dust and finishing chemicals are not the kind of Christmas magic anyone asked for.
How to Make a DIY Giant Nutcracker
1. Sketch the Proportions First
Start with a simple sketch. Divide the figure into sections: hat, head, beard area, body, legs, and base. This does not need to be gallery-worthy. It just needs to keep you from building a nutcracker with a tiny head, linebacker shoulders, and knees that suggest interpretive dance.
A common proportion for a six-foot figure is roughly this: about 10 to 12 inches for the hat, 10 to 12 inches for the head, around 24 inches for the body, and the remaining height for the legs and base. Keep the shoulders broad enough to feel balanced, but not so wide that the whole piece looks more like a festive filing cabinet.
2. Build a Strong Internal Frame
Create the main support structure with two-by-fours. This frame gives the nutcracker stability and helps attach the body, head, and base securely. If you are using a concrete form tube for the torso, size the internal wood frame so the tube slides over or around it. Screw everything together firmly and check that the frame stands straight before moving on.
For outdoor use, the base matters a lot. Cut a plywood or solid wood platform wide enough to prevent tipping. A larger base may not sound glamorous, but neither is rescuing your nutcracker from a windy face-plant in the hydrangeas.
3. Cut the Body, Limbs, and Decorative Pieces
Cut the body tube to size. Cut PVC pipe for the arms and legs, making each cut as straight as possible. If you’re using a hacksaw or miter saw, secure the pipe first instead of holding it by hand. After cutting, remove burrs and rough edges so the pieces fit cleanly and look finished.
Use wood or MDF for the head, hat brim, shoulders, boots, and trim elements. A circular or slightly squared head works well. Many DIYers also create boots and shoulder epaulets from layered wood shapes, then rely on paint to make the details pop.
4. Dry-Fit Everything Before Gluing
Before committing with screws, glue, or cement, assemble the figure loosely. This “test run” helps you check proportion, posture, and balance. The nutcracker should look upright and symmetrical, with arms and legs placed evenly and the head centered on the body.
This step saves a lot of regret. It is much easier to adjust an arm that looks slightly off when nothing is permanent yet. Once everything is glued and painted, however, that crooked arm becomes the kind of detail your eye notices forever.
5. Attach the Parts in Stages
Start by fixing the torso to the base and internal frame. Then attach the legs, followed by the arms and shoulder details. Add the head and hat last. If you’re using PVC fittings for elbows or joints, dry-fit first, then prime and cement if you want those connections permanent.
Leave decorative extras like hair, beard trim, buttons, or ornaments until after the main figure is assembled and painted. Structural work first, sparkle second. That rule applies to most of life, honestly.
6. Fill, Smooth, and Sand
Once assembled, fill visible screw holes, seams, and gaps with wood filler. After it cures, sand the whole project so the paint has a better surface to grip. Sanding also softens rough edges and helps the piece look more polished. Wipe away dust with a tack cloth or a clean rag before priming.
If you are using MDF or wood filler in decorative areas, pay extra attention to edges and transitions. Those small refinements are what separate a handmade piece from a homemade-looking one.
7. Prime Like You Mean It
Do not skip primer. It helps paint adhere better, creates a more uniform finish, and improves durability, especially on bare wood and mixed materials. For outdoor pieces, use an exterior-rated primer. For slick or tricky surfaces, a bonding primer is even better.
Prime all exposed wood, repaired spots, and any areas where different materials meet. Let the primer dry fully, then do a light sanding if the surface feels rough. This extra pass makes the final paint job look dramatically smoother.
8. Paint the Nutcracker in Layers
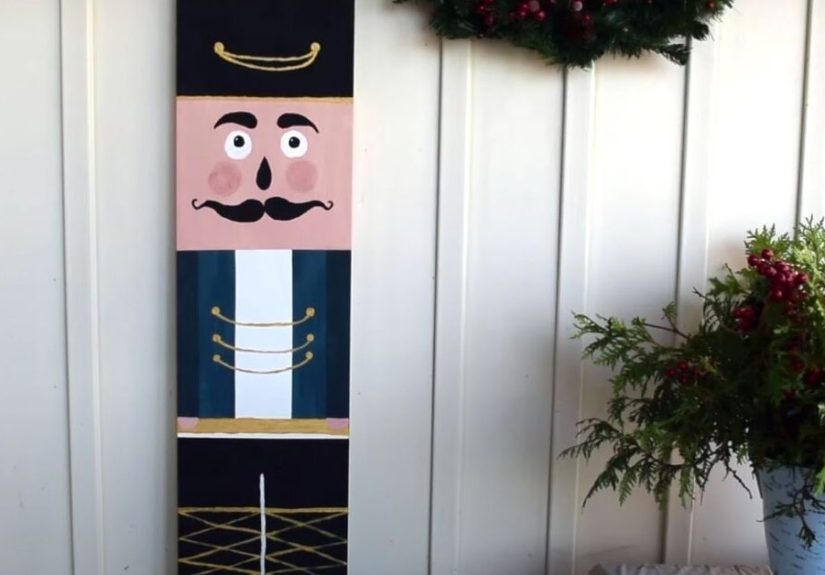
Now comes the fun part. Traditional nutcrackers usually feature bold holiday colors like red, green, black, white, and gold. But you are not legally required to make yours look like it enlisted in Santa’s army. Navy and gold looks elegant. Cream and soft sage feels upscale. Red and blush can lean playful. A candy-themed palette works beautifully for whimsical Christmas décor.
Paint the largest areas first: body, pants, boots, hat, and face. Then add smaller details like the belt, trim, mustache, buttons, beard, eyebrows, and mouth. Use painter’s tape for clean lines and a small artist brush for facial features. If you want a polished finish, use multiple thin coats instead of one thick one.
For spray-painted sections, keep the can moving, overlap slightly, and apply several light coats. Start and stop your spray just off the surface rather than blasting a full spray directly onto the edge. That simple habit cuts down on drips and blotches.
9. Seal and Protect It
If your nutcracker will be outdoors, finish with a protective topcoat suitable for exterior use. A clear sealer can help reduce fading and moisture damage. Semi-gloss or satin finishes usually look best because they add durability without highlighting every tiny imperfection the way high gloss can.
If your display includes lights, use outdoor-rated lights and cords, fasten them securely, and avoid overloading extension cords. Turn lights off when you leave the house or go to bed. Christmas should sparkle, not smolder.
Easy Design Ideas for a Better-Looking Nutcracker
Classic Front Porch Style
Use deep red, evergreen, black boots, white beard details, and gold trim. Place one on each side of the front door with lanterns, wreaths, and a garland overhead. This look is timeless and works with almost any home exterior.
Modern Christmas Style
Try matte black, cream, muted green, and brushed gold. Simplify the face and uniform details for a cleaner silhouette. This works especially well on porches with minimalist architecture.
Whimsical Candyland Style
Use pink, peppermint red, aqua, and glitter accents. Add oversized buttons, striped arms, or a faux-fur hat trim. This style is charming for family homes and playful holiday photo backdrops.
Common Mistakes to Avoid
- Making the base too small: Large décor pieces need visual and physical balance.
- Skipping the dry fit: This is how you end up with odd proportions and regret.
- Ignoring surface prep: Dirty, dusty, glossy surfaces do not hold paint well.
- Using indoor paint outside: Outdoor exposure is ruthless. Use the right materials.
- Overdecorating the face: Simpler facial details often look more charming from a distance.
- Forgetting storage: Build with post-holiday life in mind, not just December ambition.
How to Style Your DIY Giant Nutcracker
A giant nutcracker does not need much help, but thoughtful styling makes it shine. For porches, flank the front door with a matching pair. Add potted evergreens, ribbon, or lanterns at the base. Indoors, place one near a fireplace, staircase, or entry bench. If you only build one, give it enough surrounding negative space so it remains the star.
You can also personalize it with house numbers, a family monogram, or the current year. That small touch makes the piece feel custom and helps it become part of your family’s holiday tradition instead of just a one-season craft project.
How to Store It After Christmas
Before storing your nutcracker, wipe off dust and dirt and inspect for chips, cracks, or loose trim. Repair anything small right away, because tiny problems have a funny way of becoming next year’s “why is the beard in a separate box?” issue.
If you have room, store it upright in a protected area. If not, wrap it well and store it horizontally. Bubble wrap, large storage bags, and a clean dry corner of the garage can work well. The goal is simple: keep moisture, dust, and accidental impacts away from the finished surface.
Real-World Experience: What Making a DIY Giant Nutcracker Actually Feels Like
Here is the part many tutorials skip: building a DIY giant nutcracker is one of those projects that feels mildly ridiculous in the beginning, surprisingly serious in the middle, and completely worth it at the end. At first, you are standing in front of a pile of wood, pipe, primer, and paint thinking, “So I’ve decided to construct a six-foot holiday gentleman. Excellent. Very normal.” Then the body goes together, the boots appear, and suddenly you are emotionally invested in whether this festive soldier has enough personality.
The first real lesson most people learn is that scale changes everything. A design that looks cute on paper can look awkward when it becomes life-size. Tiny buttons disappear. Skinny arms look flimsy. A hat that seemed perfectly proportioned can start looking like an upside-down flowerpot with authority issues. That is why stepping back every so often matters. The giant version teaches you to decorate with distance in mind, not just close-up detail.
The second lesson is that prep work is not glamorous, but it is absolutely what makes the finished project look impressive. Sanding edges, filling screw holes, wiping away dust, waiting for primer to dry, then sanding again a little before paint all feel like the boring chapters of the story. But that boring stuff is where the magic sneaks in. It is the difference between “cute from across the yard” and “wait, you made that?”
There is also something unexpectedly fun about painting a nutcracker face. The moment the eyes go on, the project stops being a collection of materials and starts becoming a character. Even a simple expression can change the entire mood. Slightly arched brows can make it look proud and formal. Rounder eyes make it friendlier. A bigger mustache adds drama. A sharper jawline makes it feel more traditional. It is basically portrait painting, except your subject is a wooden holiday guard who would absolutely judge your wrapping skills.
Another real-life truth: these projects nearly always take longer than expected. Not because they are impossible, but because there are lots of small decisions. Should the trim be gold or black? Does the beard need another coat? Are the boots too short? Should the arms bend a little? This is normal. Holiday DIY projects are part construction, part decorating, and part standing back with your hands on your hips like a very seasonal art director.
But once the nutcracker is finished and set in place, it changes the whole atmosphere. A plain porch suddenly looks curated. A doorway becomes an entrance. People notice. Kids smile. Guests comment on it immediately. And because you made it yourself, it carries a different kind of charm than store-bought décor. It has scale, personality, and just enough handmade character to feel warm instead of mass-produced.
That is probably the best part of the experience. A DIY giant nutcracker is not only a decoration. It becomes a memory marker. You remember the paint colors you chose, the moment the face came together, the argument over whether it needed glitter, and the final reveal when you set it by the door and thought, “Well, look at that. We made Christmas theater.”
Conclusion
Making a DIY giant nutcracker is one of the most rewarding Christmas décor projects you can tackle because it combines craftsmanship, creativity, and full-on holiday drama in the best possible way. With a sturdy frame, thoughtful proportions, proper priming and paint prep, and a few smart finishing details, you can build a decoration that looks custom, photographs beautifully, and comes back year after year. Whether you choose a traditional red-and-gold soldier or a more modern twist, the goal is the same: create a festive showpiece that makes your home feel joyful before anyone even steps inside.


