Table of Contents >> Show >> Hide
- What You’re Making (And Why It Works)
- Ingredients
- Equipment
- Step-by-Step: How to Make a Brain Jello Mold
- Serving Ideas (Spooky-Cute, Not Over-the-Top)
- Flavor Variations That Still Look Like a Brain
- Troubleshooting: Fixes for Common Brain Jello Problems
- Food Safety and Storage
- FAQ: Brain Jello Mold Recipe Questions
- Conclusion
- Real-Life Brain Jello Adventures ( of Experience)
If you’ve ever looked at a Halloween dessert table and thought, “Cute… but where’s the dramatic centerpiece?”
congratulations: you’re exactly the kind of person a brain Jello mold was made for.
This brain jello mold recipe is spooky-cute (not gross), ridiculously jiggly, and surprisingly easy
the kind of project that makes people say, “Wait… you made that?” while they reach for a second slice.
The secret is classic gelatin-mold technique: dissolve flavored gelatin in hot water, cool it with cold water, and (optionally)
add evaporated skim milk for an opaque “realistic” lookmore haunted-house, less science-lab.
Then you chill, unmold, and pretend it was effortless the whole time. (We’ll keep your legend safe.)
What You’re Making (And Why It Works)
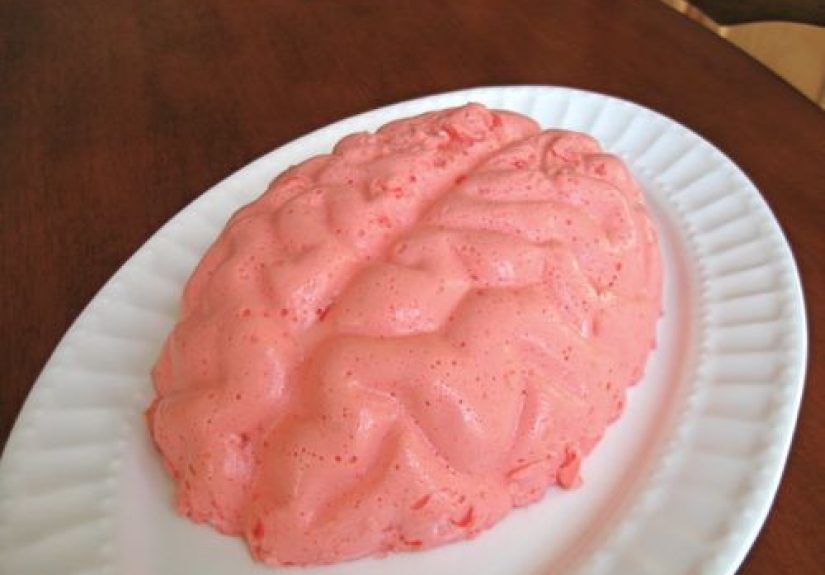
A brain-shaped gelatin dessert is basically a regular Jell-O mold with better PR.
The ridges and grooves of the brain mold create instant “wow” without fancy decorating skills.
Adding evaporated fat-free skim milk gives the gelatin a creamy opacity and smoother look, which reads as “brain”
on a party table (especially under dim lighting and a strategically placed plastic spider).
Quick Recipe Snapshot
- Prep time: 10–15 minutes
- Chill time: 4 hours (overnight is even better)
- Total time: ~4 hours 15 minutes
- Makes: 10–14 servings (depending on how fearless your slices are)
- Skill level: Beginner-friendly, party-legend potential
Ingredients
This version aims for the classic “Halloween brain” look and a crowd-pleasing flavor. Peach, watermelon, and strawberry
tend to look the most “brain-ish,” but you can pick whatever your people love.
For the Brain Jello Mold
- 2 to 3 boxes (3 oz each) flavored gelatin (peach, watermelon, strawberry, or a mix)
- 2 to 2 1/2 cups boiling water (see notes below)
- 3/4 to 1 cup cold water
- 1 can (12 oz) evaporated fat-free skim milk (optional but recommended for the opaque “brain” look)
- Neutral oil or nonstick cooking spray (for greasing the mold)
- Optional: 1–2 drops green food coloring (to mute brightness and create a more “gray-pink” tone)
Optional “Spooky Sauce” (Tasty, Not Messy)
- 2–4 tablespoons seedless raspberry jam
- 1–2 teaspoons water (to thin into a drizzle)
Equipment
- Brain-shaped gelatin mold (plastic molds are common)
- Large mixing bowl
- Whisk or spoon
- Measuring cups
- A larger bowl or small pot (to hold the brain mold steady in the fridge)
- Serving plate or tray (chilled if possible)
Step-by-Step: How to Make a Brain Jello Mold
Step 1: Prep the Mold (This Prevents “Stuck Brain Syndrome”)
Wash and dry your brain mold thoroughly. Lightly coat the inside with a thin layer of neutral oil or nonstick spray.
Then wipe away any excesstoo much grease can blur the details.
Place the mold opening-side up in a larger bowl so it sits level and stable.
Step 2: Dissolve the Gelatin Completely
Pour the gelatin powder into a large bowl. Add the boiling water and stir for a full 2 minutes,
scraping the sides and bottom. The goal is zero granules.
Undissolved crystals are the #1 reason you end up with a lumpy texture that screams “rookie mistake.”
Step 3: Add Cold Water (And Milk, If Using)
Stir in the cold water to cool the mixture down.
If you’re using evaporated fat-free skim milk, slowly pour it in while stirring.
This makes the mixture look cloudy and creamyexactly what you want for a brain effect.
Optional: add 1–2 drops of green food coloring to tone down any neon vibes. Think “haunted mansion,” not “highlighter pen.”
Step 4: Reduce Bubbles (Your Brain Should Be Wrinkly, Not Foamy)
Let the mixture sit for 2–3 minutes so bubbles rise. Skim off foam with a spoon if needed.
Bubbles aren’t the end of the world, but fewer bubbles = a cleaner unmold and sharper details.
Step 5: Pour and Chill
Carefully pour the gelatin mixture into the prepared brain mold.
Cover loosely (plastic wrap is finetry not to let it touch the surface).
Refrigerate until fully set: at least 4 hours, ideally overnight for the cleanest release.
Step 6: Unmold Like a Pro (Warm Water = The Cheat Code)
When you’re ready to serve, run warm (not hot) tap water in a bowl or sink.
Dip the outside of the mold for about 5–15 secondskeep water below the rim so it doesn’t splash onto the gelatin.
Gently pull the edges away from the mold with wet fingertips if you can reach them.
Lightly wet your serving plate (this helps you reposition the brain if it lands a little off-center),
place it on top of the mold, and flip confidently. Give the mold a gentle shake.
If it doesn’t release, dip again for a few seconds and try once morepatience wins.
Serving Ideas (Spooky-Cute, Not Over-the-Top)
- Classic party platter: Set the brain on a dark tray with candy “bones” or chocolate cookie crumbs.
- “Spooky sauce” drizzle: Thin raspberry jam with water and drizzle lightly over the top for a creepy-cool finish.
- Slice style: Use a thin, sharp knife. Wipe the blade between cuts for clean slices.
- Kid-friendly vibe: Pair with whipped cream “clouds” and fruitsweet, not scary.
Flavor Variations That Still Look Like a Brain
1) Peach + Strawberry “Two-Tone” Brain
Make two separate gelatin mixtures (one peach, one strawberry). Chill each mixture in the fridge for 30–45 minutes
until slightly thickened (pourable but not watery). Pour one flavor into the mold, then slowly pour the second
to create natural swirls. Chill until fully set.
2) Clear “Alien Brain” Version (No Milk)
Skip evaporated milk and make the gelatin according to the box ratio using water only.
The brain will be translucent and glow-yespecially cool under party lights.
3) Juice-Based Brain (More Grown-Up Flavor, Still Family-Friendly)
Use unflavored gelatin plus fruit juice (like white grape, apple, or cranberry) for a less candy-sweet taste.
You’ll need to bloom gelatin in cold liquid first, then warm gently to dissolve (avoid boiling),
then chill as usual. This is a great option if you want a “fancier” flavor profile.
Troubleshooting: Fixes for Common Brain Jello Problems
“It won’t come out of the mold!”
- Dip the mold in warm water for a few more seconds and try again.
- Loosen edges with wet fingers if possible.
- Make sure it’s fully set (rushing is the enemy of a clean release).
“My brain looks bubbly.”
- Stir gently after adding milk and cold water.
- Let mixture rest 2–3 minutes before pouring.
- Skim foam from the bowl before pouring into the mold.
“It’s too soft.”
- Chill longer (overnight helps a lot).
- Double-check you used the right water ratio.
- If using milk, stick with evaporated fat-free skim milk for best set and shape definition.
Food Safety and Storage
Gelatin desserts are happiest in the fridge. Keep your brain mold refrigerated until serving.
For parties, follow the basic food-safety rule: don’t let perishable foods sit out longer than about 2 hours
(and less if the room is very warm). When in doubt, pop the platter back in the fridge between rounds.
- Store: Covered in the refrigerator.
- Best texture window: 1–5 days (it can last longer, but details and bounce are best early).
- Do not freeze: Freezing can cause weeping and texture changes when thawed.
FAQ: Brain Jello Mold Recipe Questions
Do I really need a brain mold?
For the full effect, yesbecause the ridges do the decorating for you. But if you’re mold-less,
you can still make “brain vibes” by setting gelatin in a loaf pan and scoring the top with a spoon
for a wrinkly look. Not identical, still fun.
Why evaporated milkwhat’s the point?
It creates opacity and a softer, more realistic color. It also gives a slightly creamier mouthfeel.
If you prefer a bright, clear gelatin look, skip it and use all water.
How far ahead can I make it?
The day before is perfect. You’ll get a cleaner unmold, sharper grooves, and less stress on party day.
Conclusion
A brain-shaped gelatin dessert is the rare Halloween recipe that’s equal parts easy, goofy, and genuinely impressive.
Once you nail the two big skillsfully dissolving the gelatin and unmolding with warm water
you can remix flavors, colors, and toppings however you want.
Make it cute, make it spooky, make it wildly wobbly. And if someone asks how long it took?
Smile mysteriously and say, “Oh, you know… science.”
Real-Life Brain Jello Adventures ( of Experience)
The first time most people try a brain Jello mold, the emotional journey is surprisingly dramatic for something that jiggles.
There’s the early confidence phase (“I can boil water. I’m basically a chef.”), followed by the suspenseful chilling period
where you open the fridge like it’s a movie trailerjust a quick peekthen close it again, pretending you’re patient.
If you’re making this for a party, that fridge becomes your VIP lounge. Nothing else is allowed to bump the brain.
Leftovers? On a lower shelf. Soda? Somewhere else. The brain has entered the building.
When you mix the gelatin, one common “aha” moment is realizing how much the stirring matters.
If you rush the dissolve step, you’ll often notice tiny grainy bits laterusually right when you’re pouring,
when it’s too late to act casual. The fix is simple: stir longer than you think you need.
People who take an extra 30 seconds here usually end up with a smoother unmold and cleaner slices.
It’s one of those tiny efforts that pays off like compound interest, but with dessert.
Another shared experience: the bubble situation. If you whisk like you’re trying to win a speed contest,
you’ll trap air and get a foamy top. Then you have a choice: skim it (responsible adult energy) or ignore it
(chaotic Halloween energy). Skimming feels fussy, but it also makes the final brain look more detailed,
especially in the grooves. A lot of home cooks learn a gentle stir is the sweet spotcalm, steady, and
slightly ominous, like you’re preparing a potion.
The most memorable moment is always unmolding. This is where legends are bornor where someone says,
“It’s fine, we’ll serve it from the mold,” and quietly changes the subject.
Warm water is the difference between victory and awkwardness. The first successful release feels ridiculous
in the best way: you flip the mold, you hold your breath, and thenplopit lands perfectly.
Suddenly you’re the kind of person who makes novelty desserts on purpose. People gather around.
Phones come out. Someone says, “That’s actually amazing,” which is exactly the reaction a brain dessert deserves.
Slicing is its own mini-adventure. Thin slices show off the shape best, but the gelatin likes a clean knife.
Many people develop a “wipe between cuts” rhythm that makes them feel oddly professional.
And the funniest part? After all that spooky presentation, the flavor is just… nostalgic and sweet.
Guests usually go from “Whoa!” to “Oh, this tastes like childhood,” in one bite.
That contrastdramatic look, friendly flavoris why this dessert keeps showing up year after year.
It’s Halloween magic you can make with a bowl, a fridge, and a little confidence.