Table of Contents >> Show >> Hide
- The Before: A Room With the Wrong Job
- The After: White Walls, A Turquoise Ceiling, and Instant “Happy”
- Flooring That Can Handle Real Life (and Real Paint)
- Window Treatments That Feel Like Art
- Lighting: The Unsung Hero of Any Art Space
- Zones: Because Creativity Loves a Little Structure
- The Signature DIY: A 3D Quote Wall With Meaning
- Recreate the Look: A Practical Step-by-Step Plan
- Common Mistakes to Avoid in a Home Art Studio
- Why This Makeover Works (and Why It Still Feels Fresh)
- Experiences From “Sweet Studio” Style Makeovers (A 500-Word Reality Check, In the Best Way)
Some room makeovers are about aesthetics. This one is about momentumturning a space that felt stuck into a space that
feels like possibility (with a side of turquoise, because why not?). When Chris Loves Julia transformed a stale,
outdated third-bedroom nursery into an art studio, they didn’t just “decorate.” They rewired the room’s purpose:
creative work for Julia, a kid-friendly corner for their daughter, and a vibe that says, come in, make a mess, and
call it art.
If you’ve ever stared at an unused room and thought, “We should do something with this… eventually,” this makeover is
your friendly nudge. Not a guilt trip. More like a cheerful shove wearing roller skates.
The Before: A Room With the Wrong Job
The studio started as the third upstairs bedrooman older nursery that was dingy, outdated, and emotionally heavy for
the family. Instead of letting it sit as an awkward reminder, they chose a different storyline: a usable room they
could enjoy right now. That decision is the unsung hero of the whole makeover.
The After: White Walls, A Turquoise Ceiling, and Instant “Happy”
Over about a month and a half, the transformation came down to a handful of high-impact moves: crisp white walls, a
lively turquoise ceiling, updated lighting, warmer flooring choices, and imaginative window treatments. The result
feels bright and alivelike the room finally got a cup of coffee and remembered it has dreams.
Design move #1: Gallery-white walls that let the color do the talking
The walls were painted a clean white (a classic move for studios because it keeps the space bright and lets artwork,
supplies, and textiles stand out). White also plays nicely with photographyimportant here because Julia planned to
photograph her work in the room. The walls function as a calm backdrop so the bolder elements (hello, ceiling) can
shine without turning the whole room into a carnival.
Design move #2: A ceiling that steals the showin a good way
Painting the ceiling turquoise is the “dessert first” choice of this makeover, and it works. A colored ceiling pulls
your eye upward, adds personality, and can make a room feel more intentionalless “spare bedroom,” more “creative
studio.” It’s also a clever way to add color without sacrificing wall space for storage, art, or photos.
If you’re nervous about painting a ceiling, you’re normal. Ceilings are basically the final boss of DIY painting: arms
overhead, paint in your hair, existential questions. But good prep and technique matter more than superhuman biceps.
(And yes, painter’s tape is your friend, not your enemy.) Practical ceiling-paint technique and prep guidance is widely
recommended by major DIY/home outlets for a reason: it keeps the “fresh coat” from turning into the “modern art
splatter” you didn’t intend.
Flooring That Can Handle Real Life (and Real Paint)
Studios live hard. Paint drips happen. Glitter appears out of nowhere. An innocent cup of rinse water becomes a
betrayal. So the floor matters more than people think.
Layered flooring strategy: Painted base + modular softness
In this makeover, the floor got attention in two smart ways: the base floor was painted a deep brown tone, and then
the space was softened with FLOR carpet tilescozy underfoot, easy to refresh, and flexible if you want to swap pieces
later. Modular carpet tiles are popular because you can replace a single tile instead of redoing everything, and they
let you “design” the rug size for the room you actually have (not the room a rug company imagines you have).
Translation: the floor became both practical and comfyideal for working, photographing, and, yes, sitting on the
floor for a picnic lunch because you love the room that much.
Window Treatments That Feel Like Art
Instead of typical curtains, they used two tapestries as window treatmentsan idea that adds color, pattern, and a
handmade vibe without needing custom drapery. This is one of those “creative person” decisions that makes a studio
feel like a studio. Tapestries also add softness and visual texture, which helps balance all the clean white and
functional furniture.
Lighting: The Unsung Hero of Any Art Space
Lighting isn’t just about brightness; it’s about seeing color accurately and avoiding harsh shadows while you work.
The makeover included an updated ceiling fixture, which instantly modernized the room and made the space feel finished
rather than “we’ll get to that later.”
Studio lighting basics you can steal
-
Prioritize color accuracy: The Color Rendering Index (CRI) is a standard measure of how faithfully
a light source shows colors compared to a reference. For indoor lighting, CRI 80 is commonly recommended as a
baseline; if your work depends on color matching, aim higher when you can. -
Think in layers: Use ambient light (ceiling) plus task lighting (a desk lamp or adjustable arm lamp)
so you’re not fighting shadows. -
Choose a “daylight-ish” feel for making art: Many artist lighting products and studio lamps lean
toward a daylight range (often around 5000K) to mimic natural light for color work.
Bonus: painting a desk lamp a sunny color (they went bold yellow) is the kind of small, happy detail that turns
“functional” into “fun.” It’s like giving your lamp a personality. A very optimistic personality.
Zones: Because Creativity Loves a Little Structure
The room works because it’s divided into purposeful zoneswithout feeling overly “designed.” The layout supports how
people actually use the space:
Julia’s work areas
- Desk zone: A place to blog, sketch, prep prints, and plan projects.
- Easel zone: A dedicated spot for canvas work, with supplies nearby and room to step back.
- Big chalkboard surface: Used for drawing and as a visual focal point; also helpful for keeping the room flexible.
Kid-friendly “studio buddy” corner
One of the sweetest parts of this makeover is the intentional space for their daughter to “work,” toocomplete with a
small table and chairs. This isn’t just cute; it’s strategic. If you want a studio to be used in a real family, it
helps to design for the reality that kids exist and they also want to create.
The trick is giving kids a defined area with their own supplies so they’re not “borrowing” your good brush to paint a
rock, the dog, and possibly the wall. (Ask me how I knowactually don’t, because I’m a language model. But you know
how you know.)
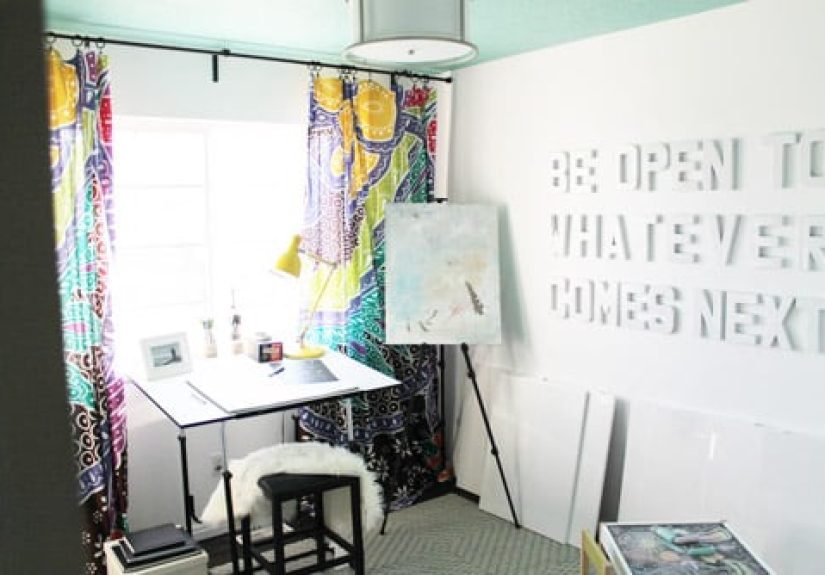
The Signature DIY: A 3D Quote Wall With Meaning
The most memorable design element isn’t furniture or paint. It’s the 3D quote on the wall: “Be Open To Whatever Comes Next.”
That kind of personal detail is what turns a pretty room into a meaningful one. It anchors the space emotionally and
visuallylike a mission statement you can’t ignore when you walk in.
If you’re building your own studio, consider what your “anchor” could be: a quote, a gallery wall, a pinboard of
inspiration, or a single piece of art that sets the tone. Rooms feel finished when they have a point of view.
Recreate the Look: A Practical Step-by-Step Plan
Want the same “sweet studio” energy without copying every detail? Here’s a practical roadmap that borrows the logic
behind the makeover.
Step 1: Define how you’ll actually use the room
List your creative activities (painting, sewing, digital art, photography, crafting, shipping orders, kid projects).
Then write what each one needs: flat surface, sink access, storage, light, floor protection, wall space, outlets.
Your studio should be designed around your workflownot around a Pinterest photo that doesn’t know you.
Step 2: Paint strategically (walls, then ceiling if you’re brave)
A bright wall color (often white or near-white) helps bounce light and keeps the room feeling open. If you want bold,
put it on the ceiling or on one controlled area so the room stays workable. Prep matters: clear the space, protect
floors, patch holes, clean surfaces, and remove hardware for a smoother finish.
Step 3: Choose flooring that forgives you
If you’re messy (artist = yes), prioritize durable flooring and/or modular rugs. Carpet tiles can add softness and
reduce noise, and if one section gets destroyed by your “experimental phase,” you can replace it without redoing the
whole room.
Step 4: Upgrade lighting for both mood and accuracy
Start with good overhead ambient light. Then add task lighting where you work. If color accuracy matters, look for
higher CRI options, and consider a daylight-style lamp for detailed work.
Step 5: Build storage that makes cleanup fast
The secret to using a studio regularly is not having to tidy for 40 minutes before you can start. Use a mix
of open and closed storage:
- Clear bins for visibility (so supplies don’t disappear into a mystery drawer).
- Labeling so “misc” doesn’t become a lifestyle.
- Rolling carts for flexible projects.
- Vertical storage (shelves, pegboards, wall rails) to free up work surfaces.
- Color-coding for pens/markers if you want your studio to feel like a candy store (the good kind).
Step 6: Add one bold “signature” detail
A quote wall. A painted ceiling. Dramatic curtains. A giant chalkboard. Pick one statement element that feels like
youthen let the rest support it. This keeps the room from feeling busy while still making it memorable.
Common Mistakes to Avoid in a Home Art Studio
1) Designing for a fantasy version of yourself
If you haven’t used an easel in five years, don’t make it the centerpiece. Design for what you do now, with room to
grow.
2) Ignoring lighting until the end
Bad lighting makes every project harderespecially anything involving color. Plan it early so you’re not stuck
working under a single sad bulb that makes your greens look like regrets.
3) Not protecting the floor
Even neat artists spill. Modular rugs, drop cloths, and wipeable zones are worth it.
4) Storage that’s too complicated
If cleanup requires a flowchart, you won’t do it. Simple containers, clear labels, and “close enough” systems win.
Why This Makeover Works (and Why It Still Feels Fresh)
The genius of the Chris Loves Julia studio makeover isn’t that it uses rare, expensive materials. It’s that every
choice supports a real life:
- Emotionally: The room’s purpose shifted from “waiting” to “living.”
- Visually: White walls + bold ceiling + patterned textiles create balance.
- Functionally: Multiple work zones, durable flooring, and practical lighting make it usable daily.
- Personally: The quote wall turns decor into meaning.
In other words, it’s not just a pretty room. It’s a room that wants you to walk in and make something.
Experiences From “Sweet Studio” Style Makeovers (A 500-Word Reality Check, In the Best Way)
If you’re planning a studio makeover inspired by this one, here’s what people tend to experience in the real world
the stuff you don’t always see in the final, perfectly lit reveal photo. Think of these as the behind-the-scenes
truths that make the “after” feel even better.
First: painting a ceiling a bold color is almost always terrifying at minute three. You start confident, then you
notice the roller splatter, then you wonder why gravity hates you, then you briefly consider moving homes instead of
finishing. And thensomewhere around coat twoit clicks. The ceiling becomes a design decision, not a mistake. It’s
the moment when the room stops being “a spare bedroom with art supplies” and becomes “a studio.” The funny part is
that once you’ve done it, you’ll look at every plain white ceiling like it’s underachieving.
Second: flooring decisions change how often you use the space. People who choose soft, modular flooring (like carpet
tiles or a replaceable rug layer) tend to spend more time in the studiositting on the floor to sort supplies, laying
out prints, letting kids join in without hovering like a security guard. When the room feels comfortable, it becomes
a place you linger. When the floor is cold and precious, you treat the studio like a museum and forget you’re supposed
to make things in it.
Third: the “kid corner” (or guest corner, or hobby-sharing corner) is a relationship saver. In family homes, creative
rooms can become battlegrounds if one person’s project takes over every surface. A dedicated small table, a bin for
kid-safe supplies, and a clearly defined “this area is yours” zone reduces the constant negotiation. Even if you don’t
have kids, the same principle applies: give every recurring activity a home. Wrapping station? One drawer. Sketching?
One shelf. Packing orders? One cart. The less you shuffle, the more you create.
Fourth: most people underestimate how emotional an “unused” room can feel. When a space is tied to an old plan, a
stalled goal, or just a season of life that changed, it can carry a weird weight. Turning it into a studio often
creates a surprisingly light, energizing sense of progress. Not because everything is perfect, but because you’ve
chosen motion over pause. The studio becomes proof that you can adaptand that your home can support who you are today.
Finally: the “signature detail” (like the 3D quote wall) becomes the thing you didn’t know you needed. People almost
always remember the one element that feels personal. It’s the first thing you point out to a friend on a FaceTime
tour. It’s the detail that makes you smile when you walk in. And when you’re stuck mid-projectpaint drying, supplies
everywhere, creativity in a temporary comathat signature moment reminds you why you made the room in the first place.
A sweet studio isn’t just organized. It’s encouraging.


