Table of Contents >> Show >> Hide
- What Is a Pony Wall (and Why Is It Called That)?
- Where Pony Walls Work Best
- Planning Your Pony Wall Like You Mean It
- Materials and Tools for a DIY Pony Wall
- How to Build a Pony Wall: Step-by-Step
- Step 1: Lay Out the Wall Location
- Step 2: Find Joists (or Plan Blocking)
- Step 3: Cut Plates and Studs
- Step 4: Assemble the Frame
- Step 5: Anchor the Wall to the Floor and Existing Wall
- Step 6: Reinforce the Free End (Choose One Approach)
- Step 7: Add Blocking for Anything You’ll Mount
- Step 8: Drywall and Finish
- Step 9: Add the Cap (The Part Everyone Touches)
- Design Ideas That Make Pony Walls Look Intentional
- Special Case: Pony Walls in Bathrooms and Showers
- Common DIY Mistakes (and How to Avoid Them)
- How Much Does a Pony Wall Cost?
- When to Call a Pro
- Wrap-Up: Your Home, But Better Zoned
- Real-Life Pony Wall Lessons (So You Don’t Learn Them the Hard Way)
If you’ve ever walked into a house and thought, “I love how open this feels… but also, where do I put my stuff and why can I see my laundry from the sofa?” congratulations, you’re emotionally ready for a pony wall.
A pony wall (also called a half wall) is one of those deceptively simple home features that can solve multiple problems at once: it divides space without swallowing light, adds a little privacy without making a room feel like a maze, and gives you a place to lean dramatically while telling guests, “Yes, I totally built that.”
This guide breaks down what pony walls are, where they work best, and how to build a sturdy, wobble-free DIY pony wall that looks like it belongs in your home not in an unfinished basement from a horror movie.
What Is a Pony Wall (and Why Is It Called That)?
A pony wall is a short wall that doesn’t extend all the way to the ceilingoften around 3 to 4 feet tall, but not locked to a single “official” height. It can be purely decorative (space-defining) or functional (supporting a countertop, acting as a safety barrier, or anchoring fixtures).
The name is commonly explained with a visual that’s hard to unsee: a pony could stand behind it and stick its head over the top. (Architectural terminology is, apparently, powered by farm metaphors and vibes.)
Pony Wall vs. Knee Wall vs. Cripple Wall
People toss these terms around like they’re interchangeable. They’re not always:
- Pony wall / half wall: Short wall used as a divider or feature in living spaces, kitchens, stair edges, bathrooms, etc.
- Knee wall: A short wall in attic spaces that supports roof rafters (often structural).
- Cripple wall: A framed wall between a foundation/stem wall and floor framing, usually structural.
Translation: most pony walls inside your main living areas are non-load-bearing, but short walls in attics and crawl spaces may be doing real structural work. If you’re replacing a full-height wall with a pony wall, you must confirm whether the original wall was load-bearing before you start demo.
Where Pony Walls Work Best
Pony walls thrive in homes where you want “open concept” energy with “I still need boundaries” functionality. Here are the most commonand most usefulspots.
1) Open-Concept Room Division
A half wall can carve out zones (living vs. dining, entry vs. lounge, office nook vs. everything else) without blocking sightlines. It’s especially helpful when you want separation but hate dark corners and closed-off rooms.
2) Kitchen Separators (Without Feeling Like a Food Court)
A pony wall behind a cabinet run or near a peninsula can visually “finish” a kitchen edge, hide countertop clutter, and give you a natural spot for outlets. Done well, it says “custom detail.” Done poorly, it says “why is this bump-out here?”
3) Stair Guards and Split-Level Edges
Pony walls often show up along stairways or level changes. In these areas, your half wall may function like a guardwhich can trigger building code requirements. That means the design isn’t only aesthetic; it’s safety equipment with better lighting.
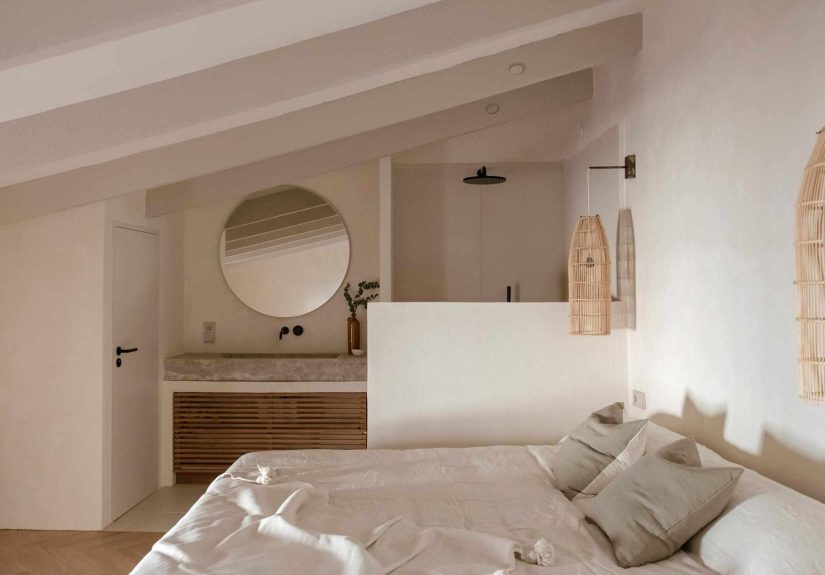
4) Bathrooms: Privacy, Storage, and Layout Fixes
In bathrooms, pony walls can shield a toilet, separate a vanity zone, or create a partial partition for a shower while keeping the room from feeling boxed in.
5) Shower Pony Walls
A shower pony wall can act as a water barrier, support glass, hold a niche or plumbing, or allow more light than a full shower wall. But this is also where you’ll need to think about waterproofing like an adult who has read too many “mold remediation” invoices.
Planning Your Pony Wall Like You Mean It
Choose the Right Height
Pony walls aren’t one-size-fits-all. A few practical height targets:
- About 36 inches: Common for guard-like half walls and many room dividers.
- Counter height (often around 36 inches): Useful if you want it to align with kitchen or vanity surfaces.
- Bar height (often around 42 inches): Helpful when you want more screening or a ledge feel.
If your pony wall functions as a guard (like at a stair edge or drop-off), codes often require a minimum height in the neighborhood of 36 inches in many residential situations, with variations by locale and use-case. Always check local requirements before locking your dimensions.
Know What’s Under Your Feet: Floor Joists Matter
A pony wall is only as sturdy as what it’s attached to. The biggest planning question is: Do your floor joists run perpendicular or parallel to the pony wall?
- Perpendicular joists: Easier. You can fasten into joists beneath the wall line.
- Parallel joists: You’ll likely need blocking between joists so the wall can be anchored properly.
Decide How You’ll Prevent “Pony Wall Wobble”
The free end of a half wall loves to wobblebecause physics. Your reinforcement options include:
- Extend the end stud down through the subfloor and fasten it to a joist or blocking.
- Build an L-shape by adding a short return wall at the end (increases rigidity dramatically).
- Add a beefy post inside the end (sometimes doubled studs or engineered posts) and tie it into framing below.
Pick one of these on purpose. Don’t rely on “hope” and two drywall screws.
Materials and Tools for a DIY Pony Wall
Typical Materials
- 2×4 lumber for top/bottom plates and studs (or 2×6 for more heft, if desired)
- Construction adhesive (optional but helpful)
- Fasteners: structural screws and/or framing nails, plus drywall screws
- Shims (for leveling on imperfect floors)
- Drywall (typically 1/2-inch) and corner bead
- Joint compound + tape
- Primer + paint (or tile materials if finishing as a tiled surface)
- Cap material (wood cap, stone/quartz remnant, MDF profile, etc.)
Tools You’ll Actually Use
- Measuring tape, pencil, chalk line
- Level (4-foot is ideal)
- Stud finder and/or magnet trick (fastener-finding)
- Circular saw or miter saw
- Drill/driver + bits
- Hammer (even if you pretend you don’t need one)
- Drywall knife set + sanding block/pole sander
How to Build a Pony Wall: Step-by-Step
The steps below assume you’re building a standard, non-load-bearing interior pony wall attached to at least one existing wall. If your wall needs to serve as a guard at a stair opening or supports a countertop, build sturdier than you think you need. Overbuilding is cheaper than rebuilding.
Step 1: Lay Out the Wall Location
Measure from nearby walls so your pony wall runs straight and square. Use a chalk line on the subfloor. Mark the endpoints clearlyespecially the “free end,” because that’s where reinforcement decisions matter.
Step 2: Find Joists (or Plan Blocking)
Identify joist direction if you can access the basement/crawl space. If you can’t, locate fasteners or use a stud/joist finder on the floor. If joists run parallel to your wall, plan for blocking between joists at the wall line so you have something solid to screw into.
Step 3: Cut Plates and Studs
Cut the bottom plate and top plate to length. Then cut studs to your target wall height minus the combined thickness of the plates. Common stud spacing is 16 inches on center. Add studs at both ends.
Pro tip: Think ahead about your finish thickness and cap. A chunky wood cap can add height quickly, and suddenly your “subtle divider” is tall enough to qualify as a small billboard.
Step 4: Assemble the Frame
Build the wall frame on the floor: bottom plate + studs + top plate. Check the frame for square. If the wall is short, you can usually lift it into place with one helper and a shared sense of optimism.
Step 5: Anchor the Wall to the Floor and Existing Wall
Stand the frame on your layout line. Plumb it with a level. Then:
- Fasten into the floor framing using structural screws where possible (not just the subfloor).
- Fasten the wall end into studs of the adjacent full-height wall.
- Use shims if the floor isn’t level so the wall stays plumb before you lock it in.
Step 6: Reinforce the Free End (Choose One Approach)
Option A: The “Through-the-Floor Stud” Method
Extend the end stud down through a cutout in the subfloor so it can be screwed/bolted to a joist or blocking below. This dramatically reduces wobble because you’re creating a strong connection into the structure, not just the sheathing layer.
Option B: The L-Shape Return
Add a short perpendicular return wall at the free end (even 12–24 inches helps). This creates a rigid corner, like bracing a bookshelf. It’s a clean solution when a through-floor connection isn’t practical.
Option C: Hidden Post Inside the End
Double up studs at the end or integrate a post detail, then tie it into blocking below. This can be especially helpful when the pony wall needs to support a countertop overhang or glass hardware.
Step 7: Add Blocking for Anything You’ll Mount
Planning to add an outlet, a towel hook, a floating shelf, or a glass panel clamp? Install blocking now. Future-you will thank present-you, and your drywall will remain mostly un-perforated.
Step 8: Drywall and Finish
Hang drywall like a standard wall: screw into studs, keep screw spacing consistent, and use corner bead on exposed edges. Tape, mud, sand, repeat (and repeat again, because drywall finishing is 40% skill and 60% lighting).
Step 9: Add the Cap (The Part Everyone Touches)
The cap is both a visual finish and a durability upgrade. Popular cap ideas:
- Wood cap: Warm, classic, easy to match trim.
- Stone/quartz remnant: Great for kitchens and baths; wipeable and durable.
- Wide ledge cap: Turns the pony wall into a display shelf (plants, frames, your “I can keep herbs alive” fantasy).
Design Ideas That Make Pony Walls Look Intentional
Add Trim and Paneling
Wainscoting, board-and-batten, or simple picture-frame molding can make a half wall feel custom instead of “temporary.” Paint it the same color as your main trim for a built-in look, or use a contrasting color to define zones.
Top It With Glass (Light + Safety)
A short wall with a glass panel above it can create a stair guard or shower partition that feels airy. If you go this route, make sure the framing is sturdy enough for the hardware and that local code requirements are met.
Make It Functional
A pony wall can hide wiring, house outlets, support a counter, or become a mini storage wall with cubbies on one side. “Pretty” is great. “Pretty and useful” is better.
Special Case: Pony Walls in Bathrooms and Showers
Bathrooms are where pony walls earn their keepand where sloppy construction gets punished quickly. Any pony wall inside a wet zone needs a waterproofing plan that treats the wall like a shower assembly component, not like a living-room divider.
Key Waterproofing Principles
- Use appropriate backing: Cement board or other approved substrates are common in wet areas. Follow your system specs.
- Use a waterproof membrane: Wet areas require membranes designed for that environment, applied to manufacturer-recommended thickness.
- Don’t ignore the top of the wall: Water loves horizontal surfaces. The top needs to be waterproofed and properly finished.
- Confirm compatibility: Not every membrane works for every wet condition; consult manufacturer guidance.
If you’re tiling a shower pony wall, treat it as part of a complete shower waterproofing system. When in doubt, follow established tile industry methods and product instructions to prevent moisture intrusion into framing.
Common DIY Mistakes (and How to Avoid Them)
1) Anchoring Only to Subfloor
Subfloor alone is not the structural hero you want it to be. Whenever possible, fasten into joists or blocking below. This is the difference between “solid wall” and “wobbly handshake.”
2) Forgetting Free-End Reinforcement
A pony wall with one open end needs a plan. Through-floor stud, L-return, or internal postchoose one.
3) Skipping Blocking
If you’ll mount anything to the wall, add blocking while the studs are exposed. Retrofitting later is possible, but it’s also an excellent way to learn new curse words.
4) Ignoring Code When It’s a Guard
If the wall helps prevent falls at a drop-off, it may be treated like a guard. That affects height and strength expectations. Local codes vary, so verify requirements before you build.
5) Underestimating Bathroom Water
Water doesn’t negotiate. If the pony wall is in a shower zone, waterproof it correctly or budget for future repairs.
How Much Does a Pony Wall Cost?
A straightforward DIY interior pony wall is often a budget-friendly project:
- Basic framing + drywall + paint: commonly a few hundred dollars depending on size and finishes.
- Upgrades (stone cap, tile, glass, electrical): can push costs higher quickly.
The biggest cost variable is not the lumberit’s the finish level. A simple painted half wall is affordable. A tiled shower pony wall with glass and specialty waterproofing is a different category entirely.
When to Call a Pro
- If you suspect the project involves a load-bearing wall or structural changes
- If the pony wall acts as a guard in a stair/open-edge situation and must meet safety requirements
- If you’re adding plumbing, electrical, or complex waterproofing assemblies
- If you want a seamless, high-end finish and drywall makes you feel personally attacked
Wrap-Up: Your Home, But Better Zoned
A pony wall is the rare home upgrade that’s both practical and surprisingly stylish. It can define spaces, add safety, support counters, and improve flow as long as you build it like it’s going to be leaned on by every guest you’ve ever invited over.
Plan the height, respect the framing below, reinforce the free end, and finish it like it belongs there. Do that, and your pony wall won’t just be a “half wall.” It’ll be a full win.
Real-Life Pony Wall Lessons (So You Don’t Learn Them the Hard Way)
You know how some projects look easy until you’re standing in the aisle at the hardware store holding a 2×4 like it personally offended you? Pony walls can be like thatsimple concept, surprisingly nuanced execution. Here are the “experience-based” realities DIYers tend to run into (a.k.a. the stuff people wish they’d known before they started).
Lesson #1: The wobble is real, and it’s not charming.
A freestanding pony wall end behaves like a tiny diving board. The first time you push on it and it flexes, your confidence may briefly leave your body. This is why reinforcement isn’t optional. Extending the end stud down to connect to a joist, adding blocking, or building a return wall turns a shaky divider into something that feels like it came with the house.
Lesson #2: Floors are rarely as level as your imagination.
On paper, everything is square and true. In real houses, floors slope, dip, and occasionally suggest they’ve been through things. Shims become your best friend. If you anchor a wall before it’s plumb, you’ll fight it the entire way through drywall and trim. Take the extra minutes to level and plumb at the framing stage, because it saves hours later.
Lesson #3: The cap is where quality gets judged.
People will touch the top ledge. They’ll set drinks on it. They’ll lean on it during awkward conversations. If the cap overhang is uneven, if corners are rough, or if the finish feels “temporary,” that’s what everyone notices even if they can’t explain why. A clean cap (wood with crisp edges, or a stone remnant with polished lines) makes the whole wall feel intentional.
Lesson #4: Adding outlets is easier now than later.
A pony wall is a fantastic spot for an outletespecially near a kitchen edge, a living area divider, or a workspace. But the best time to plan for that is before the drywall goes up. Even if you’re not installing electrical immediately, adding blocking and thinking through routing helps future-proof the wall. Retrofitting can be done, but it’s far messier.
Lesson #5: Bathroom pony walls demand respect.
In living spaces, a pony wall can be framed, drywalled, painted, and enjoyed. In showers, it’s part of a water management system. DIYers often discover that waterproofing has rules, layers, thickness requirements, and manufacturer instructions that are not “suggestions.” The top of the wall is a big onehorizontal surfaces invite standing water, and water will take any shortcut you accidentally provide. If you’re tiling, use the proper membrane approach, follow product specs, and treat every seam like it’s trying to betray you.
Lesson #6: A half wall can create a “stuff shelf” if you’re not careful.
Pony walls are greatuntil they become the official landing zone for mail, keys, backpacks, and the mysterious items that appear in every household. If you want the wall to stay attractive, plan its top width, consider a cap that’s not too deep, and pair it with purposeful storage nearby. Otherwise, your beautiful DIY project becomes a permanent exhibit titled: “Objects We Haven’t Put Away Since Tuesday.”
Lesson #7: The finish level you want determines the whole workflow.
If you want smooth walls and crisp trim lines, drywall finishing mattersand lighting reveals everything. Many DIYers find it helpful to prime early, then inspect with raking light (a flashlight held sideways) to catch imperfections before paint. The good news: pony walls are smaller than full walls, so they’re a manageable place to level up your finishing skills.
Bottom line: pony walls are a friendly DIY project if you respect the structure and don’t skip the reinforcement. Treat it like a real wallbecause it isand you’ll end up with a feature that adds function, style, and a little architectural swagger to your home.


