Table of Contents >> Show >> Hide
- Before You Start, Figure Out What Kind of Job This Really Is
- Way #1: Hand Scraping for Loose and Peeling Paint
- Way #2: Wet Sanding or Shrouded Power Sanding to Smooth the Surface
- Way #3: Pressure Washing for Loose Exterior Paint and Dirty Surfaces
- Way #4: Infrared or Low-Heat Removal for Thick Paint on Wood Trim
- Way #5: Chemical Strippers for Intricate Trim, Masonry, and Stubborn Coats
- Way #6: Professional Media Blasting for Large, Tough Exterior Jobs
- How to Choose the Best Paint Removal Method
- Mistakes to Avoid When Removing Exterior Paint
- Experience: What Removing Exterior Paint Actually Feels Like
- Conclusion
Exterior paint removal sounds simple until you’re halfway up a ladder, holding a scraper, wondering why your house appears to be wearing five decades of questionable decisions. The good news is that removing exterior paint is absolutely doable when you match the method to the surface, the paint condition, and the age of the home. The bad news is that there is no single magic trick. Anyone promising a “one-minute miracle” is probably also trying to sell a folding garden hose and a revolutionary banana slicer.
If you want a long-lasting repaint, proper paint removal matters. Loose, cracked, blistered, or alligatored paint will keep failing under fresh coats unless you deal with the underlying problem. Sometimes that means stripping everything. More often, it means removing only what has lost adhesion, then feathering edges, repairing the surface, priming, and repainting.
This guide walks through six practical ways to remove exterior paint, plus how to choose the right one for wood siding, trim, masonry, metal, and problem areas that laugh in the face of ordinary scraping.
Before You Start, Figure Out What Kind of Job This Really Is
Not every peeling paint problem calls for total paint removal. If less than half the coating has failed and the remaining paint is still well bonded, selective removal may be enough. But if the finish is peeling everywhere, trapping moisture, or layered so thickly that it looks like tree bark in a bad mood, a more aggressive approach may be justified.
1. Check the age of the home
If the house was built before 1978, assume lead paint could be present until testing proves otherwise. That changes the conversation immediately. In that case, the safest move is often to hire a lead-safe certified professional rather than turning your yard into an accidental dust laboratory.
2. Identify the surface
Wood siding, brick, metal railings, concrete foundations, and decorative trim all respond differently to paint removal methods. What works beautifully on a steel railing can absolutely wreck old brick or gouge clapboard.
3. Find the reason the paint failed
Moisture, poor prep, trapped dirt, chalky residue, incompatible coatings, and sun damage are all common culprits. If you remove the paint but ignore the cause, the new paint job may fail with impressive speed and very rude timing.
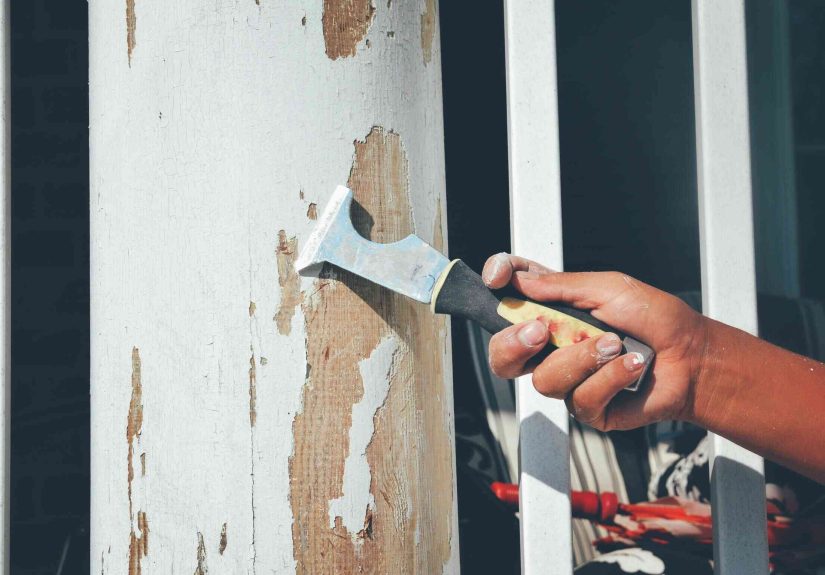
Way #1: Hand Scraping for Loose and Peeling Paint
Best for: wood siding, trim, window casings, porch details, and smaller sections of obvious failure.
Hand scraping is the most basic exterior paint removal method, and honestly, it earns more respect than it gets. A quality scraper removes loose paint with precision, creates less chaos than aggressive machine methods, and gives you a clear look at what is truly failing versus what can stay.
This method is ideal when the paint is flaking, curling, bubbling, or lifting at the edges. Instead of attacking the whole wall like it insulted your family, you focus on the weak material only. That makes scraping a smart first step before sanding, patching, priming, or moving to a stronger removal technique.
Why it works
Scraping removes paint that has already lost adhesion. In other words, you are not forcing the issue; you are simply evicting what already quit the job. That is often enough for spot repairs and moderate exterior prep.
Pros
- Inexpensive and widely useful
- Good control on delicate trim and older wood profiles
- Excellent for targeted paint removal before repainting
Cons
- Slow on large surfaces
- Tiring on heavily layered paint
- Needs follow-up smoothing for a polished finish
For many homes, scraping is not the whole solution, but it is almost always part of the solution. Think of it as the reliable opening act that makes the headliner look better.
Way #2: Wet Sanding or Shrouded Power Sanding to Smooth the Surface
Best for: feathering edges after scraping, smoothing rough patches, and preparing repaint areas on wood or some metal surfaces.
Once loose paint is removed, the surface usually looks uneven. Old paint edges can telegraph through the new finish and leave your house looking like it was painted over topographical lines. That is where sanding comes in.
Sanding is less about stripping every last molecule of old paint and more about creating a smooth, paintable surface. On ordinary repaint jobs, that distinction matters. You are not chasing perfection. You are chasing adhesion and a finish that does not scream “weekend panic project.”
When this is the right choice
Use sanding after scraping when the remaining paint is sound but the transition from painted to bare areas is rough. On some projects, especially metal trim or rails, light abrasive prep may also help remove oxidation, rust residue, or stubborn fragments.
What to remember
For older homes, dust control is not optional. When lead may be present, heavy dry sanding is the wrong kind of excitement. Wet methods or power tools with proper dust collection are far better choices than blasting dust into the air and hoping for the best.
Pros
- Creates a cleaner, more professional-looking finish
- Improves primer and paint adhesion
- Useful after scraping or chemical stripping
Cons
- Can create a lot of dust if done carelessly
- May scar wood or softer substrates if overdone
- Better for prep and refinement than full paint removal
Way #3: Pressure Washing for Loose Exterior Paint and Dirty Surfaces
Best for: decks, some wood exteriors, and surfaces where paint is already failing badly and dirt is part of the problem.
Pressure washing is one of the fastest ways to remove loose exterior paint, but it is not a universal answer. Used correctly, it can clear away dirt, chalk, mildew, and paint that has already lost its grip. Used badly, it can force water behind siding, scar wood, fuzz the grain, and turn a prep day into a repair week.
This method shines when the goal is to remove weak material quickly before hand prep. It is especially helpful on broad exterior areas that are dirty, chalky, or already peeling in sheets. It is less appropriate when the surface is delicate, cracked, historic, or already one bad decision away from splintering.
Why homeowners like it
It is fast. Very fast. Nothing boosts confidence like watching years of grime and failed paint flee the scene under controlled water pressure. But the keyword there is controlled. Exterior paint removal should not feel like you are trying to cut steel with rain.
Pros
- Quickly removes dirt, chalk, mildew, and loose paint
- Helpful as an early prep step before scraping and sanding
- Efficient on large exterior areas
Cons
- Can damage siding or force moisture into the wall assembly
- Not ideal for fragile trim or very old wood
- Requires drying time before priming and repainting
If you choose this route, think of pressure washing as a prep partner, not a complete paint stripping strategy.
Way #4: Infrared or Low-Heat Removal for Thick Paint on Wood Trim
Best for: old wood trim, detailed exterior woodwork, stubborn paint buildup, and areas where scraping alone is painfully slow.
Heat-based removal softens old paint so it can be lifted off more easily. On exterior wood, this can be a highly effective way to tackle thick paint layers without grinding the surface to death. It is especially useful on trim profiles, sash details, and stubborn sections where the paint is bonded in some places and stacked like geological sediment in others.
Infrared systems and lower-heat approaches are often preferred over more aggressive high-heat methods because they can soften paint while reducing scorching risk. That said, this is still not a toy. Heat and old houses are not a casual combination.
Where it shines
If you are trying to preserve wood details rather than flatten them, heat can be gentler than excessive scraping or sanding. It can also reduce brute-force scraping effort, which your wrists will appreciate around hour three.
Pros
- Effective on heavy paint buildup
- Helpful for preserving detailed wood profiles
- Often faster than scraping alone on old trim
Cons
- Fire risk if handled carelessly
- Not appropriate when lead safety is uncertain and you are not trained
- Less practical on huge wall expanses
If your home is older and you are even slightly suspicious about lead, this is a strong “call a pro” moment instead of a “let’s learn by trial and error” moment.
Way #5: Chemical Strippers for Intricate Trim, Masonry, and Stubborn Coats
Best for: ornate trim, carved details, brick, masonry, metal, and places where scraping or sanding would be too harsh.
Chemical paint strippers are the specialists of exterior paint removal. They are not usually the fastest method, but they can be the most surface-friendly for tricky spots. If you have decorative trim with grooves, turned porch posts, old brick, or multiple tough layers that refuse to budge, a good stripper can save enormous effort.
Modern homeowners are also much more selective about stripper chemistry than they used to be. That is smart. “Strong enough to remove paint” should not automatically mean “strong enough to remove your will to live.” Safer, lower-odor, and specialty gel or paste formulas are often better fits for residential work, especially outdoors on vertical surfaces.
Why this method matters
Brick and detailed woodwork are easy to damage with overly aggressive abrasion. Gel or paste removers can cling to vertical surfaces, soften old coatings, and make hand removal far easier. On brick in particular, that can be much kinder than attacking the surface with methods that chew up the face of the masonry.
Pros
- Useful on detailed or delicate surfaces
- Often the best option for paint on brick or ornate trim
- Can reduce gouging compared with aggressive mechanical removal
Cons
- Slower and messier than some other methods
- Product choice matters a lot
- Cleanup and disposal require care
In plain English: this is the “slow but civilized” option.
Way #6: Professional Media Blasting for Large, Tough Exterior Jobs
Best for: large exteriors, stubborn coatings on tough substrates, and situations where speed and scale matter more than DIY friendliness.
Media blasting can remove exterior paint quickly from large surfaces, which is why it remains tempting. It is also why it is best left to professionals. On the right substrate and in trained hands, blasting can be an efficient solution. On the wrong surface or in the wrong hands, it can roughen wood, erode masonry, and create a cleanup problem big enough to earn neighborhood gossip.
For some projects, especially heavily coated exteriors or hard surfaces, pro blasting makes sense. For fragile clapboards, historic trim, or mystery substrates, it can be too aggressive. This is not the chapter where I tell you to rent industrial equipment and “believe in yourself.”
Pros
- Fast on large projects
- Can remove extremely stubborn coatings
- Useful when other methods are too slow
Cons
- Usually not DIY-friendly
- Can damage soft or historic materials
- Messy, expensive, and highly dependent on operator skill
How to Choose the Best Paint Removal Method
If you are still deciding how to strip exterior paint, use this simple rule: start with the least aggressive method that will actually work. That usually means scraping first, then sanding for smoothness, then escalating only when the surface or coating demands it.
- Wood siding: scraping, careful sanding, selective pressure washing, or low-heat methods
- Detailed trim: scraping plus chemical stripper or low-heat removal
- Brick and masonry: gel or paste strippers, often followed by hand cleanup
- Metal: scraping, wire brushing, sanding, or specialty stripper depending on condition
- Massive exterior jobs: professional removal, possibly including blasting where appropriate
And remember: if the remaining paint is well bonded, you may not need to strip everything. Exterior painting success often depends more on honest prep than dramatic demolition.
Mistakes to Avoid When Removing Exterior Paint
- Ignoring lead risk: This is the big one. Older homes deserve extra caution.
- Choosing the wrong method for the surface: Brick, wood, and metal are not interchangeable.
- Trying to remove all paint when you only need to remove failing paint: More work does not always mean better results.
- Skipping surface repairs: Rot, cracks, failed caulk, and moisture problems will sabotage the new finish.
- Painting too soon after washing: Exterior surfaces need adequate drying time.
- Using removal as a substitute for diagnosis: If moisture caused the peeling, the paint was the symptom, not the disease.
Experience: What Removing Exterior Paint Actually Feels Like
Here is the part that no glossy project guide talks about enough: exterior paint removal is not just a technical job, it is a patience job. The first hour often feels heroic. You lay out your tools, make a plan, and imagine a clean, beautiful facade by dinner. By the second hour, you discover that your house has approximately seventeen layers of old paint, three mystery repairs, and one spot where the previous owner appears to have used optimism as a primer.
The real experience of removing exterior paint is learning that every section of a house behaves differently. One board lets go easily with a scraper, almost as if it has been waiting years for retirement. The next board clings to old paint like it signed a blood oath. Window trim can be especially humbling. What looked like “a quick touch-up area” from the driveway suddenly becomes an archaeological dig of caulk, cracked paint, and ancient brush marks.
There is also a mental shift that happens once you stop expecting one perfect method. Experienced homeowners and painters know the job usually becomes a combination act. You scrape one area, sand the edges, switch methods on a stubborn corner, then step back and realize that success is not about stripping everything to bare material just because you can. It is about leaving behind a surface that is stable, smooth enough, dry enough, and properly prepared for the next coating.
Another real-world lesson is that surface condition tells stories. Peeling near gutters often points to water problems. Failing paint on lower boards may reveal splash-back, soil contact, or moisture trapped from behind. Trim that keeps shedding paint may have years of buildup with poor bonding between old coats. Once you have worked on a house exterior for even a weekend, you stop seeing “paint problems” and start seeing building clues.
And yes, exterior paint removal is physically demanding. It is shoulders, forearms, ladders, awkward angles, and repeated trips to move tarps, tools, and debris. It rewards pacing more than bravado. The people who finish cleanly are usually not the ones who attack the wall at maximum speed. They are the ones who work methodically, contain the mess, keep tools sharp, and know when a surface needs a different approach.
Most of all, the experience teaches respect for prep work. Fresh paint gets the compliments, but prep does the heavy lifting. A house that looks crisp and finished a year later is usually the result of boring, careful decisions nobody photographed: removing loose paint completely, smoothing transitions, addressing moisture, choosing the right primer, and not painting over wishful thinking. That is the unglamorous truth. Exterior paint removal may not be the fun part of the project, but it is often the part that decides whether the whole job lasts.
Conclusion
The best way to remove exterior paint depends on the surface, the paint condition, and whether you are dealing with simple peeling or a full-scale old-house saga. Hand scraping works beautifully for loose paint. Sanding refines the surface. Pressure washing helps on broad, dirty, failing areas. Low-heat tools can tackle stubborn buildup on wood. Chemical strippers are excellent for intricate trim and masonry. Media blasting belongs in the professional category for large or demanding jobs.
If you remember one thing, let it be this: the goal is not to remove paint in the most dramatic way possible. The goal is to create a sound, clean, paintable exterior without damaging the surface underneath. Your future self, standing back and admiring a finish that actually lasts, will be deeply grateful.


