Table of Contents >> Show >> Hide
- What Makes Japanese-Style Gift Wrapping Feel So Different?
- Way #1: Furoshiki Cloth Wrapping (Reusable, Elegant, Surprisingly Easy)
- Way #2: Origata-Inspired Paper Wrapping (Crisp, Minimal Tape, Very “Japan Department Store”)
- Way #3: Finish with a Mizuhiki-Style Band (The Detail That Says “This Was On Purpose”)
- Quick Checklist: Make Any Gift Look Japanese-Style in 60 Seconds
- Conclusion: The Wrap Is the Warm-Up Act
- Experiences: What It’s Like to Actually Wrap Gifts Japanese Style (The Fun, the Fumbles, and the “Aha!” Moments)
Some people give gifts. Other people give gifts and a wrestling match with tape, wrinkled paper, and that one corner that refuses to behave.
Japanese-style gift wrapping is the opposite of that chaos. It’s calm. It’s precise. It’s “I respect you enough to fold this like it’s a tiny work of art.”
And the best part? You don’t need secret ninja trainingjust a few smart techniques, the right materials, and a willingness to crease things like you mean it.
In Japan, presentation is part of the message: the wrap isn’t “extra,” it’s the opening line. Below are three approachable, very doable ways to wrap a gift
Japanese stylewhether you’re wrapping a birthday box, a host gift, or something oddly shaped that normally makes wrapping paper cry.
What Makes Japanese-Style Gift Wrapping Feel So Different?
Japanese wrapping traditions emphasize clean lines, intentional folds, and a sense of care. Think less “cover it and hope for the best”
and more “this is a small ceremony.” You’ll see a few themes pop up across styles:
- Neatness and restraint: minimal tape, hidden seams, crisp edges.
- Material respect: cloth gets reused; paper is chosen and folded thoughtfully.
- Meaning in details: cords, bands, and tags can symbolize connection and good wishes.
- Practical beauty: a wrap that’s elegant, secure, and often easy to open.
Ready to wrap like you’ve got a fancy department store on speed dial? Let’s go.
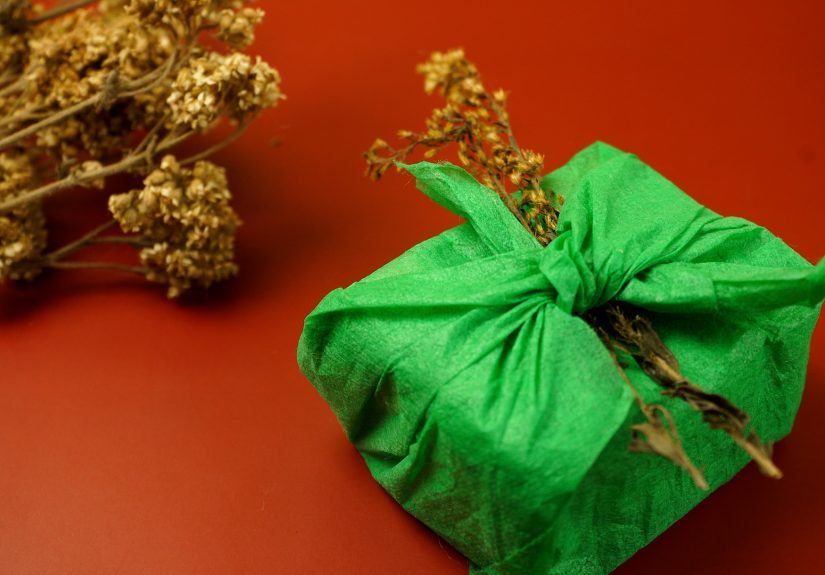
Way #1: Furoshiki Cloth Wrapping (Reusable, Elegant, Surprisingly Easy)
Furoshiki is the Japanese tradition of wrapping with clothoften a square piece of fabric tied in beautiful knots.
It’s sustainable, it looks high-end, and it turns your wrapping into a bonus gift (because who doesn’t love a scarf, bandana, or tea towel?).
What You’ll Need
- A square cloth (a real furoshiki, scarf, bandana, tea towel, or fabric square)
- Your gift (box, bottle, book, etc.)
- Optional: a small sprig of greenery, dried flowers, or a gift tag
Basic Box Wrap: “Two Knots and You’re Fancy”
This is the classic beginner-friendly approach: place the gift in the center, tie opposite corners, then tie the remaining corners.
It’s fast, tidy, and doesn’t involve fighting with tape like it owes you money.
- Lay the cloth flat on a clean surface and smooth out wrinkles.
- Place the gift in the center (if the cloth is a square, the gift often looks best angled slightly so corners have room to tie).
- Bring two opposite corners up over the gift and tie a firm square knot.
- Bring the remaining two corners up and tie another square knot on top.
- “Fluff” the loose ends so the knots look like a soft bow.
Pro move: tuck a small sprig of cedar, rosemary, or dried flowers into the knot. It instantly says,
“I had my life together long enough to do this,” even if you absolutely did not.
Bottle Wrap: The Ultimate Host-Gift Flex
Wrapping a bottle Japanese style is basically a party trickpeople will ask, “How did you DO that?” and you’ll pretend it’s
something you do every Tuesday.
- Lay the cloth flat like a diamond.
- Place the bottle near the center and fold one corner over the top, tucking it gently behind the neck/cap.
- Bring the opposite corner up and around the bottle so the fabric hugs it.
- Gather the two side corners, bring them up, and tie a secure knot above the bottle’s shoulder.
- Adjust the “handles” (the tied ends) so it’s balanced and easy to carry.
Furoshiki Tips That Make It Look Intentional (Not Accidental)
- Choose fabric with “give”: soft enough to knot, sturdy enough to hold shape.
- Size matters: too small and you can’t tie; too large and it looks like your gift is wearing a cape.
- Make the cloth part of the gift: use a tea towel for kitchen gifts or a scarf for fashion gifts.
- Keep the knot centered: symmetry is the secret sauce for that polished look.
Way #2: Origata-Inspired Paper Wrapping (Crisp, Minimal Tape, Very “Japan Department Store”)
Origata is a traditional Japanese approach to wrapping with folded paperrooted in formality and precision.
It’s closely related to the broader culture of paper folding, and historically carried real social meaning (who you were, what you were giving,
and why it mattered). Today, you can borrow the aesthetic without needing a master’s degree in folding.
The goal here is clean geometry: sharp creases, tidy edges, and tape that’s either minimal or cleverly hidden.
What You’ll Need
- Wrapping paper (washi-style paper looks amazing, but kraft or quality gift wrap works too)
- Scissors or a craft knife
- Double-sided tape (optional but helpful for invisible finishes)
- A ruler or bone folder (optional for extra-crisp creases)
The “Diagonal Wrap” Look: A Simple Method for Crisp Japanese Vibes
This is an approachable, origata-inspired technique that creates a sleek, professional finish using minimal tape.
You’ll form clean triangular folds and a tidy seam linemore “boutique” than “last-minute panic.”
- Measure smart: Place the box on the paper and make sure you have enough to cover the top and wrap the sides with a little overlap. Trim excess to reduce bulky corners.
- Set the angle: Put the box slightly diagonal on the paper so folds land cleanly on edges.
- Wrap the first side: Bring one side of paper up and over the box. Crease sharply along the edge.
- Wrap the second side: Bring the opposite side over, creating a clean overlap seam. Use a small strip of tape (preferably double-sided) to securekeep tape hidden under the overlap.
- Form tidy ends: On one end, press paper down to create two triangles, then fold them in neatly like doors closing. Crease everything sharply.
- Create a clean final flap: Fold the remaining flap up and over. If the paper edge looks rough, fold the edge inward a tiny bit before the final fold to hide imperfections.
- Repeat on the other end: Same folds, same crisp creases, same tiny victory.
Japanese-style detail that levels it up: Before your final folds, run a fingernail (or bone folder) along every crease.
Crisp edges are the difference between “handmade” and “handmade by a wizard.”
Optional: Add Elegant Pleats (Small Effort, Big Impact)
If you want to lean into an origata-inspired look, add a few narrow pleats on the visible seam or on one side of the box.
Keep it subtle: 3–5 small pleats can look refined without turning your gift into an accordion.
- Make pleats evenly spaced (use a ruler if you’re feeling fancy).
- Keep them aligned with the box edges for a calm, geometric feel.
- Secure the pleats on the underside with one small piece of tape.
Common Mistakes (And How to Avoid the “Sad Burrito Wrap”)
- Too much paper: creates bulky ends. Trim early and re-check before folding.
- Weak creases: makes everything look sloppy. Crease like you mean it.
- Tape everywhere: Japanese style hides the “construction.” Use less, place it smarter.
- Thin tear-prone paper: can rip at corners. Medium-weight paper is your friend.
Way #3: Finish with a Mizuhiki-Style Band (The Detail That Says “This Was On Purpose”)
If Way #2 is the outfit, Way #3 is the accessory that makes people go, “Oh. You’re good at this.”
Mizuhiki refers to decorative cordstraditionally made from twisted washi paperused to tie and embellish gifts,
especially for formal occasions. Even if you don’t have authentic mizuhiki cord, you can capture the look and meaning with a few smart substitutes.
Option A: Use Real Mizuhiki Cord (If You Have It)
If you’ve got mizuhiki cord (craft stores, Japanese shops, or specialty retailers), keep the design clean: one band around the box, one neat knot on top.
Traditional colors often follow basic “celebratory vs. somber” conventions, but modern gift wrapping also uses creative color palettes.
- Wrap the cord around the box like a band (horizontally or vertically).
- Bring cord ends to the top center.
- Tie a simple decorative knot (even a neat bow works if you’re not knot-fluent yet).
- Trim ends evenly or tuck them under for a minimalist finish.
Option B: Fake the Mizuhiki Look (Tastefully) With What You Already Own
No mizuhiki? No problem. The vibe is “refined band + intentional knot,” not “authenticity police, arrest me.”
Try one of these:
- Hemp twine or cotton cord for a natural, minimalist look.
- Thin ribbon (matte over shiny for a calmer Japanese aesthetic).
- Washi tape + paper strip as a modern bandclean and graphic.
DIY Paper Band + Mini Tag (A Simple Nod to Noshi-Style Presentation)
Traditional noshi elements can be complex and occasion-specific. For everyday gifting, you can add a respectful nod:
a clean paper band and a small folded tag that looks intentional, not overdone.
- Cut a long strip of paper (about 1–2 inches wide). Solid color or subtle pattern works best.
- Wrap it around the box like a belt and tape it underneath.
- Fold a small rectangle of contrasting paper into a simple “flag” shape (like a tiny folded label).
- Tuck the folded tag under the band on the top-right area of the gift (or center it if you prefer symmetry).
- Add a short handwritten note (keep it neatthis is not the moment for chaotic cursive).
Quick Checklist: Make Any Gift Look Japanese-Style in 60 Seconds
- Pick one focal element: cloth knot, crisp paper folds, or a cord banddon’t stack everything.
- Keep tape minimal and hidden whenever possible.
- Crease every edge sharply (a ruler helps, a spoon works in a pinch).
- Choose calm materials: washi paper, kraft paper, fabric wraps, matte cords.
- Add one natural accent (greenery, dried flower) if it fits the occasion.
Conclusion: The Wrap Is the Warm-Up Act
Japanese-style gift wrapping isn’t about perfectionit’s about intention. A furoshiki wrap says “sustainable and stylish.”
Origata-inspired paper folding says “clean, thoughtful, and quietly impressive.” A mizuhiki-style band says “I cared enough to finish this properly.”
Pick one method, try it twice, and by the third attempt you’ll be wrapping with the calm confidence of someone who definitely doesn’t own
a drawer full of crumpled tape remnants. (We can all aspire.)
Experiences: What It’s Like to Actually Wrap Gifts Japanese Style (The Fun, the Fumbles, and the “Aha!” Moments)
The first time someone tries Japanese-style wrapping, the most common reaction is a mix of delight and suspicionlike you’ve discovered a cheat code.
Cloth wrapping feels almost unfair because it looks so elevated for such a small amount of effort. You lay down a scarf, tie a couple knots, fluff the ends,
and suddenly your gift looks like it came with background music and a slow-motion reveal.
In real life, the “furoshiki moment” usually happens at gatherings: you bring a bottle, someone notices the cloth wrap, and now the wrapping becomes
the conversation starter. It also changes the tone of the gift. Instead of the wrap being torn off and tossed, people pause. They ask if the cloth is reusable.
They keep it. The wrapping stops being disposable and starts being part of the gestureespecially when you use a tea towel for a kitchen gift or a bandana
in a color you know the recipient will wear.
The paper-folding experience is different. It’s less “wow, magic scarf” and more “wow, how is this seam so clean?” The biggest shift is mental:
you stop thinking of wrapping as “covering” and start thinking of it as “building.” Measuring becomes calmer. Cutting becomes deliberate.
And creasing becomes oddly satisfyinglike organizing a messy drawer, but for your soul.
There are also predictable fumbles. One classic beginner move: using paper that’s too thin, which tears the second you try to crease a corner.
Another: using too much paper because “more must be safer,” which creates bulky ends that look like your gift is wearing shoulder pads.
The fix is almost always the same: medium-weight paper, less excess, sharper creases. If you want an instant upgrade, fold the cut edge inward
before your final seamhiding uneven cuts makes your wrap look store-level, even if your scissors are… enthusiastic but not precise.
The mizuhiki-style finishing step is where people usually feel the “I’m doing a craft” anxiety. But the funny truth is that you don’t need
complicated knots to get the Japanese vibe. A simple band wrapped around the box and finished with a tidy knot (or even a clean bow) communicates
the same thing: intention. It’s like plating food. You don’t need a culinary degree; you just need to stop dumping everything in the middle of the plate.
A centered band, balanced ends, and one small accent is enough.
The best “experience hack” is practice with low-stakes items. Wrap a book you own. Wrap a cereal box. Wrap a shoebox. Use an old scarf.
The goal is to train your hands to make crisp folds without pressure. By the time you’re wrapping a real gift, your fingers will already know
what to doand you’ll be able to focus on the fun parts, like choosing a calm paper pattern or adding a tiny sprig of greenery that makes the whole thing
look like a magazine photo.
And perhaps the most satisfying experience of all: watching someone hesitate before opening the gift because it looks too pretty to ruin.
That pause is the point. Japanese-style wrapping creates a small moment of respectlike a quiet “thank you” before the present is even unwrapped.
It turns the outside into part of the gift, and that’s a surprisingly powerful feeling to give.