Table of Contents >> Show >> Hide
- Why DIY Car Detailing Is Worth It
- Tip 1: Start in the Shade on a Cool Surface
- Tip 2: Build a Basic Kit Before You Begin
- Tip 3: Clean the Wheels and Tires First
- Tip 4: Pre-Rinse and Pre-Treat the Ugly Stuff
- Tip 5: Wash From the Top Down Using a Smart Method
- Tip 6: Dry the Car Properly Instead of Letting It Air Dry
- Tip 7: If the Paint Feels Rough, Use a Clay Bar
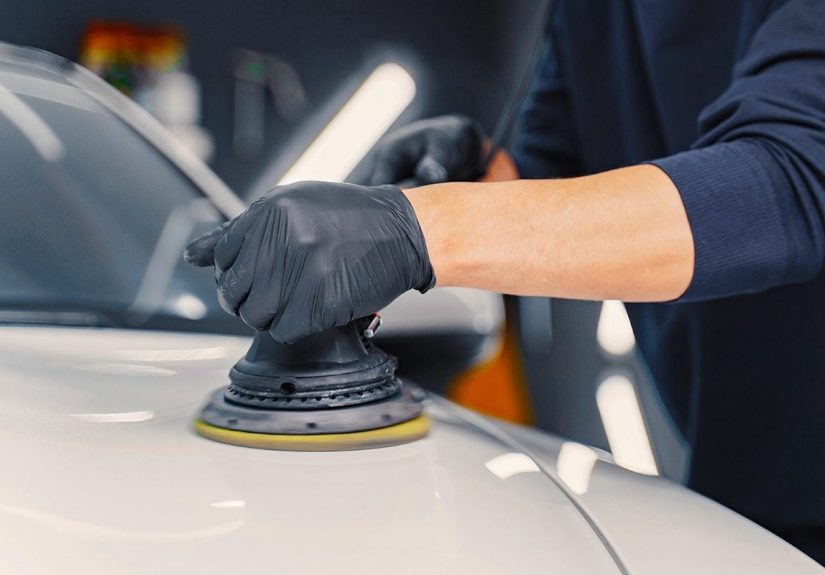
- Tip 8: Polish Only When Needed, and Use the Least Aggressive Option
- Tip 9: Protect the Finish With Wax, Sealant, or a Spray Ceramic Product
- Tip 10: Vacuum the Interior Before Spraying Anything
- Tip 11: Match the Cleaner to the Surface
- Tip 12: Clean the Glass Last for a Truly Finished Look
- Tip 13: Maintain the Car Between Deep Details
- Common DIY Car Detailing Mistakes to Avoid
- A Real-World Example of a Smart DIY Detail
- What DIY Car Detailing Feels Like After You’ve Done It a Few Times
- Conclusion
If your car currently looks like it lost a fight with pollen, coffee, road dust, and one suspicious French fry under the seat, don’t panic. DIY car detailing is not reserved for professional detailers with expensive polishers, dramatic lighting, and the patience of monks. With the right process, a few smart tools, and a little elbow grease, you can make your vehicle look dramatically better in your own driveway.
The trick is knowing what actually matters. A good detail is not about randomly spraying shiny stuff on every surface and hoping for the best. It is about cleaning safely, protecting what you cleaned, and avoiding the classic mistakes that turn a weekend project into a swirl-mark memorial. Whether you drive a daily commuter, a family SUV, or a pickup that has seen things, these DIY car detailing tips will help you get professional-looking results without professional-level drama.
Why DIY Car Detailing Is Worth It
Detailing your own car can save money, help preserve the finish, and make everyday driving feel a lot better. A clean interior is more pleasant, a protected exterior is easier to maintain, and regular care can help your vehicle look newer longer. It also makes resale photos far less embarrassing. That alone deserves a trophy.
Tip 1: Start in the Shade on a Cool Surface
Before you grab the hose, choose the right time and place. Washing and detailing in direct sunlight is one of the easiest ways to make the job harder. Water and soap dry too quickly on hot paint, which can leave spots, streaks, and residue behind. Warm panels also make some products flash off before they have time to do their job.
Early morning, late afternoon, or a shaded garage apron is ideal. Touch the paint first. If the hood feels like it could fry an egg, it is not detailing time. A cool surface gives you more control and better results, especially on dark-colored vehicles that show every mistake like a tattletale.
Tip 2: Build a Basic Kit Before You Begin
DIY car detailing goes much smoother when you are not running around the house searching for a towel that does not smell like laundry beads. A simple starter kit is enough for most people. Focus on safe, automotive-friendly tools rather than collecting every shiny gadget on the internet.
What to keep in your detailing kit
- Car wash soap, not dish soap
- Two buckets, or three if you want one dedicated to wheels
- Microfiber wash mitts and microfiber drying towels
- A wheel brush and separate wheel towels
- Vacuum with crevice tool
- Interior cleaner or all-purpose automotive interior cleaner
- Glass cleaner safe for automotive glass
- Clay bar or clay mitt
- Wax, sealant, or spray ceramic protectant
- Soft detailing brushes for vents, emblems, and trim
The keyword here is separate. Towels that touch wheels should not touch paint. That is how you accidentally rub brake dust into your clear coat and invent sadness.
Tip 3: Clean the Wheels and Tires First
Wheels are usually the dirtiest part of the vehicle. They collect brake dust, road grime, tar, and grime that seems to have signed a long-term lease. Cleaning them first keeps splatter off freshly washed paint and lets you tackle the messiest job while your motivation is still high.
Use a dedicated wheel cleaner if needed, plus separate brushes and towels. Get into lug nut holes, around spokes, and along the tire sidewalls. If your tires still look brown after a rinse, they are telling you they need more attention. A well-cleaned wheel and tire combo makes a bigger visual difference than most people expect. In fact, clean wheels can make an average wash look suspiciously expensive.
Tip 4: Pre-Rinse and Pre-Treat the Ugly Stuff
Always rinse the vehicle before touching the paint with a mitt. That initial rinse removes loose dirt and reduces the chance of dragging grit across the surface. After that, look for trouble spots such as bird droppings, bug splatter, tree sap, or sticky road film.
These contaminants should be softened or pre-treated before you scrub. Letting a product dwell briefly is smarter than attacking the area like you are sanding a deck. For example, if the front bumper is decorated with highway bug casualties, spray the area first and give it a moment before washing. Your paint will thank you by not looking scratched later.
Tip 5: Wash From the Top Down Using a Smart Method
Gravity is real, and dirt follows it. That is why the roof, glass, hood, and upper panels should be washed before the lower rocker panels and bumpers. The lower half of a vehicle is usually much dirtier, so save it for last.
The top-down logic
If you wash the bottom first, then move to the hood with the same mitt, you are essentially exfoliating your paint with road grit. That is not a premium service.
Use the two-bucket method
One bucket holds your soapy wash solution. The other holds clean rinse water for your mitt. After each section, rinse the mitt before loading it with fresh soap again. This simple habit helps keep dirt out of your wash media and off your paint. Work in small sections and rinse frequently.
If you want to level up, use one mitt for upper panels and another for the lower sections. It is a small change that can reduce swirls over time.
Tip 6: Dry the Car Properly Instead of Letting It Air Dry
Air drying sounds lazy-efficient, but it often leaves mineral spots and streaks, especially if you have hard water. Once the vehicle is rinsed, dry it promptly with plush microfiber drying towels or a dedicated car dryer or blower if you have one.
Patting or gently dragging a clean microfiber towel across lubricated paint is safer than using old bath towels or whatever mystery rag is in the trunk. Start with the glass and upper panels, then work your way down. Open the doors, trunk, and fuel door to catch trapped water. Otherwise, that hidden water will emerge later and run down your clean panels like your car is actively mocking you.
Tip 7: If the Paint Feels Rough, Use a Clay Bar
A car can look clean and still feel gritty. Run your fingertips lightly over the paint after washing and drying. If it feels rough instead of slick, bonded contaminants are probably stuck in the surface. That is where a clay bar or clay mitt helps.
Use plenty of lubricant and work one small section at a time. Clay is not for scrubbing hard. It is for gliding over the paint to lift embedded contamination. After claying, the surface should feel smoother and be better prepared for wax or sealant. This step is especially useful for cars parked outside, exposed to industrial fallout, tree sap mist, or lots of highway miles.
Tip 8: Polish Only When Needed, and Use the Least Aggressive Option
Polishing is for improving paint clarity by reducing oxidation, light scratches, haze, or swirl marks. It is not something you need every wash. In fact, aggressive correction too often can do more harm than good.
If your paint looks dull or has visible swirls, start small. Try a mild polish by hand on a test spot before committing to the whole vehicle. Always use the least aggressive product and method that gives you the improvement you want. Deep scratches that catch a fingernail are usually not realistic hand-polish fixes, so do not fall into the trap of rubbing one spot for 45 minutes while questioning all your life choices.
Tip 9: Protect the Finish With Wax, Sealant, or a Spray Ceramic Product
Once the paint is clean and smooth, lock in the effort. Protection matters because it helps water bead, makes future washes easier, and adds gloss. Traditional wax gives a warm shine. Synthetic sealants often last longer. Spray ceramic products are popular because they offer a good balance of ease and durability for DIY users.
Apply thin, even coats according to product directions. More product does not equal more protection. It usually equals more buffing and more muttering. Pay attention to trim, too. Some products can leave white residue on textured black plastic if used carelessly, so controlled application is your friend.
Tip 10: Vacuum the Interior Before Spraying Anything
Interior detailing should begin with dry cleanup, not a random bottle of cleaner. Remove trash, take out the floor mats, and vacuum thoroughly before treating surfaces. This prevents you from turning crumbs and dust into muddy paste.
Use a crevice tool along seat rails, under seat edges, between cushions, inside cup holders, and in the trunk. If you have pets, a rubber brush or pet hair tool can save enormous frustration. Once loose dirt is gone, you can actually clean surfaces instead of just redistributing debris like a tiny tornado.
Tip 11: Match the Cleaner to the Surface
Not every interior material wants the same treatment. Leather, cloth, plastic, piano black trim, rubber mats, and infotainment screens all have different needs. A strong cleaner that works on one area may be a terrible idea on another.
Safer interior habits
- Use a leather-safe cleaner and conditioner on leather seating surfaces
- Use fabric or upholstery cleaner for cloth seats and carpet
- Use gentle interior cleaner for dashboards, doors, and consoles
- Use minimal moisture around buttons, switches, and screens
- Always test products on a small hidden spot first
A matte dashboard should not end up looking like a glazed doughnut. Avoid overdoing greasy dressings. A clean, natural-looking finish usually looks better and attracts less dust.
Tip 12: Clean the Glass Last for a Truly Finished Look
Few things ruin a detail faster than streaky glass. Save glass cleaning for the end so overspray from dressings, tire shine, or interior cleaners does not undo your work. Use a dedicated glass towel and an automotive glass cleaner safe for tinted windows.
Clean interior glass with extra patience, because that hazy film on the inside of the windshield can be stubborn. Roll windows down slightly to reach the top edges. On exterior glass, remove leftover bug residue and road film carefully. If the rest of the car looks fantastic but the windshield is smeary, the whole job somehow feels incomplete. Glass is the punctuation mark of detailing. Make it a good one.
Tip 13: Maintain the Car Between Deep Details
The easiest full detail is the one that never has to undo six months of neglect. Maintenance washes, quick vacuuming, fast cleanup of bird droppings, and occasional interior wipe-downs can dramatically reduce how much work each session takes.
Keep a microfiber towel, quick detail spray, and small trash bag in the car. Shake out mats weekly. Wipe spills when they happen. Rinse winter salt or heavy mud before it builds up. Clean door jambs and the trunk lip once in a while. Little habits keep a car from slipping back into chaos, and they make your next DIY car detailing session feel more like refinement than rescue.
Common DIY Car Detailing Mistakes to Avoid
- Using dish soap or household cleaners on paint
- Washing in direct sun on hot panels
- Using one bucket and one dirty mitt for the entire car
- Reusing wheel towels on painted surfaces
- Applying too much wax or dressing
- Scrubbing stains before vacuuming first
- Ignoring glass until the very end and then rushing it
- Assuming every scratch can be polished away by hand
A Real-World Example of a Smart DIY Detail
Imagine a silver crossover that lives outside, carries two kids, and spends weekdays parked under a tree. A smart Saturday detail would start with shade, a wheel cleaning pass, and a full rinse. The owner would pre-treat sap dots and bug residue, wash from the roof down with two buckets, dry with microfiber towels, then clay just the hood and upper doors where contamination is most obvious. After that, a spray sealant adds gloss and protection without turning the day into a marathon. Inside, the mats come out, the vacuum hits the crumbs and pet hair, cloth cleaner handles a mystery seat stain, and glass gets cleaned last. That is not concours prep. It is realistic DIY detailing that delivers visible, satisfying improvement.
What DIY Car Detailing Feels Like After You’ve Done It a Few Times
The first DIY detail usually takes longer than expected. Much longer. You start with confidence, a playlist, and a bucket full of ambition. Then the wheels reveal years of brake dust, the cup holders turn into archaeological sites, and one tiny sap spot becomes a full side quest. That is normal. Most people learn quickly that detailing is not hard because any single step is complicated. It is hard because every little area asks for attention, and cars have a shocking number of “little areas.”
After a few sessions, though, something changes. You stop moving randomly and start working in a rhythm. You know to set out your towels first. You know the wheel brush belongs far away from the paint towels. You know the windshield always looks worse right before it looks better. And you learn that five extra minutes spent vacuuming crevices can make the interior feel twice as clean.
You also start noticing things regular drivers ignore. A clean dashboard is nice, but a properly cleaned steering wheel feels even better because it is the one surface you touch every time you drive. Door jambs suddenly matter. So do the edges of the trunk opening and the top of the windows that disappear into the doors. DIY detailing trains your eyes to see grime in layers. It is a blessing and a mild curse.
There is also a weirdly satisfying emotional payoff. A freshly detailed car does not just look better. It feels more organized, more cared for, and somehow more expensive, even if it is a ten-year-old commuter with a dent from a grocery cart incident nobody wants to discuss. When the paint feels slick, the interior smells clean instead of “old French fries and gym bag,” and the glass is crystal clear, driving becomes more enjoyable. Ordinary errands gain a tiny bit of main-character energy.
Another common experience is discovering that perfection is not the goal. The first-time DIY detailer often wants the car to look brand new. The experienced one wants the car to look dramatically better while staying realistic about time, budget, and skill. That shift matters. It keeps the process fun. You learn that improving 80 percent of the car safely is better than chasing 100 percent and creating new problems. Maybe one scratch stays. Maybe one stain only fades instead of disappearing. That is okay. The car can still look excellent.
Perhaps the biggest lesson is that maintenance beats heroics. Once you have detailed your car properly, you become highly motivated to avoid ruining your own hard work. You keep a trash bag in the center console. You wipe bird droppings sooner. You stop letting receipts breed in the cup holder. In other words, the detailing session quietly upgrades your habits. And that is why DIY car detailing becomes addictive for some people. It is not just cleaning. It is visible progress, instant feedback, and one of the few adult hobbies where a microfiber towel can make you feel oddly powerful.
Conclusion
The best DIY car detailing tips are not about buying the most expensive products or copying a professional studio routine step for step. They are about using safe methods, following the right order, and paying attention to the details that actually change the result. Start with shade, use proper wash tools, treat wheels separately, protect the paint, clean the interior intelligently, and keep the glass for last. Do that consistently, and your vehicle will look cleaner, feel better, and stay easier to maintain over time.
In other words, you do not need a detailing shop to get a car you are proud to drive. You just need a plan, some patience, and the willingness to battle crumbs with honor.


