Table of Contents >> Show >> Hide
- Candy-Making Quick Start: Melt Chocolate Like You Mean It
- The 12 Easy Chocolate Candy Recipes
- 1) 3-Ingredient Microwave Fudge
- 2) Classic Chocolate Truffles (The “Fancy” Ones)
- 3) Oreo “Cheater” Truffles
- 4) Peanut Butter Cups (No Special Molds Required)
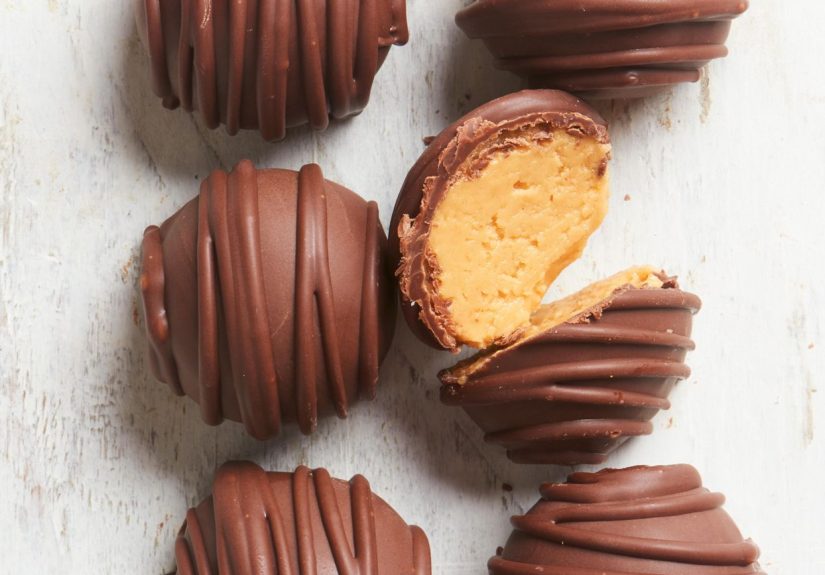
- 5) Buckeye Balls (Peanut Butter Centers, Chocolate Shell)
- 6) Custom Chocolate Bark (The Pantry-Cleanout Hero)
- 7) Peppermint Bark (Holiday Energy, Anytime)
- 8) Saltine Toffee Bark (A.K.A. “Chocolate Crack”)
- 9) Chocolate Turtle Clusters (Pecan + Caramel + Chocolate)
- 10) Chocolate Peanut Clusters (Old-School Candy Shop Vibes)
- 11) Chocolate-Covered Pretzel Rods (Giftable in 10 Minutes)
- 12) 3-Ingredient Chocolate Fondue “Candy Board”
- Make-Ahead, Storage, and Gifting Tips
- Extra Kitchen Notes: What It’s Like to Actually Make These ( of Real-World Experience)
- Conclusion
Chocolate candy has a magical talent: it looks like you spent all afternoon in a tiny apron whispering French words to a saucepan… even when you actually just used the microwave and strong opinions.
This guide is built for real lifeweekday cravings, last-minute gifts, “I promised I’d bring dessert” emergencies, and anyone who believes the best kitchen tool is a spoon. Below are 12 easy, mostly no-bake chocolate candy recipes with practical tips, smart swaps, and a few gentle reminders to keep water far away from melting chocolate (seriously, chocolate is dramatic).
Candy-Making Quick Start: Melt Chocolate Like You Mean It
Pick your chocolate: Bars or wafers melt smoother than many chips (chips are formulated to hold their shape). But if chips are what you’ve got, you can still make great candyjust melt slowly and stir often.
Microwave method (least fussy): Use a dry bowl. Microwave at medium/50% power in short bursts (about 30 seconds), stirring thoroughly each time. Stop when it’s mostly melted; stirring will finish the job. Overheating is how you end up with scorched chocolate and a personal feud with your microwave.
Double boiler method (classic): Set a heatproof bowl over barely simmering water. Make sure the bowl doesn’t touch the water. Keep steam and splashes awaymoisture can “seize” chocolate into a gritty clump.
Tempering (optional, but pretty): If you want a glossy snap for dipped candies, tempering helps. If you want delicious candy in your face immediately, you can skip it and chill the pieces instead.
The 12 Easy Chocolate Candy Recipes
1) 3-Ingredient Microwave Fudge
Why it’s easy: One bowl, one microwave, no candy thermometer, no stress spiral.
Ingredients
- 2 cups semisweet chocolate chips (or chopped chocolate)
- 1 (14 oz) can sweetened condensed milk
- 2 tbsp butter (optional, for extra silkiness)
- Pinch of salt
Steps
- Line an 8×8-inch pan with parchment.
- Microwave chocolate + condensed milk + butter in 30-second bursts, stirring well, until smooth.
- Stir in salt. Pour into pan, smooth top, chill 2–3 hours. Cut into squares.
Variations: Swirl in peanut butter, fold in toasted nuts, or sprinkle flaky salt on top before chilling.
2) Classic Chocolate Truffles (The “Fancy” Ones)
Why it works: Warm cream + chopped chocolate = ganache, which is basically edible velvet.
Ingredients
- 8 oz bittersweet or semisweet chocolate, finely chopped
- 1/2 cup heavy cream
- 1 tsp vanilla (optional)
- Coatings: cocoa powder, chopped nuts, toasted coconut, sprinkles
Steps
- Heat cream until steaming (not boiling). Pour over chocolate; sit 2 minutes.
- Stir until glossy. Add vanilla. Chill 1–2 hours until scoopable.
- Scoop, roll into balls (cold hands help), and coat.
Pro tip: If ganache feels too soft, chill longer. If it’s too firm, let it sit at room temp for 10 minutes.
3) Oreo “Cheater” Truffles
Why everyone loves them: They taste like a bakery bite, but you basically just stir and dunk.
Ingredients
- 1 package Oreo cookies
- 8 oz cream cheese, softened
- 10–12 oz melted chocolate or candy coating
Steps
- Crush cookies into fine crumbs. Mix with cream cheese until uniform.
- Roll into balls; freeze 20–30 minutes.
- Dip in melted chocolate. Chill until set.
Make it yours: Use mint Oreos, peanut butter Oreos, or add a pinch of espresso powder for grown-up vibes.
4) Peanut Butter Cups (No Special Molds Required)
Why it’s a keeper: Chocolate + peanut butter is a forever relationship.
Ingredients
- 12 oz milk or dark chocolate, melted
- 1/2 cup creamy peanut butter
- 2–3 tbsp powdered sugar (to taste)
- Pinch of salt
Steps
- Line a muffin tin with paper liners.
- Spoon 1–2 tsp chocolate into each liner; swirl to coat the bottom. Chill 10 minutes.
- Mix peanut butter + powdered sugar + salt. Add a small dollop to each cup.
- Top with more chocolate. Chill until firm.
Upgrade: Add crushed pretzels, chopped peanuts, or flaky salt on top.
5) Buckeye Balls (Peanut Butter Centers, Chocolate Shell)
Why it’s fun: They look like you planned a whole thing. You did not. Respect.
Ingredients
- 1 cup peanut butter
- 1/2 cup butter, softened
- 2–3 cups powdered sugar
- 1 tsp vanilla
- 10 oz melted chocolate
Steps
- Mix peanut butter + butter + vanilla. Add powdered sugar until it’s rollable.
- Roll balls; chill or freeze 20 minutes.
- Dip in melted chocolate, leaving a small “eye” uncoated if you want the classic look.
- Chill to set.
Texture note: If your peanut butter is very runny, add more powdered sugar or chill longer before dipping.
6) Custom Chocolate Bark (The Pantry-Cleanout Hero)
Why it’s brilliant: Bark is the “choose your own adventure” of candy.
Ingredients
- 12 oz chocolate (dark, milk, or white), melted
- Toppings: nuts, dried fruit, crushed cookies, toasted seeds, flaky salt
Steps
- Line a baking sheet with parchment.
- Spread melted chocolate into an even layer.
- Sprinkle toppings. Lightly press them in.
- Chill until firm; break into shards.
Combo ideas: Pistachio + sea salt, pretzel + smoked salt, dried cherries + almonds, espresso beans + cacao nibs.
7) Peppermint Bark (Holiday Energy, Anytime)
Why it pops: Cool peppermint against rich chocolate feels like winter in a biteminus the parking tickets.
Ingredients
- 8 oz dark or semisweet chocolate, melted
- 8 oz white chocolate, melted
- 1/2 tsp peppermint extract (optional; a little goes a long way)
- Crushed peppermint candies or candy canes
Steps
- Spread dark chocolate on parchment; chill until just set but still slightly tacky.
- Mix peppermint extract into white chocolate (if using). Spread over dark layer.
- Top with crushed peppermint. Chill fully; break into pieces.
Pro tip: Crush candy canes in a zip-top bag with a rolling pin. Therapeutic and festive.
8) Saltine Toffee Bark (A.K.A. “Chocolate Crack”)
Why it’s legendary: Salty crackers + buttery toffee + chocolate = dangerously snackable.
Ingredients
- Saltine crackers (enough to cover a sheet pan)
- 1 cup butter
- 1 cup brown sugar
- 10–12 oz chocolate, chopped
- Optional: nuts, flaky salt
Steps
- Line a rimmed baking sheet with foil + parchment. Cover with saltines.
- Boil butter + brown sugar for ~3 minutes, stirring; pour over crackers.
- Bake at 350°F for 5–7 minutes until bubbly.
- Sprinkle chocolate on top; wait 2 minutes, then spread. Add toppings. Chill and break.
Important: Watch closelyonce toffee goes from “caramel” to “campfire,” there’s no coming back.
9) Chocolate Turtle Clusters (Pecan + Caramel + Chocolate)
Why they feel fancy: You get chewy, crunchy, and chocolatey in one bitelike candy architecture.
Ingredients
- Pecan halves
- Soft caramels (store-bought) + a splash of cream or milk
- Melted chocolate
- Optional: pretzel bits, flaky salt
Steps
- Arrange small pecan “clusters” on parchment.
- Melt caramels with a splash of cream; spoon onto pecans.
- Spoon or drizzle melted chocolate over caramel. Sprinkle salt if desired.
- Chill until set.
Shortcut: Use caramel sauce thick enough to mound (or let sauce cool slightly so it doesn’t run away).
10) Chocolate Peanut Clusters (Old-School Candy Shop Vibes)
Why it’s unbeatable: Two ingredients can still be a full personality.
Ingredients
- 12 oz chocolate, melted
- 2 cups roasted peanuts (or mixed nuts)
- Pinch of salt
Steps
- Stir peanuts and salt into melted chocolate.
- Spoon little mounds onto parchment.
- Chill until firm.
Mix-ins: Toss in mini marshmallows for a rocky-road feel, or use honey-roasted peanuts for sweet-and-salty fireworks.
11) Chocolate-Covered Pretzel Rods (Giftable in 10 Minutes)
Why they win parties: People love snacks on sticks. It’s science.
Ingredients
- Pretzel rods
- 12 oz melted chocolate or candy melts
- Toppings: sprinkles, crushed nuts, toasted coconut, mini chips
Steps
- Dip pretzel rods into melted chocolate (tilt the cup so it’s easy).
- Let excess drip off; sprinkle toppings before it sets.
- Lay on parchment to firm up (or chill for speed).
Neat trick: Drizzle contrasting chocolate in thin lines for that “artisan candy shop” look.
12) 3-Ingredient Chocolate Fondue “Candy Board”
Why it counts as candy: Everything you dip becomes candy. Strawberries? Candy. Marshmallows? Mega-candy.
Ingredients
- 8 oz chocolate, chopped
- 1/2 cup heavy cream
- Pinch of salt
- Dippers: strawberries, banana slices, pretzels, shortbread, marshmallows
Steps
- Warm cream until steaming. Pour over chocolate; rest 2 minutes.
- Stir until smooth. Add salt.
- Serve warm with dippers. If it thickens, gently rewarm and stir.
Flavor twists: Add a tiny splash of vanilla, espresso, orange zest, or a pinch of chili powder for drama (the good kind).
Make-Ahead, Storage, and Gifting Tips
Chill smart: Most of these set beautifully in the fridge. For the best texture, let candies sit at room temp 5–10 minutes before serving (especially truffles and fudge).
Storage basics: Keep dairy-based candies (truffles, Oreo truffles) refrigerated in an airtight container. Bark, clusters, and pretzels can often stay cool-room-temp, but warm kitchens will soften chocolate fastif your house runs hot, refrigerate.
Gift like a pro: Use parchment between layers, choose containers with tight lids, and add a tiny note: “Store cool, eat happily.”
Extra Kitchen Notes: What It’s Like to Actually Make These ( of Real-World Experience)
Here’s the part nobody tells you until you’re standing over a bowl of chocolate wondering if you accidentally invented glue: candy-making is mostly about tiny decisions that add upheat level, patience, and whether your spoon is secretly wet. The good news? Once you’ve made a batch or two, you start recognizing the “feel” of success.
Moment #1: The chocolate looks thick, but it’s not ruined. When chocolate is almost melted, it can look stubbornly lumpy and you’ll be tempted to blast it with more heat. Don’t. Stir first. Those last few pieces melt from residual warmth, and stirring keeps everything smooth without scorching the cocoa solids.
Moment #2: Seized chocolate teaches boundaries. If a drop of water sneaks into melted chocolate, it can seize into a grainy, stiff mass. It’s annoying, but also a reminder to keep bowls bone-dry, avoid steamy lids, and not rinse your spatula mid-project. (Chocolate is basically the cat of ingredients: it does not like surprise moisture.)
Moment #3: Fudge is the “forgiving friend.” Condensed-milk fudge is hard to mess up, which is why it’s such a confidence builder. The texture tells you everything: too soft? Chill longer. Too firm? Next time, melt a touch less or add a tablespoon of butter for extra smoothness. And if you cut it too soon and the squares look messy, call them “rustic” and proceed to eat them anyway.
Moment #4: Truffles are a temperature game. Rolling truffles is easiest when the ganache is cold enough to hold shape but not rock-solid. You’ll find the sweet spot after a couple of tries. If the ganache starts melting in your hands, it’s not a failure; it’s your kitchen saying, “Put me back in the fridge for 10 minutes.”
Moment #5: Bark makes you look wildly competent. Chocolate bark is the ultimate “I totally planned this” treat. Spread, sprinkle, chilldone. The fun part is realizing you can build flavors like a snack-board architect: salty pretzels, tart dried cherries, toasted nuts, crushed peppermint, even potato chips. The first time you break it into shards, it’s weirdly satisfyinglike edible stained glass.
Moment #6: Dipping is messy… in a charming way. Chocolate-covered pretzels and buckeyes can drip, puddle, and occasionally glue themselves to the parchment. The trick is to embrace the process: let excess chocolate fall back into the bowl, tap gently, and remember that nobody has ever rejected a candy because the drizzle line was “too expressive.”
Moment #7: The best batches happen when you make extras. Not because you need more candy (though you do), but because it removes pressure. If you have a few “ugly” pieces, they become the cook’s reward. Every candy maker deserves a private stash. It’s tradition. Very serious tradition.
Conclusion
Easy chocolate candy is the perfect mix of comfort and flex: it’s cozy enough for a movie night and pretty enough for a gift box. Start with microwave fudge for instant wins, move to truffles when you want that fancy finish, and keep bark in your back pocket for every last-minute holiday, birthday, or “I brought something!” situation.
Most importantly: melt slowly, keep things dry, and taste-test aggressively. You know. For quality control.


