Table of Contents >> Show >> Hide
- Meet the Maker: Cait Conquers and the Joy of the Thrift Flip
- Why Thrift Store Clothing Makeovers Are Trending (And Not Just Because TikTok Said So)
- 25 of Her Best Thrift Store Transformations (New Pics)
- #1 The “Haunted Wallpaper” Brocade Flip
- #2 The Gothic-Star Halloween Glow-Up
- #3 The 90s Floral “Pinch Pleat” Revival
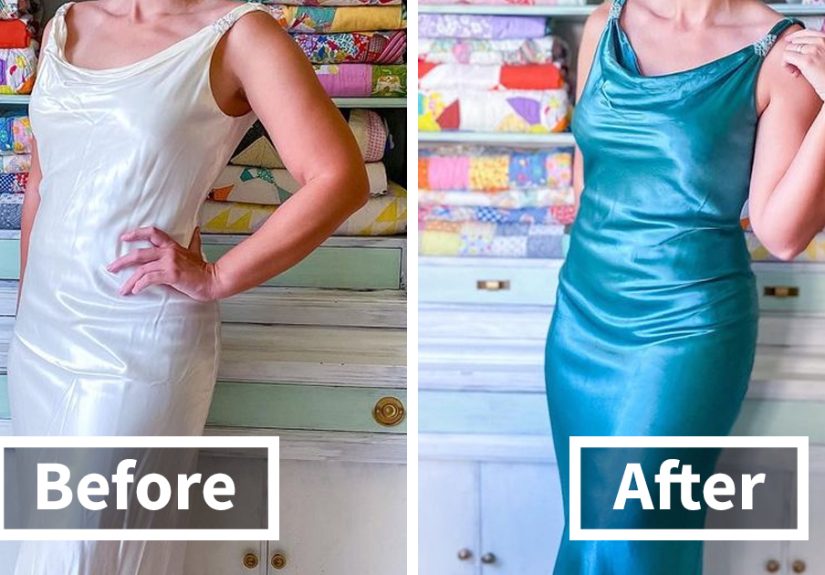
- #4 The Custom-Dyed Event Dress
- #5 The $3 “Church Dress” Franken-Flip
- #6 The “Sad 80s” Date-Night Upgrade
- #7 The Full Seam-Rip Redesign with Color Blocking
- #8 The Maxi Dress Turned 50s-Inspired Full Skirt
- #9 The Tablecloth Dress (Quarantine Edition)
- #10 The “Sound of Music” Mood Shift
- #11 The Embroidery Panel Dress (Plus a Pattern Hack)
- #12 The “Selkie-Inspired” Mashup from Multiple Dresses
- #13 The Thrifted Skirt Turned Dress
- #14 The “Stiff and Crusty” Fabric Rescue via Tie-Dye
- #15 The “Why Didn’t I Post This?” Tie-Dye Moment
- #16 The “Bridesmaid Dress From Hell” Becomes Cute
- #17 The 1986 Prom Dress Reimagined in Blue
- #18 The Shoulder Pad Removal (AKA Instant Time Travel)
- #19 Muumuu to Romper (Pattern Hack Edition)
- #20 The Lace Dress That Chose Violence
- #21 Valentine’s Pink Dress with a New Zipper Strategy
- #22 Cottagecore Muumuu Flip (Hawaii Edition)
- #23 The Mega “Frankenstein” Dress (Multiple Garments + Ruffles)
- #24 The Purple Dress with a Vintage Placemat Apron
- #25 Purple/Black/Grey Ice Dye Before-and-After
- What These Makeovers Teach (Even If You’re a Beginner)
- A Beginner-Friendly Thrift Flip Playbook
- Extra: of Real-World Thrift-Flip Experiences (So You Know What You’re Signing Up For)
- Conclusion: A Closet Upgrade That’s Also a Confidence Upgrade
There are two kinds of people in a thrift store: the ones who whisper, “What is that?” and walk away… and the ones who whisper the same thing, then immediately start
calculating seam allowances in their head like a beautiful, fabric-loving gremlin.
Today’s spotlight is for the second groupspecifically, a woman who takes “sad rack dress” energy and upgrades it into “Where did you buy that?” energy. Her name is Caitlin
Trantham, known online as Cait Conquers, and her whole deal is transforming thrift store finds into modern, wearable outfits with clever pattern work, dyeing,
and the kind of fearless creative problem-solving that makes your sewing machine quietly gasp.
Meet the Maker: Cait Conquers and the Joy of the Thrift Flip
Caitlin’s transformations hit that sweet spot Bored Panda readers love: dramatic before-and-after photos, practical sewing skills, and just enough chaos to make you think,
“Okay… maybe I could learn to do this.” She’s been open about learning through practice, making mistakes, and taking on projects that stretch her skillsbecause the
fastest way to level up is to pick something slightly terrifying and then refuse to be bullied by it.
Her approach is also refreshingly real-world. Thrifted clothing comes with quirks: weird sizing, missing dressing rooms, mystery stains, and fabrics that behave like they were
engineered by an evil wizard. Instead of pretending everything is easy, she treats each piece like a puzzleunpick seams, rework structure, add support where needed, and end up
with something that looks intentional (the highest compliment in sewing).
Why Thrift Store Clothing Makeovers Are Trending (And Not Just Because TikTok Said So)
The “thrift flip” boom isn’t random. It’s the perfect mashup of three big forces:
- Budget reality: People want style without the “my wallet just left the chat” price tag.
- Uniqueness: Wearing something one-of-one beats showing up in the same outfit as your coworker’s cousin’s dog walker.
-
Sustainability pressure: More shoppers are paying attention to textile waste and the environmental cost of fast fashion, and secondhand is one of the easiest
ways to reduce demand for new production.
The best part? A refashion doesn’t require you to be a fashion design graduate with a studio and an assistant named “Stitch.” It requires basic tools, patience, and a willingness
to do the unglamorous stuff: seam ripping, pressing, fitting, and sometimes muttering “Why is this sleeve shaped like a croissant?” into the void.
25 of Her Best Thrift Store Transformations (New Pics)
These are the kinds of makeovers that make you want to start thrifting immediately… and also make you respect anyone who can sew a zipper without bargaining with the universe.
For each one, the magic isn’t just “cut it shorter.” It’s structure, fabric behavior, and thoughtful design choices.
#1 The “Haunted Wallpaper” Brocade Flip
Before: Cream floral damask brocade with a bolero/sleeve situation and a vibe that says, “Victorian couch, but make it wearable.”
After: Sleeves removed, fabric dyed, then fully taken apart and reassembled inside out because the wrong side looked betterlike luxe, moody wallpaper.
#2 The Gothic-Star Halloween Glow-Up
Before: A formal dress that needed a new identity.
After: Dyed darker with a plan (and a little bravery), repaired beading by hand, added star details, adjusted straps, and finished with a corset-style back for
drama and fit.
#3 The 90s Floral “Pinch Pleat” Revival
Before: Pretty-but-dated floral dress.
After: Taken apart at the seams, rebuilt with a new bodice, saved by a clever pinch pleat and bow when the front panel ran wide, with the original collar ruffle
repurposed into straps.
#4 The Custom-Dyed Event Dress
Before: A dress with potential but not the right color story.
After: Dye formulas used to create a custom shadeproof that dyeing isn’t just “toss it in and hope,” it’s basically kitchen chemistry with better outfits at the end.
#5 The $3 “Church Dress” Franken-Flip
Before: A thrifted “church dress” with moth holes in the sleeves and a lining that needed help.
After: Sleeves sacrificed, velvet appliqués saved, lining pieced together for enough skirt fabric, and the two-tone effect turned a limitation into a design feature.
#6 The “Sad 80s” Date-Night Upgrade
Before: An 80s dress doing the most, not always in a good way.
After: A quick modern refit while keeping puff sleeves (because yes, puff sleeves are having a moment again), turning “prom mom” into “cute dinner plans.”
#7 The Full Seam-Rip Redesign with Color Blocking
Before: A dress that needed more than minor tailoring.
After: Every seam dismantled, a brand-new bodice sewn with color blocking, and trim reused so it still felt like the same garmentjust upgraded.
#8 The Maxi Dress Turned 50s-Inspired Full Skirt
Before: A maxi with a print that screamed retro potential.
After: Bodice and skirt separated, bodice refined at darts, skirt shortened and gathered, and bonus fabric used to add pockets (because pockets are the love language of DIY fashion).
#9 The Tablecloth Dress (Quarantine Edition)
Before: A tablecloth with main-character vintage energy.
After: A dress that leans classic Americanaproof that home linens sometimes just want to live their runway dream.
#10 The “Sound of Music” Mood Shift
Before: One of those thrift finds that makes you ask, “Was this made from curtains?”
After: A refashion that leans playful and costume-adjacent in the best waylike the outfit found its purpose and stopped being confused.
#11 The Embroidery Panel Dress (Plus a Pattern Hack)
Before: A dress with embroidered panels worth saving.
After: A new silhouette built around the panels, using a base pattern as a starting point and then tweaking until it fit like it was always meant to be that way.
#12 The “Selkie-Inspired” Mashup from Multiple Dresses
Before: Several thrifted dressesnone of them “the one.”
After: Pieces combined into a puff-sleeve, romantic silhouette inspired by modern viral cottagecore aesthetics, showing how remixing fabrics can create a totally new garment.
#13 The Thrifted Skirt Turned Dress
Before: A skirt with good fabric and limited yardage.
After: A dress built from a pattern designed to use less fabricperfect for upcycling when you’re working with “I have exactly this much and not one inch more.”
#14 The “Stiff and Crusty” Fabric Rescue via Tie-Dye
Before: A dress headed for landfill territory, complete with small holes and fabric that lost its softness.
After: A tie-dye transformation that refreshes the look and gives the piece a second life (and often hides tiny flaws like a polite, fashionable magician).
#15 The “Why Didn’t I Post This?” Tie-Dye Moment
Before: Another piece waiting for its glow-up.
After: A bold tie-dye update that proves sometimes the best projects are the ones you forgot about until suddenly they’re your favorite.
#16 The “Bridesmaid Dress From Hell” Becomes Cute
Before: Collar, lace, puff sleeves (plus lace sleeves underneath), ankle length, huge bowbasically a whole theatrical production.
After: Bodice rebuilt, sleeves kept but resized with elastic, skirt cut from lower down for extra fabric, and a shorter hem that makes the print feel modern.
#17 The 1986 Prom Dress Reimagined in Blue
Before: A sentimental lace prom dress with historyand high stakes.
After: Recolored and re-envisioned with care, balancing respect for the original with a fresh look that feels bold instead of dusty.
#18 The Shoulder Pad Removal (AKA Instant Time Travel)
Before: Drop waist, puff sleeves, shoulder padsthe full vintage package.
After: Sleeves and pads removed, waistline lifted, and suddenly it reads “cute vintage-inspired floral,” not “found in a trunk labeled 1987.”
#19 Muumuu to Romper (Pattern Hack Edition)
Before: A muumuu with fabric too sweet to ignore.
After: A romper created by combining pattern elements and fighting for the fit until it behavedbecause rompers are cute, but they’re also tiny tailoring demons.
#20 The Lace Dress That Chose Violence
Before: A lace dress that looked like it would be easy (famous last words).
After: A finished refashion after plenty of troubleshootingan important reminder that “pretty fabric” does not automatically mean “nice to sew.”
#21 Valentine’s Pink Dress with a New Zipper Strategy
Before: A pink dress with a side zip and an overlay that wasn’t cooperating.
After: Zipper moved to the back, bodice reshaped at multiple seams, overlay removed, and the fluffy underskirt became the star (as it deserved).
#22 Cottagecore Muumuu Flip (Hawaii Edition)
Before: A classic muumuubold print, big volume, big “auntie at the cookout” potential.
After: Encased elastic puff sleeves and a cinched waist for a modern cottagecore silhouette that feels airy, romantic, and field-of-wildflowers ready.
#23 The Mega “Frankenstein” Dress (Multiple Garments + Ruffles)
Before: Several dresses and a lace layer that weren’t doing much on their own.
After: A restructured bodice with thin straps, a rebuilt train, a high-low hem, layered skirts, and hours of rufflespart upcycle, part engineering project, all commitment.
#24 The Purple Dress with a Vintage Placemat Apron
Before: A dress she didn’t even love that much (honesty! growth!).
After: Dyed purple, skirt raised, buttons moved to the back, and a quirky apron made from vintage placemats for a cottagecore-meets-Sound-of-Music-meets-French-country vibe.
#25 Purple/Black/Grey Ice Dye Before-and-After
Before: A piece ready for a color overhaul.
After: Ice dye in a moody paletteproof that color alone can completely change how “modern” a garment reads.
What These Makeovers Teach (Even If You’re a Beginner)
Under all the fun “wow” factor, there are real, repeatable lessons hereespecially if you want to refashion thrift store clothes without ending up with a garment that can only be worn
inside your house, in the dark, when no mirrors are present.
1) Fit is a design choice, not a magical accident
Most thrift flips succeed because the maker actively reshapes the bodice: darts, seams, zipper placement, waistline height, strap length. If it looks “store-bought,” it’s often because
it fits like it was made for a human body in the current decade.
2) The “ugly” part is often just the styling and proportions
Puffy sleeves plus a drop waist plus a huge bow can read costume-y. Remove one element, shorten the hem, adjust the waist placement, and suddenly the print feels playful instead of chaotic.
3) Dye is the fastest way to change the story
Dye can modernize a thrift find instantlybut it’s not one-size-fits-all. Fabric content matters (synthetics and blends behave differently), and details like beading or overlays may take dye
in surprising ways. That’s not a reason to avoid it; it’s a reason to test and plan.
4) Reuse what’s already good
Trim, embroidery panels, ruffles, appliqués, even collar detailsthese are the expensive-looking parts. Salvaging them is how you keep a refashion from looking “homemade” in the bad way.
A Beginner-Friendly Thrift Flip Playbook
If you want to start refashioning thrift store clothing, use this order of operations:
- Pick the right “starter” garment: oversized dresses, muumuus, maxi skirts, and anything with too much fabric are easier than tight garments.
- Check fabric content: fiber labels help you avoid dye surprises and ironing disasters.
- Take photos before you cut: you’ll thank yourself when you’re trying to remember how the lining was attached.
- Start with structure: shoulders, bust, waist placement. The hem is dessert, not dinner.
- Press every step: ironing is basically free professional-looking energy.
- Add one “wow” detail: pockets, a bow, contrast straps, or a new back closure can make it feel intentional.
Extra: of Real-World Thrift-Flip Experiences (So You Know What You’re Signing Up For)
The internet makes refashioning look like a three-step process: 1) buy ugly dress, 2) do a little snip-snip, 3) emerge as the final boss of sustainable fashion. In reality, thrift
flipping is a full sensory experiencepart treasure hunt, part engineering, part emotional growth journey.
First comes the thrill of the find. You’re scanning racks and your brain starts doing that weird thing where it sees “possibility” instead of “problem.” You spot a dress
with a great print but chaotic sleeves. You find a muumuu with enough fabric to build a small tent. You find a skirt that’s basically begging to become a dress. You feel powerful. You
feel chosen. You feel like the thrift gods are smiling upon you. Then you get home and remember: thrift store lighting is a liar.
Next is the fitting phase, where you learn that sizing is fictional and dressing rooms are not guaranteed. Sometimes you’re buying based on vibes, measurements, and a
whispered prayer. You try the garment on and discover the zipper is in a cursed position, the waist hits at your ribs, and the sleeves are somehow both tight and enormous. This is where
beginners often panic. The secret is to treat it like raw material. You’re not “ruining” a perfect dressyou’re rescuing fabric and rebuilding a better garment.
Then comes the seam ripping, also known as “the part no one puts in the montage.” It’s quiet, repetitive, and weirdly satisfying until you accidentally nick the fabric
and immediately reconsider every decision you’ve ever made. But seam ripping teaches you how clothing is constructed. After a few projects, you’ll start recognizing patterns: how linings
are attached, where darts hide, why certain seams ripple. Your eyes get sharper. Your taste gets stricter. Suddenly you’re the person in the store muttering, “That’s a nice French seam,”
and you don’t even feel embarrassed.
Dyeing is its own adventure. You may go in thinking you’re about to create a soft romantic blush, and you come out with “grape soda noir,” which is… a mood. Sometimes overlays and trims
take dye differently and you end up with accidental contrast that looks designer. Sometimes you learn the hard way that some fabrics are committed to staying exactly the color they were
born as. The win is when you stop seeing surprises as failures and start seeing them as design prompts.
Finally, you get the payoff: the moment you put it on and it actually fits, the hem swings the way you wanted, and the whole thing looks intentional. That’s when you understand why
refashioning is addictive. It’s not just saving money. It’s not just sustainability. It’s the feeling of turning “almost trash” into “absolutely wearable,” using your own hands and your
own taste. And if your first project turns out a little wonky? Congratulationsyou’re officially doing the thing. Keep going.
Conclusion: A Closet Upgrade That’s Also a Confidence Upgrade
Cait Conquers’ best transformations are a reminder that thrift store clothes don’t have to stay stuck in their original eraor their original silhouette. With smart alterations, creative
dye work, and a willingness to rebuild instead of “just trimming,” old garments can become fresh outfits that feel personal, modern, and genuinely special.
If you’re tempted to start, begin small, pick a forgiving garment, and let the process be messy. The goal isn’t perfection. The goal is progressand maybe pockets.


