Table of Contents >> Show >> Hide
- The Standard Answer: How High Should Upper Cabinets Be?
- Standard Upper Cabinet Sizes and What They Mean for Layout
- When the Standard Height Should Change
- Ceiling Height: The Secret Ingredient Nobody Should Ignore
- Common Mistakes That Make Upper Cabinets Feel Wrong
- How to Decide the Right Upper Cabinet Height for Your Kitchen
- Final Verdict
- Experience-Based Lessons From Real Kitchen Projects
If kitchen design had a greatest-hits album, upper cabinet height would absolutely make the track list. It seems like a small detail until you live with it every day. Hang the cabinets too low, and your coffee maker feels like it needs a crouching permit. Hang them too high, and grabbing a cereal bowl turns into a shoulder workout nobody asked for. The good news is that this problem has been solved many times over by designers, cabinet makers, and installers. The even better news is that the answer is not mysterious. It is mostly math, a little ergonomics, and a dash of common sense.
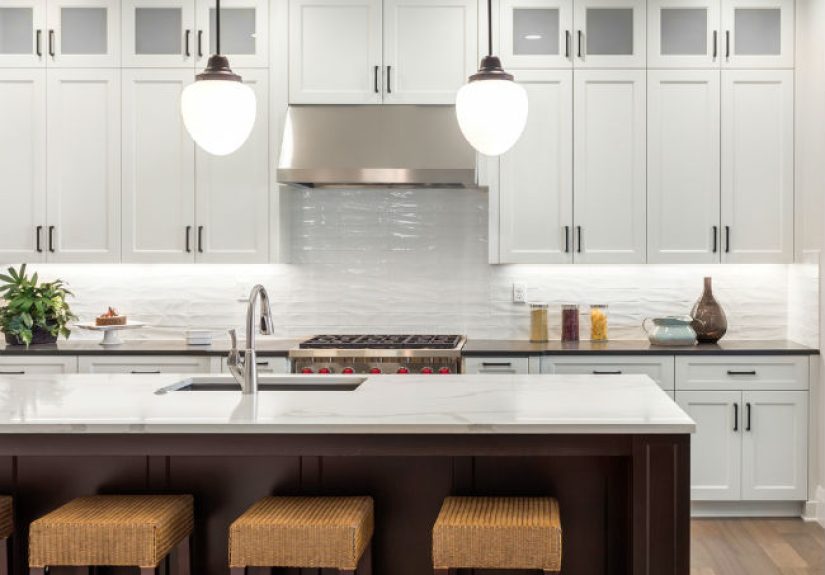
For most kitchens, the standard space between the countertop and the bottom of the upper cabinets is 18 inches. Since finished countertops usually land around 36 inches from the floor, that means the bottom of the uppers typically sits about 54 inches above the floor. That measurement has become standard for a reason: it creates a comfortable work zone, leaves room for a backsplash, keeps everyday appliances usable, and still makes cabinet shelves reachable for most adults. In other words, it is the Goldilocks zone of kitchen storage, not too high, not too low, and not likely to make you mutter under your breath while reaching for the olive oil.
The Standard Answer: How High Should Upper Cabinets Be?
The classic rule of thumb is simple: install upper cabinets so there is 18 inches of clearance between the countertop and the bottom of the cabinet. In a standard kitchen with a 36-inch-high finished counter, this places the cabinet bottom at 54 inches above the floor. That spacing is common because it balances function and comfort. It leaves enough open wall area for a practical backsplash and enough work space below for food prep, small appliances, and visual breathing room.
This measurement also works well with the cabinet sizes most manufacturers sell. Standard wall cabinets are commonly available in heights such as 30, 36, and 42 inches, with a standard depth around 12 inches for most wall applications. When those sizes are paired with the usual 18-inch gap, the whole layout starts to make sense. It is not random. It is a system.
Why 18 Inches Works So Well
First, it protects your workspace. Counters are not just decorative ledges where lemons go to look pretty. They are work surfaces. You need room to chop vegetables, unload groceries, plug in a toaster, and stage dinner without feeling like the cabinets are hovering over your head like a helicopter parent.
Second, 18 inches supports the standard backsplash zone. Many kitchens use a backsplash that fills the wall space between counter and uppers, and this height feels visually balanced. It is tall enough to look intentional and useful, not squished.
Third, it keeps storage reasonably reachable. Cabinet designers are always making a tradeoff between capacity and access. You can move uppers higher and gain room for a blender base or dramatic tile, but you lose easy reach. A kitchen that looks sleek but requires a step stool for your everyday mugs is not winning any medals for usability.
Standard Upper Cabinet Sizes and What They Mean for Layout
Once you know the bottom of the upper cabinets usually starts at 54 inches above the floor, the next question is how tall the cabinets themselves should be. That depends on your ceiling height, your storage needs, and how polished you want the final look to feel.
30-Inch Upper Cabinets
A 30-inch wall cabinet is often used when homeowners want open space above the cabinets, need to work around soffits, or prefer a lighter look. If the bottom starts at 54 inches, the top lands at 84 inches. In an 8-foot kitchen, that leaves a full foot between the cabinet top and the ceiling. Some people like that airy gap. Others see it as a dust collection shelf in formal wear.
36-Inch Upper Cabinets
A 36-inch wall cabinet is a middle-ground favorite. Starting at 54 inches, it reaches 90 inches high, leaving about 6 inches below an 8-foot ceiling. That is a sweet spot for crown molding, trim details, or subtle lighting. It looks more custom than a shorter cabinet, but it still avoids the fully built-in look of ceiling-height units.
42-Inch Upper Cabinets
A 42-inch wall cabinet is the go-to option when you want more storage and a taller, more finished appearance. Installed with the standard 54-inch bottom line, it reaches 96 inches, which is exactly 8 feet. In a kitchen with an 8-foot ceiling, that often means the cabinets can run to the ceiling or nearly so. This is one of the easiest ways to make a standard kitchen look more expensive, because it eliminates the awkward dead zone above the cabinets.
In taller rooms, such as kitchens with 9-foot ceilings, 42-inch uppers still work beautifully, but they will leave a gap above unless you use stacked cabinets, a riser, or decorative molding. That is not a flaw. It is just a design decision. The key is making the decision on purpose instead of discovering it after installation with the emotional energy of a person reading surprise baggage fees at the airport.
When the Standard Height Should Change
Even though 18 inches is the usual answer, it is not a law of nature. Good kitchen design is about the people using the room, not worshipping a tape measure. There are several situations where adjusting upper cabinet height makes sense.
1. Accessibility and Household Reach
If the kitchen needs to be more accessible, cabinet height should be adjusted for the user instead of forcing the user to adapt to the kitchen. Reach range matters. Frequently used items are easier to manage when they stay within a more comfortable zone, and accessible design guidance generally keeps commonly used storage lower and more reachable than many standard layouts do.
For some households, that means lowering the uppers slightly. For others, it means keeping everyday dishes in lower cabinets or drawers and reserving the highest shelves for occasional-use items. A kitchen can still look elegant while being kinder to shoulders, wrists, and step stools. In fact, that is usually the more sophisticated choice.
2. Tall Backsplashes and Statement Tile
Some kitchens benefit from a little more vertical breathing room between the counter and the uppers. Maybe you want a dramatic slab backsplash, extra room for under-cabinet lighting, or space for a coffee station with taller appliances. In those cases, homeowners sometimes nudge the gap to 19 or 20 inches. That can look great, but it should be done with your eyes open. Every inch you add below the cabinets pushes the shelves above farther out of comfortable reach.
3. Appliance Planning
Not all countertop appliances are created equal. A sleek toaster can live almost anywhere. A stand mixer, espresso machine, or tall blender setup is another story. If you use bulky appliances every day and hate dragging them in and out of a cabinet, give them room. Planning around real life beats planning around a fantasy kitchen where nobody owns a rice cooker.
4. The Area Above the Range
The zone above a cooktop is special. It should not be treated exactly like the rest of the wall cabinet run. Ventilation equipment, manufacturer instructions, and safe clearances matter here. Range hood height varies by appliance type and model, and gas cooking usually requires more clearance than electric. That is why smart kitchen plans treat the cooking zone as its own design problem, not a copy-and-paste of the sink wall.
In practice, this means you may keep standard upper cabinet height on surrounding walls while altering the area above the stove for a hood, microwave, or decorative feature. Good design is consistent, but it is not stubborn.
Ceiling Height: The Secret Ingredient Nobody Should Ignore
Upper cabinet height is not just about the counter. It is also about where the cabinets end. Ceiling height changes everything.
In an 8-foot kitchen, 42-inch uppers often look the most seamless because they reach the ceiling line cleanly when installed at standard height. In a 9-foot kitchen, you have more options. You can use 42-inch uppers and leave room above, stack smaller cabinets on top, or extend the design upward with trim. In older homes with soffits, beams, or uneven ceilings, the math becomes more custom, and that is where careful measuring matters more than following generic rules from the internet.
There is also a visual question to answer: do you want the kitchen to look tall, grounded, airy, or built-in? Ceiling-height cabinets generally feel more tailored and more expensive. Cabinets with an open gap above can feel lighter, more traditional, or more budget-friendly, depending on the details. Neither is automatically right. The best choice is the one that fits your room and the way you want it to feel.
Common Mistakes That Make Upper Cabinets Feel Wrong
The biggest mistake is measuring from the wrong reference point. Installers should work from the finished floor and final countertop height, not from hopeful assumptions. Base cabinets, flooring changes, countertop thickness, and wall irregularities can all affect the final result.
The second mistake is ignoring trim, lighting, and hardware. Crown molding needs space. Under-cabinet lighting needs planning. Even the depth of a cabinet matters, because standard wall cabinets are usually shallower than base cabinets for a reason: you want headroom and visibility over the workspace.
The third mistake is choosing style over daily function. Open shelves and dramatic tile are lovely. So is being able to reach a plate without reenacting a climbing scene from an action movie. A beautiful kitchen that frustrates you twice a day will eventually stop feeling beautiful.
The fourth mistake is forgetting the relationship between uppers and what lives below them. Sinks, cooktops, coffee stations, and prep zones do not all work the same way. The kitchen should be designed as a series of working areas, not a flat wall with cabinets pasted across it.
How to Decide the Right Upper Cabinet Height for Your Kitchen
Start with the standard. In most cases, 18 inches above the countertop is where you should begin. Then adjust only if you have a clear reason. Maybe your household is shorter or taller than average. Maybe you want full-height cabinets to reach an 8-foot ceiling. Maybe you need more room for a beloved espresso machine that is basically a family member at this point.
Next, test the layout in real life. Use painter’s tape on the wall. Stack boxes on the counter. Pretend to reach for plates, open an appliance lid, or clean under the cabinet line. A tape measure tells you the number, but a mockup tells you whether the number will make you happy on a random Tuesday morning.
Finally, prioritize the items you use most. Rarely used platters can live higher. Everyday bowls, glasses, and pantry staples should not require acrobatics. This simple rule keeps the kitchen practical long after the remodel excitement wears off and the invoices stop haunting your dreams.
Final Verdict
So, what is the correct upper cabinet height for kitchens? For most homes, the answer is 18 inches above the countertop, which usually places the bottom of the upper cabinets about 54 inches off the floor. Pair that with common wall cabinet heights like 30, 36, or 42 inches, and you have a layout that works with standard counters, standard ceilings, and standard human arms.
Still, the best kitchen is not built for “most homes.” It is built for your home. If you need more clearance, easier reach, a dramatic backsplash, full-height cabinetry, or better appliance space, adjust the plan. The smartest kitchen designers know the standard. The best ones know when to bend it.
Experience-Based Lessons From Real Kitchen Projects
One of the most consistent lessons from real kitchen remodels is that homeowners rarely complain about following the standard 18-inch rule, but they often complain when they ignore it without a solid reason. In everyday use, that 18-inch gap tends to feel natural. It gives enough room for prep, enough room for small appliances, and enough room for your kitchen not to feel like it is leaning over your shoulder. When cabinets are installed too low, the complaint is immediate. Counters feel cramped. Coffee makers start bumping into cabinet bottoms. The backsplash area looks stingy. What seemed like “just an inch or two” on paper suddenly feels like a design mistake in real life.
At the same time, households that push the cabinets too high often discover a different problem. The kitchen may look taller and more open, but the top shelves become storage for the things you use once a year and forget the rest of the time. That is fine for holiday platters, but not great for cereal bowls, spices, or vitamins. In many remodels, the best compromise has been to keep the standard mounting height and change the cabinet style instead. Going from a 30-inch wall cabinet to a 42-inch wall cabinet often solves the storage problem without sacrificing comfort below.
Another common experience shows up in small kitchens. Homeowners sometimes assume that leaving space above the cabinets will make the room feel larger. Sometimes it does, but often it just creates a dusty void that visually chops up the wall. In compact kitchens, cabinets that extend to the ceiling usually feel cleaner and more intentional. They also add storage where every inch matters. People are frequently surprised by how much more polished the room looks when that awkward top gap disappears.
The cooking zone is where experience tends to humble everyone. Many first-time remodelers try to treat the area above the range the same way they treat the rest of the uppers. Then the hood requirements show up, the appliance manual starts making demands, and suddenly the “perfectly symmetrical” cabinet plan is not so perfect. In practice, successful kitchens treat the stove wall as its own zone. Once ventilation, safety, and real clearance needs are handled first, the rest of the cabinetry falls into place more easily.
There is also a strong quality-of-life lesson in mockups. Homeowners who tape the cabinet line on the wall, test the height with actual appliances, and physically reach for imaginary dishes almost always make better decisions. It sounds low-tech because it is low-tech, but it works. A mockup can reveal whether a blender lid will hit the cabinet, whether under-cabinet lighting will feel cramped, and whether the top shelf will require a ladder worthy of a fruit orchard.
Finally, the most successful kitchens tend to reflect the habits of the people who use them. A tall homeowner who loves clean lines may prefer slightly more clearance and taller cabinets. A multigenerational household may need easier reach and more accessible storage zones. A serious home cook may sacrifice a little upper storage to create a better range hood setup or more visual breathing room above the prep space. The real-world takeaway is simple: standards are useful because they work most of the time, but the happiest kitchens are the ones where those standards are adjusted with purpose, not abandoned for drama.


