Table of Contents >> Show >> Hide
- Why a Daylily Garden Plan Works So Well
- The Garden Plan at a Glance
- Plant Palette: Daylilies First, Supporting Cast Second
- Layout: A Simple 10' x 10' Daylily Island Bed
- How to Plant Daylilies So They Actually Thrive
- Care Calendar: Keep It Pretty Without Living Outside
- Troubleshooting: When Your Daylilies Get Weird
- Swap-Ins: Make This Plan Work in Your Yard
- Conclusion: A Flower-Forward Bed That Still Feels Effortless
- Extra: Real-World Daylily Garden Experiences (What to Expect in Year 1 and Beyond)
Daylilies are the overachievers of the perennial world. They bloom like they’re paid by the petal,
shrug off heat like it’s small talk, and somehow look “intentional” even if you planted them while
holding a coffee and three questionable life decisions.
This daylily-filled garden plan is designed to do one thing extremely well: show off your favorite flowers
(yes, daylilies… and their best friends) in a layout that looks polished, colorful, and “a gardener lives here”
without becoming a second job.
Why a Daylily Garden Plan Works So Well
A lot of flowers are beautiful. Some are beautiful and dramatic. Daylilies are beautiful, dramatic, and also
reliablelike that friend who shows up on time and brings snacks.
What makes daylilies a “design cheat code”
- Huge variety: Thousands of cultivars in nearly every color (except true blue), plus different heights and flower forms.
- Bloom season strategy: Mix early-, mid-, and late-season bloomers for a longer show.
- Strong structure: Arching, grassy foliage reads as neat even when nothing is blooming.
- Low-fuss performance: Once established, they tolerate drought but look best with regular moisture.
Translation: you can build a bed that looks curated, not chaoticand still have weekends free for things like
grilling, napping, or pretending you’ll finally organize the garage.
The Garden Plan at a Glance
This plan is a 10′ x 10′ island bed (viewable from all sides) with a simple “thriller–filler–spiller”
structureexcept the “filler” is mostly daylilies because… that’s the point.
Site requirements
- Light: Full sun is ideal (aim for 6+ hours). Part sun works, but bloom quantity may dip.
- Soil: Well-drained soil enriched with compost; daylilies hate “wet feet.”
- Water: Weekly deep watering during establishment; about 1″ per week is a solid goal in summer.
- USDA Zones: Adaptable across many zones; choose cultivars appropriate to your region.
Design goals (the “why this looks good” list)
- Continuous interest: Flowers in waves + foliage contrast all season.
- Color control: A warm palette with a “cool pop” so it feels intentional, not like a crayon accident.
- Easy maintenance: Mulch, sensible spacing, and repeat performers.
Plant Palette: Daylilies First, Supporting Cast Second
The fastest way to make a daylily bed look designer is to use repeating groups of a few varieties,
instead of one of everything you’ve ever loved at the garden center. (I know. I’m asking a lot.)
Daylily “anchors” (pick 3–5 and repeat)
- Long-blooming/reblooming: Great for steady color and fewer “gap weeks.”
- Midseason stars: Big, bold bloomers that peak when summer parties happen.
- Late-season finishers: Keep the bed lively as other perennials fade.
Example mix (swap cultivars based on what’s available locally): a golden rebloomer, a rich red rebloomer,
a peach or coral midseason bloomer, and a lavender late-season type for contrast.
Companion plants that make daylilies look even better
These choices are here for three reasons: texture, bloom timing, and clean edges.
Pick what fits your climate and taste.
- Front edge: Catmint, creeping phlox (sunny sites), or coral bells (part sun).
- Pollinator-friendly mids: Coneflowers, black-eyed Susans, yarrow, salvia.
- Late-season support: Sedum (stonecrop), asters, ornamental grasses for fall texture.
- Foliage “wow”: Hostas for shadier edges, or heuchera for color-rich leaves.
- Optional seasonal sparkle: Caladiums or New Guinea impatiens as warm-season accents in part shade.
Quick safety note: avoid planting the old roadside orange “ditch lily” types near natural areas, because some forms
can spread aggressively. Stick to named, well-behaved cultivars and manage clumps responsibly.
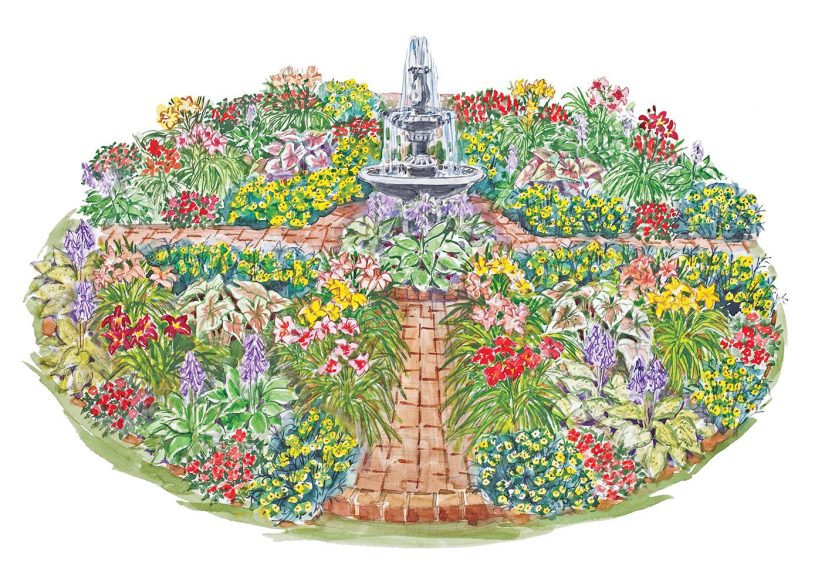
Layout: A Simple 10′ x 10′ Daylily Island Bed
Think of this as a layered donut: a focal point in the center, tall plants around it, and progressively
shorter plants toward the edge so everything is visible.
Step 1: Choose a center focal point (one item, not a flea market)
- Best: A small fountain, birdbath, obelisk, or slender evergreen.
- Goal: Something vertical to give the bed “structure” even when flowers are resting.
Step 2: Place tall daylilies in the inner ring
Make a loose circle around the focal point using your tallest daylilies (typically 28–40″).
Plant in groups of 3 or 5 for that “yes, I planned this” look.
Step 3: Fill the middle ring with rebloomers
This is where the bed earns its paycheck. Use reblooming or long-blooming daylilies as the bulk
of the planting so color keeps returning through summer.
Step 4: Finish with a clean edge
A crisp border makes the whole design look more expensive. Use a consistent edging plant
(catmint, low sedum, coral bells, or a neat groundcover) so the bed has a “frame.”
Suggested quantities (approximate, adjust to your spacing)
- Daylilies: 15–25 plants total, depending on mature size and how fast you want it to fill in.
- Companions: 12–20 plants total, chosen for repeated drifts (not one-offs).
- Mulch: 2–3″ layer after planting to reduce weeds and stabilize moisture.
How to Plant Daylilies So They Actually Thrive
Daylilies are forgiving, but if you nail the basics, you’ll get bigger clumps, better bloom, and less drama.
(We want drama in the flowers, not in the roots.)
Soil prep
- Clear weeds and loosen soil to about a foot deep if possible.
- Mix in compost or well-rotted organic matter for drainage and moisture balance.
- If your soil stays soggy, consider a slight berm or raised bed.
Planting depth and spacing (the “don’t bury the crown” rule)
- Depth: Set the crown (where roots meet foliage) about 1″ below the soil surface.
- Spacing: Most daylilies do well spaced roughly 18–24″ apart (variety dependent).
- Water in: Water thoroughly at planting, then keep evenly moist until established.
Mulch and edging
Mulch keeps moisture steady and weeds down, but keep mulch pulled slightly back from crowns.
For a tidy look, define the bed edge with a spade cut or edging materialclean lines make flowers feel intentional.
Care Calendar: Keep It Pretty Without Living Outside
Early spring
- Remove old foliage and winter debris.
- Top-dress with compost; fertilize lightly if your soil is lean.
- Refresh mulch to 2–3″ (not piled on crowns).
Late spring to midsummer
- Water: Deep water during dry spells; consistent moisture helps bloom performance.
- Deadhead: Remove spent blooms for a cleaner look (and to reduce seed formation).
- Scape cleanup: When a flower stalk finishes, cut the scape near the base.
Late summer to fall
- Trim tired foliage if it looks rough, especially in humid climates.
- Clean up fallen leaves and plant debris to reduce disease carryover.
- If dividing, do it in cooler weather and water well afterward.
Winter
- In cold climates, let plants go dormant naturally; remove dead foliage as needed.
- In milder climates, evergreen or semi-evergreen types may keep some foliagejust clean up damaged leaves.
Troubleshooting: When Your Daylilies Get Weird
“My daylilies have tons of leaves but few flowers”
- Too much shade: Move them or prune overhead branches for more sun.
- Crowding: Older clumps may bloom less; divide every few years.
- Excess nitrogen: Heavy lawn fertilizer drift can create lush leaves and fewer blooms.
“Something orange and dusty is on the leaves”
That can be daylily rust. Start with cultural fixes: avoid overhead watering, improve airflow,
and remove infected or dead foliageespecially at season’s end.
“Deer ate the buds like it was a buffet”
Sadly, deer sometimes treat daylily buds like a salad bar with feelings. Consider deterrents, fencing,
or adding less-palatable companions (ornamental grasses can help diversify what’s on the menu).
Swap-Ins: Make This Plan Work in Your Yard
The plan is flexible by design. Keep the structure (center focal point + rings of height) and swap
plants based on your conditions.
If you have blazing sun and heat
- Lean into heat-lovers: yarrow, salvia, coneflower, ornamental grasses, sedum.
- Use mulch and deep watering to keep daylilies blooming strong.
If you have part sun or afternoon shade
- Choose daylilies known to perform in part sun; expect slightly fewer blooms than full sun.
- Add foliage stars: hostas, heuchera, and caladiums (seasonal) for color even when flowers pause.
If you want a cooler color palette
- Build around lavender, soft yellow, and cream daylilies.
- Pair with blue salvia, catmint, and silvery foliage for a calm, cottage feel.
Conclusion: A Flower-Forward Bed That Still Feels Effortless
This daylily-filled garden plan is basically a confidence boost in plant form: repeat a few great daylily
varieties, layer in companion plants for long-season interest, and anchor it all with a simple focal point.
You’ll get a garden that looks full, colorful, and cohesivewithout needing a gardening degree or a weekend
devoted to “why is this weed immortal?”
If you want the fastest “wow,” start with reblooming daylilies for steady color, then add companions that bloom
before and after peak daylily season. Do that, and you’ll have something blooming for monthsplus a bed that
looks like it belongs in a magazine, not just in your camera roll titled “Yard Stuff.”
Extra: Real-World Daylily Garden Experiences (What to Expect in Year 1 and Beyond)
If you’ve never grown daylilies in a concentrated design, here’s the part nobody tells you: the first season can
feel a little underwhelming… and then suddenly you’re addicted. A daylily bed behaves like a slow clap. Early on,
it’s polite. Later, it’s a standing ovation.
In Year 1, your biggest “experience” is patience. Newly planted daylilies often spend their energy
settling ingrowing roots, expanding fans, and figuring out the new neighborhood. You may get flowers, especially
from robust container-grown plants, but the bed usually looks best when you accept that foliage is the opening act.
This is also the year you’ll be most grateful for companion plants and a clean edge, because they make everything
look purposeful while the daylilies bulk up.
By Year 2, you start seeing the plan’s personality. Clumps look fuller, scapes are sturdier, and bloom
timing becomes easier to read. You’ll notice how different flower forms change the vibe: big spiders look dramatic,
ruffled doubles look romantic, and small rebloomers keep color present even between the “big show” weeks. This is also
when repeating groups starts to pay offyour eye sees rhythm instead of randomness.
Then comes the “oh wow” momentusually mid-summer. It’s the week you walk outside and realize your
bed looks like you hired help. The inner ring is popping, the rebloomers are cycling back in, and the companions
are covering any awkward gaps like talented backup dancers. If you planted with bloom succession in mind, you’ll feel
like you cracked a secret garden code: something is always happening, but nothing looks frantic.
You’ll also learn what daylilies want from you… and what they don’t. They want consistent moisture
while establishing, then occasional deep watering in heat. They want good drainage. They do not want you to
bury their crowns like you’re tucking them in for winter. They also don’t want to be smothered by weedsespecially in
the center of a clump, where pulling invaders later feels like trying to remove glitter from a carpet.
Maintenance becomes strangely satisfying. Deadheading is quick (and mildly therapeutic), and removing
finished scapes makes the bed look instantly tidier. Dividing, when the time comes, is equal parts “free plants!”
and “why is this clump built like a linebacker?” But the payoff is real: rejuvenated bloom and new divisions to expand
the bed or share with friends who will say, “Oh, you didn’t have to,” while absolutely meaning, “Yes you did.”
Most gardeners end up customizing the plan based on lived reality. Maybe deer pressure means you add
more ornamental grasses and fewer bud-heavy favorites. Maybe your afternoon shade turns you into a hosta-and-heuchera
collector who still loves daylilies as the summer headline. Maybe you discover you’re a “warm palette person” after all,
because coral and gold daylilies make the whole yard feel sunnyeven on days when your inbox is not.
And that’s the best part: a daylily-filled garden plan isn’t rigid. It’s a framework that gets better as you learn
your yard. Once you see which cultivars bloom longest, which colors glow at dusk, and which companions thrive in your
soil, your bed stops being “a plan” and starts being your gardenone that flaunts your favorite flowers on purpose.


