Table of Contents >> Show >> Hide
- Why This Neapolitan Treat Works
- What “Neapolitan” Means in This Recipe
- Ingredients
- Equipment
- Step-by-Step Neapolitan Marshmallow Treats Recipe
- Texture & Flavor Upgrades (Optional but Wonderful)
- Troubleshooting Guide
- Make-Ahead, Storage, and Freezing
- Serving Ideas
- Conclusion
- Experience Notes (Extended 500+ Words): What Making These Treats Taught Me
If you’ve ever stared at a plain cereal bar and thought, “You’re cute, but can you be dramatic?” welcome home.
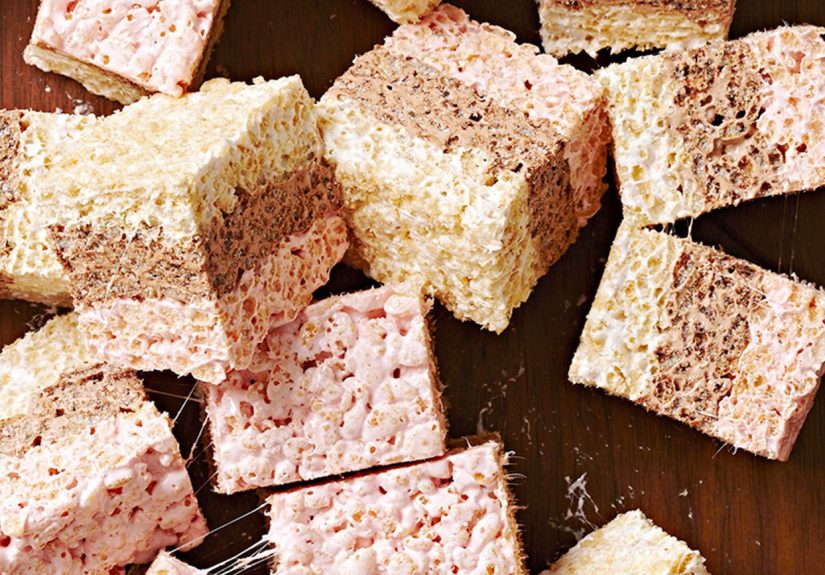
This Neapolitan Marshmallow Treats Recipe turns a nostalgic snack into a layered dessert bar with
big “birthday party meets bakery window” energy. You get three flavors in one pan: vanilla, strawberry, and chocolate.
In other words, the dessert equivalent of a wardrobe change.
The beauty here is that the method stays approachable: melt, stir, press, repeat. No candy thermometer, no stand mixer,
no pastry school trauma. But the final result tastes far more intentional than the classic back-of-the-box bar.
The vanilla layer is mellow and buttery, the strawberry layer is fruity and slightly tangy, and the chocolate layer
lands the finish with cozy cocoa depth. Each bite has crunch, chew, and enough marshmallow pull to make everyone at the
table quietly stop talking.
This guide gives you everything: an in-depth ingredient breakdown, foolproof layering instructions, troubleshooting,
make-ahead tips, and fun variations for parties, holidays, and “I made this because Tuesday was rude” moments.
If you’re looking for a no-bake layered dessert that’s easy, colorful, and crowd-friendly, this is your move.
Why This Neapolitan Treat Works
A lot of marshmallow bars are either too sweet, too dense, or weirdly hard the next day. This version avoids those
traps by using a texture-first approach.
1) Three flavor layers with one base technique
You make each layer using the same core method, then customize with chocolate or strawberry accents. That means less
complexity in the kitchen and more consistency in results.
2) Marshmallow-forward ratios for a chewy bite
A generous marshmallow-to-cereal ratio helps keep the bars soft and flexible instead of dry and brittle. You want
“gentle bend,” not “construction material.”
3) Low heat preserves softness
The moment marshmallows overcook, texture can shift from gooey to tough. Keep heat low and melt just until smooth.
Think warm hug, not sugar lava.
4) Salt and vanilla balance sweetness
A little salt and vanilla keep flavors rounded and grown-up, so the bars taste rich rather than one-note sweet.
5) Layering gives visual wow with minimal effort
You’re basically building a striped dessert. Slice into squares, and suddenly everyone thinks you planned your life.
What “Neapolitan” Means in This Recipe
Traditionally, Neapolitan flavor means vanilla + strawberry + chocolate. In this marshmallow treat
format:
- Vanilla layer: classic crisp rice marshmallow base with vanilla extract.
- Strawberry layer: strawberry marshmallows plus jelly (or freeze-dried strawberry powder) for flavor and color.
- Chocolate layer: chocolate crisp rice cereal and a touch of melted chocolate for a deeper cocoa note.
The final bar tastes familiar but new like a throwback with upgraded shoes.
Ingredients
Pan + Base
- Nonstick spray or softened butter, for pan
- 1 sheet parchment paper (with overhang for easy lifting)
- 9 tablespoons unsalted butter, divided (3 tbsp per layer)
- 15 cups mini marshmallows, divided (about 5 cups per layer)
- 1 1/2 teaspoons vanilla extract, divided
- 3/4 teaspoon fine salt, divided
Vanilla Layer
- 5 cups crispy rice cereal (plain)
Strawberry Layer
- 4 cups crispy rice cereal (plain)
- 1 cup strawberry marshmallows (optional but great)
- 1 tablespoon strawberry jelly, warmed
- Optional: 2 tablespoons freeze-dried strawberry powder
- Optional: 1–2 drops natural red or pink food coloring
Chocolate Layer
- 3 cups chocolate crispy rice cereal
- 2 cups plain crispy rice cereal
- 1/2 cup mini semisweet chocolate chips
- Optional: 1 tablespoon cocoa powder (sifted)
Optional Flavor Boosters
- Flaky sea salt for finishing
- 1 tablespoon sweetened condensed milk per layer for extra chew
- Browned butter (swap for regular butter in one or all layers)
Equipment
- 9×13-inch pan
- Large nonstick pot or Dutch oven
- Silicone spatula (lightly greased works best)
- Offset spatula or wax/parchment paper for pressing layers
- Sharp chef’s knife for clean slicing
Step-by-Step Neapolitan Marshmallow Treats Recipe
Step 1: Prep the pan and ingredients
Line a 9×13-inch pan with parchment, leaving overhang on two sides. Lightly grease the parchment and sides.
Measure every ingredient before turning on heat. Marshmallow mixtures move fast, and this is not the moment to
discover your cereal box is spiritually empty.
Step 2: Build the vanilla layer
- Melt 3 tablespoons butter over low heat.
- Add 5 cups mini marshmallows and 1/4 teaspoon salt; stir until just melted and glossy.
- Stir in 1/2 teaspoon vanilla.
- Fold in 5 cups plain crispy rice cereal until evenly coated.
- Transfer to pan and press into an even layer. Press firmly enough to level, but don’t compact aggressively.
Pro move: lightly grease your spatula so marshmallow doesn’t stick and test your patience.
Step 3: Build the strawberry layer
- In the same pot, melt 3 tablespoons butter over low heat.
- Add 4 cups mini marshmallows + 1 cup strawberry marshmallows and 1/4 teaspoon salt.
- Stir until nearly smooth, then add strawberry jelly and 1/2 teaspoon vanilla.
- If using, add freeze-dried strawberry powder and a tiny drop of color for a stronger pink tone.
- Fold in 4 cups plain crispy rice cereal.
- Spread over vanilla layer and press gently into an even sheet.
Keep the heat low the whole time to protect flavor and texture. If the mixture thickens too quickly, take it off heat
and stir a few seconds before pressing.
Step 4: Build the chocolate layer
- Melt remaining 3 tablespoons butter over low heat.
- Add 5 cups mini marshmallows + 1/4 teaspoon salt; melt until smooth.
- Stir in 1/2 teaspoon vanilla.
- Add chocolate chips and stir just until mostly melted.
- Fold in 3 cups chocolate crispy rice cereal + 2 cups plain cereal (plus cocoa powder, if using).
- Spread over strawberry layer and press level. Top with a pinch of flaky salt if desired.
Step 5: Set, slice, and serve
Let bars cool at room temperature for 45–60 minutes. Lift out using parchment overhang.
Use a sharp knife lightly greased (or warmed in hot water and dried) for clean edges.
Cut into 16 large squares or 24 party squares.
Texture & Flavor Upgrades (Optional but Wonderful)
Brown Butter Upgrade
For a toastier, nuttier profile, brown the butter before adding marshmallows.
Watch closely: butter can go from “golden delicious” to “well, that’s smoke” in seconds.
Browned butter works especially well in the chocolate layer.
Reserve Some Marshmallows
For extra gooey pockets, hold back about 1/2 cup mini marshmallows per layer and fold them in right before cereal.
They’ll partially melt and create little soft spots throughout the bars.
Sweet-Salty Balance
A tiny pinch of salt in each layer plus a light flaky salt finish gives better contrast and keeps sweetness from feeling flat.
Troubleshooting Guide
Problem: Bars are hard
- Cause: Overheated marshmallows or over-packed layers.
- Fix: Use low heat, melt only until smooth, and press lightly.
- Next time: Add 1 tablespoon sweetened condensed milk to each layer for extra softness.
Problem: Layers slide apart
- Cause: Previous layer cooled too long before next one was added.
- Fix: Add layers while the previous one is set enough to hold shape but still slightly tacky.
- Next time: Work in sequence without long breaks.
Problem: Sticky, messy slicing
- Cause: Warm bars or dry knife.
- Fix: Cool fully and use a greased or hot-water-warmed knife, wiping between cuts.
Problem: Strawberry flavor is too faint
- Cause: Jelly alone can be subtle.
- Fix: Add freeze-dried strawberry powder, or use strawberry marshmallows + jelly together.
Make-Ahead, Storage, and Freezing
- Room temp: Store airtight with parchment between layers of bars.
- Best texture window: 1–3 days for peak chew.
- Still good: Up to 5 days depending humidity and ingredient choices.
- Extended storage: Some richer formulas (extra marshmallow/fat) can stay pleasant up to about a week.
- Freezer: Wrap squares individually + place in freezer bag up to 1 month. Thaw at room temp, wrapped.
Serving Ideas
- Birthday trays: Cut into mini cubes, serve on colorful liners.
- Bake sale bars: Wrap individually with bakery stickers.
- Holiday platter: Drizzle white chocolate and add pink/chocolate sprinkles.
- Ice cream sandwich hack: Thin-cut bars + strawberry ice cream center.
- Gift box: Stack with parchment and include flavor labels.
Conclusion
This Neapolitan Marshmallow Treats Recipe is the perfect mix of nostalgic and new:
the simplicity of classic cereal bars with the flavor payoff of a layered dessert.
It’s easy enough for a weeknight, cute enough for a party, and customizable enough for your inner dessert scientist.
Keep heat low, measure before you start, and don’t over-press the mixture. Do that, and you’ll get soft, chewy bars
with clean stripes and big flavor in every bite.
Most importantly, these bars are fun. And in a world full of serious recipes with seven bowls and an emotional support
thermometer, fun is a feature not a bonus.
Experience Notes (Extended 500+ Words): What Making These Treats Taught Me
The first time I made Neapolitan marshmallow treats, I treated them like regular cereal bars with a cute color plan.
That was adorable. It was also wrong. By layer two, I realized this recipe is less about raw cooking skill and more about
rhythm. You have to move with intention: melt gently, stir quickly, spread while warm, then reset for the next layer.
Once I stopped trying to “wing it” and started prepping everything first, the process got dramatically easier.
My biggest learning moment came from the strawberry layer. I assumed jelly alone would create a loud berry flavor.
It didn’t. It gave color and sweetness, but the fruit note was softer than expected. On my next batch, I added freeze-dried
strawberry powder and finally got that bright, nostalgic strawberry flavor that actually reads in a mixed bite. I also learned
that too much coloring can make bars look neon in an unhelpful way. One small drop is usually enough. Two if you’re bold.
Three if you enjoy explaining your choices to guests.
The chocolate layer taught me patience. If you dump chocolate chips into very hot marshmallow mixture and keep stirring
aggressively, the mixture can tighten fast. Not ruined, just harder to spread elegantly. The fix was simple: lower heat,
remove pot from burner, stir until mostly melted, and fold cereal immediately. I started getting smoother top layers and
cleaner stripes after that.
Texture-wise, the most dramatic improvement came from two tiny changes: adding a bit more salt and pressing less forcefully.
Early batches looked great but had that slightly dense chew that feels tiring after one square. Once I switched to “light but
even pressure,” bars stayed airy and pleasant. The salt was equally important. Without it, the bars tasted sweet-sweet-sweet.
With it, vanilla smelled warmer, chocolate tasted deeper, and strawberry felt brighter. It wasn’t salty dessert; it was balanced
dessert.
Another real-world lesson: cutting technique matters more than people think. If you slice while bars are warm, you get sticky
drag lines and scraggly edges. If you wait until fully set, warm the knife briefly, wipe between cuts, and cut in one confident
downward motion, suddenly your bars look bakery-ready. This is the difference between “homemade charm” and “did you buy these?”
Both are valid outcomes, but sometimes you want applause.
I also tested these as make-ahead treats for a party. Day one was peak gooey. Day two was my personal favorite: still soft,
but with slightly cleaner bite structure. By day three, texture was firmer but still very good. Individually wrapping pieces
in parchment kept edges from drying out. If you’re gifting them, that little wrapping step makes a huge difference and looks
thoughtful.
The funniest feedback came from a friend who “doesn’t like marshmallow treats.” She took one to be polite, paused mid-bite,
then grabbed a second and asked if there were “secret pastry chef tricks” involved. The secret was honestly just technique:
low heat, salt, layering strategy, and not compressing the life out of the pan. That’s the beauty of this recipe. It feels
playful, but it rewards precision in tiny, manageable ways.
If I had to summarize the experience in one line, it’s this: Neapolitan marshmallow treats are simple enough to make anytime,
but nuanced enough to feel like you learned something every batch. They’re nostalgic, yes but they’re also a reminder that
small technique upgrades can turn a childhood snack into a dessert people actually talk about.


