Table of Contents >> Show >> Hide
- Why Leg Press Safety Matters
- Understanding the Leg Press Machine
- Before You Start: The Safety Checklist
- Proper Leg Press Form: Step-by-Step
- Best Foot Placement for Leg Press Safety
- Common Leg Press Mistakes That Cause Injuries
- How to Protect Your Knees on the Leg Press
- How to Protect Your Lower Back
- Warm-Up Tips Before Using the Leg Press
- How Much Weight Should You Use?
- Breathing and Tempo: Small Details, Big Difference
- Who Should Be Extra Careful?
- Leg Press Safety for Beginners
- Leg Press Safety for Experienced Lifters
- Machine Maintenance and Gym Safety
- What to Do If You Feel Pain During Leg Press
- Safe Leg Press Workout Example
- Experience-Based Tips: Real-World Lessons for Safer Leg Press Training
- Conclusion
The leg press machine looks simple: sit down, put your feet on the platform, push, repeat, feel heroic. But like most gym equipment, it rewards good technique and punishes bad habits with the enthusiasm of a referee who has been waiting all day to blow the whistle. Used correctly, the leg press can help build stronger quads, glutes, hamstrings, and calves while offering more back support than many free-weight lower-body exercises. Used carelessly, it can irritate knees, strain the lower back, stress the hips, or turn a “quick leg day” into a long relationship with an ice pack.
This guide covers practical leg press machine safety for beginners, experienced lifters, older adults, and anyone returning after time away from training. We will look at setup, foot placement, range of motion, knee position, breathing, warm-ups, loading, common mistakes, and smart injury prevention habits. The goal is not to scare you away from the machine. The goal is to help you use it like someone who wants stronger legs, not a dramatic gym story.
Why Leg Press Safety Matters
The leg press is popular because it feels controlled. Your back rests against a pad, the machine guides the path, and you do not have to balance a barbell across your shoulders. That controlled environment can be helpful, especially for people learning lower-body strength training. However, “machine-guided” does not mean “mistake-proof.” Your joints still move under load, your spine still needs support, and your knees still care deeply about alignment.
Most leg press injuries happen because of a few predictable issues: too much weight, poor foot placement, locking the knees, lowering too deeply, rushing through reps, or letting the hips roll off the pad. The good news is that these are usually preventable. With a careful setup and a little patience, the leg press can be a safe, effective part of a lower-body workout.
Understanding the Leg Press Machine
There are several types of leg press machines, and each one changes the feel of the movement slightly. The most common versions are the 45-degree sled leg press, the horizontal seated leg press, and the vertical leg press. Commercial gyms often use the 45-degree sled or seated version because they are stable and easy to adjust.
45-Degree Leg Press
On this machine, you sit at an angle and push a weighted sled upward along rails. It can handle heavy loads, which is exactly why ego lifting loves it so much. Safety handles or stops are usually included, and you should always know where they are before starting.
Horizontal Seated Leg Press
This version usually has a seat, back pad, and footplate that moves forward or backward. It is common in general fitness centers and may feel more beginner-friendly. The same safety rules apply: controlled reps, knees aligned with toes, heels flat, and no knee lockout.
Vertical Leg Press
This machine places the lifter underneath the platform. It is less common and demands extra caution because the load moves above the body. Beginners should generally use a more standard seated or angled machine first.
Before You Start: The Safety Checklist
A safe leg press begins before the first rep. Think of setup as your insurance policy. It may not look exciting, but it keeps the workout from becoming a blooper reel.
1. Inspect the Machine
Check that the seat, back pad, footplate, rails, handles, safety stops, and weight pins or plates are secure. Do not use a machine that feels unstable, has frayed cables, loose parts, missing pins, cracked padding, or strange grinding noises. If something looks wrong, report it to gym staff. Your legs can wait; your knees cannot file a complaint form.
2. Adjust the Seat and Backrest
Sit with your back and hips firmly against the pad. Your tailbone should not lift when you lower the weight. If the seat angle forces your lower back to round, adjust the machine or reduce your range of motion. A stable torso helps protect the spine and allows the legs to do the work.
3. Set the Safety Stops
On machines with adjustable safety stops, set them before loading heavy weight. The stops should prevent the sled or platform from traveling too far toward you. This is especially important on 45-degree machines, where a missed rep can quickly become more exciting than anyone requested.
4. Choose a Sensible Starting Weight
The leg press often allows people to move more weight than they can squat. That does not mean you should load every plate in the gym and hope physics is in a generous mood. Start light, practice clean reps, and increase gradually. Proper technique should come before impressive numbers.
Proper Leg Press Form: Step-by-Step
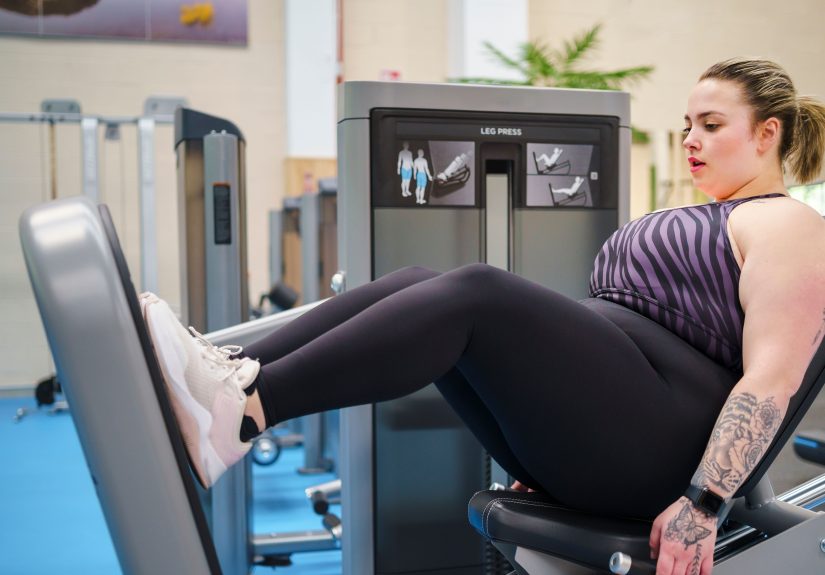
Step 1: Sit Tall and Brace
Sit with your head, shoulders, back, and hips supported. Hold the handles if the machine has them. Tighten your abdominal muscles gently, as if preparing for someone to poke your stomach. This helps stabilize your spine without turning the exercise into a full-body panic event.
Step 2: Place Your Feet Correctly
Place your feet about hip-width to shoulder-width apart on the platform. Keep your heels flat and your toes slightly turned out if that feels natural. Your knees should point in the same direction as your toes throughout the movement. If your knees cave inward or flare wildly outward, reduce the weight and fix the alignment.
Step 3: Unlock the Safety Handles Carefully
Before releasing the safety handles, make sure your feet are secure and your body is stable. Do not begin with your knees fully locked. Keep a slight bend in the knees so your muscles, not your joints, manage the load.
Step 4: Lower With Control
Bend your knees and lower the platform slowly. A common safe target is around a 90-degree knee angle, though your ideal range depends on hip mobility, knee comfort, machine design, and body proportions. Stop before your hips curl off the pad or your lower back rounds. Depth is useful only when you can control it.
Step 5: Press Through the Midfoot and Heels
Push the platform away by driving through your midfoot and heels. Keep your heels in contact with the plate. If your heels lift, your foot position may be too low, your range may be too deep, or the weight may be too heavy.
Step 6: Finish Without Locking the Knees
Extend your legs until they are nearly straight, but do not snap or lock your knees at the top. Knee lockout shifts stress away from the muscles and into the joints. Keep a soft bend, pause briefly, and repeat with control.
Best Foot Placement for Leg Press Safety
Foot placement changes which muscles work hardest and how much stress your knees, hips, and lower back experience. There is no single perfect placement for every body, but there are safer starting points.
Standard Foot Placement
A hip-width or shoulder-width stance near the middle of the platform is usually the best starting position. This balanced placement trains the quads, glutes, and hamstrings without forcing an extreme joint angle.
Too Low on the Platform
Placing your feet too low may increase knee stress because the knees travel farther forward. Some lifters use a lower position to emphasize the quadriceps, but it requires control and healthy knees. Beginners should be cautious.
Too High on the Platform
A higher foot position may shift more work toward the glutes and hamstrings. However, if your hips tuck under or your lower back rounds at the bottom, the position is too high or too deep for your current mobility.
Too Wide or Too Narrow
A very wide stance can stress the hips and groin if forced. A very narrow stance can make knee tracking harder for some people. Choose a position where your knees follow your toes smoothly and your feet stay flat.
Common Leg Press Mistakes That Cause Injuries
Mistake 1: Locking Out the Knees
This is the classic leg press error. The lifter pushes hard, straightens the legs completely, and rests at the top with the knees locked. Under heavy load, that position can place unnecessary stress on the knee joints and ligaments. Keep the knees slightly bent at the top of every rep.
Mistake 2: Going Too Deep
Deep reps are not automatically better. If your knees come toward your chest and your lower back peels away from the pad, you have gone beyond your safe range. Control matters more than depth. Stop where your hips remain stable and your spine stays supported.
Mistake 3: Using Too Much Weight
The leg press is where many people discover their inner superhero. Unfortunately, the knees and lower back did not audition for that movie. If you need to bounce the sled, shorten the rep, twist your knees, or grip the handles like you are landing a plane in a storm, the weight is too heavy.
Mistake 4: Letting the Knees Cave In
Knees collapsing inward can increase stress on the knee joint. Keep your knees aligned with your toes. If alignment breaks down, reduce the load, slow the tempo, and consider strengthening the glutes and hip stabilizers with accessory exercises.
Mistake 5: Bouncing at the Bottom
Bouncing turns a strength exercise into a joint-stress experiment. Lower the platform under control, pause briefly if needed, and press smoothly. Momentum may move the weight, but muscles build the strength.
Mistake 6: Lifting the Hips Off the Seat
If your hips rise or your tailbone curls off the pad, your lower back may round under load. This can irritate the lumbar spine. Reduce depth, adjust the seat, or lighten the weight.
How to Protect Your Knees on the Leg Press
Knee safety starts with alignment. Your knees should travel in the same direction as your toes, not cave inward, wobble, or twist. Use a controlled range of motion and avoid locking out at the top. If you feel sharp pain, stop. Muscle effort is normal; stabbing joint pain is your body sending an email with “urgent” in the subject line.
People with previous knee injuries, arthritis, meniscus issues, or ligament problems should get guidance from a qualified medical or fitness professional before using heavy loads. The leg press may be useful in some rehabilitation programs, but the right setup, weight, and range of motion matter greatly.
How to Protect Your Lower Back
Your lower back should remain supported throughout the exercise. The most common back-related problem happens when the knees come too close to the chest and the pelvis rolls backward. This position can flatten or round the lower spine under load.
To reduce risk, keep your back and hips against the pad, control the bottom position, and avoid forcing depth. If you cannot maintain contact with the seat, shorten your range of motion. You can still build strong legs without folding yourself like a camping chair.
Warm-Up Tips Before Using the Leg Press
A proper warm-up improves movement quality and prepares the muscles and joints for work. Spend five to ten minutes increasing body temperature with light cardio such as walking, cycling, or using an elliptical. Then perform dynamic movements like bodyweight squats, glute bridges, step-ups, or light leg presses.
Start your leg press session with warm-up sets. For example, use a very light weight for 12 to 15 controlled reps, then gradually increase the load over one or two more sets before beginning your working sets. Warm-up sets are not wasted time. They are your body’s way of saying, “Thank you for not surprising me.”
How Much Weight Should You Use?
The right weight depends on your training level, goals, body size, injury history, and machine type. For general strength and muscle building, choose a load that allows controlled reps with good form. Most recreational lifters do well with moderate sets of 8 to 12 repetitions. Beginners may start with 10 to 15 reps using light resistance.
Use the “two-rep rule” as a simple guide. If you could perform many more reps with perfect form, the weight may be too light for strength progress. If you cannot complete the target reps without bouncing, locking out, or losing alignment, the weight is too heavy. Progress slowly. Adding a small amount of weight over time is safer than making one dramatic jump because someone nearby looked strong and your pride got chatty.
Breathing and Tempo: Small Details, Big Difference
Do not hold your breath excessively unless trained to use advanced bracing techniques. For most people, inhale as you lower the weight and exhale as you press. Keep the tempo controlled: about two to three seconds down, a brief pause, and one to two seconds up. Slower reps help you feel your muscles working and reduce the temptation to bounce.
Who Should Be Extra Careful?
Some people should take additional precautions with the leg press. This includes beginners, older adults, people with knee pain, individuals with hip or lower-back problems, anyone returning after surgery, and lifters recovering from a sports injury. Extra caution does not always mean avoiding the machine. It means using lighter loads, controlled range of motion, professional guidance, and honest attention to pain signals.
If you experience swelling, sharp pain, numbness, tingling, or joint instability, stop training and seek professional advice. The leg press should challenge your muscles, not create a mystery medical subplot.
Leg Press Safety for Beginners
Beginners should focus on learning the movement rather than chasing heavy numbers. Start with the empty sled or the lightest machine setting. Practice foot placement, knee tracking, controlled lowering, and smooth pressing. Record a short video from the side if allowed in your gym, or ask a qualified trainer to check your form.
A beginner-friendly workout might include two or three sets of 10 to 12 reps with a comfortable weight. Rest for 60 to 90 seconds between sets. Increase weight only when every rep looks clean and feels controlled.
Leg Press Safety for Experienced Lifters
Experienced lifters often run into trouble because the leg press makes heavy loading feel deceptively manageable. The machine supports the torso, so the legs can move serious weight. But connective tissues, joints, and recovery capacity still have limits.
Advanced lifters should rotate heavy sessions with moderate sessions, avoid max-effort ego sets, and use full control through a safe range of motion. If using intensity techniques such as drop sets, rest-pause sets, or high-rep finishers, reduce the load and keep form strict. Fatigue is not an excuse for knee wobble theater.
Machine Maintenance and Gym Safety
Leg press safety is not only about the person using the machine. Equipment condition matters. Gym owners and staff should inspect machines regularly, maintain moving parts, check cables and bolts, replace worn pads, and remove damaged equipment from service. Users should also stay alert. If the sled sticks, the seat slips, the handles feel loose, or the machine sounds like a haunted shopping cart, do not use it.
What to Do If You Feel Pain During Leg Press
If you feel discomfort, first identify where it occurs. Mild muscle burning in the quads or glutes is normal during a challenging set. Sharp pain in the knee, hip, or back is not. Stop the set, reduce the weight, adjust your foot position, and check your range of motion. If pain continues, skip the exercise and choose a safer alternative such as step-ups, wall sits, glute bridges, or bodyweight squats within a comfortable range.
Persistent pain should be evaluated by a healthcare professional, physical therapist, or qualified sports medicine provider. Training through pain may sound tough, but long-term progress usually belongs to the people who know when to back off.
Safe Leg Press Workout Example
Beginner Session
Warm up with five minutes of light cycling. Then perform two warm-up sets on the leg press with light resistance. Complete two to three working sets of 10 to 12 reps. Keep the movement slow, stop before the knees lock, and rest 60 to 90 seconds between sets.
Intermediate Session
Warm up with dynamic lower-body movements. Perform two warm-up sets, then three to four working sets of 8 to 10 reps. Use a weight that feels challenging but allows perfect alignment. Finish with light hamstring curls or calf raises if desired.
Joint-Friendly Session
Use a moderate foot position, light to moderate weight, and a pain-free range of motion. Perform two to three sets of 12 to 15 slow reps. Avoid deep flexion if it causes knee or hip discomfort. This version works well for people prioritizing control, circulation, and confidence.
Experience-Based Tips: Real-World Lessons for Safer Leg Press Training
After watching many gym-goers use the leg press, one pattern becomes obvious: the safest lifters are rarely the loudest lifters. They do not slam the sled, stack plates like they are building a metal sandwich, or treat knee lockout as a finishing pose. They set up carefully, test the first rep, and make small adjustments before the working set begins.
A useful habit is to perform the first repetition of every set like a rehearsal. Lower slowly and ask yourself: Are my heels flat? Are my knees tracking with my toes? Is my lower back still against the pad? Do I feel the muscles working, or do I feel pressure in the joints? That one careful rep can prevent an entire set of sloppy movement.
Another practical lesson is that foot placement often needs personal tuning. A tall lifter with long femurs may need a slightly different stance than a shorter lifter. Someone with tight hips may need to reduce depth. A person with sensitive knees may feel better with feet a little higher on the platform, while still keeping the heels flat and hips stable. The best setup is not the one that looks coolest on social media. It is the one that lets you move smoothly, pain-free, and consistently.
Many beginners also underestimate how much fatigue changes form. The first eight reps may look excellent, then reps nine through twelve become a documentary about survival. When fatigue arrives, the knees may cave inward, the heels may lift, or the lifter may bounce out of the bottom. A safer approach is to end the set when form begins to fade. Leaving one or two good reps “in the tank” is not weakness. It is how you train again next week without negotiating with your kneecaps.
One of the most helpful cues is “push the platform away, do not throw it.” The leg press should feel powerful but controlled. If the weight moves so fast that the sled rattles at the top, slow down. If the descent feels like gravity is making all the decisions, lighten the load. Controlled lifting builds strength you can trust.
For people returning after a break, the first leg press session should feel almost too easy. Muscles regain confidence faster than joints and connective tissues adapt. A smart comeback might include light sets, limited depth, and extra rest. The goal is to leave the gym thinking, “I could have done more,” not “I have made a terrible scheduling decision for tomorrow’s stairs.”
Experienced lifters can benefit from occasional form audits. Even strong people develop habits: one foot slightly higher, one knee drifting inward, one side pushing harder. Using lighter symmetrical sets, single-leg variations with caution, or trainer feedback can reveal imbalances before they become problems.
Finally, respect recovery. Heavy leg press sessions can create serious soreness, especially when paired with squats, lunges, or deadlifts. Schedule hard lower-body training with enough rest between sessions. Sleep, hydration, protein, and mobility work are not glamorous, but they are part of injury prevention. Strong legs are built during training and repaired during recovery. Ignore that second half, and your body will eventually send a reminder with interest.
Conclusion
The leg press machine can be an excellent tool for building lower-body strength, but safety depends on how you use it. Set the machine correctly, keep your back and hips supported, place your feet securely, track your knees with your toes, lower the platform under control, and avoid locking your knees at the top. Choose weights that match your ability instead of your ego, and treat pain as information rather than an obstacle to bulldoze.
Good leg press technique is not complicated, but it does require attention. A few smart habits can protect your knees, hips, and lower back while helping you train harder over the long term. The safest lifter is not the one who moves the most weight today. It is the one who can keep training, improving, and walking down stairs tomorrow without making dramatic sound effects.


