Table of Contents >> Show >> Hide
- What Makes “Kokedama From Cuttings” Different?
- Best Plants to Use (Cuttings-Friendly Picks)
- Step 1: Take Healthy Cuttings (Because Sad Cuttings Make Sad Kokedama)
- Step 2: Root the Cuttings First (Yes, First)
- Step 3: Gather Materials (Your Kokedama Tool Kit)
- Step 4: Mix the “Soil” for the Ball
- Step 5: Build a Mini Root Core (Perfect for Cuttings)
- Step 6: Wrap with Moss (The Sweater Moment)
- Step 7: Tie It Up (Secure, Not Strangled)
- How to Display Your Cutting-Grown Kokedama
- Kokedama Care: Watering, Light, and Feeding
- Troubleshooting: When Your Moss Ball Sends Passive-Aggressive Signals
- Example Project: A Pothos Cutting Kokedama (Fast, Cute, Nearly Foolproof)
- Conclusion
- Experience Notes: What People Learn After Their First Kokedama
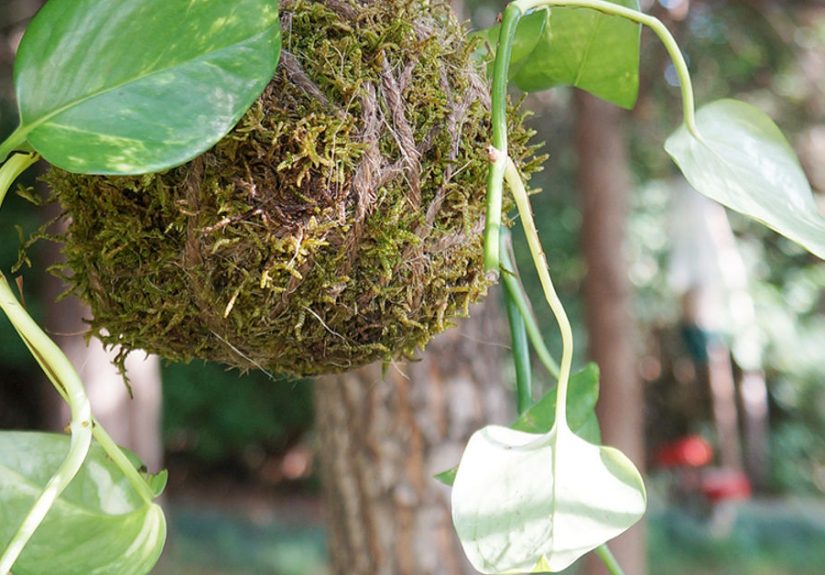
Kokedama is the Japanese “moss ball” planting style that makes a houseplant look like it’s wearing a tiny green sweater and living its best minimalist life. Instead of a pot, the plant’s roots sit in a compact ball of growing medium that’s wrapped in moss and tied with string. It’s part plant, part sculpture, and part “How is that not falling apart right now?”
Here’s the twist: you don’t need a full-grown plant to make one. In fact, starting with plant cuttings (once they’re rooted) can make kokedama easier to shape, cheaper to create, and way more funbecause you get to say, “I made this from basically a twig,” which is the ultimate plant-person flex.
What Makes “Kokedama From Cuttings” Different?
Traditional kokedama often starts with a small potted plant. That works great, but it can feel like wrestling a root ball into a tidy spherelike trying to fold a fitted sheet into a perfect square.
Rooted cuttings change the game:
- Smaller roots = easier shaping and wrapping.
- Lower cost = you can make multiple kokedama from one “mother plant.”
- Custom sizes = tiny desktop moss balls or bigger statement pieces.
- Less transplant shock (when done right) because the roots are still in “expansion mode.”
The main catch: you can’t rush the rooting stage. Kokedama is art, not fast food.
Best Plants to Use (Cuttings-Friendly Picks)
Your ideal candidates are plants that root reliably from stem cuttings and tolerate consistent moisture without throwing a dramatic fit.
Easy wins for beginners
- Pothos (Epipremnum aureum): fast, forgiving, and basically immortal if you give it indirect light.
- Heartleaf philodendron: roots readily and looks great trailing from a kokedama perch.
- Syngonium (arrowhead plant): roots easily and stays compact.
- Coleus: roots quickly; great if you want colorful leaves.
- Spider plant babies: not a “cutting” exactly, but plantlets behave similarly and are super cooperative.
Good, but slightly fussier
- Hoya: roots slower, but rewards patience with thick, waxy leaves.
- Ferns: often better from divisions than cuttings, but some can work if you’re starting with established rooted pieces.
- Succulents: possible, but the kokedama moisture environment can be risky unless you adjust the mix and watering.
Step 1: Take Healthy Cuttings (Because Sad Cuttings Make Sad Kokedama)
Start with a healthy mother plant. Use clean, sharp scissors or snipscleanliness matters because cuttings are basically tiny open wounds (plant wounds, not horror-movie vibes).
How to take a stem cutting
- Choose a stem with several leaves and at least one visible node (a node is where roots commonly form).
- Cut a piece about 3–6 inches long, making the cut just below a node.
- Remove leaves from the lower portion so they won’t sit in water or wet media and rot.
- Optional: dip the cut end in rooting hormone if you want to speed things up or improve success.
Tip: If you’re propagating vines (like pothos or philodendron), you can take multiple cuttings and later combine them into one fuller kokedama.
Step 2: Root the Cuttings First (Yes, First)
You can attempt to build a kokedama around an unrooted cutting, but it’s like moving into a new house before the foundation is poured. Root first, then moss-ball later.
Option A: Root in water (easy, visible progress)
- Place the node(s) in room-temperature water; keep leaves above the waterline.
- Set the jar in bright, indirect light.
- Change water every few days (or at least weekly) so it stays fresh.
- Wait until roots are at least 1–2 inches long and branching.
Many common houseplants root within a few weeks, but timing varies by plant and season.
Option B: Root in a loose medium (strong roots for the next step)
A light, airy rooting mix helps prevent rot because roots need oxygen. Popular options include perlite-heavy mixes, or blends that drain well while staying slightly moist.
- Fill a small pot with a well-draining medium (often perlite, vermiculite, or a propagation mix).
- Insert the cutting so at least one node is in the medium.
- Keep evenly moistnever soggy.
- Add humidity (a clear bag “tent” works) if your home is dry.
The payoff: soil-rooted cuttings often transition into a kokedama ball with less “root confusion” than water-rooted cuttings. But both can work if you’re gentle during the move.
Step 3: Gather Materials (Your Kokedama Tool Kit)
- Rooted cuttings (the star of the show)
- Sheet moss (for the outer wrap)
- Sphagnum moss (optional, helps hold moisture around roots)
- Growing medium to form the inner ball (see mixes below)
- String: cotton twine, jute, or fishing line (clear line disappears visually)
- Scissors
- Bowl of water and a tray/towel (mess is part of the craft)
Step 4: Mix the “Soil” for the Ball
Kokedama mixes are designed to hold together while still allowing air and drainage. Many recipes blend peat moss with bonsai soil components to create a moldable, cohesive ball.
A reliable basic mix
- Peat moss for stickiness and moisture retention
- Bonsai soil / akadama-style clay granules (or a gritty bonsai mix) for structure
Add water slowly and knead until it holds shape like a firm snowball. If it’s oozing water, it’s too wet. If it crumbles like a bad cookie, add a bit more moisture.
A more beginner-friendly “what you might already have” mix
- Potting mix (not too chunky)
- Extra perlite for drainage
- A handful of chopped sphagnum moss for binding
This can be easier to source in the U.S. and still forms a workable ballespecially for tropical houseplants.
Step 5: Build a Mini Root Core (Perfect for Cuttings)
With rooted cuttings, you’re creating a compact center that keeps roots cozy without drowning them.
- Gently rinse off old rooting medium if needed (be carefulnew roots are fragile).
- Take a small handful of damp mix and form a base mound in your palm.
- Place the cutting roots on the mound, spreading them lightly.
- Add more mix around the roots and press into a tight sphere.
Size tip: For a single cutting, think “large lime” to “small orange.” For a cluster of cuttings, “grapefruit” is a common sweet spot.
Step 6: Wrap with Moss (The Sweater Moment)
Layering method that stays put
- If using sphagnum moss, wrap a thin layer around the soil ball first (helps lock in moisture).
- Lay sheet moss flat, green side out.
- Place the ball in the center and fold the moss around it like you’re wrapping a burrito… but for plants.
- Trim excess moss so it overlaps neatly without bulky lumps.
Step 7: Tie It Up (Secure, Not Strangled)
Wrap string around the moss ball in multiple directions until it feels firm. You want the moss to stay snug against the soil, but you don’t want to crank it down like you’re packaging a bowling ball for shipping.
Quick tying tips
- Start with a long length of string; running out mid-wrap is a classic kokedama plot twist.
- Cross-wrap vertically and horizontally to create a “net.”
- Tie off securely, and leave a tail if you plan to hang it.
How to Display Your Cutting-Grown Kokedama
Kokedama can be displayed on a dish, a decorative stone, or a shallow tray. Hanging looks incredible, but it can dry fasterespecially indoors with heating or AC.
- Best for beginners: set on a dish so you can monitor moisture easily.
- For trailing plants: perch on a stand so vines can spill dramatically.
- For hanging: choose plants that tolerate faster drying and keep a close eye on watering.
Kokedama Care: Watering, Light, and Feeding
Watering (the “pick it up” method)
The easiest test is weight. When the ball feels light, it’s time to water. To water, soak the kokedama in a bowl of water for about 5–10 minutes, then let it drain until it stops dripping.
Light
Most indoor kokedama plants do best in bright, indirect light. Too much direct sun can scorch leaves and brown the moss. If your moss goes crispy, it’s usually light or dryness (or both) giving you feedback.
Humidity
Moss likes humidity. If your home is dry, occasional misting helps, and placing kokedama near other plants can create a mini “humidity neighborhood.”
Fertilizer
Use a diluted water-soluble fertilizer during active growth (spring/summer), every few weeks. If you fertilize heavily, you may get lush growthbut you’ll also get a kokedama that needs upgrading sooner.
Troubleshooting: When Your Moss Ball Sends Passive-Aggressive Signals
Problem: Leaves yellowing
- Most common cause: overwatering or staying too wet.
- Fix: drain longer after soaking; water less often; ensure the ball isn’t sitting in a puddle.
Problem: Moss browning
- Most common cause: too much sun or dry air.
- Fix: move to indirect light, mist lightly, soak thoroughly when needed.
Problem: The ball is cracking or crumbling
- Cause: mix too dry or not enough binding material.
- Fix: re-soak and gently compress; consider adding more peat/coir or chopped sphagnum next time.
Problem: Mold or funky smell
- Cause: too wet, poor airflow, or constant high moisture.
- Fix: let it dry slightly between waterings; increase airflow; avoid leaving it waterlogged.
Example Project: A Pothos Cutting Kokedama (Fast, Cute, Nearly Foolproof)
Want a low-stress first attempt? Try pothos:
- Take 3–5 pothos cuttings, each with at least one node.
- Root them in water until you have multiple roots per cutting.
- Cluster the rooted cuttings together and build a small soil ball around them.
- Wrap with sheet moss and tie securely.
- Display on a dish in bright, indirect light.
In a few weeks, you’ll have a fuller moss ball as new growth kicks inlike your kokedama is “leveling up.”
Conclusion
Making kokedama from plant cuttings is a satisfying blend of propagation science and plant-styling art. Root the cuttings first, build a compact soil core, wrap it neatly in moss, and learn the rhythm of soaking when the ball feels light. Once you get the hang of it, you can turn one mother plant into a whole constellation of moss ballseach one a tiny, living sculpture that proves you’re both crafty and slightly magical.
Experience Notes: What People Learn After Their First Kokedama
The first kokedama is usually equal parts pride and confusion. Pride because you made a plant levitate in a mossy orb. Confusion because you’ll immediately wonder: “Is it too wet? Too dry? Is it judging me?” That learning curve is normaland honestly, it’s part of the fun.
One of the biggest “aha” moments is realizing that kokedama watering isn’t about a strict schedule. It’s about feedback. People who do best tend to pick up the ball every so often and trust what it’s telling them. Heavy means hydrated. Light means thirsty. If you rely only on a calendar reminder, you’ll eventually water a still-wet ball (hello, yellow leaves) or forget a dry one (hello, crispy moss). The weight check becomes second nature surprisingly fast.
Another common lesson: rooted cuttings need a gentler transition than established plants. Fresh rootsespecially water rootscan be delicate. If you pack the soil mix too aggressively or tug while wrapping moss, you can damage the very roots you worked weeks to grow. A trick many plant folks use is to build the ball in two stages: first, make a soft “nest” of mix around the roots, then gradually firm it up once everything is in place. Think “supportive hug,” not “airport suitcase compression.”
People also learn quickly that string tension matters. Too loose and the moss slips like a scarf in a wind tunnel. Too tight and the ball can’t breathe, and stems may get pinched. A good goal is “secure enough to lift without wobbling.” If you can gently rotate the ball in your hands and the moss stays put, you’re winning. Clear fishing line is popular because it disappears visually, but twine is easier to handle for beginners (and feels less like you’re rigging up a tiny plant marionette).
Display style teaches its own lessons. Hanging kokedama looks amazinguntil you notice it dries out faster than the one sitting on a dish. Many people end up using a hybrid approach: hang it for the aesthetic, but keep a small bowl or tray below during watering days, and don’t hesitate to bring it down for a thorough soak. If you’re forgetful, countertop display is often kinder. You’ll see it more, touch it more, and notice early signs of stress.
Finally, there’s the “plant selection reality check.” Some plants thrive in kokedama because they enjoy consistent moisture and adapt well to compact root spaces. Others act like they’re being asked to live inside a damp sock. If your first attempt struggles, it doesn’t mean you’re bad at kokedamait may just mean your plant wanted a different lifestyle. Many growers find that pothos, philodendron, syngonium, and spider plant babies are the easiest confidence-builders. Once you nail those, you can experiment with fussier choices and tweak the mix and watering to match their needs.
The best part is that every kokedama teaches you something. After a few rounds, you’ll have your own methodyour preferred string, your favorite soil mix texture, the exact soak time that works in your homeand your moss balls will start looking less like “first attempt” and more like “intentional botanical art.” Which is a very fancy way of saying: you’ll be making tiny plant planets, and they’ll look awesome.