Table of Contents >> Show >> Hide
- What a Reverse Osmosis System Actually Does
- Before You Buy: A Smart DIY Reality Check
- Tools and Materials You Will Probably Need
- How to Install a Reverse Osmosis Water Filter (DIY)
- Step 1: Clear the cabinet and choose the layout
- Step 2: Shut off the cold water and relieve pressure
- Step 3: Install the feed water adapter
- Step 4: Install the drain connection
- Step 5: Mount the filter assembly
- Step 6: Place and prepare the storage tank
- Step 7: Install the RO faucet
- Step 8: Connect the tubing
- Step 9: Install filters or membrane if required
- Step 10: Sanitize, flush, and pressure-test the system
- Common DIY Mistakes to Avoid
- Maintenance After Installation
- Is DIY Installation Worth It?
- 500 Extra Words of Real-World Experience: What Installing an RO System Feels Like
- Conclusion
If your tap water tastes like it took a wrong turn through a swimming pool, a reverse osmosis water filter can feel like a small kitchen miracle. Under-sink RO systems are popular because they can reduce a wide range of contaminants, improve taste, and give you a dedicated faucet for cleaner drinking water without turning your countertop into a gadget graveyard. Better yet, many homeowners can install one themselves with patience, a few basic tools, and the willingness to spend quality time crouched under a sink like a determined raccoon.
This guide walks you through how to install a reverse osmosis water filter as a DIY project, what to check before buying a system, the mistakes that trip people up, and what real-world ownership actually feels like after the box is empty and the tubing is connected. The goal here is not just to get the unit mounted. It is to help you install it neatly, safely, and without creating a tiny indoor fountain.
What a Reverse Osmosis System Actually Does
A reverse osmosis system pushes water through a semipermeable membrane. Most home units also use a prefilter and postfilter, which is why you often hear people talk about “stages.” The prefilter helps protect the membrane, the membrane handles the heavy filtration work, and the postfilter gives the final water a last polish before it reaches your glass.
For homeowners, the big appeal is broad contaminant reduction. Depending on the certified claims for the specific model, an RO system may reduce things like dissolved solids, lead, fluoride, arsenic, chlorine taste and odor, and more. Some systems are certified for additional contaminant claims, which is why shopping by certification matters more than shopping by marketing adjectives like “ultra,” “mega,” or “space-age waterfall technology.”
There is one tradeoff you should know up front: RO systems create wastewater. That is normal. Some models are much more efficient than others, so if water efficiency matters to you, compare systems carefully instead of assuming every unit performs the same way.
Before You Buy: A Smart DIY Reality Check
1. Make sure RO is the right solution
If you mainly dislike the taste or smell of chlorine, a simpler carbon filter may be enough. If you want broader contaminant reduction, reverse osmosis may be worth the upgrade. In short, do not buy a bazooka when a flyswatter will do. A little clarity now saves money later.
2. Look for certification, not vibes
Choose a system with certification to recognized standards, especially NSF/ANSI 58 for reverse osmosis. Then check the product sheet for the specific contaminants it is certified to reduce. Not every RO unit is certified for the same claims, and “filters water” is not the same as “certified to reduce what I actually care about.”
3. Check your under-sink space
A traditional RO system usually needs room for the filter assembly, a storage tank, tubing, and a dedicated faucet. Some tankless units are more compact, but they may require power and still need careful routing. Either way, do not eyeball this. Measure the cabinet and think ahead about future filter changes. A system that fits today but cannot be serviced tomorrow is just a very expensive game of sink Tetris.
4. Confirm your water supply setup
Most under-sink RO systems connect to the cold water line only. You also need a nearby drain connection, usually above the P-trap, and enough working room to install the drain adapter or drain saddle cleanly.
5. Think about your faucet plan
Many RO systems use a separate drinking-water faucet. If your sink already has an unused hole for a soap dispenser or accessory, great. If not, you may need to drill a new hole depending on your sink or countertop material. That is not always difficult, but it can move the project from “easy afternoon” to “okay, now I need the right bit and a calm attitude.”
Tools and Materials You Will Probably Need
- Adjustable wrench or open-end wrenches
- Phillips screwdriver
- Drill and bits, if a faucet hole is needed
- Utility knife or tubing cutter
- Plumber’s tape
- Bucket or shallow pan
- Towels or rags
- Flashlight or work light
- The RO kit, including faucet, drain connection, tubing, tank, filters, and mounting hardware
Before starting, unpack everything and verify that all parts are present and undamaged. This step feels boring right up until you discover the missing fitting after disconnecting the water line.
How to Install a Reverse Osmosis Water Filter (DIY)
Step 1: Clear the cabinet and choose the layout
Remove the pile of half-empty cleaners, mystery sponges, and that one bottle with no label that has somehow survived three moves. Then dry-fit the components under the sink. Decide where the filter assembly will mount, where the tank will sit, and how the tubing will run.
Try to keep the layout simple and service-friendly. Leave enough clearance under the filter housings for replacement, avoid sharp bends in tubing, and make sure the assembly is mounted on a solid vertical surface. Neat tubing is not just pretty. It helps prevent kinks, strain, and future troubleshooting headaches.
Step 2: Shut off the cold water and relieve pressure
Turn off the cold water shutoff valve under the sink. Open the kitchen faucet to relieve pressure and let any remaining water drain. Keep a towel and bucket ready before disconnecting anything. Plumbing loves dramatic timing.
If your cold water line does not have a shutoff valve where you need one, address that first. Some installation manuals specifically note that a shutoff valve should be present before continuing.
Step 3: Install the feed water adapter
Disconnect the cold water line from the faucet connection point and install the feed water adapter or supply fitting included with your RO kit. This fitting creates a branch that sends cold water to the reverse osmosis system.
Use plumber’s tape where the instructions call for it, tighten connections securely, and do not overtighten plastic fittings. The goal is snug, not “I am trying to bench-press the sink.” Once installed, reconnect the faucet supply line and leave the RO feed valve in the position recommended by your manufacturer until you are ready for startup.
Step 4: Install the drain connection
RO systems need a place to send reject water. In most under-sink installations, that means attaching the drain adapter or drain saddle to the sink drainpipe above the P-trap. Position it carefully and align the holes correctly so the drain line flows cleanly.
This is a step where sloppy work causes noise, leaks, and future grumbling. Make sure the gasket is seated properly, the clamp is even, and the tubing path will not kink. Good drain placement is one of those invisible victories that keeps everything peaceful later.
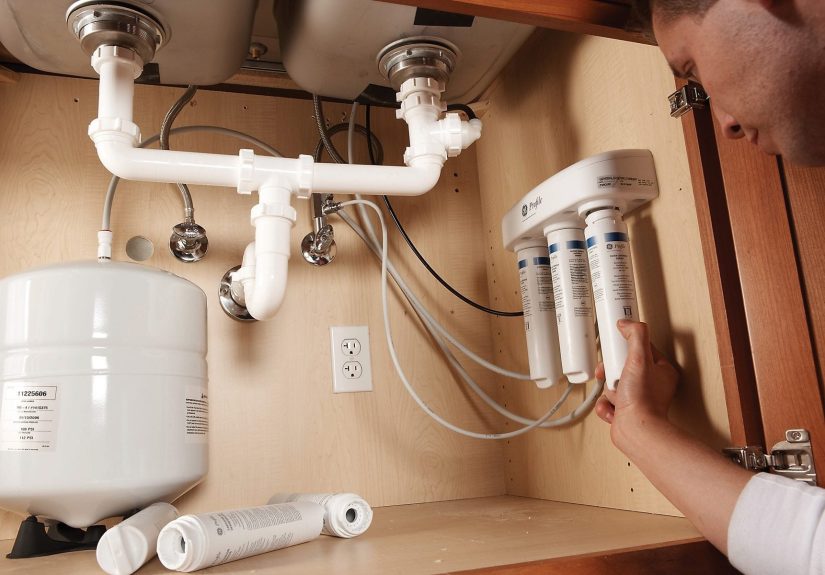
Step 5: Mount the filter assembly
Use the included hardware to mount the main RO assembly on the cabinet wall or side panel. Keep it high enough off the cabinet floor to allow room for future filter changes. Also leave side clearance if the manufacturer calls for it.
Do not mount it where it will get bumped by trash bins, cleaning bottles, or your own knees every time you reach under the sink. Quiet, accessible, out of the way: that is the sweet spot.
Step 6: Place and prepare the storage tank
If your system uses a storage tank, wrap the tank threads with plumber’s tape if directed and attach the tank valve. Set the tank upright in a stable location where it will not block other parts of the install. Tank models store filtered water so you can get a decent pour from the faucet instead of waiting for a slow trickle.
If you are installing a tankless system, follow the manufacturer’s clearance and power requirements carefully. Some newer RO units are very DIY-friendly, but “tankless” does not mean “thoughtless.”
Step 7: Install the RO faucet
Mount the dedicated drinking-water faucet on the sink or countertop using an existing hole if possible. If you must drill a new opening, confirm that your sink or countertop material can be drilled safely and that you have the correct tools. Stainless steel is one thing. Stone is another conversation entirely.
Once the faucet is secured, route the tubing down into the cabinet without twisting or crushing it. A clean faucet install makes the whole system look more professional, even if your shirt is now covered in cabinet dust and regret.
Step 8: Connect the tubing
Most kits use color-coded tubing or clearly labeled ports. Connect the feed water line, drain line, tank line, and faucet line exactly as shown in the manual. Push tubing fully into quick-connect fittings or tighten compression fittings according to the instructions.
This is not the moment for improvisation. Cut tubing square, route it neatly, and double-check every connection before turning the water back on. A reversed line can turn your proud installation into a plumbing-themed puzzle.
Step 9: Install filters or membrane if required
Some systems ship with filters preinstalled. Others require you to insert cartridges or the membrane during setup. Follow the sequence in the manual. Pre, membrane, post is a common arrangement, but do not assume every unit is identical.
Step 10: Sanitize, flush, and pressure-test the system
Once everything is connected, slowly turn the water back on and inspect every fitting for leaks. Then follow the startup instructions for sanitizing, filling, and flushing the system. This step matters. A new RO system often needs an initial purge before the water is ready to drink.
Be patient here. The first tank fill can take time, and the first batches of water are often discarded according to the manufacturer’s instructions. Think of it as the system’s warm-up lap.
Common DIY Mistakes to Avoid
- Connecting to hot water: Most systems are for cold water only.
- Skipping certification checks: Do not assume every RO unit reduces the same contaminants.
- Ignoring cabinet clearance: You need room for future filter replacement.
- Rushing the drain install: Poor drain alignment is a classic source of leaks and noise.
- Failing to flush the system: Startup instructions are not decorative reading.
- Kinking tubing: Tight bends reduce flow and invite trouble.
- Using RO with a refrigerator incorrectly: If your fridge already has built-in filtration, review the appliance guidance before tying an RO line into it.
Maintenance After Installation
Installing the system is the opening act. Maintenance is the long-running show. Most RO systems need periodic prefilter and postfilter changes, while the membrane usually lasts longer. The exact schedule depends on the model, water quality, and usage, so follow the manufacturer’s replacement intervals.
A good habit is to write the installation date on a sticker inside the sink cabinet or set a recurring phone reminder. Future You will be deeply grateful when “sometime last year, maybe?” is replaced by an actual date. Also consider testing your water periodically if your concern is tied to a specific contaminant.
If your system starts producing water more slowly, tastes off, or makes unusual noises, do not panic immediately. First suspects are often clogged filters, low supply pressure, a full or under-pressurized tank, or a line that was nudged into a kink while someone shoved a bottle of dish soap under the sink like it was a competitive sport.
Is DIY Installation Worth It?
For many homeowners, yes. If you are comfortable shutting off a water line, installing a faucet, and following a step-by-step manual, this is a very realistic DIY project. Traditional systems often take an afternoon. Compact modern models may be faster, while older plumbing, hard countertop materials, or cramped sink cabinets can stretch the timeline.
The real advantage of doing it yourself is not just saving on labor. You also learn how your system works, which makes future filter changes, troubleshooting, and upgrades far less intimidating. And there is a special kind of satisfaction in pouring that first glass of filtered water and thinking, “I made this happen with a wrench and stubbornness.”
500 Extra Words of Real-World Experience: What Installing an RO System Feels Like
On paper, installing a reverse osmosis water filter sounds wonderfully tidy. Shut off water. Connect a few lines. Mount a faucet. Drink cleaner water. In real life, the experience is usually a blend of easy wins, awkward angles, and one brief moment where you question every life choice that led you under the sink with a flashlight in your mouth.
A common first surprise is cabinet space. Plenty of people buy a system after measuring width and forgetting about depth, drain pipes, garbage disposals, pullout trash cans, or the giant bottle of dish detergent that apparently deserves permanent residency. Once you start dry-fitting components, you realize layout matters almost as much as the actual plumbing. The homeowners who have the best experience tend to spend extra time planning where the tank, manifold, and tubing will go before making any permanent moves.
Another very real experience is discovering that the “easy” part depends heavily on the age of your plumbing. In a newer kitchen, fittings often come apart with modest effort. In an older home, the shutoff valve may look like it was installed during the Truman administration and has not been touched since. Suddenly, what should have been a 10-minute connection step becomes a slow-motion negotiation with mineral buildup, old threads, and patience. This is why smart DIYers build in extra time instead of assuming the project will go exactly like the glossy product photo suggests.
Then there is the faucet decision. If you already have a spare hole in the sink deck, you feel like the universe is rooting for you. If not, the faucet step becomes the emotional turning point of the project. Many people can handle it just fine, but it is often the moment where confidence dips and caution rises. Once the faucet is in place, though, the job starts to feel real. Suddenly it looks less like a pile of parts and more like an actual upgrade.
The first startup is also memorable. New owners often expect instant perfection, but RO systems usually need time to fill and flush. The initial water may not be for drinking, and the flow may seem slower than a regular kitchen faucet. That is normal. After the purge process is complete, most people notice the taste difference right away, especially if their old water had a chlorine edge, mineral heaviness, or that faint “public swimming pool meets penny jar” character no one asked for.
Long-term, the experience is usually less dramatic and more convenient than people expect. You stop buying so many bottles. Coffee and tea may taste cleaner. Ice can improve too, if your setup supports it properly. Guests start using the little RO faucet like it is the VIP entrance to hydration. The biggest lesson most homeowners learn is that installation is only half the story. The truly happy RO owners are the ones who keep up with filter changes, leave enough space for maintenance, and keep the manual somewhere smarter than “a random drawer I will never open again.”
In other words, a DIY reverse osmosis install is rarely glamorous, occasionally awkward, and often absolutely worth it. It is one of those home projects where the reward shows up a little at a time, one better-tasting glass after another.
Conclusion
Installing a reverse osmosis water filter yourself is one of the more satisfying kitchen upgrades because it blends practical value with daily payoff. You are not just adding a gadget. You are creating a dedicated source of cleaner, better-tasting water right where you use it most. The keys to a smooth job are simple: buy the right certified system, plan the under-sink layout carefully, connect only to cold water, take your time with the drain and faucet, and follow the startup and flushing instructions exactly.
Do that, and your DIY project has a very good chance of ending not with a leak, but with a cold glass of water and the deeply satisfying feeling that your kitchen just got smarter.


