Table of Contents >> Show >> Hide
- Why Transfer Cassette Tape to a Computer?
- What You Need to Digitize Cassette Tapes
- Best Setup Options
- How to Transfer Cassette Tape to Computer Step by Step
- Step 1: Inspect the tape and the player
- Step 2: Clean the tape path and heads
- Step 3: Connect the hardware
- Step 4: Choose recording settings
- Step 5: Make a short test recording
- Step 6: Adjust azimuth if needed
- Step 7: Record the full side
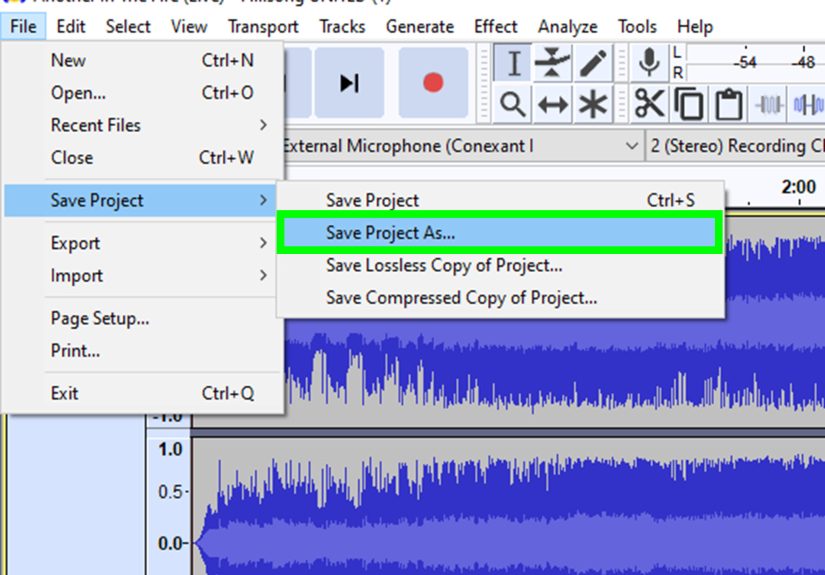
- Step 8: Save a raw master immediately
- Step 9: Edit and clean up the audio
- Step 10: Export listening copies and back everything up
- Tips for Better Sound Quality
- Common Mistakes to Avoid
- What to Do If the Tape Has Problems
- Should You DIY or Use a Professional Service?
- Final Thoughts
- Real-World Experiences and Lessons from Digitizing Cassettes
- SEO Tags
There is something wonderfully stubborn about cassette tapes. They hiss a little, they clunk when you press play, and they have a special talent for making you feel like you should be wearing denim while fixing a bike. But nostalgia alone is not a storage strategy. If you have old mixtapes, family interviews, sermon recordings, band demos, language lessons, or that one tape labeled “Do Not Erase!!!” in very stressed handwriting, now is a smart time to transfer cassette tape to computer and preserve it digitally.
The good news is that digitizing cassette tapes is not some secret ritual performed only by audio engineers in dimly lit studios. You can absolutely do it at home with the right setup, a little patience, and the emotional strength to hear your old answering-machine voice from 2004. This guide walks you through the full process, from choosing the gear to cleaning up the final files, so you can turn aging analog recordings into digital audio that is easier to store, organize, and enjoy.
Why Transfer Cassette Tape to a Computer?
Before getting into cables and software, let’s answer the obvious question: why bother? Because cassette tapes are not getting younger, prettier, or more cooperative. Magnetic media can degrade over time, and old playback machines can become unreliable. Even if a tape still plays today, that does not guarantee it will behave next year.
When you transfer cassette tape to computer, you create a digital version that is easier to back up, edit, label, and share. You can save a clean master file, make smaller listening copies for your phone, split long recordings into tracks, and avoid repeated playback on the original cassette. In other words, you let the tape retire with dignity instead of making it do encore performances forever.
What You Need to Digitize Cassette Tapes
1. A cassette player or cassette deck
You need a working device that can actually play the tape. This can be a full-size cassette deck, a portable cassette player, or a USB cassette converter. A proper deck usually gives you better playback stability and sound quality than a bargain-bin portable unit, especially for important recordings.
2. A way to connect the player to your computer
This is where many people accidentally wander into the audio wilderness. Ideally, use the cassette deck’s line out or RCA outputs. From there, connect the signal to one of these:
- a computer with a real line input, or
- a USB audio interface connected to your computer.
If your deck only has a headphone jack, you can still use it, but keep the output level moderate. Too much volume can overload the recording and make everything sound like your mixtape is screaming through a paper towel tube.
3. The right cable
Your exact cable depends on the outputs and inputs involved. Common options include:
- RCA to 3.5 mm stereo cable
- RCA to dual 1/4-inch cable
- 3.5 mm to 3.5 mm stereo cable
Check both ends before buying anything. Nothing kills momentum like realizing your “perfect cable” is perfect for someone else’s equipment.
4. Recording software
You do not need expensive software to record a cassette to computer. Audacity is the most popular free option and works well for beginners. Adobe Audition is another strong choice if you already use Creative Cloud or want more advanced editing and restoration tools.
5. Headphones or speakers for monitoring
Use headphones to listen for distortion, hum, missing channels, or obvious issues during the transfer. If the left side sounds like a ghost and the right side sounds like a lawn mower, you want to know that before recording the whole tape.
Best Setup Options
Option 1: Cassette deck + USB audio interface
This is usually the best choice for quality and reliability. A decent cassette deck connected to a basic USB audio interface gives you better control over input levels and often cleaner audio than a computer’s built-in sound hardware.
Option 2: USB cassette player
This is the easiest route for casual users. Many USB cassette players are designed specifically for cassette-to-digital transfer. They are convenient and beginner-friendly, though sound quality can vary a lot. Fine for everyday listening, less ideal for precious archival recordings.
Option 3: Cassette player straight into the computer
This works only if your computer has a true line input. A microphone input is not the same thing. Mic inputs are made for much weaker signals and can add noise, distortion, or weird mono problems when fed a line-level source.
How to Transfer Cassette Tape to Computer Step by Step
Step 1: Inspect the tape and the player
Look at the cassette shell. If it is cracked, warped, moldy, or shedding bits of tape, stop and assess before pressing play. Also check the pressure pad and rollers. If the cassette player is dirty or known for chewing tapes, do not trust it with your favorite family memories. That is how legends become tragedies.
Step 2: Clean the tape path and heads
Clean the playback heads, capstan, and pinch roller if your deck needs it. A dirty deck can add noise, reduce treble, or damage playback. If a tape is visibly damaged or contaminated, be careful. In more serious cases, professional help is worth considering.
Step 3: Connect the hardware
Connect the cassette deck output to your interface or line input. Then connect the interface to your computer if needed. Open your recording software and select the correct recording device. Set the project to stereo if the source is stereo.
Step 4: Choose recording settings
For a high-quality master file, recording to WAV is the smart move. A practical home workflow is to capture at 24-bit if your hardware supports it, with at least a 44.1 kHz sample rate. If you plan to burn CDs later, 44.1 kHz is a natural fit. You can always make MP3 or AAC copies later for casual listening, but keep the master uncompressed.
Step 5: Make a short test recording
Do not launch into a full 45-minute transfer without a test. Record 20 to 30 seconds, stop, and listen back. Check for these common problems:
- distortion or clipping
- audio only on one side
- buzzing or electrical hum
- very low volume
- playback that sounds muffled or off-speed
Set your levels conservatively. In plain English: leave headroom. You want a healthy signal, not a waveform that looks like it ate too much and exploded.
Step 6: Adjust azimuth if needed
If the tape sounds dull, phasey, or weak in the high end, azimuth may be off. Azimuth is the alignment of the tape head relative to the tape. On some decks, adjusting playback azimuth can significantly improve clarity. This matters most for homemade tapes and old field recordings, where the original recording alignment may not have been ideal.
Step 7: Record the full side
Once the test sounds right, rewind and record the entire side in one pass. Then flip the cassette and repeat for the other side. Some people record both sides into one long file first, then split tracks later. That is often the easiest workflow.
Step 8: Save a raw master immediately
After capture, save an untouched master copy before doing cleanup edits. This is your safety net. If you get carried away with noise reduction later and accidentally make the recording sound like it was captured inside a vacuum cleaner, the raw master saves the day.
Step 9: Edit and clean up the audio
Now you can trim silence, split tracks, label files, and do light restoration. Common cleanup tasks include:
- removing extra silence at the beginning or end
- normalizing volume
- light hiss reduction
- separating songs or sections
- adding metadata like artist, date, or notes
Go easy on restoration tools. Heavy-handed noise reduction can strip away detail and make voices sound artificial. The goal is to improve listenability, not to turn a beloved cassette into a haunted robot podcast.
Step 10: Export listening copies and back everything up
Keep your master as WAV. Then export listening copies in MP3 or another convenient format if you want smaller files. Back up your files in at least two places, such as an external drive and cloud storage.
Tips for Better Sound Quality
Use the best playback machine you can find
A solid deck often makes a bigger difference than fancy software. Better transport stability can reduce wow, flutter, and channel imbalance. If one machine sounds muddy and another sounds surprisingly lively, trust your ears.
Match the tape’s noise reduction if possible
If the original tape was recorded with Dolby noise reduction, playback should generally use the matching setting. Otherwise the sound may be too dull or too bright. If you are unsure, make a short test with Dolby on and off, then keep the version that sounds most natural.
Do not keep replaying fragile tapes
Every extra pass adds wear and risk. Plan the transfer, make the best capture you can, save your master, and move on.
Label files clearly
Name files with useful information such as artist, album, tape side, recording date, or source notes. “Tape1_final_final_REALfinal.wav” is funny exactly once.
Common Mistakes to Avoid
- Using the computer’s mic input: This can distort line-level audio and create messy results.
- Recording too hot: Digital clipping is ugly and permanent.
- Saving only as MP3: Always keep a WAV master.
- Skipping the test recording: That is how people discover problems after digitizing an entire tape.
- Over-processing: Hiss removal is helpful; audio surgery with a chainsaw is not.
- Ignoring mechanical issues: Sometimes the problem is not the software. It is the cassette shell, pressure pad, or deck alignment.
What to Do If the Tape Has Problems
Muffled sound
Try cleaning the heads, checking azimuth, or testing a better deck.
Uneven playback or dropouts
The shell may be misaligned, the pressure pad may be weak, or the tape may be worn. Sometimes another machine handles the tape better.
Tape gets eaten
Stop immediately. Do not keep pressing buttons like a panicked game show contestant. Power off, gently remove the tape, inspect the deck, and consider using a different machine.
Severe mold, stickiness, or damage
For valuable recordings, this is a case for a professional transfer service. Some problems are beyond normal home cleanup and can get worse with amateur handling.
Should You DIY or Use a Professional Service?
If the tapes are common music cassettes and you enjoy hands-on projects, DIY transfer is a great option. It is affordable, flexible, and oddly satisfying. But if the tapes are rare, damaged, or emotionally priceless, a professional service may be the better call. Think wedding vows, oral histories, deceased relatives, unreleased band recordings, or anything you would absolutely hate to lose.
A pro service can help when you need specialized playback decks, better restoration tools, or experience with damaged media. Sometimes peace of mind is worth outsourcing. Sometimes you also just do not want your Saturday to revolve around a cable labeled “probably stereo?”
Final Thoughts
Learning how to transfer cassette tape to computer is part preservation project, part audio scavenger hunt, and part tiny time machine. The process is straightforward once you understand the signal path: play the tape, capture the audio cleanly, save a master, make listening copies, and back everything up. The hardest part is usually not the software. It is finding a cassette deck that still behaves like a responsible adult.
Done well, digitizing cassette tapes gives old recordings a practical future. Your mixtapes can live on your phone, your family interviews can be archived safely, and your old demos can finally leave that shoebox in the closet. The tape may have started the story, but your computer is where the next chapter gets to stick around.
Real-World Experiences and Lessons from Digitizing Cassettes
One of the most surprising parts of a cassette-to-digital project is how emotional it can get. People often begin the job thinking it is just a technical task, like moving files from one folder to another. Then the tape starts rolling and suddenly there is a grandparent’s voice, a teenage garage band, a child singing off-key with heroic confidence, or a radio recording that instantly pulls you into a different decade. That emotional weight changes the way you work. You stop rushing. You listen more carefully. You realize you are not just converting audio; you are rescuing moments.
Another common experience is discovering that the playback machine matters more than expected. Many people start with a cheap USB cassette player because it seems simple, then wonder why the recording sounds thin, noisy, or wobbly. Switching to a better deck often brings a dramatic improvement. The lesson is simple: software can help polish a transfer, but it cannot fully fix a weak playback source. Garbage in, garbage out still runs the audio universe with impressive consistency.
There is also the famous “I should have done a test recording” moment. Almost everyone who digitizes a stack of cassettes eventually makes one preventable mistake: the cable is loose, the input is wrong, the level is too high, or the file was accidentally recorded in mono. That first mistake usually teaches the habit that saves every later transfer. Test first. Listen back. Then commit to the full capture. It is not glamorous advice, but neither is re-recording both sides of a 90-minute tape because the audio was clipping the whole time.
Many people also learn that less restoration is often better. The first time you use noise reduction, it feels magical. The second time, you get ambitious. By the third pass, the recording may sound as if it was filtered through a toaster. A light touch usually wins. A bit of hiss is part of the cassette character. Removing every trace of it can remove life from the recording too. Experienced hobbyists often keep two versions: a raw master and a gently cleaned listening copy.
Finally, digitizing cassettes teaches patience in a very literal way. Transfers happen in real time. A 45-minute side takes about 45 minutes. There is no “turbo nostalgia” button. That pace can feel slow, but it also creates a kind of forced listening session. You hear full conversations, forgotten intros, awkward pauses, accidental mic bumps, and all the wonderfully human details modern media often trims away. In that sense, the experience is not just about saving audio. It is about spending time with it. And that may be the best reason to do the project at all.