Table of Contents >> Show >> Hide
- Should You Sand the Floor at All?
- Tools and Supplies You’ll Likely Need
- How to Prepare the Room Before Sanding
- Choosing the Right Grit Sequence
- Step-by-Step: How to Sand a Wood Floor
- Expert Tips for Better Results
- Mistakes to Avoid When Sanding a Wood Floor
- 1. Starting too aggressively
- 2. Skipping grit levels
- 3. Leaving the machine still
- 4. Ignoring protruding nails
- 5. Sanding an engineered floor without checking thickness
- 6. Trying to sand away a moisture problem
- 7. Doing a sloppy cleanup before finishing
- 8. Choosing DIY when the floor clearly needs a pro
- When to Hire a Professional
- Final Thoughts
- Real-World Experiences: What Sanding a Wood Floor Actually Feels Like
- SEO Tags
If your wood floor has seen better days, welcome to the club. Scratches, dull spots, mystery stains, and that one traffic path that looks like it hosts a daily parade can make even a beautiful hardwood floor look tired. The good news? Sanding can bring a worn floor back to life. The less-good news? A floor sander is not a forgiving little craft tool. Used well, it creates a smooth, fresh surface ready for stain or finish. Used badly, it can leave grooves, chatter marks, and enough regret to fuel a home-improvement break.
This guide walks you through how to sand a wood floor the smart way. You’ll learn how to prep the room, choose the right sanding approach, work through the grit sequence, avoid common blunders, and know when to call in a pro. Whether you’re refreshing oak in a bedroom or tackling a living room that has survived kids, pets, and furniture shuffling with Olympic-level enthusiasm, the goal is the same: a flatter, cleaner, better-looking floor without avoidable mistakes.
Should You Sand the Floor at All?
Before you rent a machine and channel your inner flooring contractor, make sure the floor is actually a good sanding candidate. Sanding removes the existing finish and a thin layer of wood. That is perfect for solid hardwood floors with surface wear, but it is not always the right answer for every floor.
Good candidates for sanding
- Solid hardwood with scratches, dull finish, light stains, or uneven color
- Floors with worn finish in high-traffic areas
- Older hardwood that has enough thickness left for refinishing
- Floors with minor cupping or roughness that does not stem from an active moisture problem
Think twice before sanding if:
- The floor is engineered wood with a thin wear layer
- The boards are badly warped, buckled, or actively cupping from moisture
- There is deep structural damage, rot, or loose boards everywhere
- The floor may only need screening and recoating rather than full sanding
A simple example: if water still beads on the floor and the finish is mostly intact, you may not need a full bare-wood sanding. But if the finish has worn through and the floor drinks up water like it just crossed a desert, sanding is more likely to be worth it.
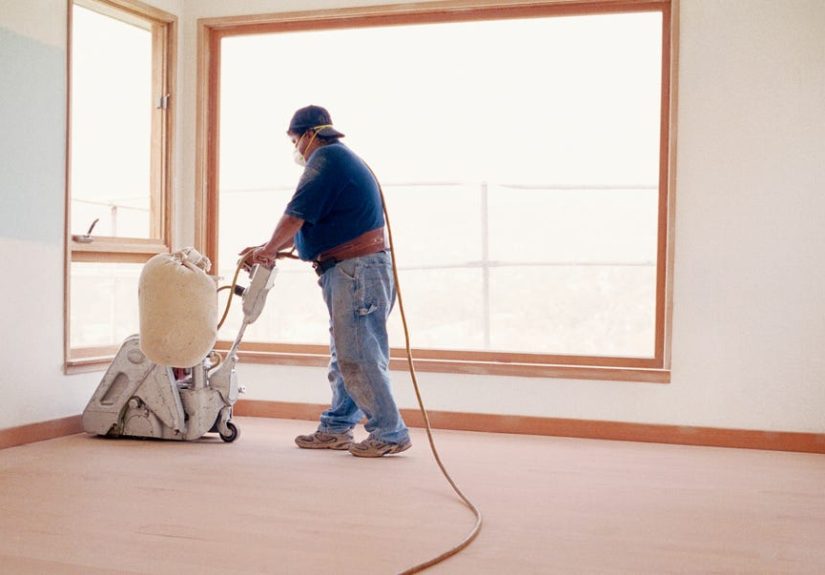
Tools and Supplies You’ll Likely Need
- Drum sander or random-orbit floor sander
- Edger for the perimeter
- Hand scraper or detail sander for corners
- Sandpaper in multiple grits
- Vacuum, broom, and microfiber cloths
- Painter’s tape and plastic sheeting for dust control
- Nail set and hammer
- Wood filler for cracks, holes, and small gaps
- Hearing protection, eye protection, and a proper dust mask or respirator
Here is one of the biggest expert tips right up front: if you are a first-timer, a random-orbit floor sander is generally easier to control than a drum sander. It removes material more slowly, but it is also less likely to leave deep gouges. A drum sander is faster and more aggressive, which sounds great until it becomes a wooden-floor tattoo machine.
How to Prepare the Room Before Sanding
1. Empty the room completely
Remove rugs, curtains, furniture, and anything else that likes to collect dust. Floor sanding creates a surprising amount of fine dust, even with dust bags or dust-containment features.
2. Check the floor for nails, staples, and damage
Run a putty knife over the surface to find protruding fasteners. Set every nail slightly below the surface with a nail set. Remove staples, carpet tack strips, and random metal bits left behind by renovations from another era. If you skip this step, the sandpaper will pay the price first, and the sander may complain second.
3. Make repairs before sanding
Tighten loose boards, address squeaks where practical, and fill small holes or cracks with stainable wood filler if appropriate. For major gaps or broken boards, patching may be necessary before refinishing. Sanding a damaged floor does not magically fix structural issues; it just makes them cleaner.
4. Control the dust
Seal doorways, vents, and adjacent openings with plastic sheeting and painter’s tape. Open windows only if your finishing plan allows it later and your climate is dry enough. Dust has a special talent for traveling to rooms you did not invite it into.
Choosing the Right Grit Sequence
The best sanding job usually comes from multiple passes with progressively finer grit, not one heroic pass with a super-coarse paper. A typical sequence for many floors is:
- Coarse cut: 36- or 40-grit to remove finish and flatten the floor
- Medium cut: 60- or 80-grit to remove scratches from the first pass
- Fine cut: 100- or 120-grit to refine the surface for finishing
The exact starting grit depends on the floor’s condition. A heavily finished or uneven floor may need 36- or 40-grit. A cleaner floor with lighter wear may start a bit finer. The key is progression. Do not skip too many grits, or the scratches from the previous pass can telegraph right through your stain or topcoat.
Step-by-Step: How to Sand a Wood Floor
Step 1: Start with the main field of the floor
If you are using a drum sander, begin moving before the drum fully engages the floor, and keep moving at a steady pace. Never let the machine sit in one place while the abrasive is in contact with the wood. That is how you create dips and gouges that will haunt you every time sunlight hits the floor.
For most floors, sand in the direction of the wood grain. On very uneven floors, some pros may begin with a diagonal pass to flatten the surface before returning to sanding with the grain. That is not beginner territory unless you truly understand the machine and the floor’s condition.
Step 2: Overlap your passes
Each new pass should overlap the previous one slightly. This keeps the cut even and helps avoid ridges. Slow and steady beats fast and frantic here. You are not mowing a lawn in a thunderstorm.
Step 3: Sand the edges
After each main-floor pass, use an edger with the same grit around the room’s perimeter. Keep the edger moving and feather your blend into the field. Many floors look good in the middle and rough around the edges because the perimeter work got rushed.
Step 4: Hit the corners and tight spots
Use a hand scraper, detail sander, or careful hand-sanding in corners, around door casings, and under radiators if accessible. These spots matter more than people think because unfinished corners stand out fast once the finish goes on.
Step 5: Vacuum thoroughly between every grit
Vacuum the entire floor, baseboards, windowsills, and nearby ledges after every sanding stage. Then wipe remaining dust with a microfiber cloth or tack method appropriate for your finishing system. If you leave coarse grit dust on the floor, the next pass can grind it right back into the wood.
Step 6: Repeat with finer grits
Work through the full sequence until the floor looks uniformly clean, smooth, and scratch-consistent. “Consistent” is the important word. A floor does not have to be brand-new perfect, but it does need to be evenly sanded.
Step 7: Inspect under bright light
Use side lighting or strong daylight to inspect for swirl marks, drum marks, missed finish along the walls, or uneven patches. This is the moment to catch problems. Once stain or polyurethane goes on, flaws become much more social and far less shy.
Expert Tips for Better Results
Use the least aggressive machine you can control
If your floor is flat and the finish is not especially thick, a random-orbit floor sander is often the better DIY choice. It is slower, but it is also less likely to leave severe damage.
Match the edge sanding to the field sanding
The perimeter should go through the same grit progression as the main floor. If the center ends at 100 grit and the edge ends at 60, the difference may show after finishing.
Do not rush filler decisions
Some gaps are seasonal and may reopen. Some cracks need filler. Some wider spaces are better left alone unless you are doing proper board repair. Filling every little line in an old floor can create an overworked look.
Test stain before committing
If you plan to stain, test it in a closet or on leftover flooring. Different species and sanding qualities absorb stain differently. A floor that looked “warm walnut” in your head may come out “dramatic coffee incident” in real life.
Respect drying and cure times
Once the sanding is done and finish goes on, patience matters. Dry-to-touch is not the same as fully cured. Put furniture back too early and you may dent, scratch, or mark the brand-new surface.
Mistakes to Avoid When Sanding a Wood Floor
1. Starting too aggressively
Using a very coarse grit on a floor that does not need it removes more wood than necessary and creates deeper scratches to remove later.
2. Skipping grit levels
Jumping from coarse to fine may save time for about six minutes and cost you hours in scratch correction.
3. Leaving the machine still
This is the classic mistake. Pause with a drum sander in one place and you can cut a visible trench into the floor.
4. Ignoring protruding nails
Fasteners tear abrasives, spark frustration, and can damage equipment. Set them before the first pass.
5. Sanding an engineered floor without checking thickness
Some engineered wood floors can be lightly refinished, while others have such a thin veneer that full sanding is risky or a bad idea altogether.
6. Trying to sand away a moisture problem
If boards are cupped because of ongoing moisture, fix the moisture source first. Sanding before the floor stabilizes can make the boards look worse later.
7. Doing a sloppy cleanup before finishing
Dust left behind becomes texture in your finish. Clean like the final look depends on it, because it does.
8. Choosing DIY when the floor clearly needs a pro
If the floor is heavily cupped, badly uneven, historically valuable, or you are working with parquet, borders, or delicate engineered planks, professional refinishing may be the money-saving choice in disguise.
When to Hire a Professional
DIY sanding can absolutely work, especially in smaller rooms with solid hardwood and a manageable finish. But some floors wave a polite little flag that says, “Please don’t learn on me.” Hire a pro when:
- The floor is severely uneven or has major damage
- You suspect moisture issues are still active
- You are dealing with thin engineered flooring
- You want a stain-sensitive species to come out perfectly even
- You do not feel comfortable running large sanding equipment
Professionals also have better dust collection, more experience blending edges, and a stronger instinct for knowing when a floor needs repair instead of more abrasion.
Final Thoughts
Sanding a wood floor is one of those jobs that rewards patience, prep, and restraint. The best results usually do not come from brute force. They come from thoughtful grit progression, careful machine control, and obsessive cleanup. If you take the time to inspect the floor, choose the right machine, prep thoroughly, and avoid the common mistakes, you can turn a worn-out surface into a floor that looks fresh, smooth, and far more expensive than your weekend felt.
And remember: the goal is not to remove every trace of your home’s history. A few gentle signs of age can add character. The real win is making the floor look intentional again instead of merely exhausted.
Real-World Experiences: What Sanding a Wood Floor Actually Feels Like
On paper, sanding a wood floor sounds straightforward: rent machine, buy sandpaper, sand floor, admire greatness. In real life, it is a mix of planning, problem-solving, and tiny moments of victory. One homeowner might start the job convinced it will take a single Saturday, only to discover that removing old finish from a red oak floor is more like negotiating with a stubborn relative. Another may begin nervously, fearing they will ruin the boards, then realize that careful prep and a slower sanding pace make the job far less intimidating.
A common experience is that the first pass feels dramatic. The floor looks rough, dusty, and worse before it looks better. This surprises a lot of people. They expect instant beauty, but the transformation usually happens gradually. After the medium grit, the wood grain starts to show more clearly. After the final sanding pass and a proper cleanup, the room suddenly looks brighter, calmer, and more finished even before stain or topcoat is applied.
Another thing people often notice is how much the edges matter. The main floor can look fantastic, but if the perimeter is rushed, the whole project feels incomplete. Many DIYers say the edging work is where they gained the most respect for professional refinishers. Corners, vents, doorways, and transitions to other rooms take more attention than expected.
There is also the emotional roller coaster of stain testing. Someone may be convinced they want a dark walnut look, then try a sample and discover it hides the grain or makes the room feel smaller. Others think they want a natural finish, only to see how beautiful the bare wood looks under sealer and decide to keep it light. That testing stage often changes the entire design direction of a room.
Perhaps the biggest lesson people share is that sanding is less about strength and more about discipline. The job rewards homeowners who keep the machine moving, clean thoroughly between grits, and stop to inspect their work under good light. It punishes rushing. The floor almost always tells the truth in the end.
When the project is done, most people remember two things. First, the room feels completely different, almost like the house got its confidence back. Second, they understand why experts keep repeating the same advice: do not skip prep, do not skip grits, and do not assume you can “fix it with finish.” In the world of floor sanding, the quality of the final look is usually decided long before the first coat of polyurethane ever goes down.


