Table of Contents >> Show >> Hide
- Safety First: Why Furnace Flues Are a Big Deal
- Know Your Furnace Flue Type
- Common Furnace Flue Problems
- Essential Tools and Materials
- Step-by-Step: How to Inspect a Furnace Flue
- Minor Furnace Flue Repairs You Can Tackle
- Flue Problems That Need a Professional
- Preventive Maintenance: Keeping Your Flue in Good Shape
- Quick FAQ About Furnace Flue Repair
- Conclusion
- Real-World Experiences: What Homeowners Learn When Fixing Furnace Flues
If your furnace flue is rusty, dripping water, or held together with more hope than hardware, it’s time to pay attention.
That simple-looking vent pipe is responsible for moving carbon monoxide and combustion gases safely out of your home.
When it fails, the result can range from “drafty and inefficient” to “call 911.” So yes, learning how to repair a furnace flue matters a lot.
In this guide, we’ll walk through how a furnace flue works, the most common flue problems, which DIY repairs are realistic,
and when it’s time to call in a licensed HVAC or chimney pro. You’ll get practical steps, real-world examples, and
some hard-earned lessons that homeowners discover the first time they tackle a flue repair.
Safety First: Why Furnace Flues Are a Big Deal
A furnace flue (or furnace vent pipe) does one job: carry exhaust gases from the furnace to the outdoors.
Those gases can include carbon monoxide (CO), an odorless, colorless gas that can be deadly at high levels.
A blocked or damaged flue can let CO spill back into your home instead of sending it outside, which is why
flue problems are treated as serious safety issues, not cosmetic fixes.
- Carbon monoxide risk: A cracked, separated, or blocked vent can leak exhaust into living areas.
- Fire risk: Damaged metal or chimney liners can overheat nearby combustibles.
- Moisture damage: Poor venting can cause condensation inside the flue, leading to rust, staining, and structural damage.
- Efficiency problems: A poorly vented furnace may short-cycle, run less efficiently, or shut down on safety switches.
Because flues tie directly into gas-burning equipment, any work you do must respect local building codes, manufacturer instructions,
and basic common sense. When in doubt, stop and call a licensed HVAC technician or chimney professional.
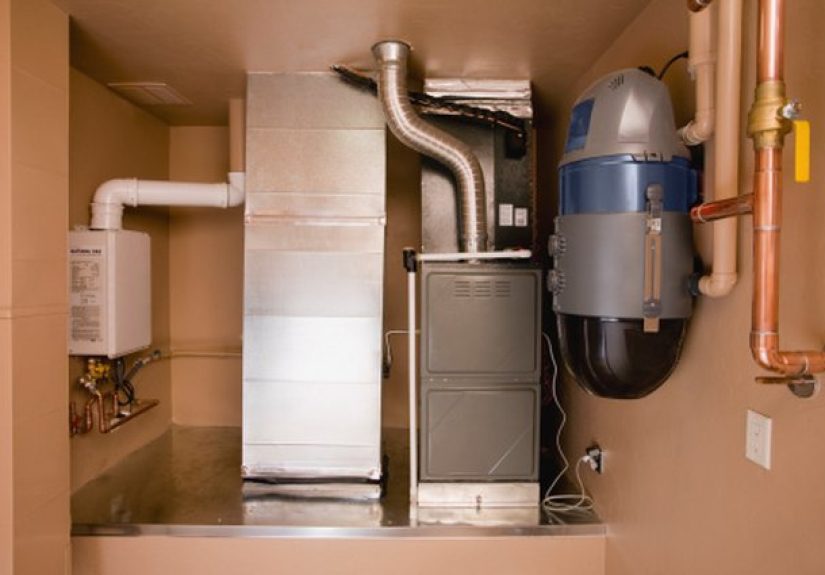
Know Your Furnace Flue Type
Before you start repairing anything, identify what kind of venting system you have. This affects what materials you can use and
what “repair” even looks like.
1. Standard-Efficiency Metal Flues
Older and standard-efficiency gas furnaces usually vent into:
- Single-wall metal pipe running into a chimney or directly through the roof.
- B-vent (double-wall metal pipe) designed to stay hotter and maintain proper draft.
These systems rely on hot exhaust rising up the chimney (natural draft). The pipe is typically galvanized or stainless steel and
must be sized correctly for the furnace and chimney according to venting tables and fuel gas codes.
2. High-Efficiency PVC Venting
High-efficiency furnaces (often 90% AFUE and up) usually vent through:
- Plastic PVC or CPVC pipes that exit through a side wall or roof.
- Often a two-pipe system: one for fresh air intake, one for exhaust.
These systems operate under mechanical draft and have strict requirements on pipe size, maximum length, number of elbows, and
approved materials. Manufacturers and newer codes often require special venting materials rated for flue gases, not just generic plumbing pipe.
3. When It’s Not a DIY Project
Skip DIY and call a pro if you notice:
- Severe rust, multiple holes, or sections of flue that crumble when touched.
- Backdrafting (you see or smell exhaust spilling into the room).
- Improperly sized or combined vents serving multiple appliances.
- Chimney liner damage, masonry issues, or missing liners altogether.
Common Furnace Flue Problems
Most flue problems fall into a handful of categories. Spotting which one you have will guide your repair plan.
-
Corrosion and rust: Moist exhaust or condensation can eat away at metal pipes, creating pinholes, flakes, and weak spots.
If you see heavy scaling or the pipe literally falls apart, replacement is usually the only safe option. -
Loose or separated joints: Over time, screws loosen, sealants dry out, and joints can pull apart, opening gaps
that leak exhaust into attics, basements, or wall cavities. -
Blockages: Bird nests, leaves, wasp nests, snow, or internal scale buildup can partially or fully block the flue,
leading to poor draft and potential CO issues. -
Improper slope: Horizontal runs should usually slope upward towards the chimney or termination to help draft and drain any condensation.
A sagging pipe can trap moisture and soot. -
Leaking condensation: Especially on high-efficiency systems, poor insulation, improper pitch, or bad joints can cause
water leaks at seams or where the vent passes through walls or ceilings.
Essential Tools and Materials
Here’s what most homeowners use for small, basic furnace flue repairs:
- Work gloves and safety glasses
- Dust mask or respirator (for soot and insulation)
- Flashlight or headlamp
- Step ladder (if safe to use)
- Screwdriver or nut driver (for sheet metal screws)
- Sheet metal screws (self-tapping, sized for your pipe)
- Listed high-temperature foil tape or vent-rated sealant (follow code/manufacturer guidance)
- Replacement vent sections, elbows, and collars compatible with your system
Always check your furnace manual to confirm which materials are approved. Some vent systems must use specific brands or pipe types to
keep warranties and safety listings valid.
Step-by-Step: How to Inspect a Furnace Flue
Before you repair anything, you need a clear picture of the flue’s condition from the furnace all the way to the termination.
Step 1: Turn Off Power and Fuel
Turn the furnace off at the thermostat and at the service switch or breaker.
If you’ll be working directly on the vent connection, shut off the gas at the shutoff valve near the furnace as well.
This reduces the risk of the furnace firing while you’re in the way.
Step 2: Inspect the Flue at the Furnace
Remove the furnace front panel (if applicable) and look where the flue connects to the draft hood or exhaust collar:
- Check for rust streaks, white powdery deposits, or soot around the joint.
- Look for gaps where the pipe meets the collar.
- Gently wiggle the pipe it should be solid, not loose or rattling.
Step 3: Follow the Flue Path Indoors
Using a flashlight, follow the flue as it travels through the basement or utility room, and into the ceiling or wall:
- Look for areas where the pipe is crushed, dented, or sagging.
- Check that all joints are overlapped in the direction of exhaust flow (upwards or towards the chimney).
- Note any spots where the pipe touches combustible materials like woodthis may violate clearance requirements.
Step 4: Inspect the Exterior Portion
If it’s safe, inspect the termination outdoors (at a side wall or roof):
- Verify that caps and terminations are intact, not missing or broken.
- Look for bird nests, leaves, snow, or other blockages at the outlet.
- Check for rust streaks or water stains under the termination or along the chimney.
If you’re not comfortable climbing on a roof, don’t. A chimney or HVAC pro can do a more thorough top-down inspection,
often using mirrors or cameras.
Minor Furnace Flue Repairs You Can Tackle
Some small furnace flue issues are realistic DIY projects for a careful, handy homeowner. If you run into anything that seems more serious than these, stop and call a pro.
1. Tightening Loose Joints
If metal flue joints have worked loose but the pipe is still structurally sound:
- Turn off the furnace and wait for the flue to cool.
- Push the male end of the pipe fully into the female end so the seam is tight and properly overlapped.
- Secure the joint with at least three evenly spaced sheet metal screws.
- Seal around the joint with approved high-temperature foil tape or vent-rated sealant if allowed by code and the manufacturer.
Avoid wrapping joints with ordinary duct tapeit will dry out, crack, and fail under heat.
2. Replacing a Short Section of Rusted Flue
If one accessible section of pipe is rusted through but the rest looks solid, you may be able to replace just that segment.
Basic steps often look like this:
- Measure the existing pipe diameter and length accurately.
- Buy matching vent pipe (same diameter, same type single-wall, B-vent, or manufacturer-specific PVC).
- Remove the screws holding the old section and carefully slide it out.
- Dry-fit the new section, making sure it maintains proper slope and alignment.
- Secure with screws at each joint and seal per code and manufacturer guidelines.
If you find that multiple sections are failing, or the flue crumbles in your hands, that’s a sign the entire system may need professional replacement.
3. Clearing Minor Blockages
For small obstructions at the outdoor termination (like leaves or a shallow bird nest near the opening), you can usually:
- Wear gloves and remove loose debris by hand.
- Use a small brush or shop vacuum (from the outside) to clear light buildup.
- Visually confirm that air can move freely through the vent.
Never push debris further into the flue where it can become a hidden blockage. If you suspect deeper or heavier buildup,
schedule a professional chimney or flue cleaning.
4. Addressing Minor Condensation Issues
If you see light water staining at a joint or exterior section of pipe:
- Confirm the vent has the correct uphill slope towards the termination.
- Insulate cold sections (if allowed) to reduce condensation.
- Reseal joints with appropriate foil tape or vent sealant.
Persistent or heavy leaking around a furnace vent may indicate incorrect vent sizing or other design issues that require professional evaluation.
Flue Problems That Need a Professional
Some furnace flue issues are beyond safe DIY territory, no matter how many tools you own or how many videos you’ve watched.
- Cracked or missing chimney liners: These can leak CO and heat into walls and attics, increasing both poisoning and fire risk.
- Improperly sized vents: Vent sizing must follow tables and codes based on BTU input, height, length, and number of elbows.
- Complex vent sharing: When multiple appliances (like a water heater and furnace) share one flue, codes limit how this can be done safely.
- Severe corrosion throughout the flue: If everything is rusted and thin, replacement of the entire system is typically safer than patching.
- Evidence of backdrafting: Soot staining, melted plastic near the draft hood, or CO detector alarms demand immediate professional attention.
A licensed pro can also pull any required permits, verify compliance with local fuel gas and mechanical codes, and document the repair for insurance or future home sales.
Preventive Maintenance: Keeping Your Flue in Good Shape
The best furnace flue repair is the one you never need to make. A few habits can drastically reduce your risk of serious flue problems:
- Annual professional inspection: Have your furnace and venting inspected every year before heating season.
- DIY visual checks: Do a quick visual inspection of accessible flue sections at least once per season, looking for rust, stains, or loose joints.
- Keep terminations clear: Make sure outdoor vents and chimney caps stay free of nests, leaves, snow, or ice.
- Maintain proper combustion air: Don’t block furnace room vents or close off mechanical rooms tightly without a design for fresh air supply.
- Monitor CO detectors: Install carbon monoxide detectors on each level of your home and test them regularly.
Quick FAQ About Furnace Flue Repair
Can I just seal a hole with tape?
For small gaps at joints, approved high-temperature foil tape or vent sealant may be acceptable, but only if the pipe is otherwise in good shape and
the repair is consistent with code and manufacturer instructions. Large holes or extensively rusted sections require pipe replacement, not just patching.
Do I need to shut off the gas to work on the flue?
You should always shut off power to the furnace and let it cool. If you’ll be disconnecting or disturbing the connection at the appliance,
it’s smart to shut off the gas at the service valve as well, especially if there’s any chance the furnace could try to fire while the vent is disconnected.
How often should a furnace flue be replaced?
There’s no one-size-fits-all timeline. Some flues last decades; others fail sooner due to moisture, poor installation, or corrosive combustion byproducts.
Replace any venting that shows structural damage, multiple holes, or heavy scaling, and follow your HVAC professional’s recommendation based on inspection.
Conclusion
Learning how to repair a furnace flue is partly about tools and hardware, and partly about knowing your limits.
You can tighten loose joints, replace a short section of rusted pipe, and clear a minor blockage all while staying within safe DIY territory.
But when the flue is heavily corroded, incorrectly sized, or tied into a complicated chimney system, the right “repair” is calling in a pro.
Treat your furnace flue like any other critical safety system in your home: inspect it regularly, fix small issues quickly,
and don’t ignore warning signs like rust streaks, water stains, or CO detector alarms. With the right mix of homeowner maintenance
and professional support, your flue can quietly do its job for many years moving the bad stuff out so your home stays warm, safe, and comfortable.
meta_title: How to Repair a Furnace Flue Safely
meta_description: Learn how to repair a furnace flue safely, spot common vent problems, and know when to call a pro to prevent carbon monoxide leaks.
sapo:
A damaged furnace flue is more than an eyesore it’s a serious safety risk that can leak carbon monoxide and moisture into your home.
This in-depth guide walks you through how furnace flues work, how to spot common problems like rust, loose joints, and blockages,
and which simple repairs a careful DIYer can handle. You’ll also learn when to stop and call a licensed HVAC or chimney professional,
how building codes and venting standards affect your options, and the best maintenance habits to keep your system running safely for the long haul.
keywords: furnace flue repair; furnace vent pipe; how to repair a furnace flue; gas furnace exhaust vent; high efficiency furnace venting; chimney flue maintenance; carbon monoxide furnace safety
Real-World Experiences: What Homeowners Learn When Fixing Furnace Flues
Reading about furnace flue repair is one thing. Standing in the basement at 10 p.m. in your oldest sweatshirt, holding a rusty vent pipe that just
crumbled in your hands, is another. Here are some real-world style experiences and lessons that homeowners tend to learn the hard way.
“It Looked Fine… Until I Touched It”
Many people first suspect a flue problem because they notice a little rust streak or a faint water stain on the pipe.
It’s easy to ignore at first (“I’ll deal with that after the holidays”). Then one day they finally reach up to check it and the pipe feels soft,
flakes away, or literally splits at a seam.
The big takeaway: surface rust can be the tip of the iceberg. What you see on the outside may represent much deeper corrosion inside the pipe.
If a light touch causes the metal to crumble, replacement is the safest path, even if the rest of the flue “looks okay” from a distance.
The Surprise of Hidden Blockages
Another common experience: everything looks fine inside, but the furnace keeps shutting off or a CO detector near the mechanical room keeps chirping.
A pro comes out, goes to the roof or wall termination, and finds a bird nest, leaves, or a wad of insulation stuffed into the flue opening.
Homeowners are often shocked to learn how attractive a warm, sheltered flue opening looks to birds and critters.
The lesson here is to treat the vent termination as part of your seasonal checklist, just like cleaning gutters or changing furnace filters.
A quick glance a couple of times a year can prevent a serious blockage and an emergency call.
Underestimating Code and Manufacturer Rules
A lot of DIYers assume vent pipe is vent pipe: if it’s the same diameter and roughly the same length, it’s fine. Then they install generic
plumbing PVC on a high-efficiency furnace, or swap a section of listed B-vent with single-wall pipe, not realizing they’ve just violated
both manufacturer instructions and fuel gas codes.
They usually find out during a home inspection when they sell the house, or when a technician refuses to service the furnace until the venting is corrected.
It can be an expensive surprise.
The experience-backed advice: always check your furnace manual before buying vent materials.
It will spell out which pipe types and fittings are allowed, maximum run lengths, and how many elbows you can use.
It might not be thrilling reading, but it’s a lot cheaper than tearing out a brand-new but non-compliant vent system.
Discovering How Much Moisture Is In Exhaust
High-efficiency furnaces create a lot of moisture as part of the condensing process. Many homeowners first realize this when they notice
water dripping from vent joints, staining ceiling drywall, or pooling at the base of the chimney chase.
Once they dig in, they find a combination of issues: vent lines without enough slope, undersized drain tubing, or poorly insulated runs that
let flue gases cool too quickly. After a pro corrects the slope and insulates the right sections, the “mystery leak” disappears.
That story usually ends with a new habit: when you see a water stain near furnace venting, don’t assume it’s a roof leak.
Check the vent route and joints as well you might catch a venting problem long before it turns into a big repair.
Respecting the Limits of DIY
One of the most valuable lessons people learn from dabbling in furnace flue repair is where their comfort zone ends.
Tightening a few screws and resealing a joint feels manageable. Realizing that the entire flue is mis-sized for the furnace,
or that the chimney liner is cracked, is a different beast.
Homeowners who’ve been through that tend to take a practical approach the next time: they’ll handle simple, visible issues themselves
and bring in a pro for anything involving design, code interpretation, or complex chimney work.
They also tend to budget for annual inspections, because they’ve seen how quickly a “small” flue issue can snowball.
In short, real-world experience reinforces what the best furnace-flue guides already say:
do what you safely can, but don’t be afraid to call for backup.
A properly installed and maintained flue is an invisible hero of your heating system and it deserves the same respect as the furnace itself.