Table of Contents >> Show >> Hide
- Before You Start: What You’re Removing (And Why It Matters)
- The 8-Step Method for Removing Tight Dowel Pins
- Step 1: Inspect, Measure, and Choose the “Least Violent” Plan
- Step 2: Stabilize the Work and Protect the Surfaces
- Step 3: Clean and SoakMake Penetrating Oil Do the Boring Work
- Step 4: If the Pin Sticks Out, Grip, Twist, and Pull (Gently)
- Step 5: Use the Right PullerCollet-Style Dowel Pin Pullers and Slide Hammers
- Step 6: Use Heat (and Sometimes Cold) to Break the Grip
- Step 7: The Drill-and-Tap Pull (Best for Blind-Hole Dowel Pins)
- Step 8: Last ResortsCollapse, Split, Weld, or Outsource (EDM)
- Troubleshooting: Common Dowel Pin Removal Problems
- After Removal: Clean, Inspect, and Prevent the Next Stuck-Pin Episode
- Frequently Asked Questions
- Real-World Shop Experiences: 500-ish Words of “Been There” Lessons
- SEO Tags
Tight dowel pins are fantastic at their day job (precision alignment) and absolutely terrible at quitting. If you’ve ever stared at a stubborn dowel pin thinking, “It’s just a tiny cylinderhow hard can it be?” congratulations: you’ve met the part that turns grown adults into poets of frustration.
This guide walks you through 8 practical, shop-tested steps for dowel pin removalstarting with gentle methods that protect the hole and moving toward “okay, now we’re getting serious” options like drill-and-tap pulls, heat/cold tricks, and last-resort extraction. The goal is simple: remove the pin without wrecking the bore, the mating surface, or your mood.
Before You Start: What You’re Removing (And Why It Matters)
“Dowel pin” is a family name. Your removal plan depends on what kind you’re dealing with and how it’s installed:
- Press-fit / interference-fit dowels (common in machinery and engine work): tight by design.
- Slip-fit dowels: should come out with modest persuasion; if not, corrosion or adhesive is involved.
- Blind-hole dowels: no exit path, so you must pull, collapse, or drill them.
- Through-hole dowels: you can usually drive them out from the back (lucky you).
- Internally threaded “pull-out” dowels: the VIPs of future-you convenience (they’re made to be removed).
Tools You’ll Want Nearby
- Safety glasses / face shield, gloves (especially if you’ll grind or drill)
- Penetrating oil, shop rags, nylon brush
- Small hammer, brass hammer (optional), pin punch set
- Locking pliers (Vise-Grips), small pry bar, thin shim stock
- Dowel pin puller kit or slide hammer (collet or jaw style)
- Heat gun or small torch (carefully), freeze spray or compressed-air “freeze” trick
- Center punch, cobalt/carbide bits, tap set, cutting fluid, bolts for pulling
- Calipers (to measure pin diameter) and a steady hand (to keep the hole centered)
The 8-Step Method for Removing Tight Dowel Pins
You’ll move through these steps in order. Stop as soon as the pin comes out cleanly. The best dowel pin removal is the one that leaves the hole looking like nothing happened.
-
Step 1: Inspect, Measure, and Choose the “Least Violent” Plan
First, confirm you’re actually dealing with a dowel pin (not a roll pin, taper pin, or broken fastener). Look for a split seam (roll pin), a tapered profile, or a mushroomed end.
Next: measure the pin diameter if you can. This helps you pick the right puller collet, punch size, andif neededthe correct drill/tap plan. Also check:
- Is it protruding? If yes, gripping/pulling might work.
- Is it in a blind hole? If yes, driving from behind isn’t an option.
- Is the surrounding part aluminum? Heat tricks work especially well because aluminum expands more than steel.
- Signs of adhesive? Shiny residue, “glued” feel, or prior assembly notes suggest threadlocker/retaining compound.
-
Step 2: Stabilize the Work and Protect the Surfaces
Tight pins don’t come out politely when the part is wobbling on your bench like a folding chair at a barbecue. Clamp the work securely with soft jaws, parallels, or wood blocks so you don’t mar critical faces.
Cover nearby machined surfaces with tape or thin shims to prevent accidental tool slips. Put on eye protectionbecause the laws of physics say the moment you skip safety glasses is the moment a metal chip discovers flight.
-
Step 3: Clean and SoakMake Penetrating Oil Do the Boring Work
Dowel pins get stuck for predictable reasons: corrosion, fretting, dried coolant, or a retaining compound. Start with cleaning. Brush away grime around the pin so penetrant can reach the interface.
Apply penetrating oil around the pin, then wait. Yes, wait. Think of it as letting chemistry do the first round while you avoid creating a problem that requires an even bigger solution.
- Pro move: Tap lightly around the pin with a small hammer after applying penetrant. The vibration helps it wick in.
- Time guide: 10–20 minutes for mild cases; several cycles (or overnight) for serious corrosion.
-
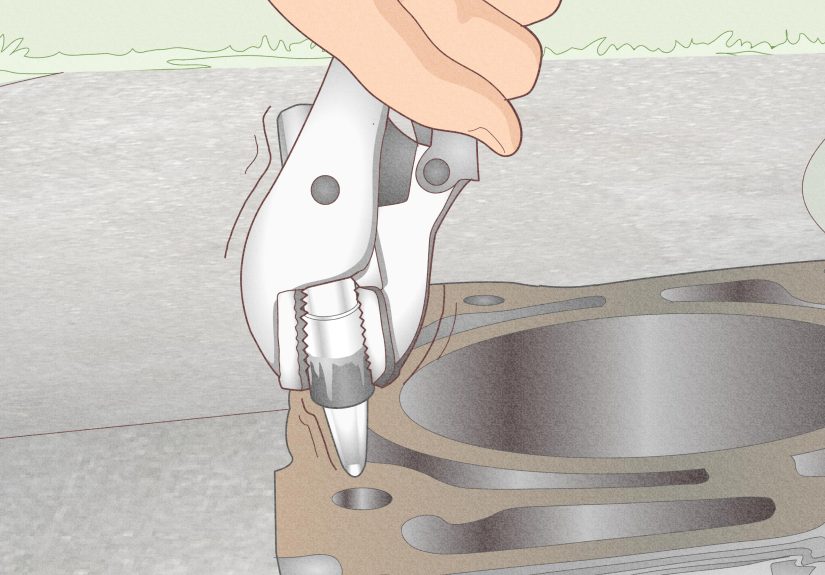
Step 4: If the Pin Sticks Out, Grip, Twist, and Pull (Gently)
If you’ve got even a little pin exposed, your best bet is often simple: lock it with quality locking pliers and twist while pulling. Twisting breaks the static friction that pure pulling fights.
Protect the surface: slip a thin shim under your pliers or use tape to avoid gouges. If the pin is long enough, you can also use two nuts on a threaded adapter (if it’s a pull-out style) and pull straight up.
Avoid: crushing the pin into an oval. Once you distort it, it can wedge tighter and damage the hole.
-
Step 5: Use the Right PullerCollet-Style Dowel Pin Pullers and Slide Hammers
When grip strength runs out, bring in purpose-built tools. A good dowel pin puller kit (often collet-style) grabs the pin evenly and pulls straightexactly what you want to protect the bore.
If you’re working with a blind-hole pin or a pin that refuses to budge, a slide hammer setup can apply sharp, controlled extraction force without you swinging a sledgehammer near precision surfaces (a classic way to become a cautionary tale).
- How it works: Attach the puller to the pin, then use the sliding weight to apply repeated pulling impacts.
- Why it helps: those impacts can break corrosion bonds better than constant force.
Keep everything aligned. Pulling at an angle is how you turn “tight pin” into “ruined hole.”
-
Step 6: Use Heat (and Sometimes Cold) to Break the Grip
Heat is your secret cheat codeespecially if the dowel is steel and the surrounding part is aluminum. Heat the surrounding metal (not the pin) so the hole expands slightly.
If you suspect a retaining compound or adhesive, localized heat can also weaken the bond. Work carefully: remove nearby seals, plastics, fuel residues, or anything that hates heat.
- Heat options: heat gun (safer), small torch (faster but riskier).
- Cold options: freeze spray on the pin to shrink it slightly and crack corrosion.
- Combo technique: warm the surrounding part, then chill the pinexpansion plus contraction can create the tiny clearance you need.
Safety note: many penetrants and aerosols are flammablekeep flames and sparks away, ventilate well, and wipe excess product before applying heat.
-
Step 7: The Drill-and-Tap Pull (Best for Blind-Hole Dowel Pins)
This is the workhorse method for a dowel pin stuck in a blind hole. The concept is simple: drill a centered hole into the pin, tap it, thread in a bolt, then pull with a slide hammer or a steady pulling setup.
How to do it without turning the hole into abstract art
- Center punch carefully. If you start off-center, you’ll drift into the parent metal.
- Spot drill. A short, rigid bit (or carbide spot drill) helps you start true.
- Drill progressively. Step up sizes, use cutting fluid, and keep the drill square.
- Tap slowly. Back out to clear chips. Don’t snap the tapbecause then you’re removing a dowel pin and hardened tap shards (a two-for-one deal nobody wants).
- Pull straight. Thread in a hardened bolt or adapter and use a slide hammer or a puller bridge.
Tip: many hardened dowel pins are tougher on the surface; starting with the right drill (and patience) matters. If your bit skates, you may need a carbide tool and a rigid setup.
-
Step 8: Last ResortsCollapse, Split, Weld, or Outsource (EDM)
If the pin is broken flush, severely seized, or you’ve already tried steps 1–7, it’s time for “precision aggression.” Choose the least damaging option for your part and equipment:
- Collapse method: drill a larger hole through the dowel (still centered), then use a small chisel or punch to collapse the thin wall inward. This reduces the interference and lets it come out.
- Split method: if you can access it with a tiny burr or end mill, cut a relief slot in the dowel to relieve pressure, then pull it.
- Weld-a-handle method: in some cases, you can weld a nut or stud onto the dowel remnant and pull it out. (This adds heat plus a grip pointvery effective, but not for delicate assemblies.)
- Machine-shop option: if the part is expensive, the hole is critical, or the pin is hardened beyond sanity, a shop can remove it via EDM or controlled machining with minimal damage.
- Accept and repair: worst case, drill out, ream, and install an oversize dowel or bushingthen re-establish alignment properly.
The “right” last resort depends on what matters more: preserving the original hole size or simply saving the part. When alignment is critical (gearboxes, fixtures, engine components), hole damage can cost you far more than the dowel pin ever did.
Troubleshooting: Common Dowel Pin Removal Problems
“I grabbed it with locking pliers and it snapped off.”
That’s common when the exposed portion is weak or already stressed. Switch to drill-and-tap (Step 7) or use a puller that grips more evenly. If it snapped flush, you’re officially in Step 8 territory.
“The pin won’t drillmy bit just skates.”
That usually means you’re on a hardened surface with insufficient rigidity or the wrong bit. Use a sharper, more rigid starting tool (spot drill), slow RPM, firm feed, and consider carbide. Keep the work clamped; handheld drilling is a fast track to off-center holes.
“Heat didn’t help, and now everything smells like regret.”
Either the bond isn’t thermal (it’s mechanical/corrosion), the heat wasn’t applied in the right place, or an adhesive is still holding on. Focus heat on the surrounding part, try the heat-and-freeze combo, and then pull immediately while conditions favor you.
After Removal: Clean, Inspect, and Prevent the Next Stuck-Pin Episode
- Deburr lightly: remove raised edges around the hole with a deburring tool or fine stone.
- Check alignment surfaces: look for galling or ovaling; if the hole is damaged, consider reaming or bushing.
- Use smarter pins next time: internally threaded pull-out dowels are a gift to future maintenance.
- Consider anti-seize or appropriate assembly practice: especially in corrosion-prone environments (but avoid contaminating precision fits).
- Document adhesives: if a retaining compound was used, note itso the next teardown doesn’t become a mystery novel.
Frequently Asked Questions
Can I just hammer a tight dowel pin out?
If it’s a through-hole dowel and you can drive it out straight with a proper punch and support, yessometimes. But hammering is how holes get peened, edges get mushroomed, and alignment gets “creative.” Pulling methods are usually safer.
What’s the safest method for a blind-hole dowel pin?
A dedicated dowel pin puller (collet style) or the drill-and-tap pull method is typically the safest blend of control and effectiveness. The key is staying centered and pulling straight.
How do I avoid damaging the hole?
Keep everything aligned, avoid prying against finished faces, use controlled force, and don’t rush drilling. Most hole damage happens from off-axis pulling or off-center drillingnot from the pin “being stubborn.”
Real-World Shop Experiences: 500-ish Words of “Been There” Lessons
Let’s talk about the part nobody admits in polite company: dowel pins don’t just get “stuck.” They get stuck on days when you’re already behind schedule, your coffee has gone cold, and you promised yourself you wouldn’t use any new swear words at work.
One of the most common scenarios is the “just enough sticking out to be tempting” pin. You clamp down with locking pliers, you pull, and you feel that glorious first millimeter of movement… and then the pin shears off like it’s offended by your optimism. The lesson: twisting helps, but crushing does not. If the pin is small or hardened, gripping too aggressively can deform or snap it before it ever releases. Now you’ve traded a straightforward pull for a flush, blind-hole problem.
Another classic: the aluminum housing with steel dowels. This is where heat earns its keep. I’ve seen pins that laughed at penetrant and pliers come out politely after a controlled heat cycle on the surrounding aluminum. The trick is aiming your heat where it matterson the boss around the pinthen pulling quickly while the expansion is working for you. Heat too broadly and you warm the pin right along with the housing, which defeats the point. Heat too aggressively and you risk discoloration, warped surfaces, or collateral damage to seals and nearby parts. A heat gun often wins here because it’s slower and less dramatic (and “less dramatic” is surprisingly useful in metalwork).
Then there’s the drill-and-tap methodreliably effective, but it rewards patience and punishes shortcuts. The first time you do it, you learn that “centered” is not a vibe; it’s a requirement. A carefully placed center punch, a rigid spot drill, and stepping up drill sizes can mean the difference between “pin removed, hole perfect” and “pin removed, hole now has an exciting new personality.” Tapping is the second test of character. If you rush, pack chips, or cock the tap, it can break and removing a broken tap is like trying to un-bake a cake.
My favorite “magic trick” stories come from hydraulic-style ideasdrilling through the pin and using grease to push it out. When it works, it’s deeply satisfying: force applied evenly, pin pops up, and you feel like you cheated. When it doesn’t, it’s usually because the seal isn’t good or the path for pressure is leaking. Still, it’s a clever method worth remembering in the right situation.
Finally, the grown-up moment: knowing when to stop and outsource. If you’re dealing with a high-value component, a hardened dowel in a critical alignment bore, or a pin that’s fused in place by years of corrosion, there’s no shame in calling a machine shop for EDM or precision removal. Pride is expensive. The smartest dowel pin removal is the one that preserves the partand lets you sleep without replaying the sound of a drill bit drifting off-center in your head.


