Table of Contents >> Show >> Hide
- Table of Contents
- Why Terracotta + Broken China Works So Well
- Supplies and Tools (Two Adhesive Options)
- Safety First (Because Shards Are Not a Vibe)
- Step 1: Prep and Seal the Pot
- Step 2: Break and Shape the China
- Step 3: Dry-Layout Your Design
- Step 4: Attach the Pieces
- Step 5: Grout Like You Mean It
- Step 6: Cure and Seal for Longevity
- Planting Tips (Drainage, Watering, and Pot Health)
- Troubleshooting: Fixes for Common Mosaic Problems
- The DIY Experience: What Making a Broken-China Mosaic Pot Feels Like ()
- Final Thoughts
Somewhere between “I should really declutter this cabinet” and “I refuse to throw out Grandma’s chipped teacup,” there’s a very satisfying craft: turning broken china into a mosaic that makes plain terracotta pots look like boutique garden art. It’s part upcycle, part puzzle, part therapy and yes, part “please don’t step on that shard.”
This guide walks you through a durable, outdoor-friendly method (plus a simpler indoor option), with real-world tips for getting clean grout lines, preventing tiles from popping off, and keeping your pot healthy for plants. You’ll finish with a one-of-a-kind planter that looks expensive and sentimental at the same timelike if a thrift store and a Mediterranean villa had a baby.
Table of Contents
- Why Terracotta + Broken China Works So Well
- Supplies and Tools (Two Adhesive Options)
- Safety First (Because Shards Are Not a Vibe)
- Step 1: Prep and Seal the Pot
- Step 2: Break and Shape the China
- Step 3: Dry-Layout Your Design
- Step 4: Attach the Pieces
- Step 5: Grout Like You Mean It
- Step 6: Cure and Seal for Longevity
- Planting Tips (Drainage, Watering, and Pot Health)
- Troubleshooting: Fixes for Common Mosaic Problems
- of “What It Feels Like” (The DIY Experience Section)
- SEO Tags (JSON)
Why Terracotta + Broken China Works So Well
Terracotta is porous, lightweight, and easy to findbasically the “white tee” of planters. Mosaic gives it personality and protection. Broken china is ideal mosaic material because it already has glaze (shiny color!), patterns, and a pleasing thickness that reads “artisan” when grouted.
The one thing to understand: terracotta’s porosity can also be your enemy. Moisture can migrate through the clay, stress adhesives, andover time encourage tiles to loosen, especially outdoors. That’s why prep, adhesive choice, and sealing matter if you want your pot to survive real weather instead of living forever on a dry porch like a decorative introvert.
Supplies and Tools (Two Adhesive Options)
Core supplies
- Terracotta pot (start with 6–10 inches tall for your first one)
- Broken china / old plates / teacups (washed and fully dry)
- Tile nippers (recommended) or a hammer (with containment)
- Work gloves + safety glasses
- Sandpaper (medium grit) or a wire brush
- Painter’s tape (optional, for clean edges)
- Sponges + microfiber cloths
- Grout float or an old gift card (the true hero of DIY)
- Bucket + mixing stick (or disposable bowl for small batches)
Adhesive option A (best for outdoor pots): thinset mortar
- Polymer-modified thinset mortar (powder you mix with water)
- Putty knife / palette knife
Why choose this: Thinset is cement-based and designed to bond tile to surfaces in wet or exterior conditions. If your pot will live outdoors, this is the sturdier choice.
Adhesive option B (easier for indoor/sheltered pots): craft/tile glue
- Strong PVA-style craft glue or tile adhesive suitable for ceramics
Why choose this: It’s simpler, less messy, and great for pots that won’t face freeze/thaw cycles or constant soaking. If you’re making a gift for someone whose plants live indoors under loving neglect, this is totally fine.
Grout + sealing supplies
- Cement-based grout (sanded or unsandedmore on this in the grout section)
- Grout sealer (penetrating sealer or a suitable tile/grout sealer)
- Optional: terracotta sealer/primer (masonry sealer or acrylic sealer)
Safety First (Because Shards Are Not a Vibe)
Breaking china is the only part of this craft that can go from “cozy hobby” to “why is my sock bleeding?” Keep fragments contained: put plates in a thick zip-top bag or wrap in an old towel before tapping with a hammer. If using tile nippers, you still want eye protectionsmall chips can pop off.
Lead note (especially for vintage/brightly decorated pieces): Some older ceramics and glazes can contain lead. For a mosaic planter used as decoration, risk is generally lower than eating off the dish, but handle shards carefully, don’t sand or create dust unnecessarily, and wash hands after. If you’re unsure about an item’s safety, reserve it for purely decorative use and avoid placing it where kids might handle loose pieces.
Step 1: Prep and Seal the Pot
1) Clean and rough up the surface
New terracotta can be dusty. Rinse the pot, let it dry fully, then scuff the exterior lightly with sandpaper or a wire brush. This gives adhesive a better grip. Wipe off dust.
2) Decide your mosaic boundaries
Most people mosaic the outside only (recommended). Leave the bottom ring and drainage hole clear. Consider leaving the inside unlined so the pot can still “breathe,” but do plan to seal strategically (next step).
3) Seal/prime the terracotta (highly recommended for outdoor pots)
Terracotta wicks moisture. That moisture can push against adhesive and grout over time. Applying a terracotta/masonry sealer (or an acrylic sealer) helps reduce wicking. At minimum, seal the inside of the pot and the rim area; ideally, seal the whole pot (inside and outside) before mosaicking. Let the sealer cure per label directions.
Tip: If you love the natural terracotta look on the inside, seal it with a clear product so it still looks earthyjust less thirsty.
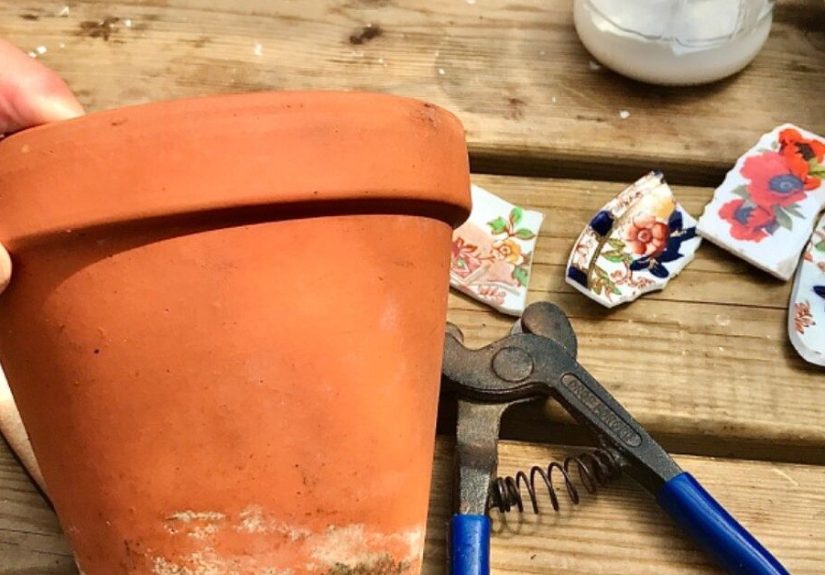
Step 2: Break and Shape the China
1) Break into manageable “tesserae”
Aim for a mix of sizes: larger pieces for quick coverage and smaller pieces for curves and gaps. If you’re using patterned china, try to preserve motif fragments (flowers, borders, that charming little sailboat) because those are your “wow” pieces.
2) Use tile nippers for control
Tile nippers let you trim edges, make small notches, and keep pieces from sticking out like tiny ceramic shark fins. If a shard has an extra pointy corner, nip it. Your future self (and anyone who ever brushes past the pot) will thank you.
3) Sort by color and thickness
Put pieces into little piles: whites/blues, warm florals, dark accents, etc. Also separate thick vs. thin. Thickness matters because your final surface looks smoother when pieces sit at similar heights.
Step 3: Dry-Layout Your Design
Dry-layout is the “no regrets” stage. Put the pot on a lazy Susan (or an upside-down bowl) and arrange pieces without adhesive first.
Design ideas that look fancy without being hard
- Random scatter: fastest, forgiving, and very “European patio.”
- Border + fill: use patterned rim pieces, then fill the body with solids.
- Medallion moment: place one motif (a rose, crest, or cameo) as the centerpiece.
- Color ombré: darker near the base, lighter toward the rim.
Keep grout lines in mind: consistent spacing looks intentional. Tiny gaps are okay; grout will fill them. Massive gaps make grout do all the work and can look like your mosaic is socially distancing.
Step 4: Attach the Pieces
Option A: Using thinset mortar (best outdoors)
- Mix a small batch. Thinset starts to firm up as you work. Mix to a peanut-butter consistency: spreadable, not drippy.
- Work in sections. Spread a thin layer on a 4–6 inch area with a palette knife.
- Press pieces in. Wiggle each shard slightly to seat it. Keep the glazed side out, obviouslyunless you’re going for “mosaic pot but make it sandpaper.”
- Mind the rim. Avoid sharp edges on the top rim where hands will touch. Use smaller, rounded pieces or keep the rim clean and paint it later.
- Let it cure. Follow your thinset’s cure time (often 24 hours) before grouting.
Option B: Using strong craft/tile glue (best indoors/sheltered)
- Apply glue to the back of a piece (or directly to the pot) and press firmly.
- Use painter’s tape to hold slippery pieces in place while drying, especially on curved sides.
- Let it dry fullydon’t rush. Grouting too early can shift pieces.
Step 5: Grout Like You Mean It
Grout is where the magic happens: it unifies the design, protects edges, and makes everything look finished. It also reveals every place you thought, “Eh, that gap is probably fine.” (It is fine. Mostly.)
Choose sanded vs. unsanded grout
- Unsanded grout: best for narrow joints (around 1/8 inch and smaller) and smoother finishes.
- Sanded grout: better for wider joints (over ~1/8 inch) because it’s stronger and less likely to shrink in larger gaps.
For broken china mosaics, many people end up with mixed joint widths. If most gaps are tiny, go unsanded. If your style is “bold grout lines,” choose sanded. Either way, read the bag directions and mix correctlygrout consistency matters more than your playlist.
How to grout a mosaic pot (cleanly)
- Protect the workspace. Put down paper or plastic. Grout has commitment issues: it will stick around.
- Mix grout to a thick paste. Let it “slake” (rest) if the product directions say so, then remix.
- Apply with a float or gloved hand. Push grout into gaps from multiple directions. Curves need extra attention.
- Let it set briefly. Wait until it starts to haze on the tile (often 10–20 minutes, but watch the surface).
- Wipe gently with a damp sponge. Rinse sponge often. Don’t flood with watertoo much water can weaken grout and wash it out of joints.
- Buff the haze. After it dries further, polish with a dry microfiber cloth.
Color tip: Light grout brightens and looks classic; dark grout makes patterns pop and hides dirt. Mid-tone grout is the “I can’t commit” optionand sometimes that’s perfect.
Step 6: Cure and Seal for Longevity
Cement grout needs time to cure. Don’t rush to seal immediately unless your product instructions say it’s okay. Once cured, apply a grout/tile sealer to help resist moisture and stainingespecially if the pot will live outside or be watered heavily.
Outdoor durability checklist
- Use thinset mortar for stronger bonding in wet/exterior conditions.
- Seal terracotta to reduce moisture wicking through the clay.
- Seal grout after it cures.
- In freeze/thaw climates, move pots to shelter in winter if possible.
Planting Tips (Drainage, Watering, and Pot Health)
Keep drainage working
Don’t mosaic over the drainage hole. If grout or adhesive clogs it, clear it with a skewer or drill bit (carefully) once everything is cured.
Expect the pot to behave differently
A sealed, mosaicked pot won’t “breathe” like raw terracotta. That means soil may stay moist longer. Great for thirsty plants; risky for plants that hate wet feet. If you’re unsure, choose plants that tolerate consistent moisture (many herbs, annuals, some tropicals) or be extra cautious with succulents and cacti.
Use a saucer or pot feet
Mosaic adds weight and sometimes changes how the base sits. Pot feet improve drainage and reduce water pooling underneath, which is kinder to grout over time.
Troubleshooting: Fixes for Common Mosaic Problems
Problem: Tiles pop off later
- Likely cause: terracotta wasn’t sealed, adhesive wasn’t suited for moisture, or cure time was rushed.
- Fix: scrape off old adhesive, reseal that area if needed, reattach with thinset, and regrout.
Problem: Grout cracks or shrinks
- Likely cause: grout too wet, joints too wide for unsanded grout, or movement from temperature swings.
- Fix: remove loose grout with a grout saw or small tool, regrout with correct consistency, cure, and seal.
Problem: Hazy film won’t come off
- Likely cause: grout haze left too long or not buffed.
- Fix: buff with a dry cloth; if stubborn, use a grout haze remover appropriate for ceramic (test in a small spot first).
Problem: Sharp edges feel dangerous
- Fix: add more grout to soften edges, or remove and replace the sharp piece with a smoother one. Safety is chic.
The DIY Experience: What Making a Broken-China Mosaic Pot Feels Like ()
The first experience most people have with broken-china mosaics is emotional whiplash: you start with a cracked plate that feels like trash, and within an hour you’re holding a handful of shimmering pieces like they’re treasure. There’s something oddly satisfying about deciding that a mistakea dropped dish, a chipped teacup, a thrift-store oddballstill deserves a spotlight. It’s like giving your stuff a second act, except the stuff is now intentionally covered in mortar and you’re calling it “garden art.”
The breaking stage is where your personality shows up. Some people are delicate and methodical, using tile nippers like a surgeon. Others go full cinematic: plate in a towel, one decisive hammer tap, dramatic pause. Either way, the moment you see a beautiful floral pattern split into mosaic-ready fragments, you realize you’re basically collaborating with chaos. You don’t fully control the piecesyou negotiate with them. And that negotiation becomes part of the charm: the curve of a shard suggests a border, a tiny blue fragment becomes the “sparkle” that pulls everything together, and a weird trapezoid piece somehow becomes the star of the whole pot because it fits perfectly where nothing else would.
Then comes dry-layout, which is quietly the most meditative part. You’re arranging, stepping back, rearranging, and suddenly time disappears. It’s like a jigsaw puzzle, but you’re allowed to change the picture. This is where people often discover their “mosaic style”: maybe you love tidy spacing and clear patterns, or maybe you’re an artsy gremlin who prefers a playful scatter of color. Both are valid. The pot doesn’t judge you. The pot just wants to be fabulous.
Attaching the pieces is when confidence and mess meet in the middle. Your first section might feel wobblylike everything is sliding, and you’re unsure if the adhesive is too thick or too thin. Then you find the rhythm: spread, press, wiggle, step back. By the time you’ve gone halfway around the pot, you’re making design decisions like a tiny, powerful architect. The outside world fades away. You’ll start noticing patterns everywhere: on mugs, on tile floors, in the way sunlight hits the glaze. Congratulations, you have mosaic brain now.
Grouting is the dramatic makeover reveal. The pot looks chaotic right before groutlike a craft store exploded. Then grout goes in, the lines clean up, the design suddenly feels cohesive, and you get that “oh WOW” moment. It’s also the stage where you learn patience, because rushing the wipe-down can pull grout out of joints, and over-wetting can weaken it. But once you buff off the haze and the china starts to shine, it feels like you didn’t just decorate a pot you built something. Something sturdy, personal, and oddly elegant for an object whose job is literally to hold dirt.
And the best part? Every time you water the plant, you’ll notice a new detail: a tiny rose fragment, a gold rim line, a bit of blue that catches the light. Your planter becomes a little memory containerproof that broken things can be reassembled into something even better looking than before. Also proof that you now have a very specific opinion about grout.
Final Thoughts
Mosaic terracotta pots with broken china are equal parts practical and poetic: you’re reinforcing a humble planter, upcycling old ceramics, and creating a piece that’s genuinely durable when built with the right materials. Start simple, focus on good prep and cure times, and remember: grout forgives a lot. Your garden will look more curated, your “broken stuff” pile will shrink, and your plants will get to live in something that feels like a tiny ceramic party.


