Table of Contents >> Show >> Hide
- Why Oversized DIY Bats Work So Well for Halloween
- Choose Your Build Style Before You Start
- Materials You May Need
- How to Make Oversized DIY Bats: Easy Paper Method
- How to Make Oversized Outdoor Bats
- Best Places to Display Oversized Halloween Bats
- How to Make Your Bat Display Look Better, Not Busier
- Common Mistakes to Avoid
- Budget, Timing, and Difficulty
- How to Store Oversized DIY Bats After Halloween
- The Experience of Making Oversized DIY Bats for Halloween Fun
- Final Thoughts
Some Halloween decorations whisper. Oversized DIY bats absolutely do not. They swoop, they swarm, they turn an ordinary front door into a full-blown spooky spectacle, and they do it without requiring a fog machine, a 12-foot skeleton, or a second mortgage. If you want a Halloween project that looks dramatic, photographs beautifully, and makes your house seem like it’s hosting a tiny bat convention, giant handmade bats are a fantastic place to start.
The beauty of this project is that it works at almost any skill level. You can make oversized bats from lightweight paper and cardstock for walls, doors, and indoor displays, or build larger outdoor bats from sturdier materials for porches, bushes, fences, and yard décor. Either way, the basic idea is the same: create a recognizable bat silhouette, add dimension so the wings look alive, and arrange the bats in a way that suggests motion. Translation: don’t line them up like they’re waiting at the DMV.
In this guide, you’ll learn how to make oversized DIY bats for Halloween fun, which materials work best, how to style them so they look more impressive than cheesy, and how to avoid the classic mistakes that make handmade decorations look less “haunted manor” and more “craft store tornado.”
Why Oversized DIY Bats Work So Well for Halloween
Halloween décor is at its best when it creates a mood fast. Bats do that almost instantly. They’re iconic, graphic, and easy to recognize from a distance. Even better, their shape naturally suggests movement. A bat with folded wings looks fine; a bat with slightly bent wings looks like it’s mid-flight and plotting tiny dramatic crimes.
Oversized bats also give you a lot of visual impact for a pretty reasonable budget. A stack of black paper, foam board, trash bags, hangers, zip ties, tape, and a little patience can create decorations that cover a doorway, climb a staircase, skim across a window, or hover above shrubs. You are basically buying big spooky energy for small spooky money.
From an SEO point of view, this is also why “DIY Halloween bats,” “oversized bat decorations,” “Halloween porch bats,” and “paper bat wall décor” are popular search themes every fall. People want something easy, striking, and adaptable. Giant bats check every box.
Choose Your Build Style Before You Start
Before you grab scissors and go full midnight crafter, decide which type of oversized bat you want to make. There are two main approaches.
1. Lightweight oversized bats for walls, doors, and windows
This version uses black cardstock, poster board, foam board, or lightweight craft paper. It’s ideal for indoor walls, front doors, glass, mantels, staircases, party backdrops, and apartment-friendly decorating. It is easier, cheaper, and faster. It is also less likely to start a crafting argument with your glue gun.
2. Sculptural oversized bats for outdoor displays
This version uses sturdier materials such as plastic hangers, heavy-duty trash bags, foam insulation, zip ties, electrical tape, and hot glue. These bats look larger and more dramatic, especially outdoors, because the frame gives them bulk and shape. If you want giant bats hovering over your porch or lawn like they pay rent there, this is your move.
Materials You May Need
For paper or cardstock oversized bats
- Black cardstock, poster board, or heavyweight craft paper
- Bat template or printed silhouette
- Scissors or craft knife
- Pencil or white pencil for tracing
- Bone folder, ruler, or the back of a butter knife for creasing wings
- Painter’s tape, removable adhesive, tack putty, or double-sided tape
For sturdier outdoor oversized bats
- Black plastic hangers
- Heavy-duty black trash bags
- Zip ties in small and medium sizes
- Pipe foam insulation or similar lightweight tubing
- Black electrical tape
- Hot glue
- Black faux fur or textured fabric for the body, optional
- Wire cutters and scissors
Optional extras for extra drama
- Fishing line for hanging bats from ceilings or tree branches
- Dowel rods or branches for bush and yard displays
- Black gaffer tape for hidden support
- Battery-operated uplights or warm spotlights
- Spray adhesive for large paper surfaces
How to Make Oversized DIY Bats: Easy Paper Method
If you want a fast and stylish result, start here. This method is great for creating a swarm effect over a front door, entry wall, staircase, or window.
Step 1: Pick three or four bat sizes
The secret to a realistic bat display is variation. Don’t make 20 identical bats unless your decorating theme is “clone cave.” Print or draw silhouettes in small, medium, large, and oversized versions. The mix of sizes creates motion and makes the arrangement feel intentional.
Step 2: Trace and cut the shapes
Trace each silhouette onto black cardstock, poster board, or foam board. If you want to save time, fold paper and cut multiple layers at once. That trick is especially useful when you need a whole colony and your wrist has already filed a complaint.
Step 3: Add dimension to the wings
This is the step people skip, and it’s exactly why some bat displays look flat. Lightly score or crease the wing lines so each wing bends slightly forward or backward. A gentle fold makes the bat look like it’s in motion instead of taped to the wall in defeat.
Step 4: Plan your layout before sticking anything up
Arrange the bats on the floor first. Think of the display as a flowing shape, not random confetti. You can create a swirl moving up a staircase, an arc over a doorway, or a diagonal flight path across a wall. Larger bats should anchor the layout, while smaller ones fill in the motion.
Step 5: Attach with removable adhesive
Use painter’s tape, tack putty, or other removable adhesive for most indoor surfaces. For doors, windows, and smooth painted walls, use just enough adhesive to hold the center body while leaving the wings free. That little lift at the edges is what gives the display life.
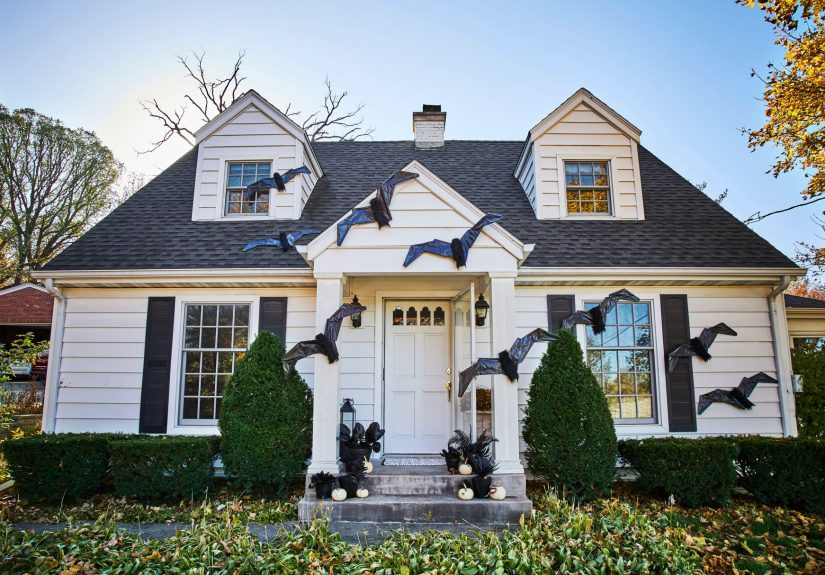
How to Make Oversized Outdoor Bats
If you want bats big enough to make your neighbors pause mid-dog-walk, build the sculptural version. This style is especially effective on porches, fences, bushes, and yards because it stands up better outdoors and reads clearly from farther away.
Step 1: Build the wing frame
Use black plastic hangers to form the basic wing structure. Arrange them so the hooked and angled parts create a broad wing span. Secure the pieces together with zip ties. You do not need perfect geometry here. Bats are spooky, not symmetrical little accountants.
Step 2: Add shape with foam insulation
Attach cut sections of pipe foam insulation where you want thickness or curve, especially along the body or inner wing sections. This gives the bat a fuller silhouette and helps it hold its shape once covered.
Step 3: Cover the frame
Stretch heavy-duty black trash bags or black plastic sheeting over the frame and secure the material tightly with electrical tape, hot glue, or additional zip ties. Trim the edges to define the wing shape. Keep the outer edge jagged enough to suggest bat wings, but not so jagged that it looks like the bat lost a fight with hedge clippers.
Step 4: Make the body
Create a central body from rolled plastic, foam, or insulation, then wrap or cover it in black faux fur or fabric if you want extra texture. Attach it firmly between the wings. A textured body makes the bat look more finished and less like a flying garbage bag, which is not the Halloween vibe we’re chasing.
Step 5: Hang or stake the bat
For porch displays, suspend the bat from hooks, branches, or beams with fishing line or heavy string. For yard or shrub displays, attach the bat to dowels, rods, or branches and secure them into the ground or containers filled with sand. Place the biggest bats higher up and angle the wings slightly for a more active silhouette.
Best Places to Display Oversized Halloween Bats
Front door and entryway
This is the classic look for a reason. A cloud of bats flying across or around the front door feels dramatic, festive, and very photo-friendly. It turns your entry into a Halloween focal point without cluttering it with too many props.
Windows
Bats on windows look fantastic during the day, but they really shine at night when indoor light creates a silhouette effect. You can tape paper bats to the glass, use removable window-friendly methods, or paint washable bat silhouettes on the inside if you want a more graphic look.
Staircases and hallways
If you’re decorating indoors, guide the bats upward along a staircase wall or through a hallway. It makes the display feel like it’s moving through the house instead of just sitting there waiting for attention.
Shrubs, bushes, and garden beds
Foam-core or framed bats mounted on rods can “fly” out of landscaping. This looks especially good when arranged in staggered heights, with the largest bats at the back and medium ones lower in front.
Party backdrops and dessert tables
Oversized bats behind a dessert table, drink station, or Halloween photo booth add instant style. Pair them with pumpkins, candles, lanterns, and a dark tablecloth for a setup that says, “Yes, I did think about the aesthetic. No, I will not apologize.”
How to Make Your Bat Display Look Better, Not Busier
Good Halloween decorating is about composition. A huge flock of bats can look chic and spooky or like a black paper traffic jam. The difference is editing.
Stick to one main movement pattern. Let the bats swirl upward, drift across the wall, or explode outward from one corner. Avoid scattering them randomly everywhere. Also, leave negative space. The empty space around the bats is part of what makes them look dramatic.
Lighting matters, too. A warm porch light, soft uplighting, or even indoor lamp glow can make silhouettes pop. If you’re displaying bats on a dark wall, create contrast with a lighter background element such as a window frame, trim, mirror, or painted door.
Common Mistakes to Avoid
Using flimsy paper outdoors
Construction paper and thin craft paper may survive for approximately nine minutes if the weather is feeling generous. For exterior use, choose stronger materials or a structured frame.
Making every bat the same size
Uniformity kills the illusion of motion. Vary the scale so the display feels dynamic.
Flattening the wings
Creased or curved wings create shadows and dimension. Flat wings create sadness.
Using the wrong adhesive
Always test a small area first. Some surfaces need delicate painter’s tape, some do better with tack putty, and some outdoor setups need removable weather-resistant hooks or stronger supports.
Ignoring the weather
Wind, humidity, and rain are undefeated champions. If you’re decorating outdoors, reinforce attachment points and choose materials that can handle the conditions for at least the length of the season.
Budget, Timing, and Difficulty
A paper bat wall or door project can usually be completed in one afternoon, especially if you’re using templates and pre-planning the layout. A larger outdoor bat may take more time, but the visual payoff is bigger. In most cases, the project is still far more affordable than buying oversized premade décor, especially if you already have basic craft supplies at home.
Difficulty-wise, this is one of the friendlier Halloween DIY projects out there. You do not need advanced crafting skills. You mostly need patience, sharp scissors, and the emotional strength to cut out “just a few more bats” when you thought you were done 20 minutes ago.
How to Store Oversized DIY Bats After Halloween
Do future-you a favor and store them properly. Flat paper bats can be stacked between sheets of cardboard or tucked into a large art portfolio. Foam-core bats should be stored flat when possible. Sculptural outdoor bats can be wrapped loosely in plastic and placed in a storage bin, but avoid crushing the wings or body shape.
Label the container clearly. Do not toss the bats into a random holiday bin with tangled lights, rogue ornament hooks, and one haunted extension cord. That is how craft projects go to die.
The Experience of Making Oversized DIY Bats for Halloween Fun
There is something weirdly delightful about making oversized bats for Halloween. At first, the project seems almost too simple. You trace a shape, cut some paper, bend a few wings, and tell yourself this will be a quick little seasonal craft. Then you tape the first bat to the wall, step back, and realize one bat alone looks less “gothic masterpiece” and more “lonely fruit bat with a dream.” So you make three more. Then ten more. Suddenly you are standing on a chair at 9:40 p.m., covered in paper scraps, emotionally committed to a flock.
That is part of the fun. Oversized DIY bats are one of those rare decorations that reward momentum. Every additional bat makes the display look better. Every variation in size adds movement. Every slightly bent wing catches light differently. The project starts as basic cutting and taping, but it quickly becomes visual storytelling. You are no longer decorating a wall; you are directing a tiny spooky action scene.
Another great part of the experience is how flexible the project feels in real life. If you live in a house, bats can take over the front porch, swirl around the door, or hover above shrubs. If you live in an apartment, bats can sweep across a window, mirror, hallway, or entry nook and still make a major statement. This is not one of those crafts that demands a farmhouse porch, a giant budget, or a garage full of tools. It adapts. It plays nice with small spaces. It also plays nice with people who enjoy dramatic results and minimal nonsense.
There is usually one comedic moment in the process, too. Maybe your tape fails and a bat slowly glides off the wall like it has lost the will to haunt. Maybe one wing gets folded too hard and your bat looks oddly inspirational, like it is trying to become a motivational logo. Maybe the giant outdoor version starts out looking majestic and ends up resembling a villainous black kite until you adjust the body shape. This is normal. Halloween crafting has always included a brief stage called, “Trust the process, even though the process looks ridiculous.”
Once the bats are finally up, though, the payoff is excellent. In daylight, the silhouettes look crisp and graphic. At night, they feel cinematic. Porch lights and indoor lamps throw shadows that make the wings seem alive. Kids notice them immediately. Adults usually pretend they are just casually observing while secretly thinking, “Okay, that looks amazing.” And because bats are more playful than gory, the display can lean spooky without crossing into nightmare fuel territory.
That balance is probably why oversized DIY bats have become such a beloved Halloween decorating idea. They are dramatic without being expensive, stylish without being fussy, and handmade without looking homemade in the bad way. Most of all, they are fun. Not just fun to look at, but fun to build, tweak, and arrange until the whole setup feels right. It is the kind of project that turns decorating into part of the celebration itself, which is really the best kind of Halloween magic.
Final Thoughts
If you want a Halloween project with high impact, low intimidation, and plenty of room for creativity, oversized DIY bats are hard to beat. You can go simple with paper silhouettes, go bold with sculptural outdoor builds, or mix both methods for a layered display. Add a little dimension, vary the sizes, plan the movement, and your bats will look intentional, dramatic, and wonderfully spooky.
In other words, this is your sign to stop overthinking it, grab the black paper, and let your walls become gloriously batty.


