Table of Contents >> Show >> Hide
- Why Make DIY Artificial Flowers?
- Silk vs. Tissue Paper: Which One Should You Use?
- Tools & Materials
- Method 1: How to Make Realistic Silk Flowers (Fabric Petals + Wired Stem)
- Step 1: Pick a flower style and make a petal template
- Step 2: Stiffen the fabric (optional, but recommended)
- Step 3: Cut petals efficiently (without losing your mind)
- Step 4: Shape the petals (this is where they stop looking flat)
- Step 5: Build a center (bud or stamen)
- Step 6: Assemble the bloom in layers
- Step 7: Add sepals, leaves, and wrap the stem
- Example: A simple silk rose (quick blueprint)
- Method 2: How to Make Tissue Paper Flowers (Accordion “Pom-Pom” Style)
- Method 3: Giant Tissue Paper Flowers (Petal-by-Petal Wall Flowers)
- Realism Tricks: Color, Texture, and “Nature Doesn’t Do Perfect”
- Stems, Bouquets, and Arranging Like You Know a Florist
- Care, Cleaning, and Storage
- FAQ
- Workshop Notes: Real-World Experience Tips (The Stuff Tutorials Don’t Always Say)
- SEO Tags
Fresh flowers are gorgeous. They’re also dramatic. One minute they’re living their best life in a vase, the next they’re shedding petals like they’re
auditioning for a soap opera. If you want blooms that stay put, don’t need water, and never wilt on you out of spite, it’s time to learn the fine art of
making artificial flowers.
This guide covers two of the most popular (and most doable) DIY routes: silk (fabric) flowers that look impressively realistic, and
tissue paper flowers that are fast, budget-friendly, and surprisingly elegant once you know a few shaping tricks. You’ll get step-by-step
methods, specific measurements, “don’t do what I did” pitfalls, and realism upgrades that make your faux bouquet look less like a party aisle impulse buy.
Why Make DIY Artificial Flowers?
- They last for years (decades, if you store them well) and don’t require any plant parenting skills.
- They’re customizable: color, size, stem length, petal count, “wildflower chaos”it’s all up to you.
- They’re cost-effective for big projects like backdrops, wedding decor, and centerpieces.
- They’re allergy-friendly and won’t leave pollen on your table like a tiny yellow crime scene.
Silk vs. Tissue Paper: Which One Should You Use?
Think of this as choosing between two superpowers. Silk flowers are about realism and structure. Tissue paper flowers are about speed, volume, and fun.
Both are great; they just shine in different situations.
Choose silk (fabric) when you want:
- More realistic petals with natural curves and crisp edges
- Flowers that hold their shape in a vase bouquet
- A “real florist made this” look (especially for roses, peonies, ranunculus)
Choose tissue paper when you want:
- Quick party decor, backdrops, garlands, or big statement blooms
- Lightweight flowers you can hang or tape to walls
- A budget-friendly craft that still looks polished with the right finishing touches
Tools & Materials
For silk (fabric) flowers
- Silk or satin fabric (real silk, polyester “silk,” organza, or lightweight cotton all work)
- Paper for templates (printer paper or cardstock)
- Sharp scissors (and optional pinking shears to reduce fraying)
- Floral wire (18–26 gauge is a good range) and wire cutters
- Floral tape (green) for wrapping stems
- Hot glue or fabric glue; needle and thread (optional but strong)
- Fabric stiffener (optional but extremely helpful for crisp petals)
- Fray-check or clear-drying glue (optional, for edges)
For tissue paper flowers
- Tissue paper sheets (gift tissue works great)
- Scissors
- Pipe cleaners or floral wire
- Glue dots or a small amount of glue (optional)
- Floral tape (optional, for stems)
Optional “level-up” supplies
- Chalk pastels or makeup sponge (for petal shading)
- Craft paint marker (for subtle veining or edge tint)
- Wooden dowels (for thicker stems)
- Foam ball, floral tape, or scrap felt (for flower centers)
- Pencil or chopstick (for curling paper petals)
Method 1: How to Make Realistic Silk Flowers (Fabric Petals + Wired Stem)
This method is the sweet spot between “easy enough for a weekend” and “nice enough to fool your aunt who inspects centerpieces like it’s her job.”
You’ll cut petals from fabric, shape them, then assemble around a wired center.
Step 1: Pick a flower style and make a petal template
Choose a simple flower to start: a rose, peony, or a five-petal wildflower shape. Draw and cut 2–3 petal sizes on paper:
- Small petals (for the center/bud): about 1–1.5 inches tall
- Medium petals: about 1.75–2.25 inches tall
- Large petals (outer layer): about 2.5–3.5 inches tall
Don’t stress perfection. Real flowers aren’t symmetrical either. In fact, a tiny bit of unevenness is your realism cheat code.
Step 2: Stiffen the fabric (optional, but recommended)
If your fabric is floppy, petals can collapse and look sad. Lightly apply fabric stiffener and let it dry completely.
If you don’t have stiffener, a thin coat of diluted white glue (applied sparingly) can also help. Test on a scrap first.
Step 3: Cut petals efficiently (without losing your mind)
Fold the fabric into a few layers (not too thick), pin the template, and cut multiple petals at once. A good starter batch:
- 5–7 small petals
- 7–10 medium petals
- 8–12 large petals
If edges fray, use pinking shears or apply a tiny line of clear-drying glue along the cut edge and let dry.
Keep it minimalyour petals should not feel like cardboard.
Step 4: Shape the petals (this is where they stop looking flat)
You have a few safe ways to shape fabric petals:
- Curl edges by rolling the petal edge around a pencil or gently pulling it over the blade of scissors (go slow).
- Cup the petal by pressing the center into your palm and pinching the base.
- Use gentle heat (optional): a hair dryer on low, steam at a distance, or an iron on a low setting with a pressing cloth.
Always test firstsome synthetics melt if you even look at them too intensely.
Step 5: Build a center (bud or stamen)
For a rose-like center, wrap one small petal tightly around the tip of a floral wire and secure with glue or a few stitches.
Add 1–2 more small petals around it, slightly offset, until you have a neat bud shape.
Step 6: Assemble the bloom in layers
Attach petals around the bud, working from small to large. Key realism moves:
- Offset each petal so seams don’t line up in a perfect circle.
- Vary the angle: some petals more upright, others more open.
- Pinch bases slightly so petals flare naturally instead of sticking straight out.
Secure each petal at the base with a tiny dot of glue, then wrap the base with floral tape to lock everything in.
Step 7: Add sepals, leaves, and wrap the stem
Cut a small star-like shape from green fabric for sepals (the leafy part under the flower). Glue it under the bloom.
Add leaves along the stem and wrap with floral tape from the flower base downward, stretching the tape slightly so it sticks to itself.
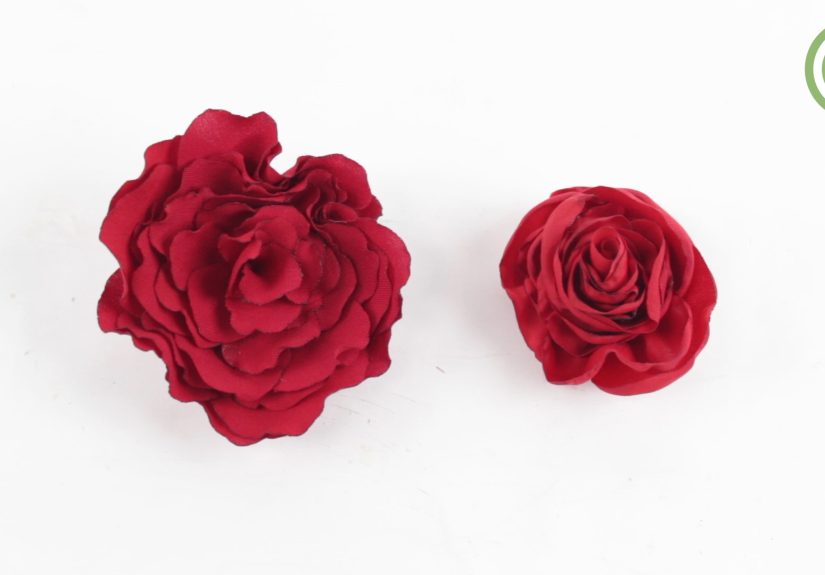
Example: A simple silk rose (quick blueprint)
- Cut 6 small, 8 medium, 10 large petals.
- Make a bud with 2 small petals around floral wire.
- Add remaining small petals to thicken the center.
- Attach medium petals in a ring, offset like a spiral staircase.
- Attach large petals with more outward curl for an “open rose” look.
- Wrap base and stem with floral tape; add 1–2 leaves.
Method 2: How to Make Tissue Paper Flowers (Accordion “Pom-Pom” Style)
This is the classic tissue paper flower method because it’s fast, reliable, and scales beautifullyfrom small blooms to big show-stoppers.
The core idea: stack tissue sheets, accordion fold them, tie the middle, then fluff.
Step 1: Stack and cut to size
For one medium flower, start with 8–12 sheets of tissue paper. A great all-purpose size is about 10 x 20 inches.
Bigger sheets = bigger flower. More sheets = fuller flower.
Step 2: Accordion fold
Fold the stack back and forth like a fan in 1–1.5 inch folds. Keep edges aligned. Perfection isn’t required, but consistency helps the bloom open evenly.
Step 3: Tie the center
Wrap a pipe cleaner or floral wire tightly around the middle and twist. If you want a stem, leave extra length hanging down.
Step 4: Shape the ends for different petal looks
- Rounded ends = soft, peony-like fluff
- Pointed ends = dahlia or chrysanthemum vibe
- Fringed ends (tiny cuts) = extra texture and “fuzz”
Step 5: Fan and fluff (gently, like you’re handling a tiny butterfly)
Separate the stacked layers, lifting one sheet at a time toward the center. Tissue tears easily, so pull from near the base rather than yanking the edge.
Once one side is fluffed, flip and repeat.
Make tissue paper flowers look more realistic
- Use 2–3 colors layered together (darker center, lighter outer petals) for natural depth.
- Don’t fluff perfectly: leave a few petals slightly uneven, like a real flower that didn’t get the memo about symmetry.
- Crumple a few outer petals lightly before folding to add organic texture.
- Trim the profile after fluffingsnip a few petals shorter to avoid a perfectly round “pom” look.
Method 3: Giant Tissue Paper Flowers (Petal-by-Petal Wall Flowers)
If you’re decorating a wall, a photo backdrop, or a big event space, giant blooms are your best friend. They’re dramatic, light, and surprisingly simple:
you build them like a layered crown.
Step 1: Cut petals in three sizes
Use 8–12 petals per flower. A solid starter set:
- 4 large petals (about 10–12 inches tall)
- 4 medium petals (about 8–10 inches tall)
- 2–4 small petals (about 6–8 inches tall)
Use a teardrop shape for classic florals. Cut a small slit (about 1 inch) at the petal basethis lets you overlap the base and create a natural cup.
Step 2: Curl and cup
Curl petal edges around a pencil or dowel. Overlap the slit at the base and secure with a dot of glue to create a cupped shape.
This is what keeps giant flowers from looking like flat paper cutouts.
Step 3: Build the base
Cut a cardstock circle (about 4–6 inches wide). Glue large petals first, slightly overlapping, then add medium petals, then small petals closer to the center.
Offset each layer so petals fall between the petals underneath.
Step 4: Add a center
For the center, you can:
- Use a tight tissue fringe strip and roll it into a coil.
- Glue a small tissue “puff” ball.
- Layer small curled petals into a spiral “rose” center.
Realism Tricks: Color, Texture, and “Nature Doesn’t Do Perfect”
Whether you’re working with fabric or tissue paper, realism is mostly a game of tiny decisions.
Here are the upgrades that deliver the biggest payoff:
- Gradient color: darker center + lighter outer petals mimics real bloom depth.
- Odd petal counts: 5, 7, 9 often looks more natural than 6 or 8.
- Mixed edge shapes: round some petals, point others, or add a few micro-snips.
- Light shading: a dusting of chalk pastel along edges gives dimension fast.
- Asymmetry: tilt the bloom slightly on the stem. Perfectly upright = instantly artificial.
Stems, Bouquets, and Arranging Like You Know a Florist
Make stems that don’t wobble
- Tissue flowers: twist pipe cleaners together for thickness or tape a pipe cleaner to a skewer/dowel.
- Silk flowers: floral wire wrapped in tape works great; for heavy heads, use thicker gauge wire or double up.
- Pro tip: wrap stems with floral tape for grip and a clean finish. Stretch the tape as you wrap so it bonds to itself.
A simple bouquet formula that always looks full
- Pick one hero flower type (largest blooms).
- Add one supporting flower type (smaller blooms for depth).
- Add filler (tiny tissue puffs, small fabric buds, or paper leaves).
- Use greens (paper leaves or fabric leaves) to break up color blocks.
Make it look “styled,” not “stuffed in a vase”
Arrange your flowers loosely, then rotate the bouquet and adjust from all angles. Aim for a slightly uneven silhouette.
If you can describe your bouquet as “a perfect dome,” it needs a little messiness. Yes, that is professional advice.
Care, Cleaning, and Storage
- Dusting: use a soft brush or cool hair-dryer air from a distance.
- Storage: keep blooms in a box with tissue padding; avoid crushing petals.
- Avoid moisture for tissue flowers (they’re basically paper’s emotional support project).
- Keep out of harsh sun if you used dyes or pastel shadingfading is real.
FAQ
How long do DIY artificial flowers last?
Fabric flowers can last for years with light dusting and careful storage. Tissue paper flowers last a long time indoors, but they’re more vulnerable to crushing,
humidity, and curious pets who believe anything fluffy is a toy.
Can I use regular printer paper instead of tissue?
You can, but it behaves differentlystiffer folds, less fluff, more “paper craft” than “petal.” Tissue gives airy volume; cardstock gives structure.
Use the right material for the look you want.
What’s the fastest method for beginners?
The accordion-fold tissue flower is the quickest win: minimal tools, fast steps, big visual payoff. Silk flowers take longer but look more realistic in a vase.
Workshop Notes: Real-World Experience Tips (The Stuff Tutorials Don’t Always Say)
After you’ve made a few batches of silk or tissue paper flowers, you start to notice patternslike which steps are truly “optional” (spoiler: they’re not),
and which mistakes happen so predictably they deserve their own name. Consider this section your shortcut through the most common learning curve.
First: tissue paper tears, and it will test your patience. The fix isn’t superhuman gentlenessit’s leverage. When fluffing an accordion flower,
pull layers upward from near the tied center, not from the outer edge. If you grab the tip of a petal and yank, tissue paper will respond the only way it knows:
by ripping dramatically. If a tear happens anyway, don’t scrap the flower. Hide the damaged layer toward the inside and fluff a healthy layer over it. Tissue is
forgiving like that, as long as you don’t announce the mistake to the room.
Second: “perfectly even” often looks fake. New crafters tend to cut petals like they’re manufacturing aircraft parts. Real blooms are messy:
petal heights vary, edges curl unevenly, and centers aren’t perfectly centered. When your flower looks too round or too symmetrical, do a quick edit. Snip a few
petals shorter, crumple a couple of outer petals lightly, or pinch one side of the bloom tighter so it sits at a slight angle. These tiny imperfections read as
“natural” instantly.
Third: glue is a tool, not a personality trait. Over-gluing is the fastest way to turn delicate petals into stiff, shiny blobs. For tissue paper,
use tiny glue dots or the smallest possible dab at the base. For silk, consider a few stitches at the petal base if you want strength without bulk. If you do use
hot glue, keep a scrap piece of cardboard nearby to wipe strings and excess. Nothing ruins a realistic petal edge like a dangling glue filament that catches the
light like a spider web.
Fourth: stems matter more than you think. A beautiful bloom on a floppy stem looks like a flower that’s had a long week. If your tissue flower
head is large, double up pipe cleaners or tape the stem to a skewer/dowel before wrapping with floral tape. For silk blooms, choose wire thickness based on head
weightthin wire is great for small buds, but large flowers need thicker wire or two wires twisted together. Once wrapped in floral tape, the stem looks cleaner,
feels sturdier, and holds its pose in a vase instead of slumping into a sad lean.
Fifth: color is where “homemade” becomes “handcrafted.” Flat, single-color petals can look cartoonish, especially with tissue paper.
If you want an easy upgrade, layer two colors (a deeper center and lighter outer sheets), or dust the edges with a tiny bit of pastel/chalk using a sponge.
On silk petals, a faint edge tint or a touch of shading near the base creates depth that reads as realistic even from a distance. Keep it subtlethink “sunset”
not “highlighter marker.”
Finally: plan your bouquet like a recipe. When people say their DIY arrangements look “off,” it’s usually not the flowersit’s the mix.
Use a simple structure: big focal blooms first, then smaller supporting flowers, then filler and greens. Rotate the bouquet as you build and check silhouette
from the side. The goal is a relaxed, uneven outline with pockets of depth, not a tight ball of identical blooms. If you get stuck, remove one or two flowers,
create breathing room, then re-add them in a different spot. Bouquets love a good plot twist.
If you take anything from these workshop notes, let it be this: making artificial flowers is less about perfect cutting and more about
shaping, layering, and a little strategic chaos. That’s not just crafting adviceit’s also surprisingly solid life advice.


