Table of Contents >> Show >> Hide
- What Is a Silhouette (and Why It Works So Well)?
- Start Strong: The Best Photos for Silhouettes
- How to Make a Silhouette in Photoshop (3 Reliable Methods)
- How to Make a Silhouette in Lightroom (Classic, CC, or Mobile)
- How to Make a Silhouette in Other Tools
- Troubleshooting: Fix Common Silhouette Problems
- Creative Ideas: Don’t Stop at “Black Shape on Pretty Sky”
- Conclusion (Plus of Real-World Editing Experiences)
Silhouettes are the little black dresses of the photo world: simple, dramatic, and somehow always appropriate. Whether you’re making a moody sunset portrait, a clean logo-style cutout, or a poster-worthy graphic, the silhouette effect boils down to one ideakeep the subject dark and the background brighter.
In this guide, you’ll learn how to make a silhouette in Photoshop, Lightroom, and a few other toolsplus how to fix the most common “why does my silhouette look like a fuzzy potato?” problems.
What Is a Silhouette (and Why It Works So Well)?
A silhouette is a subject rendered as a mostly solid dark shape with minimal interior detail, clearly separated from a lighter background. Your brain loves it because it’s instant storytelling: you recognize the shape, fill in the meaning, and feel fancy doing it.
The two kinds of silhouettes you’ll make
- Photographic silhouette: You keep the background visible (sunset, sky, fog, city lights) and push the subject into deep shadow.
- Graphic silhouette (cutout): You turn the subject into a flat, solid shapeoften blacksometimes on a transparent background for design use.
Start Strong: The Best Photos for Silhouettes
You can force a silhouette out of almost any image, but some photos make the process hilariously easier:
- Clear outline: Profile views, distinct poses (jumping, dancing), recognizable shapes (trees, dogs, bicycles).
- Backlighting: Bright sky/window behind the subject. The brighter the background, the easier the separation.
- Simple edges: Clean clothing lines, less hair frizz, fewer overlapping objects.
Quick shooting tips (so editing becomes a victory lap)
- Expose for the background: Meter on the sky/sunset and let the subject fall into shadow.
- Turn off fill flash: Flash adds detail to the subject, which is the opposite of what you want.
- Choose strong shapes: Hands separated from the body, chin lifted, subjects in profile.
- Keep the background uncluttered: Telephone poles “growing” out of heads are not a vibe.
How to Make a Silhouette in Photoshop (3 Reliable Methods)
If silhouettes were an Olympic sport, Photoshop would show up wearing a gold medal and an optional cape. Here are three approaches depending on your goal: fast, clean, or ultra-precise.
Method 1: The Fast Cutout (Select Subject + Fill Black)
Best for: clean graphic silhouettes, stickers, logos, printable art, transparent backgrounds.
- Open your photo and duplicate the background layer (so you can undo without crying).
- Go to Select > Subject (or use the Object Selection tool and click Select Subject).
- Click Select and Mask (optional but recommended) to refine edges:
- Use the Refine Edge Brush for hair/fur.
- Feather slightly (tiny amounts!) if edges look jagged.
- Output to a Layer Mask (non-destructive and future-you will be grateful).
- Create a new layer above the subject and fill with black:
- Option A: Create a Solid Color Fill Layer (black), clip it to the subject layer.
- Option B: Make a selection from the mask and fill it on a new layer with black.
- Hide or delete the background if you want transparency.
- Export: Use PNG for transparent background; JPEG if you’re placing it on a solid background.
Pro tip: If you want a “perfectly solid” silhouette, don’t rely on darkening aloneactually fill the shape with a flat black layer. That’s how you avoid weird mid-gray patches.
Method 2: The High-Contrast Photo Silhouette (Levels/Threshold)
Best for: turning a photo into a bold silhouette look quickly, especially when the background is already bright.
- Duplicate your layer.
- Add a Black & White adjustment (optional) to simplify tones.
- Add a Levels or Curves adjustment:
- Pull the shadows down until the subject becomes mostly black.
- Push highlights up to keep the background bright.
- For a more graphic result, use Image > Adjustments > Threshold:
- Slide until the subject becomes a clean black shape while the background stays mostly white/light.
- Clean up the edges with a layer mask and a brush:
- Paint with black to hide unwanted bits.
- Paint with white to restore missed areas.
Reality check: Threshold is fast, but it can turn hair into crunchy confetti. If you need clean hair detail, Method 1 or Method 3 will treat you better.
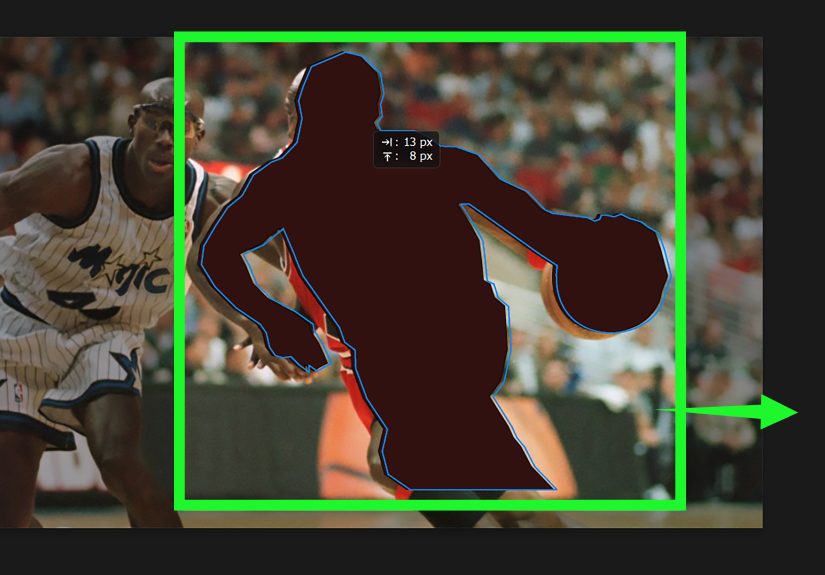
Method 3: The Cleanest Silhouette (Pen Tool / Paths)
Best for: ultra-crisp silhouettes, product shapes, logos, typography projects, anything you might scale or print.
- Select the Pen Tool and carefully trace the subject’s outline (zoom in, take your time, bribe yourself with snacks).
- Convert the path to a selection (or create a Shape Layer directly).
- Fill the shape with solid black.
- If you need a vector workflow, copy/export the path to Illustrator and refine anchor points there.
Why this rocks: The Pen Tool doesn’t guess. It doesn’t hallucinate. It doesn’t decide your subject’s elbow is “background now.” It just obeys.
How to Make a Silhouette in Lightroom (Classic, CC, or Mobile)
Lightroom can’t create a true “filled shape on transparent background” silhouette like Photoshopbut it can absolutely create a photographic silhouette look by masking your subject and crushing its exposure.
Lightroom method: Mask the subject and darken it hard
Best for: silhouette photos with visible backgrounds (sunsets, skylines, windows), fast edits, batch workflows.
- Open the image in the Develop module (or Edit panel).
- Go to Masking and choose Select Subject.
- Refine the mask:
- Add/Subtract with Brush to fix missed areas.
- Turn on the mask overlay to see what’s selected (and avoid accidentally darkening the sky).
- With the subject mask active, lower:
- Exposure (often dramatically)
- Highlights, Shadows, and Blacks
- Increase Contrast if the subject still looks muddy.
- (Optional) Create a second mask for the Background and brighten it slightly to increase separation.
Lightroom “make it pop” trick: Add a subtle background boost (slightly brighter highlights or warmer tones) while keeping the subject crushed. Separation is everything.
When Lightroom silhouettes look “gray” instead of “graphic”
- Lower Blacks more: A silhouette should be mostly solid dark.
- Reduce Shadows: Shadows often keep hidden detail that makes the subject look less silhouette-y.
- Watch for noise: Crushing exposure can reveal grain. Add light noise reduction if needed.
How to Make a Silhouette in Other Tools
Sometimes you don’t need a spaceship; you just need to get to the grocery store. Here are solid “more” options.
GIMP (Free): Silhouette with Selection + Fill
Best for: free Photoshop-style silhouettes, transparent PNG exports.
- Select the subject (Foreground Select, Paths Tool, or Select by Color depending on the image).
- Refine the selection (feather lightly if needed, then tighten edges).
- Create a new layer and fill the selection with black.
- Hide/delete the background layer.
- Export as PNG for transparency.
Canva / Adobe Express: Quick Silhouette Graphics
Best for: fast social graphics, posters, simple cutouts.
- Remove background (where available), then apply a single-color effect or place the cutout over a contrasting background.
- Expect “good enough” edgesnot fine hair detail.
Phone apps (fastest in human history)
- Use a background remover tool, then apply a solid color overlay (black) to the subject.
- Great for thumbnails, stickers, and quick mockups.
Troubleshooting: Fix Common Silhouette Problems
Problem: The edges look fuzzy or have a weird halo
- In Photoshop, refine the mask in Select and Mask and reduce edge contamination.
- Avoid heavy featheringtiny feather is fine; big feather turns your silhouette into a shadow puppet.
- Try a 1–2 px contract (or a gentle defringe) if the background color is bleeding into the edge.
Problem: Hair looks messy
- Choose Method 3 (Pen Tool) for a clean, graphic style.
- Or embrace the chaos and make it a “windblown cinematic silhouette.” (That’s not denial. That’s branding.)
Problem: The silhouette isn’t fully black
- Don’t just darken itfill it with a solid color layer (Photoshop/GIMP) for true graphic silhouettes.
- In Lightroom, push Blacks/Shadows down further and add contrast.
Problem: Parts of the background are inside the subject (holes)
- Paint on the mask (Photoshop/Lightroom) to fix missing areas.
- If the selection struggles, switch to Pen Tool for clean control.
Creative Ideas: Don’t Stop at “Black Shape on Pretty Sky”
- Color silhouettes: Fill the subject with a bold color instead of black for posters.
- Double exposure silhouette: Place a landscape texture inside a silhouette cutout.
- Typography silhouette: Use a silhouette as a clipping mask and fill it with text or patterns.
- Minimalist prints: Black silhouette + off-white background = instant wall art energy.
Conclusion (Plus of Real-World Editing Experiences)
Making a silhouette is one of those rare photo edits that’s both beginner-friendly and professionally useful. In Photoshop, you can create a clean, design-ready silhouette in minutes using Select Subject and a solid fill. In Lightroom, masking lets you craft dramatic photographic silhouettes fastespecially when you’ve shot with strong backlight and a clean outline.
And now for the promised “experience” sectionthe part where we admit what actually happens when you try to do this at 11:47 PM while your laptop fan sounds like it’s training for takeoff.
Real-world experience notes (a.k.a. what tutorials don’t warn you about)
The first time I tried to make a silhouette, I picked an image that looked perfect in my head: a person standing in front of a tree line at sunset. Romantic. Cinematic. Poster-worthy. Then I zoomed in and discovered the subject’s hair was basically a thousand tiny strands doing their own interpretive dance. Select Subject did its best, but the edge looked like the photo had been cut out with a butter knife. That’s when I learned the most important silhouette lesson: the best silhouette starts with the best outline. If your subject is wearing a fluffy jacket, has hair flying everywhere, or is tangled in a background full of branches, your “quick silhouette” becomes a full weekend project.
Another real-life surprise: sometimes the “perfect” silhouette isn’t perfectly black. When I was editing travel shots, I often wanted a silhouette that still kept just a whisper of detaillike the outline of a backpack strap or the curve of a bicycle frameso the subject stayed readable even when the image was small on mobile. In those cases, Lightroom was my go-to because I could push the subject into deep shadow without completely flattening it. A tiny bit of tonal variation can be the difference between “mysterious hero shot” and “random blob-shaped object.”
For design work (logos, decals, Cricut cuts, posters), I learned to stop arguing with thresholds and start using filled shapes. Threshold is fast and fun until it turns a hand into a mitten or punches random holes in a jacket. When the silhouette needs to be clean enough to print, the workflow that actually holds up is: selection → refine → fill with solid color → export PNG. And when the subject is complicated, I’ve found the Pen Tool is less “extra” than it seems. Yes, it’s slower. But it’s also the only method that doesn’t wake up in the middle of your edit and decide your subject’s ear is part of the sky now.
Finally, a practical thing: exporting matters more than you think. I’ve had silhouettes look flawless in Photoshop and then turn jagged online because I exported too small or used the wrong format. If the silhouette will be placed on different backgrounds, PNG with transparency is your best friend. If it’s a photo silhouette with a beautiful sky, export high quality and check it on a phone screen before posting. Your monitor might be forgiving; your audience’s phone will not be.
Bottom line: silhouettes are simple, but they reward good choicesgood source images, clean separation, and the right tool for the job. When you nail those, the edit feels less like “work” and more like magic (the legal kind).


