Table of Contents >> Show >> Hide
- Ringtone Reality Check (Read This Before You Click Anything)
- The 6-Step “Ringtone Recipe”
- Method 1: Make a Ringtone with iTunes on Windows (Most Reliable PC Method)
- Method 2: Make a Ringtone with Music + Finder on Mac (macOS Catalina and Later)
- Method 3: Windows Without iTunes (Apple Music + Apple Devices)
- Troubleshooting (Because This Is Where Most People Get Stuck)
- A Practical Example (So You Can Picture It)
- Advanced Tips: Make Your Ringtone Sound Like It Was Meant to Be One
- Wrap-Up
- Experience Notes: The Stuff Guides Don’t Tell You (Extra)
Your ringtone is your phone’s tiny theme song. It’s also the sound most likely to betray you in a quiet room. The good news: you can make a custom iPhone ringtone on a Windows PC or Mac using iTunes (classic) or the Music app (often called “Apple Music” on macOS). The bad news: Apple makes you earn itlike a video game side quest where the final boss is a file extension.
In this guide, you’ll learn the modern, working methods for PC and Mac, plus the handful of “gotchas” that make people swear their iPhone is haunted. We’ll keep it practical, a little funny, and very specific.
Ringtone Reality Check (Read This Before You Click Anything)
1) Streaming tracks usually can’t become ringtones
If you downloaded a song via an Apple Music subscription, it’s typically protected by DRM, which means it can’t be exported or converted into a ringtone. Use audio you own outright (purchased files), audio you imported (like an MP3), or audio you created yourself. If you try converting a protected file, you’ll run into missing options or “dimmed” tracks that refuse to cooperate.
2) Keep it short and punchy
A ringtone works best at 20–30 seconds. iPhone ringtones are commonly treated as 30-second loops, and many guides recommend staying under 30 seconds; iOS can often handle up to about 40 seconds for a ringtone, but shorter is cleaner (and less likely to startle you into dropping your phone like a hot potato).
3) You’re making an M4R file
iPhone ringtones use the .m4r extension. Under the hood, it’s basically an AAC audio file (often .m4a) with a different extension so iOS recognizes it as a ringtone. The audio doesn’t magically changeonly the label does. It’s the same file wearing a different name tag.
The 6-Step “Ringtone Recipe”
- Pick a non-protected audio file (song, voice note, sound effect).
- Choose the best 20–30 seconds (start/stop time).
- Convert that clip to AAC (creates a new file).
- Rename the new file from
.m4ato.m4r. - Transfer the
.m4rto your iPhone (iTunes on Windows; Finder on Mac; or Apple Devices on Windows). - Select it on your iPhone in Settings.
Method 1: Make a Ringtone with iTunes on Windows (Most Reliable PC Method)
Step 1 Add the song to your iTunes library
- Open iTunes.
- Go to File → Add File to Library (or Add Folder).
- Select your audio file (MP3, WAV, AIFF, etc.).
Step 2 Set the Start and Stop times
- Right-click the song → Song Info (or Get Info).
- Open the Options tab.
- Check Start and Stop and enter your times (example: Start 0:42, Stop 1:07).
- Click OK.
Pro tip: After you finish making the ringtone, come back here and uncheck Start/Stop for the original song. Otherwise, iTunes will keep playing only your 25-second snippet and you’ll wonder when your music library turned into a trailer montage.
Step 3 Create an AAC version
- Right-click the song again.
- Select Convert → Create AAC Version.
You’ll see a new, shorter track appear (often with the same name). That short track is the one you’ll turn into a ringtone file.
If “Create AAC Version” is missing: In iTunes settings/preferences, look for import settings and choose AAC Encoder. Then retry the convert step.
Step 4 Find the new file and rename it to .m4r
- Right-click the short track → Show in Windows Explorer.
- You’ll usually see an
.m4afile. Rename its extension to.m4r.
Can’t rename the extension? In File Explorer, enable View → File name extensions, then rename again.
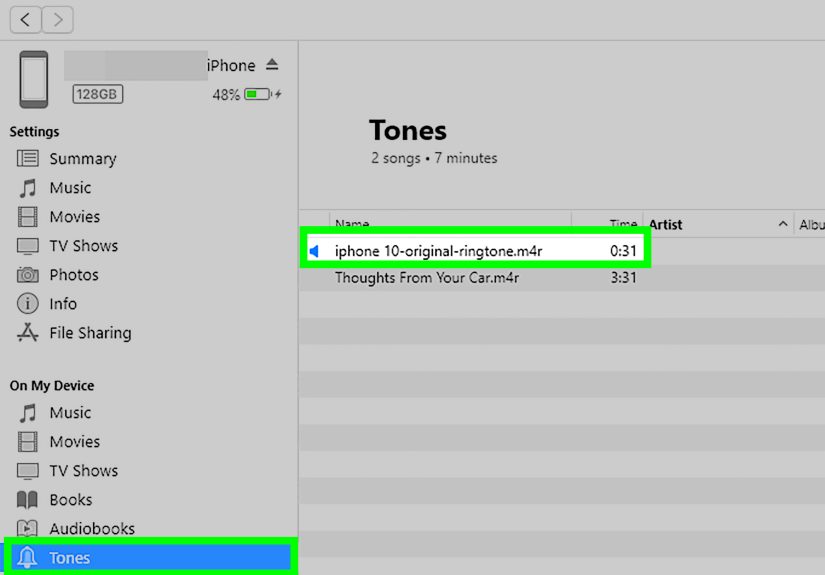
Step 5 Add the .m4r file back into iTunes (Tones)
- Drag the
.m4rfile into iTunes, or use File → Add File to Library. - Find it under Tones (sometimes listed as Ringtones).
No “Tones” section? Try enabling the sidebar or switching the library view. In some versions, the Tones category doesn’t look obvious until at least one ringtone exists.
Step 6 Sync the ringtone to your iPhone
- Connect your iPhone with a cable.
- Click the iPhone/device icon in iTunes.
- Choose Tones.
- Check Sync Tones, then select your tone(s).
- Click Apply or Sync.
Pick it on your iPhone
- Open Settings → Sounds & Haptics → Ringtone.
- Your custom ringtone should appear near the top of the list.
Method 2: Make a Ringtone with Music + Finder on Mac (macOS Catalina and Later)
On modern Macs, iTunes is replaced by the Music app for your library and Finder for syncing. You can still create the ringtone clip the familiar waythen you’ll transfer the .m4r file by dragging it onto your iPhone in Finder.
Step 1 Get your audio into the Music app
- Open Music.
- Import your file (or drag it into the library).
Step 2 Set Start/Stop times
- Right-click the track → Get Info.
- Open Options and set Start and Stop.
- Click OK.
Step 3 Convert to AAC
- Select the track, then go to File → Convert → Create AAC Version.
Step 4 Find the file and rename to .m4r
- Right-click the new short clip → Show in Finder.
- Rename
.m4ato.m4r.
Step 5 Transfer to your iPhone with Finder
- Connect your iPhone to your Mac.
- Open Finder and select your iPhone in the sidebar.
- Drag the
.m4rfile onto the iPhone’s device window (the summary/general screen). - If prompted, click Sync.
Step 6 Select it on the iPhone
- Settings → Sounds & Haptics → Ringtone.
Method 3: Windows Without iTunes (Apple Music + Apple Devices)
Apple has been steering Windows users toward separate appsApple Music for music and Apple Devices for syncing. If you’re using that setup, the ringtone creation part is the same: end with a .m4r file. The transfer step can vary by Windows version and app build, but the practical approach is:
- Create the ringtone file (
.m4r) using iTunes (if installed), or another audio tool + AAC conversion. - Connect your iPhone, open Apple Devices, select your iPhone, and import/drag the ringtone in, then sync.
If you can’t find any way to import tones in your current Apple Devices build, installing iTunes specifically for ringtone syncing is still the quickest fix for many PC users.
Troubleshooting (Because This Is Where Most People Get Stuck)
“My ringtone doesn’t appear on the phone.”
- Check the extension: it must end exactly in
.m4r(not.m4r.m4a). - Resync with the phone connected by cable. For first-time ringtones, a second sync often helps.
- Restart the iPhone if it still won’t show.
- Try drag-and-drop straight onto the iPhone device window (Finder on Mac; iTunes device view on Windows).
“I can’t use this Apple Music song.”
That’s usually DRM. Subscription tracks are commonly protected, and protected files can’t become ringtones. Use a non-protected file you own or created.
“Create AAC Version” is missing.
- Set your import/encoder to AAC in app settings.
- Try a different file if the current one is restricted or protected.
“My ringtone is too quiet.”
- Boost the clip in an editor before converting.
- Avoid using a very quiet intropick a section with a clear peak (chorus, hook, punchline).
A Practical Example (So You Can Picture It)
Say your favorite part starts at 1:12 and ends at 1:35. Set Start 1:12 and Stop 1:35, create the AAC version, rename it to .m4r, then sync. If you want it to sound “immediate,” start right before a beat drop or lyric, not in the middle of a wordyour ringtone should feel intentional, not like it got cut off by a sneeze.
Advanced Tips: Make Your Ringtone Sound Like It Was Meant to Be One
Ringtones are tiny loops, so the little details matter. If your clip starts with half a second of silence, iOS will loop that silence toomeaning every ring begins with an awkward pause like your phone forgot its own name. Before you convert, trim tightly so the first beat, word, or sound happens immediately.
- Add a micro fade-in (0.1–0.3s) to prevent clicks or abrupt “pop” sounds at the start.
- Fade out at the end so the loop feels natural instead of sounding like someone yanked the aux cord.
- Boost clarity, not bass: iPhone speakers (and many Bluetooth earbuds) emphasize mids. A chorus with clear vocals often reads better than a low, rumbling intro.
- Make contact-specific tones: once the ringtone is on your phone, you can assign it to a specific person in Contacts so your phone tells you who’s calling before you even look.
If you’re using a spoken clip, keep it short and distinctthink “two seconds and done,” not “full voicemail greeting.” Your goal is instant recognition, not an audiobook sample.
Wrap-Up
Once you’ve done this once, making ringtones is mostly muscle memory: trim → convert → rename → transfer. The hardest part is choosing the clip. The second hardest part is accepting that Apple made a ringtone workflow that feels like assembling IKEA furnituresimple in concept, oddly elaborate in practice, and extremely satisfying when it finally clicks.
Experience Notes: The Stuff Guides Don’t Tell You (Extra)
Most “ringtone journeys” follow the same emotional arc. Step one is confidence: “I’ll just make a ringtone real quick.” Step two is confusion: “Why do I have two files with the same name?” Step three is enlightenment: “Oh, one is the AAC clip.” Step four is victory: “I renamed it to .m4r and it worked.” Step five is the quiet realization that you now possess a weirdly useful power.
One lesson people learn fast: recognition beats perfection. A ringtone is a reflex trigger. The best clip is the one you identify instantlyoften the chorus, a signature riff, or a comedic sound bite with a clear first syllable. Clips that fade in slowly or start mid-vowel lead to missed calls because your brain spends the first five seconds deciding whether that’s your phone or the world’s most confident microwave.
Another common “experience moment” is the Start/Stop trap. You set a perfect 28-second window, export the AAC clip, and then forget to uncheck the Start/Stop settings on the original song. Days later, every time the track comes up in a playlist, it plays only the ringtone snippetlike your library got trapped in a loop. The fix is simple (uncheck Start/Stop), but the first time it happens, it feels like your computer is pranking you.
Windows users often hit the “file extension wall.” If you can’t see extensions, renaming .m4a to .m4r feels impossible. Turning on “File name extensions” in File Explorer is a small checkbox that unlocks the entire process. People describe it as the moment they realize their PC has been politely hiding the truth about their files for years. After that, renaming to .m4r feels like a secret handshake.
Mac users face a different surprise: syncing is in Finder now. Dragging a ringtone onto the iPhone’s Finder window feels too easy, almost suspiciouslike it shouldn’t work, but it does. The “experience tip” here is to wait until the iPhone details fully load in Finder before dragging the file. If you drag too early, the file can look like it disappeared into the void. Wait a few seconds, drag again, and you’ll usually see it transfer.
The biggest practical experience of all is learning which audio is usable. Many people waste time trying to convert the one thing they can’t: a protected subscription download. When they switch to a non-protected filean older purchase, an MP3 they own, or something they recordedthe process suddenly becomes smooth. If you want a genuinely personal ringtone, try recording a short voice clip (a nickname, a funny phrase, a reminder like “Answer it!”), then follow the same AAC->M4R workflow. It’s surprisingly satisfying, and it tends to survive the “I’ll get tired of this” test better than a meme sound.
Finally, consider the long game. The best ringtones are the ones you don’t grow to hate. If you pick a joke sound, make sure it’s a joke you’ll still like after the 200th call. A good compromise is having one “fun” ringtone for friends and one calmer default for everything else. That way, your phone can still have a personality without making every meeting feel like a meme compilation.


