Table of Contents >> Show >> Hide
- Quick Pick: Choose Your Paper Carnation Style
- Materials You’ll Need
- Method 1: Tissue Paper Carnation (The Classic Fluffy Bloom)
- Method 2: Crepe Paper Carnation (More Realistic, Still Beginner-Friendly)
- Method 3: Cardstock Carnation (Crisp Petals, Strong Shape)
- Pro Tips to Make Your Paper Carnation Look Amazing
- Troubleshooting: Common Paper Carnation Problems
- What to Do With Your Paper Carnations
- Conclusion
- Experience Notes: What Makers Learn After a Few Carnations (500-ish Words of Real Talk)
Want a flower that never wilts, doesn’t demand sunlight, and won’t judge you for forgetting to water it?
Meet the paper carnation: ruffly, classic, and surprisingly easy to make.
This tutorial walks you through three beginner-friendly methodstissue paper (fast and kid-proof),
crepe paper (more realistic), and cardstock (crisp and structured)plus pro tips to level up your blooms.
Quick Pick: Choose Your Paper Carnation Style
- Fast & fluffy (tissue paper carnation): Best for classrooms, parties, and “I need this done in 10 minutes.”
- More realistic (crepe paper carnation): Best for bouquets, décor, and people who get emotionally attached to craft projects.
- Neat & structured (cardstock carnation): Great if you like clean petals and sturdy shapes (and already own glue).
Materials You’ll Need
For the Tissue Paper Method
- 6–10 sheets of tissue paper (one color or mix shades)
- Scissors
- Pipe cleaner or thin craft wire or twist tie
- Optional: stapler (for extra security), ribbon, green floral tape
For the Crepe Paper Method
- Crepe paper (petal color + green for calyx/leaves)
- Floral wire (or a skewer/pipe cleaner for the stem)
- Floral tape
- Scissors
- Glue (tacky glue or hot glue)
- Optional: pencil (for curling), pastel/chalk (for shading), pinking shears (for extra frill)
For the Cardstock Method
- Cardstock (petal color + green)
- Scissors (or a cutting machine, optional)
- Glue
- Floral wire (or pipe cleaner)
- Floral tape
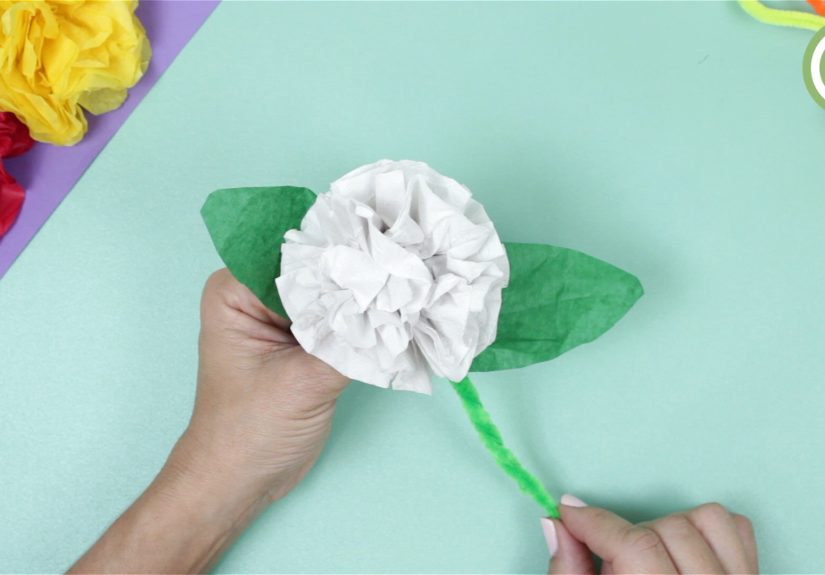
Method 1: Tissue Paper Carnation (The Classic Fluffy Bloom)
Tissue paper carnations are basically the craft-world equivalent of a comfort food: simple, satisfying,
and hard to mess up. The magic is in the accordion fold and the fluff.
Step-by-Step
-
Stack your tissue paper.
Use 6–10 sheets for a full carnation. More sheets = bigger puff. Fewer sheets = dainty bloom. -
Trim to size.
A good starter size is about 4×6 inches for small flowers or 10×14 inches for big, dramatic carnations.
(Pro tip: smaller rectangles make cuter “bouquet fillers.”) -
Accordion-fold the stack.
Fold back and forth like a fan. Aim for 1–2 inch pleats. Don’t stress if your folds aren’t perfect
carnations are famously ruffled and forgiving. -
Round the ends (for carnation vibes).
With the folded stack still compressed, trim both ends into rounded shapes.
This creates softer “petals” when you open it.
Want extra frill? Make tiny snips along the edges to add texture. -
Secure the center.
Wrap a pipe cleaner tightly around the middle and twist to lock it in place. Leave a long tail for the stem.
If you’re using wire, twist it firmly so the stack can’t slide. -
Fluff like you mean it.
Separate tissue layers gently, pulling one sheet at a time up toward the center. Alternate sides as you go.
Keep going until it looks like a full, ruffly carnation and not a sad paper taco. -
Finish the stem.
Twist the pipe cleaner into a neat stem. Wrap with green floral tape if you want a smoother, more realistic look.
Add a ribbon bow if this is a gift (or if you just enjoy being extra).
Fast Fixes for Tissue Paper
- It keeps tearing: Use fewer sheets or gentler pulls. Tissue paper prefers confidence, not aggression.
- Looks flat: Add more sheets next time, or fluff longermost “flat” flowers just need more separation.
- Center slips: Twist the tie tighter and consider a second wrap (or a staple in the center for insurance).
Method 2: Crepe Paper Carnation (More Realistic, Still Beginner-Friendly)
Crepe paper is basically tissue paper’s cooler, more sophisticated cousin. It stretches,
it shapes, and it makes petals that look surprisingly lifelike. If you’ve ever wanted your crafts
to look “store-bought” (but with more bragging rights), start here.
Step-by-Step: The Petal-Strip Method
-
Cut petal strips.
Cut three long strips of crepe paper (about 12 inches each is a solid starting point).
Along one long edge, cut repeating rounded “petal bumps” or scallops.
Shortcut: If you don’t want to cut individual petals, you can cut a continuous scalloped edge. -
Pleat the bottom edge.
Pinch tiny pleats along the bottom edge of the strip. This gathers the strip so it naturally forms a bloom.
Think of it like gathering fabric on a tiny floral dress. -
Roll the first strip into a tight center.
Wrap the pleated strip around itself, keeping the bottom edge aligned. This creates a sturdy core. -
Secure the base.
Wrap floral tape around the bottom to lock the roll in place. If you prefer glue, add small dots as you roll,
but let the glue set before you bully it into the next step. -
Add two more strips.
Repeat pleating and wrapping with the remaining strips, building out the bloom so it gets wider and rufflier. -
Attach to the stem.
Tape the base of the bloom to the end of floral wire and wrap tape down the stem to anchor everything. -
Shape the carnation dome.
Pull and fluff the petals outward. Carnations typically form a rounded, domed toplike a tiny floral cloud. -
Add a calyx and leaves (optional but impressive).
Cut a small green star shape for the calyx (the leafy base under the bloom). Tape it under the flower head.
Add simple leaf shapes down the stem.
Optional Upgrade: Make It Look “Real-Real”
- Ruffle the petal edge: Gently stretch the top edge of crepe paper to create natural waviness.
- Curl petals: Run a pencil along the petal edge to coax a soft curl.
- Add shading: Lightly brush pastel/chalk on petal tips for depth (especially pretty on pinks, reds, and whites).
- Texture trick: Use pinking shears on the top edge for instant carnation “fringe energy.”
Method 3: Cardstock Carnation (Crisp Petals, Strong Shape)
If tissue paper is “fluffy” and crepe paper is “lifelike,” cardstock is “clean and structured.”
This is a great method for bouquets that need to survive travel, kids who love glue, or anyone who hates
delicate paper with a burning passion.
Step-by-Step
-
Cut your flower pieces.
You can cut layered petal shapes by hand or use a template. Aim for multiple layers that get slightly larger. -
Pre-shape the petals.
Fold pieces gently (in half, then lightly into sections) so petals get a natural “lift.” -
Form a ring (if using strip-style pieces).
Glue the ends together to create a circle, leaving the petal tips free so they can flare outward. -
Insert the stem.
Feed floral wire through the center and twist it so it can’t pull out. Add glue where needed. -
Layer and fluff.
Glue layers from smallest to largest. Spread petals outward so the bloom looks full and “random” (in a good way). -
Add green backing and tape the stem.
Add a green calyx piece behind the bloom, then wrap the wire with floral tape.
Pro Tips to Make Your Paper Carnation Look Amazing
1) Size Cheat Sheet
- Mini carnations (boutonnière / gift topper): 4×6 inch tissue stack or shorter crepe strips
- Standard bouquet carnations: 6–10 tissue sheets at ~6×10 inches, or three 12-inch crepe petal strips
- Statement flowers: 10–14 inch tissue rectangles, extra sheets, and maximum fluffing commitment
2) The “Don’t Make It Perfect” Rule
Real carnations aren’t symmetrical. Slightly uneven petals make your paper flower look more natural.
If you accidentally cut one side differently, congratulations: you just added realism.
3) Glue Patience = Better Petals
If you’re using glue on crepe paper, give it a moment to set before wrapping the next layer.
Rushing makes the base mushy and the petals slide around like they’re trying to escape your craft table.
4) Color Strategy for Gorgeous Blooms
- Ombre tissue stack: Put darker sheets in the center and lighter sheets on the outside.
- Two-tone crepe carnation: Use a slightly darker strip for the inner wrap and lighter strips outside.
- Soft shading: Dust petal edges with pastel for depth (especially on white flowers).
Troubleshooting: Common Paper Carnation Problems
My carnation looks like a pom-pom, not a carnation
That’s normaltissue carnations live in the pom-pom neighborhood. To make it more “carnation”:
round the ends, add tiny fringe snips, and shape the top into a dome instead of a perfect sphere.
My petals are tearing
Use fewer tissue layers, pull more gently, and separate one sheet at a time. For crepe paper,
avoid over-stretching the edges until you get comfortable with the material.
The flower is lopsided
Tighten the center tie and fluff evenly from both sides. For crepe paper, keep the bottom edge aligned as you wrap.
(Misaligned bases = leaning tower of carnation.)
What to Do With Your Paper Carnations
- Bouquets: Mix 3–5 carnations with greenery for a simple, classic arrangement.
- Party décor: Cluster tissue carnations on a wall or string them into a garland.
- Gifts: Add one carnation as a gift topper (instant “look at me, I’m thoughtful” upgrade).
- School events: Perfect for graduations, dances, team banquets, and craft days.
- Home décor: A small vase of crepe carnations looks great year-roundno plant guilt required.
Conclusion
Now you know how to make a paper carnation three waystissue for quick wins,
crepe paper for realistic blooms, and cardstock for sturdy, structured petals.
The secret isn’t fancy tools; it’s simple technique: good folds, a secure center, and a little fluffing patience.
Make one, then make five more “just to practice,” and suddenly you’ve got a bouquet that lasts forever.
Experience Notes: What Makers Learn After a Few Carnations (500-ish Words of Real Talk)
Here’s the part no one tells you: your first paper carnation will probably look… enthusiastic. Not “bad,” exactlymore like
it’s auditioning to be a party decoration instead of a flower. And that’s fine! The paper carnation is one of those crafts where
the learning curve is basically a speed bump. The moment you make your second one, you’ll start noticing the little tricks that
turn “cute craft” into “wait, did you buy that?”
The biggest “aha” moment most people have is realizing that fluffing is not optional. Tissue paper flowers are like
sleepy cats: you can’t rush them, and they won’t fully come alive until you gently coax them into shape. If you stop halfway through
peeling layers, you get a flat bloom that looks more like a folded napkin than a carnation. But if you keep goingslowly separating
one sheet at a timeyou’ll suddenly hit that point where it becomes fluffy and ruffly and surprisingly legit. The difference between
“meh” and “wow” is usually two extra minutes of patient fluffing.
Another common experience: the center tie is everything. If the middle isn’t tight, the whole flower can slide around,
and then you’re holding a pile of tissue paper regret. People who make these in groups (classrooms, parties, family craft nights) often
figure out quickly that doubling up the tieor using a pipe cleaner and twisting it like you mean itsaves a lot of heartbreak.
Some folks even staple the center for extra security, which feels slightly rebellious but works beautifully.
With crepe paper carnations, the shared “real talk” is about glue: it’s tempting to keep wrapping and wrapping because you’re excited,
but if the glue hasn’t grabbed yet, the base gets mushy and the petal strip starts drifting. That’s when you end up with a bloom that’s
slowly sliding down the stem like it’s trying to leave the scene. The fix is boring but effective: tiny dots of glue, short sections,
and a brief pause to let things set. Think of it as giving your flower time to “commit.”
People also learn that imperfection is your friend. Carnations aren’t symmetrical, and paper carnations look more natural
when petals aren’t perfectly even. A slightly uneven edge, a few petals curled more than others, or a gentle dome that’s not identical on every side
can actually make the bloom look more realistic. This is one of the rare crafts where “oops” often turns into “nice detail.”
Finally, the most delightful experience: paper carnations multiply. You make one for a gift, then you think, “It needs a friend.”
Then you have three. Then you’re experimenting with ombre tissue stacks, adding soft shading, making tiny boutonnière versions, and suddenly
you’re the person who casually says, “Oh, I’ll just make the flowers.” And honestly? That’s a pretty great reputation to have.


