Table of Contents >> Show >> Hide
- Why a Bucket-and-Pipe Nutcracker Is Such a Smart DIY
- Materials and Tools You’ll Need
- Plan the Size Before You Start Cutting
- How to Make a Nutcracker Out of Buckets & Pipes: Step by Step
- Best Design Ideas for a DIY Bucket Nutcracker
- Common Mistakes to Avoid
- How Much Does a Bucket Nutcracker Usually Cost?
- Storage Tips So You Can Reuse It Next Year
- Final Thoughts
- What the Experience of Building One Is Really Like
If you’ve ever looked at those giant holiday nutcrackers guarding someone’s front porch and thought, “Well, that’s adorable, but I also enjoy paying rent,” this DIY is for you. Making a nutcracker out of buckets and pipes is one of those wonderfully scrappy projects that looks expensive, dramatic, and vaguely like it required a workshop full of elves, when in reality it mostly requires plastic buckets, PVC pipe, paint, and a stubborn refusal to buy overpriced seasonal decor.
A DIY bucket nutcracker works because the materials are lightweight, easy to find, and surprisingly versatile. Buckets create the bold round shapes of the torso and head, while PVC pipes handle the arms and legs without adding too much weight. Add a wood base, a little creative trim, and a paint job worthy of a holiday parade, and suddenly your porch has a six-foot toy soldier standing guard like he takes Christmas very personally.
In this guide, you’ll learn exactly how to make a nutcracker out of buckets and pipes, from planning the proportions to painting the final mustache. Whether you want a traditional red-and-black Christmas nutcracker, a candy-colored porch statement piece, or something that looks like it moonlights in a community theater production of The Nutcracker, this project gives you plenty of room to customize.
Why a Bucket-and-Pipe Nutcracker Is Such a Smart DIY
The beauty of this giant nutcracker DIY is that it combines affordability with scale. Buckets are sturdy, inexpensive, and already shaped like exaggerated costume pieces. PVC pipe is easy to cut, easy to paint, and perfect for creating symmetrical arms and legs. Together, they make a life-size nutcracker that looks substantial without being so heavy that moving it feels like a gym challenge.
Another reason this project works so well is flexibility. You can make a shorter indoor version that stands by the tree, or build a taller outdoor nutcracker for your porch. You can also go classic, whimsical, rustic, glamorous, or gloriously over-the-top. One builder adds faux fur and gold trim. Another adds lights, a monogram, or even house numbers. The basic shape stays the same, but the personality is entirely yours.
Materials and Tools You’ll Need
Main Materials
- 2 large plastic buckets, usually 5-gallon buckets or similarly sized plastic utility buckets
- PVC pipe for arms and legs, commonly 1-inch to 1 1/4-inch diameter
- PVC fittings if you want cleaner elbow or joint connections
- A plywood or solid wood base
- A vertical support such as a 2×2, 2×4, or sturdy center spine
- Screws, washers, nuts and bolts, or heavy-duty fasteners
- Construction adhesive or heavy-duty glue
- Plastic-bonding primer or paint formulated for plastic
- Exterior spray paint or multi-surface acrylic paint
- Clear sealer for added protection
- Foam board, wood rounds, cardboard, or a plastic planter saucer for the hat brim and decorative details
- Craft foam, felt, vinyl, ribbon, rope trim, faux fur, or yarn for facial hair and uniform accents
- Optional weights such as sandbags, bricks, or pavers for outdoor stability
Tools
- Measuring tape
- Marker or pencil
- Drill and drill bits
- Hand saw, PVC saw, ratcheting cutter, or miter saw for the pipe
- Sandpaper
- Paintbrushes and painter’s tape
- Utility knife or scissors
- Safety glasses and gloves
Plan the Size Before You Start Cutting
The easiest mistake in a PVC pipe nutcracker project is diving in with enthusiasm and zero proportions. That is how you end up with a soldier who has tiny arms, towering legs, and the energy of a holiday flamingo.
A good beginner-friendly size is around 5 to 6 feet tall. That gives you enough height for real impact without making the build awkward to store later. A simple proportion guide looks like this:
- Base and boots: 6 to 10 inches total height
- Legs: 20 to 24 inches
- Torso bucket: 14 to 16 inches
- Head and hat section: 14 to 18 inches combined
- Arms: 16 to 20 inches each
Lay everything out on the floor before assembly. Use painter’s tape around the PVC where you plan to cut so your line stays straight and easy to follow. This extra five minutes of planning can save you from rebuilding half the project after realizing one leg looks like it skipped leg day and the other trained for a marathon.
How to Make a Nutcracker Out of Buckets & Pipes: Step by Step
1. Build a Strong Base
Start with a sturdy wood base. This is what keeps your DIY nutcracker from becoming an accidental lawn dart during windy weather. Cut plywood wide enough to support the feet and body. A rectangle around 18 to 24 inches wide usually works for a large build, but go larger if your nutcracker will live outdoors.
Attach your vertical center support to the base. This can be a 2×2 or 2×4 screwed firmly into place. Think of it as the nutcracker’s spine. The torso bucket and head bucket will stack along this support, which helps keep the figure upright and aligned.
2. Create the Body With the Buckets
For the torso, place one bucket upside down over the center support. Depending on your design, you can drill a hole in the bucket bottom so the center support passes through it. Fasten the bucket with screws, washers, or adhesive where needed. If your bucket is a little flimsy, reinforce the inside with scrap wood.
The second bucket can become the head or upper hat section. Some DIYers use another bucket upside down, while others combine a bucket with a planter, bowl, or round form for a more sculpted shape. If you want that classic tall nutcracker hat, add a brim made from a wood round, thick cardboard, or a plastic saucer placed between the head and hat top.
3. Cut and Attach the PVC Legs
Measure and cut two equal lengths of PVC for the legs. Sand any rough edges after cutting. If you’re attaching the legs directly to a wood base, screw PVC mounting caps or flanges to the wood and insert the pipe. Another option is to use table screw caps or similar connectors designed to fasten pipe to a flat surface.
For a more decorative look, build simple boots around the bottom of the legs using scrap wood, foam board, or small boxes. Paint them black and suddenly your plastic pipes look very polished and very employed.
4. Add the Arms
Decide whether you want straight arms, bent elbows, or a pose that holds a staff, drumsticks, or a wreath. Drill matching holes on each side of the torso bucket for the arms. You can run a support rod or short connecting piece through the bucket, or attach elbow fittings and pipe segments on the outside.
If the arms need to be permanent, PVC cement can create a strong bond between pipe and fittings. If you prefer a build that can be adjusted later, dry-fit first and use screws in key joints. A dry fit is always smart before final assembly because PVC sets fast once cement is involved.
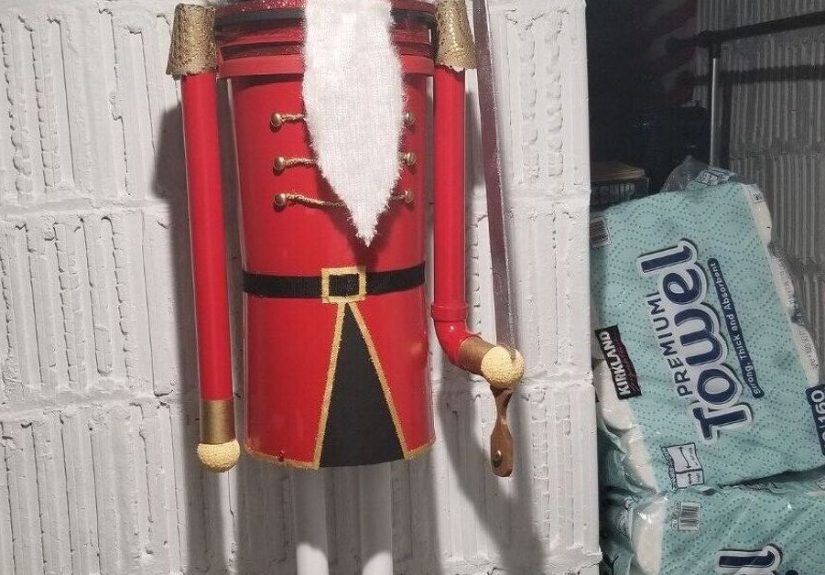
5. Build the Head, Hat, and Face
The face is where the project stops looking like stacked hardware supplies and starts looking like an actual Christmas character. Paint or attach the facial features after the head section is assembled. Most nutcrackers look best with oversized, theatrical features: wide eyes, rosy cheeks, a bold mustache, and a beard that says, “Yes, I absolutely judge your wrapping-paper choices.”
You can cut eyebrows, mustaches, teeth, and hair from craft foam, felt, vinyl, or thin wood. Faux fur and yarn also work beautifully for beards and hair. Use a half-circle for the beard, a rectangle for teeth, and curved shapes for the mustache. Keep the face large enough to read from a distance, especially if your nutcracker is meant for a front porch display.
6. Prep the Plastic Properly Before Painting
This part matters more than people think. If you skip the prep, your gorgeous holiday masterpiece may start peeling faster than cheap nail polish.
Wash the buckets and PVC thoroughly to remove dirt, grease, dust, and manufacturing residue. If the plastic is glossy, lightly sand it so the primer has something to grab onto. Wipe everything clean and let it dry completely. Then apply a bonding primer or use a paint specifically made for plastic surfaces.
When spray painting, use light coats instead of one heavy coat. Start with a tack coat, then build color gradually. This helps reduce drips, cracking, and weird texture issues. Once the color is fully dry, add painted details like trim, buttons, cuffs, and decorative stripes. For outdoor use, finish with a clear protective sealer.
7. Paint the Uniform and Details
This is the fun part. A traditional bucket nutcracker usually uses red, black, white, blue, and gold. Red makes the figure pop from the curb, black sharpens the silhouette, and gold brings that classic theatrical charm.
Paint the jacket, belt, cuffs, hat, boots, and gloves in sections. Use painter’s tape for clean lines. Gold buttons can be made from wood circles, bottle caps, or painted foam discs. Add braid, tassels, and trim with ribbon or metallic cord. If you want a polished designer look, limit your palette to three main colors and one accent.
8. Stabilize It for Display
If your nutcracker is staying outdoors, weight matters. A covered area is best, especially if you’ve used lightweight buckets and decorative trims. Add hidden weight in the base, reinforce the body-to-base connection, and make sure the figure stands level before the paint cures fully. If needed, anchor the base with bricks or place it near the door where wind exposure is lower.
Best Design Ideas for a DIY Bucket Nutcracker
- Classic Christmas: red jacket, black boots, gold trim, white pants
- Candy-colored: pink, mint, aqua, and gold for a whimsical porch look
- Farmhouse: muted red, cream, black, and stained wood accents
- Glam: metallic gold, ivory, silver, and plenty of sparkle
- Personalized: add a monogram, house number, or your family name on the hat or base
Common Mistakes to Avoid
- Skipping the dry fit and discovering too late that the arms are uneven
- Using heavy coats of spray paint that drip, wrinkle, or crack
- Forgetting to scuff glossy plastic before painting
- Building too tall without widening or weighting the base
- Using indoor-only paint on an outdoor display
- Making the facial features too small to be visible from a distance
- Ignoring storage until after you’ve built a six-foot soldier with no place to live in January
How Much Does a Bucket Nutcracker Usually Cost?
The final cost depends on whether you’re using recycled supplies or buying everything new. If you already have leftover buckets, paint, screws, or scrap wood, this can be a surprisingly budget-friendly Christmas DIY. Even when purchased new, buckets, PVC, and trim materials are usually far more affordable than buying a large pre-made decorative nutcracker.
The real splurge, if there is one, tends to be paint and embellishments. Metallic finishes, faux fur, outdoor sealer, and decorative trims can slowly sneak your budget upward while pretending to be “just one more cute detail.” Holiday crafting has that effect. It is basically festive mission creep.
Storage Tips So You Can Reuse It Next Year
Before storing your giant DIY nutcracker, wipe off dirt and dust, check for any loose trim, and touch up chipped paint. Wrap delicate features like mustaches, beards, and hat decorations with soft material. If your build comes apart in sections, label each piece now rather than trusting your future self to remember what goes where next November.
Store the figure upright if you have room, or lay it flat with padding between hard surfaces. Bubble wrap, old blankets, and large storage bags all help. The more carefully you pack it, the less likely your nutcracker will emerge next season looking like he survived a dramatic off-Broadway collapse.
Final Thoughts
Learning how to make a nutcracker out of buckets and pipes is really about combining simple materials with smart proportions and a good finish. You do not need a professional workshop, a giant budget, or a secret North Pole internship. You just need a solid base, evenly cut PVC, properly prepped plastic, and enough imagination to turn everyday hardware-store supplies into a festive showpiece.
The result is a DIY Christmas nutcracker that feels personal, memorable, and far more fun than buying one off a shelf. It makes a statement. It starts conversations. It also gives you the deeply satisfying experience of pointing at a giant porch decoration and casually saying, “Oh that? I made him from buckets and pipes,” like that is something people do every Tuesday.
What the Experience of Building One Is Really Like
The experience of making a nutcracker out of buckets and pipes is part craft project, part problem-solving exercise, and part holiday comedy. On paper, it sounds wonderfully simple: stack some buckets, cut some pipes, add paint, and boom, instant Christmas royalty. In real life, it usually begins with an exciting trip to the hardware store and ends with you standing in the garage, covered in primer dust, asking a plastic bucket if it could please cooperate for five consecutive minutes.
But that is also exactly what makes the project fun. This is the kind of DIY that feels memorable because you can actually see it come to life in stages. At first, it looks ridiculous. There is no kinder word for it. You have a base, some pipes, two buckets, and maybe a flower pot or a wood disc, and it resembles a failed science-fair robot. Then you add the center support, line up the arms and legs, and suddenly it starts looking less like scrap materials and more like a real figure. Once the face goes on, everything changes. A mustache has no business being that powerful, and yet here we are.
One of the most common experiences people have with this project is realizing that symmetry matters more than expected. If one arm is an inch lower than the other, you will see it forever. If one leg is cut just a little short, your nutcracker will lean with the weary expression of a mall Santa finishing a double shift. That is why dry-fitting the pieces first feels less like extra work and more like an act of emotional self-defense.
Painting is another adventure. The first coat can be humbling. Plastic loves to remind you that it does not automatically want paint on it. Once you clean, sand, prime, and switch to light coats, though, the project starts rewarding your patience. The colors get richer, the details get sharper, and the nutcracker suddenly develops real personality. The jacket looks crisp. The boots look intentional. The teeth look slightly dramatic, as they should.
There is also something especially satisfying about customizing the details. Some people make their nutcracker traditional and elegant. Others go playful with pastel colors, glitter, and oversized embellishments. Some even personalize them with names, house numbers, or family initials. That creative freedom is a big part of the appeal. No two bucket nutcrackers come out exactly the same, and honestly, they shouldn’t. A little character is the whole point.
And then comes the best moment of all: setting it outside. Once your finished giant nutcracker is standing by the front door, it no longer feels like a pile of hardware-store odds and ends. It feels like holiday theater. Neighbors notice it. Guests comment on it. You notice yourself glancing out the window more often than necessary just to admire your work. That is the magic of this kind of build. It is not only decor; it is an experience, a conversation starter, and a tiny triumph of creativity over boring store-bought sameness. Sure, it may test your patience once or twice, but by the time it is done, you will probably already be thinking about making a matching one next year.


