Table of Contents >> Show >> Hide
- Why This Wreath Works (And Why It Looks Expensive)
- Materials and Tools
- Design Planning: Pick Your “Bell Moment”
- Step 1: Prep the Wreath Base
- Step 2: Make Your Galvanized Bucket “Bells”
- Step 3: Arrange Greenery Like a Pro (Without Becoming One)
- Step 4: Attach the Bucket Bells to the Wreath
- Step 5: Make a Bow That Looks Like It Has a Stylist
- Step 6: Add Details That Make It Look Custom
- Outdoor Durability Tips (Because Weather Does Not Care About Your Crafting)
- Troubleshooting: Fix the Three Most Common Problems
- FAQ: Quick Answers for a Smoother DIY
- Conclusion: Your Front Door Just Got a Holiday Upgrade
- Experience-Based Tips and “What I Wish Someone Told Me” (Extra )
If your holiday decorating style can be summarized as “cozy, rustic, and slightly obsessed with anything galvanized,” you’re in the right place. A Christmas galvanized bucket bell wreath DIY is exactly what it sounds like: a wreath that features adorable “bells” made from mini galvanized buckets (or bucket-look containers), dressed up with greenery, ribbon, and all the farmhouse cheer your front door can handle.
The best part? This project is beginner-friendly, forgiving, and customizable. The worst part? Hot glue strings. They will appear on your sweater, your dog, and somehow your forehead. It’s a holiday miracle.
Why This Wreath Works (And Why It Looks Expensive)
Galvanized metal (or the faux version) brings instant texture and a vintage, barn-inspired vibe. When you combine that with classic Christmas greenery and bell shapes, you get decor that feels high-endeven if your “craft budget” is closer to “leftover coffee money.”
Plus, bells are movement decor: they catch light, create dimension, and can even jingle if you want them to. Your door becomes a festive announcement: “Yes, joy lives here. Please wipe your boots.”
Materials and Tools
Core Supplies
- Wreath base: grapevine wreath (12–18″) or wire wreath frame (12–16″)
- Mini galvanized buckets (6–10): real metal mini pails or bucket-look containers
- Evergreen picks/garland: faux pine, cedar, fir, eucalyptus, or mixed winter stems
- Ribbon: wired ribbon (2.5–4″ wide) plus optional thinner accent ribbon
- Floral wire (green, 22–26 gauge) or pre-cut wire stems
- Zip ties (optional but very helpful, especially on wire frames)
- Hot glue + glue gun (high-temp for durability, low-temp for fewer burns)
For Turning Buckets into “Bells”
- Rope, jute twine, or leather cord (for hangers and rustic style)
- Small jingle bells or beads (optional, for a clapper look and/or sound)
- Wooden bead, pinecone, or ornament (to act as the “clapper” inside)
- Screw eyes + washers + nuts (optional hardware method for a sturdier hanger)
Tools
- Wire cutters
- Scissors (fabric scissors for ribbon, if you’re fancy)
- Pliers
- Awl or drill (small bit) for holes if needed
- Measuring tape (optional, but nice for symmetry)
Design Planning: Pick Your “Bell Moment”
Before you glue anything (or commit to a bow the size of a small turkey), decide how you want the bells to show up:
- Cluster Style: 3–5 bucket bells grouped at the bottom center. Classic, balanced, and door-friendly.
- Full Ring Style: bucket bells spaced around the wreath. More visual impact, more time, more “wow.”
- Swag Style: bells hang from the lower half, with greenery sweeping sideways. Asymmetrical and modern farmhouse.
Pro tip: For a front door wreath, a 14–16″ base usually reads “just right.” If you’re decorating a big statement door (or you simply enjoy drama), go 18″.
Step 1: Prep the Wreath Base
If using a grapevine wreath: fluff and inspect. Remove loose twigs. Decide where the “top” will be (usually where the hanger sits). Grapevine is great because you can tuck stems into the vine and wire them down.
If using a wire wreath frame: plan to use zip ties and wire. Wire frames are sturdy, lightweight, and perfect for attaching heavier elementslike multiple bucket bells.
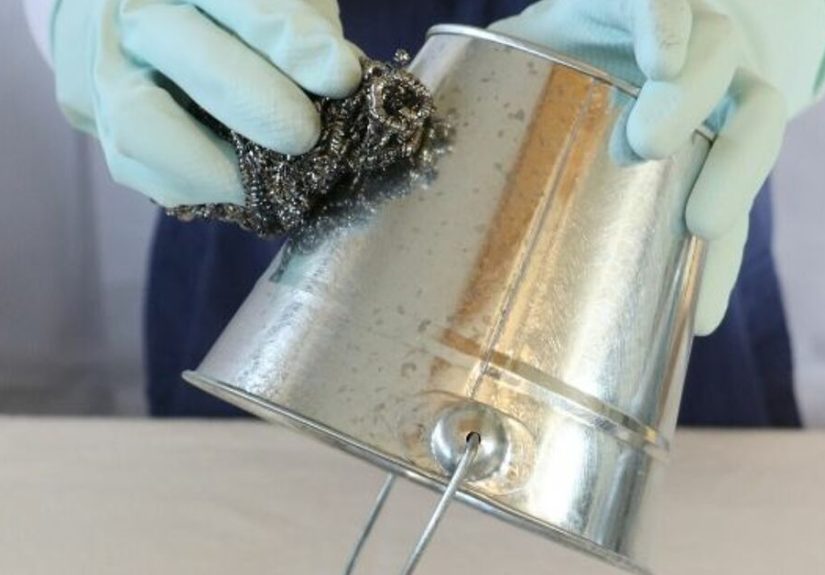
Step 2: Make Your Galvanized Bucket “Bells”
This is the part that makes people say, “Wait… you made that?” Yes. You did. You’re basically Santa’s interior designer now.
Option A: Rope Hanger Method (Fast + Rustic)
- Remove bucket handles if they look too “pail” and not enough “bell.” (Some people keep themyour wreath, your rules.)
- Create a hanger loop: cut a length of rope or cord, fold into a loop, and feed ends through the bucket’s top opening.
- Secure inside: tie a knot inside the bucket, then add hot glue around the knot area for extra hold.
- Add a clapper (optional): thread a bead, small ornament, pinecone, or jingle bell onto the rope so it hangs inside the “bell.” Tie a knot beneath it to keep it in place.
Option B: Hardware Method (Sturdy + Clean)
- Drill a small hole near the top center of the bucket bottom (which becomes the “top” when the bucket is upside down).
- Insert a screw eye bolt with a washer, then secure with a nut inside the bucket.
- Attach a hanger using rope, ribbon, or wire through the eye.
- Add an inner clapper using cord attached to the hardware inside.
Style note: Mix bucket sizes if you can (even slightly). Variation adds dimension and looks more “collected,” less “I bought the exact same thing eight times,” even if you did. (No judgment.)
Step 3: Arrange Greenery Like a Pro (Without Becoming One)
Greenery is your “visual cushion.” It softens the metal, frames the bells, and makes the whole project look lush instead of… well… bucket-forward.
How to Build a Full Base
- Start with your largest evergreen pieces and place them first. Aim for a directional flow (clockwise looks natural).
- Attach with wire by wrapping stems to the wreath base or tucking stems into grapevine and wiring over them.
- Layer medium greenery (cedar, eucalyptus, frosted stems) to add shape and depth.
- Fill gaps with smaller sprigs and picks.
Keep a “resting spot” for the bells: If you’re doing a bottom cluster, build greenery around the lower third but don’t pack it so tightly you can’t attach anything later.
Step 4: Attach the Bucket Bells to the Wreath
There are two keys to attaching bells: strength and no wobble. A little movement is cute. A full-on bucket swing is… less cute.
Best Attachment Methods
- Floral wire: wrap wire around bucket hanger and anchor it to the wreath frame or grapevine.
- Zip ties: excellent for wire framesfast, strong, and tidy when trimmed.
- Hot glue as reinforcement: use it to prevent slipping after wiring, not as the only support for heavier pieces.
Suggested Bell Placements
- Bottom cluster: group 3–5 bells together, stagger heights, then nestle into greenery.
- Asymmetrical swag: place bells slightly off-center and let greenery sweep to one side.
- Even ring: space 6–10 bells around the wreath and fill between with greenery and ribbon.
Quick balance test: Hold the wreath up by its hanger. If it tilts like it’s trying to whisper secrets to the floor, shift bell weight slightly or add a counterbalance pick near the top.
Step 5: Make a Bow That Looks Like It Has a Stylist
Wired ribbon is your best friend here. It holds shape, looks full, and forgives you when your loops are not identical (because honestly, who has time for identical loops?).
Easy Bow Formula (Works Every Time)
- Cut a long ribbon tail (10–16″).
- Make 3–5 loops on each side, increasing loop size slightly as you go.
- Pinch the center, wrap with floral wire or a chenille stem, and twist tight on the back.
- Fluff loops and dovetail the ribbon ends.
Where to put the bow: Most bucket bell wreaths look best with the bow at the top (12 o’clock) and bells at the bottom (6 o’clock). For swag style, place the bow where the greenery “starts” to guide the eye.
Step 6: Add Details That Make It Look Custom
This is where your wreath gets its personality. Choose 2–4 accent elements so it feels curated, not cluttered.
- Pinecones: wire them in for woodland charm.
- Red berries: classic Christmas color pop.
- Frosted picks: add winter sparkle without going full glitter explosion.
- Mini ornaments: tuck a few into greenery for shine.
- Extra jingle bells: small bells sprinkled through greenery can tie the theme together.
Outdoor Durability Tips (Because Weather Does Not Care About Your Crafting)
- Seal if needed: If your buckets are faux metal or painted, use a clear protective spray for outdoor display.
- Reinforce stress points: Anywhere rope meets bucket or hanger meets wreath should be wired and/or glued.
- Protect your door: Add felt pads on the back of the wreath base to prevent scratches and rattling.
- Choose outdoor-safe greenery: Faux holds up best outside; fresh can dry out quickly.
Troubleshooting: Fix the Three Most Common Problems
1) My bells look crooked
Adjust hanger lengths and anchor points. Shorten one hanger loop or re-wire the bell slightly higher. Crooked can be “rustic,” but not “confused.”
2) My wreath looks flat
Add depth by layering greenery in different directions and mixing textures (needle pine + cedar + eucalyptus). Then add one bold ribbon element or a few frosted picks for dimension.
3) The bow is eating the wreath
Reduce loop count, shorten tails, or shift the bow slightly off-center. Your bow should be the starjust not the whole movie.
FAQ: Quick Answers for a Smoother DIY
How many buckets do I need for a galvanized bucket bell wreath?
For a bottom cluster on a 14–16″ wreath, 3–5 bucket bells usually looks balanced. For a full ring, plan for 6–10 depending on bucket size and spacing.
Can I make this without power tools?
Yes. Use the rope method (knot + glue) to avoid drilling. An awl can help poke small holes if your bucket material allows it.
What’s the easiest color palette?
Galvanized silver + deep green + red accents is timeless. For modern farmhouse: galvanized + cream ribbon + soft greens + pinecones.
Conclusion: Your Front Door Just Got a Holiday Upgrade
A Christmas galvanized bucket bell wreath DIY is one of those projects that looks like you bought it from a boutique holiday marketbut you actually made it at home, possibly in pajama pants, with a glue gun and pure determination.
Keep it classic, go full farmhouse, or make it sparkle like a snow globe had a decorating budget. However you build it, the mix of galvanized texture, lush greenery, and charming bell shapes creates a wreath that feels warm, welcoming, and delightfully different from the usual ornament-and-pine combo.
Experience-Based Tips and “What I Wish Someone Told Me” (Extra )
Even though this is a beginner-friendly wreath, most DIYers end up learning a few “craft room truths” along the way. Here are the most common real-world experiences people run intoand how to make them work for you instead of against you.
1) The bells look adorable… until you hang them
On the work table, everything feels perfectly placed. Then you hang the wreath and suddenly one bell sits like it’s trying to eavesdrop on the doormat. This is normal. Gravity changes the vibe. The fix is simple: do a hanging test earlier than you think you need to. Hang the wreath on a hook (or even a cabinet knob) after you attach the bells but before you finalize the bow and accents. You’ll spot tilt issues immediately, and adjusting wire anchors is much easier before the greenery gets too dense.
2) “Rustic” can accidentally become “messy”
Galvanized decor naturally leans rustic, and that’s the charm. But if your greenery is going in every direction like it’s auditioning for a shampoo commercial, the wreath can start to look unintentional instead of cozy. A good trick is to give your wreath a direction: angle most greenery clockwise (or counterclockwise) and reserve the “wild” pieces for a few intentional spotslike the bottom cluster near the bells or one side of a swag. This keeps the wreath lively but still polished.
3) Bow confidence comes after bow chaos
Almost everyone makes one bow that looks amazing… and one bow that looks like it survived a small tornado. Wired ribbon is forgiving, but it helps to remember two things: fluffing is half the bow, and the back doesn’t matter (your wreath is not going to be graded by a panel of ribbon judges). If your loops feel uneven, pull the smaller loops outward and pinch the center tighter. If your tails look sad, trim and dovetail them so they look crisp and intentional.
4) Adhesive strategy matters more than people admit
Many DIYers start by hot-gluing everythingand then discover that heavier pieces (like multiple bucket bells) need mechanical support. The real win is combining methods: wire or zip ties for strength, hot glue for stability. Think of hot glue as the “anti-wiggle assistant,” not the “structural engineer.” When you attach bells, make the attachment secure first, then use a little glue to prevent shifting and keep everything neatly nested into the greenery.
5) The best wreaths have a “distance test”
Up close, you see every detail. From the curb, you see the overall shape and contrast. A wreath that looks busy up close can look perfect from far awayand a wreath that looks detailed on the table can disappear visually on a dark door. Step back 6–10 feet and check: do the bells stand out? Does the bow read clearly? Do you have enough contrast (light ribbon on dark door, deeper greenery on light door)? This quick distance test is one of the biggest “aha” moments crafters mention, because it helps you make the wreath look intentional in its actual home: your front door.
In the end, the most common “experience” people share is this: once you make one bucket bell wreath, you start seeing galvanized buckets everywhere and thinking, “Could that be a bell?” Congratulations. Your brain has officially entered holiday craft mode.


